Last Updated: 2024-09-14
Purpose
This article how to remove an agent from Linux.
Introduction
The Removing an Agent from Linux feature explains how to fully uninstall the agent from a Linux host and remove its registration from the portal. It covers stopping the agent service, removing packages or binaries, cleaning residual data, and deleting the agent record from the system. This ensures your environment is kept clean of defunct agents, prevents unauthorized scanning of decommissioned hosts, and keeps your asset inventory accurate.
Removing an Agent from Linux
To uninstall agents from a Linux workstation:
-
Open a Terminal, type sudo systemctl stop o24-agent.service and press Enter to stop the O24 Agent service.
Bashsudo systemctl stop o24-agent.service
-
Next, type sudo dpkg -r o24-agent and press Enter to remove the O24 Agent.
Bashsudo dpkg -r o24-agent
-
Next, type sudo rm -r -f /etc/o24-agent and press Enter to remove the directory.
Bashsudo rm -r -f /etc/o24-agent
-
Next, type sudo rm -r -f /var/cache/o24-agent and press Enter to remove the directory.
Bashsudo rm -r -f /var/cache/o24-agent
-
Next, type sudo rm -r -f /etc/o24-agent.conf.d and press Enter to remove the directory.
Bashsudo rm -r -f /etc/o24-agent.conf.d
Continue to remove the agent from Outscan as described below using either the Netsec Classic view or the Portal view.
In Netsec
To remove an agent from the targets in Netsec:
-
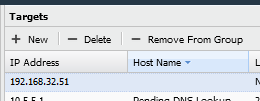
Go to Netsec > Manage Targets.
-
Select the agent that should be removed.
-
Click - Delete.
-
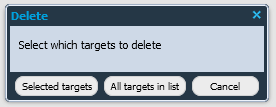
Click the Selected targets button and confirm.
In the Portal
To remove an agent from the targets in the Portal:
-
Go to Assets > Agents.
-
Select the agent.
-
Right click on the selected row and select Delete.
.png?cb=be8099867bea7489487fbc89381f06dd)
Related Articles
- Removing an Agent from Windows
- Discovering the Agent in OUTSCAN
- Installing a Linux Agent
- Check Connectivity to Agent Server
- Checking if Agent is Running
- Agent Installation Introduction
- Firewall Setup for Agents
- Agent Call Home
- Using the Agent Info Command
- Removing an Agent from Linux
- Retrieving the Agent UUID
- Finding the Agent Version
- Installing a macOS Agent
- Setting Up an Agent Using System Proxy
- Adding Agent Attributes