Purpose
This document describes how to create a Report Schedule.
Introduction
The Scheduling tab lets you schedule reports to be sent out based on either a target selection or by a report template.
Create a Report Schedule
Click New to display the Maintaining Report Schedule presenting the following options:

|
Option |
Description |
|---|---|
|
Name |
Name of the scheduled report. |
|
Report Type* |
Defines the report type The report type specifies the contents of a report. For example, a vulnerability-type report provides details on found vulnerabilities, a trend-type report shows vulnerability evolution over time, and a solution-type report shows the solutions for remediation. *For descriptions of each report type, see Report Types. |
Schedule Timing
The scheduled timing settings allow you to define when the report should be sent to the recipient and with what intervals.
|
Option |
Description |
|---|---|
|
Next Report |
The next date and time, this report should be sent to the recipient. |
|
Report Frequency |
How often the report if scheduled.
|
Settings Tab
Schedule Settings
Depending on the Report Frequency the Day in Week/Month is set to the day when a report should be sent. Run Until sets the end date until the schedule should run.
This function is not active until Schedule Timing has been set.
|
Option |
Description |
|---|---|
|
Day in Week/Month |
|
|
Run Until |
End date |
Report Settings
The Report Settings defines what detail level the report should have and in what format it should be deliviered.
|
Option |
Description |
|---|---|
|
Report Level |
Select which level of detail the report should be in.
|
|
Period |
Sets the time span for the period.
Only active when Report type is Trend or Delta. |
|
Length |
Sets the length of the period.
|
|
Include Information |
Select what kind of information that will be included in the report. (one or more can be selected)
|
|
Send reports without vulnerabilities |
Select this feature to send the reports even if there are no vulnerabilities present in it. |
|
Target Group Depth |
Selects the depth on how deep the summary of the target group will go. For example: Groups with 10 levels and the Target Group Depth set to 5, will only show the first 5 levels in the summary, omitting the results from level 6-10. |
|
Include report in PDF format |
Attach the report as a PDF file. |
|
Include report in XLS format |
Attach the report as a XLS file. |
|
Include report in XML format |
Attach the report as a XML file. |
|
Compress attachments (zip) |
It allows you to create a zip attachment which decreases its size. |
|
Password |
Enter a password if you wish to export the report password protected. The XML format does not support password protection and need to be compressed into a ZIP-file by selecting the Compress attachments (zip) option, where as the PDF and XLS can be password protected as directly without compressing.
|
Recipient
Recipients can be set as Email, Managed Report, and Database.
|
Option |
Description |
|---|---|
|
Type |
Direct the report to either Email, Managed Reports, and Database (HIAB only). |
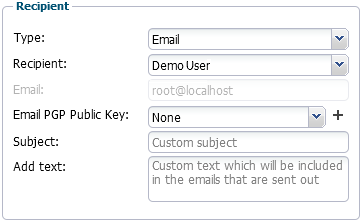
Email
When set as email the report is sent to address specified under Recipient.
|
Option |
Description |
|---|---|
|
Type |
Set as Email |
|
Recipient |
Provide a name to whom you wish to send the report. Custom is only available if you have super user privileges. |
|
E-mail PGP Public Key |
Add a PGP Public Key file to be used for encryption, when emailing the report or select unencrypted. |
|
Subject |
Enter a custom subject for email. |
|
Add text |
Custom text which will be included in the email. |
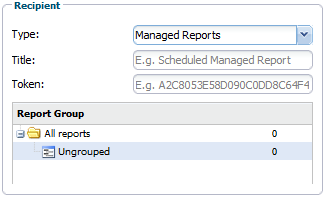
Managed Reports
When set as Managed Report the report can be viewed in the Managed Reports tool in Main Menu > Managed Reports.
|
Option |
Description |
|---|---|
|
Type |
Set as Managed Reports |
|
Title |
Set a title to the report |
|
Token |
Set a token. See Access Tokens for more information. |
|
Report Group |
Select report group where the report will be displayed in Managed Reports tool |
Database
HIAB can integrate with databases and use it as a recipient for the reports.
To use Database as a recipient, it first need to be integrated. See Database Connector for more information on how to set up Database integration on your HIAB.
To use the Database recipient:
-
Select Database in the type drop-down menu in the Recipient area
-
Enter the table name you have set up in the Database Connector integration.

Report Template Grid
Choose which Report Template you wish to use:
|
Option |
Description |
|---|---|
|
Target Groups Grid |
Choose which Target Group you wish to include in the report. |
|
Target List |
Enter specific targets you wish to include in the report. |
|
Scan Schedules |
Choose which Scan Schedules you wish to include in the report. |
Comment Tab
This is an optional value where additional comments can be added to the Report Schedule grid under the Comments column.
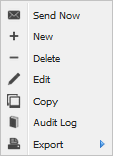
Sending a Report Manually
To send a report immediately:
-
Select the scheduled report
-
Click Send Now.
Modify a Schedule
To edit a report schedule:
-
Right-click on a scheduled report to open the context menu.
-
Select Edit to display the Maintaining Report Schedule form.
Delete a Schedule
To remove the report schedule:
-
Right-click on a scheduled report to open the context menu.
-
Select Delete.
Appendix
Report Types
|
Option |
Description |
|---|---|
|
Vulnerability |
The vulnerability report provides details on each vulnerability found in the scanned schedule. |
|
Group Vulnerability |
The group vulnerability report provides a group summary of average risks/target and age. Group details will be provided with more information on each finding. |
|
Trend |
The trend report provides the vulnerability evolution for a scanned target over time. |
|
Group Trending |
The group trending report provides the vulnerability evolution by groups for a scanned target over time. |
|
Delta |
The delta report compares two scans for each selected target and show the total delta of all those targets. |
|
Group Delta |
The group delta report compares two scans for each selected target and show the total delta of all those targets by groups. |
|
Solution Task Report |
The solution task report report shows the solutions for remediation for reported findings. |
|
Solution Target Report |
The solution target report report shows the solutions for remediation for reported targets. |
|
Dashboard |
The dashboard report exports the current view of the dashboard. |
|
Target Discovery |
The target discovery report provides details of discovered targets. |
Related Articles