Skip table of contents

HIAB Maintenance Settings


Purpose

This document provides users with a comprehensive overview of the Maintenance Settings for HIAB.

Introduction

The Maintenance Settings feature enables you to manage updates, setup the HIAB backup correctly within your organization's environment and to plan automated removal of old vulnerability data.

Prerequisites

It is required that the reader has access to the HIAB Account and Portal Interface.

Note

Available in HIAB only.


Getting Started

To launch the HIAB, open a web browser and connect to the HIAB by using its assigned network address.

Note

Use HTTPS protocol.

HIAB Login


Log in using your credentials.

Update

This feature enables you to manage updates correctly within the organizations environment. 
Once logged in, go to Main Menu > Settings > Maintenance.

The HIAB sometimes need to be restarted. This usually occurs after an kernel update or a kernel change.

When a restart is required, it is indicated in the Outpost24 AB HIAB About page. 

To access the About page , click the Main menu and select About.


Overview

In the Maintenance Settings window, the Update tab allows you to schedule regular updates of the HIAB software and the vulnerability findings.

The elements of the Update tab are described below:

OptionDescription
SettingsAllows/prohibits updating when scans are running.
ScheduleAllows you to schedule your updates on a regular basis. Here you can specify the frequency, date and time of the next update.
Notifications
  • Notify on failing: Enable/disable notifications on failed updates.
  • Notify on done: Enable/disable notifications on successful updates.


Latest Updates

The Latest Updates area displays the status of the latest updates performed. This grid is configurable, by clicking the arrow next to the name of any grid column allows you to customize which columns that will be shown out of the following:

ColumnDescription
DateDate when the update was performed
InformationStatus of the update


At the bottom of the window, five options are available:

OptionDescription
Upload rpm keysThis functionality is available only upon request. Contact our support team in case of need.
Upload Update PackageUsed together with Generate Update Key. It is used to upload an update package for HIAB when the HIAB does not have any internet access.
Generate Update KeyIt is used to generate a update key. It is most commonly used together with Upload Update Package.
Update NowStart manual update.
SaveSaves update settings.


Important

The Update Package is bound to the generated key, in other words, it can only be uploaded on the specific HIAB on which the key was generated. Similarly, the key is bound to the HIAB on which it was generated.


Online Updating

When a HIAB is configured as a scanner in a distributed set up, then that scanner is updated through the defined scheduler over the encrypted TCP port 443.

A scheduler HIAB will instead connect directly to the external update server over TCP port 443.

Direct Update

To update the HIAB:

  1. Click the Update Now button in the lower right corner to start the update immediately.
  2. The update can take a couple of minutes or much longer sometimes. Do not disrupt this process if it takes longer duration. 
  3. Once the download is done, the system restarts.
  4. After you log in you are greeted with an announcement of a successful update with a link to the Release Notes.

Scheduled Update

In the Schedule section you can choose different date intervals for your update and also change the date when the next update will occur.

Schedule Update

To schedule an update:

  1. Set a date and time in Next update when to start looking for an update.
  2. Set the Frequency on how often the HIAB should check.
    - Hourly
    - Daily
    - Weekly
    - Fortnightly
    - Monthly
    - Quarterly

The HIAB will start looking for an update from the date you have set and repeat the process according to the set frequency. If an update is available, the HIAB automatically starts the update.

Offline Updating

Follow the steps below to update your HIAB without internet access.

  1. Launch the HIAB and open a web browser and connect to the HIAB by using its assigned network address.

    Use HTTPS protocol.


    Authentication


    Log in using your credentials.

  2. Go to Main Menu > Settings > Maintenance.
  3. At the bottom of the windows, click the Generate Update Key button to download the update key.
  4. Open a web browser and go to OUTSCAN, https://outscan.outpost24.com/
  5. Go to Main Menu > Support.
  6. Select the HIAB Update Package tab.


  7. Click Upload update key to upload the key file you downloaded in #3. 
  8. Click Download Update Package on the bottom left of the page to start download the file.
  9. Go back to your HIAB.
  10. Click on Upload Update package.
  11. Select the file you downloaded in #8.

    Upload update package


  12. Click on Upload

The update can take a couple of minutes or much longer sometimes. Do not disrupt this process if it takes longer duration. 

Note

The Update Package is bound to the generated key, in other words, it can only be uploaded on the specific HIAB on which the key was generated. Similarly, the key is bound to the HIAB on which it was generated.

The Update Package contains:

  • An SQL file with license information updates.
  • A key file containing a unique key for the HIAB. The key file does not contain any information about MAC or IP.
  • Rules update.
  • Exploits update.
  • Updated RPM packages.

Backup

HIABs can be backed up to FTP, SCP, CIFS, or NFS servers, or a local backup can be downloaded to your own machine.

Note

Available only on HIAB scheduler.


The Backup Tab

The Backup tab allows you to schedule regular backups of the HIAB data and upload them to defined servers.

Backup


The elements of the Backup tab are:

Schedule: Allows you to schedule your backup on a regular basis, starting on the given date and time and then running accordingly to the set frequency.

OptionDescription
Frequency

Select backup frequency.

  • Weekly
  • Monthly
  • Quarterly
  • Fortnightly
  • Daily
Next backup dateSelect a start date and time in the drop down menus.


Settings

By selecting Include Settings the network and host settings are included in the backup as a default.

The settings backup includes: 

  • Network configuration
  • Remote SSH settings 
  • Syslog configuration 
  • SNMP configuration
  • WINS Servers
  • Update settings
  • Backup settings
  • Backup FTP, SCP, CIFS, NFS configuration
  • Planning settings
  • Event settings
  • LDAP configuration
  • DBLog configuration
  • Report FTP, SCP, CIFS, NFS configuration

All other settings are included in the "normal" backup.

It is possible to download the network and host settings by clicking Download.

To supply a configuration file to update the settings accordingly, click Upload.

OptionDescription
Include SettingsInclude Network and Host Settings in the backup.
DownloadDownload the Network and Host Settings.
UploadSupply a configuration file, which will update the settings accordingly.

Back Up Distribution

You can distribute your backup by:

  • FTP
  • SCP
  • CIFS
  • NFS


Note

The backup is stored locally if you have not added any server details in the FTP, SCP, CIFS, or NFS fields.


FTP Settings

In the FTP Settings section, you can set up your FTP server credentials. In the Connect method drop down you can select if you would like to connect using regular FTP, FTPS, Implicit FTPS, or SFTP (SSH FTP).

The FTP option creates a file on the FTP server called: hiabdumpData_THE_IP_ADDRESS_YYYY-MM-DD.exp, it holds all information like scan schedules, users, roles, results and so on. Take note of the file name.

FTP Settings


Option

Description

Host

Define the FTP host.

Port

Define the port in use.

Username

Define the username for authentication against the server.

Password

Define the password for authentication against the server.

Connect Method

Select if you would like to connect using regular FTP, FTPS, Implicit FTPS, or SFTP (SSH FTP).

Passive Mode

Enable/disable passive mode. When enabled, the FTP server should listen to another port than the standard FTP data port while transferring the files.

Directory

Used if you want to switch to another working directory after the authentication against the target.

Name Prefix

Given text string will be added as a prefix to the filename.


SCP Settings

In the SCP settings section, you can setup your SCP server credentials. The Private Key setting will allow you to supply a private key to be used while authenticating.

See the FTP setting section for a description of the additional fields.

SCP settings

Option

Description

Host

Define the SCP host.

Port

Define the port in use.

Username

Define the username for authentication against the server.

Password

Define the password for authentication against the server.

Private Key

Supply a private key to be used while authenticating.

Directory

Used if you want to switch to another working directory after the authentication against the target.

Name Prefix

Given text string will be added as a prefix to the filename.

CIFS Settings

In the CIFS Settings section you can set up your CIFS server credentials.

Refer to the FTP Settings section for more information on the fields.


CIFS Settings

Option

Description

Host

Define the CIFS host.

Username

Define the username for authentication against the server.

Password

Define the password for authentication against the server.

Directory

Used if you want to switch to another working directory after the authentication against the target.

Name Prefix

Given text string will be added as a prefix to the filename.

Note

The CIFS backup only supports SMBv1.


NFS Settings

In the NFS Settings section you can set up your NFS server credentials.

Refer to the FTP Settings section for more information on the fields.


NFS Settings

Option

Description

Host

Define the NFS host.

Port

Define the port in use.

Use Lock

Disable/enable file locking. This setting is occasionally required when you are connecting to older NFS servers.

Directory

Used if you want to switch to another working directory after the authentication against the target.

Name Prefix

Given text string will be added as a prefix to the filename.

Latest Backup and Import: Displays the backup history. This grid is configurable, by clicking the arrow next to the name of any grid column allows you to customize which columns that will be shown out of the following:

  • Date: Date when the backup occurred
  • Information: Status of the backup or import


At the bottom of the window, there are four options available:

  • Download Local: You can download a backup file locally, which will be available once a backup has been performed. The file is stored locally as localbackup.exp
  • Backup: Force an instant backup of the HIAB data. The backup is uploaded to the configured file server. Priority for file servers is from high to low, i.e. FTP, SCP, CIFS, NFS.
  • Import: Clicking on import opens a popup with list of files in the given setting of the first file server if configured any (FTP, SCP, CIFS, NFS). You can select a file and click on Import button or click on Upload local button which allows to import the local backup.

Note

The current data will be removed and replaced with the content from the imported file

  • Save: Saves the current settings in the system.

Configuring Backup

To back up the existing HIAB scheduler, follow the below procedure. 

  1. Go to Main Menu > Settings > Account window and select the License tab and review the number of IPs and scans of your license.
  2. Go to Main Menu > Settings > Maintenance window, select the Backup tab. 
  3. To include the server settings to Backup file, select the checkbox beside Include settings. To download the settings as a separate file, click on Download.

    Note

    The network settings will not be migrated. 

  4. To enable to the Download Local option, you must first backup the system to the HIAB locally, this will then allow you to download the HIAB to your local machine. Click on the Backup button.
  5. Once complete, select the refresh icon (bottom left) to view the Backup done: Successfully message.

    Note

    The HIAB will not notify you that the backup is complete.

Restore

To restore the HIAB appliance from a backup, navigate to the following location in HIAB.

Go to Main Menu > Settings > Maintenance > Backup.

Note

The maintenance portal is where you manage updates and backups for the HIAB itself.


HIABs can be restored from FTP, SCP, CIFS, or NFS servers. You will need to reconfigure these settings if you wish to use this method. Alternatively, you can upload a local backup from your local machine. 

Maintenance Settings Backup


  1. Click on Import. If you receive the below error, do not worry. You have simply not configured your server information to restore the backup from. If you are restoring from a local file, select OK and move on to the next step.

    Error


  2. For network based backups, select your backup file and click Import.
  3. For local based backups, choose Upload local select the file you wish to restore from and click Upload.

    Upload Bsckup File


  4. Select Yes on any pop-up stating all data will be replaced after the restore. 

    Import

You can refresh the Latest Backup and Import section to see when your backup has completed.

Note

If you refresh and see Server not responding, then the backup will be completed and you can refresh the entire page.

Planning

The Planning tab allows you to automatically remove any old vulnerability data that matches the given criteria daily.

Note

The Planning tab is only available on the HIAB scheduler


Planning


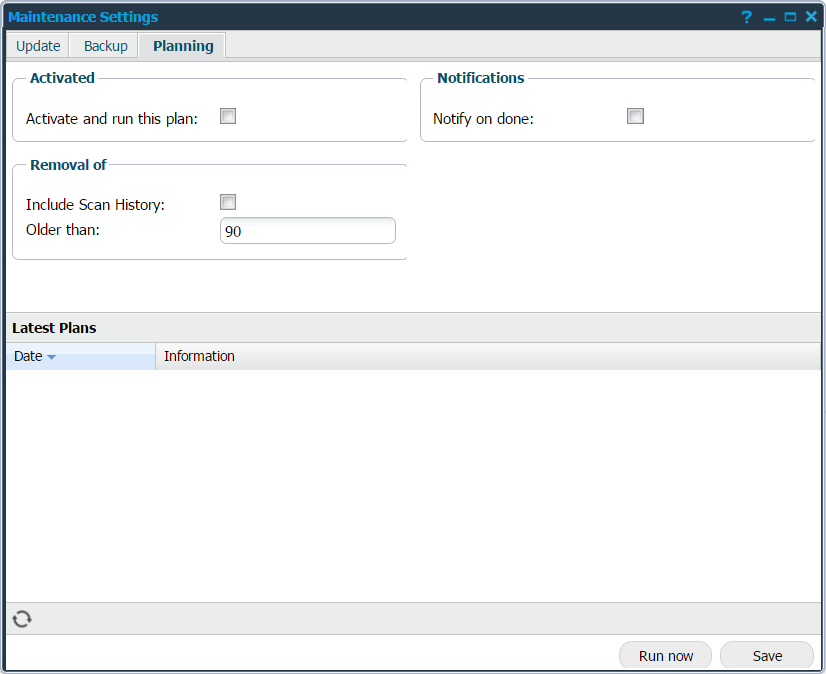
The elements of the Planning tab are described below:

Activated

The Activated section determines if removal of old data should be performed every day.

Notifications

The Notifications section enable if you wish to receive an email once this has been performed.

Removal of
  • Include Scan History: Choose to include removal of scan history details. This will remove all trace of the scan that took place.
  • Older than: Removes scan data which is older than the given number of days.
Latest Plans

The Latest Plans displays the latest plan executed. This grid is configurable, clicking the arrow next to the name of any grid allows you to customize which columns should be displayed.
The available columns are:

  • Date: Date when the plan was executed.
  • Information: Any additional information of the executed plan.


At the bottom right of the window, two buttons are available:

  • Run now: Click on Run now to execute the plan immediately.
  • Save: Saves the current settings in the system.


Copyright

© 2024 Outpost24® All rights reserved. This document may only be redistributed unedited and unaltered. This document may be cited and referenced only if clearly crediting Outpost24® and this document as the source. Any other reproduction and redistribution in print or electronically is strictly prohibited without explicit permission.

Trademark

Outpost24® and OUTSCAN™ are trademarks of Outpost24® and its affiliated companies. All other brand names, product names or trademarks belong to their respective owners.


JavaScript errors detected

Please note, these errors can depend on your browser setup.

If this problem persists, please contact our support.