Last updated: 2020-11-17
Purpose
This article provides set up information on the Thycotic integration.
Introduction
The Thycotic integration enables secure retrieval of privileged credentials from a Thycotic Secret Server vault to support authenticated scanning workflows. By configuring the connection to your Thycotic instance and referencing stored secrets when setting up SSH or SMB authentication on targets or in scan policies, the vulnerability scanner can leverage centrally managed credentials rather than storing them directly in the platform. This integration improves credential lifecycle control, reduces exposure of sensitive login data, and aligns authenticated scans with enterprise-grade privileged access management practices.
Thycotic authentication can be configured on the scan policy, on the target or on the target group.
Set Up Thycotic Integration in OUTSCAN or HIAB
To set up Thycotic in OUTSCAN or HIAB:
-
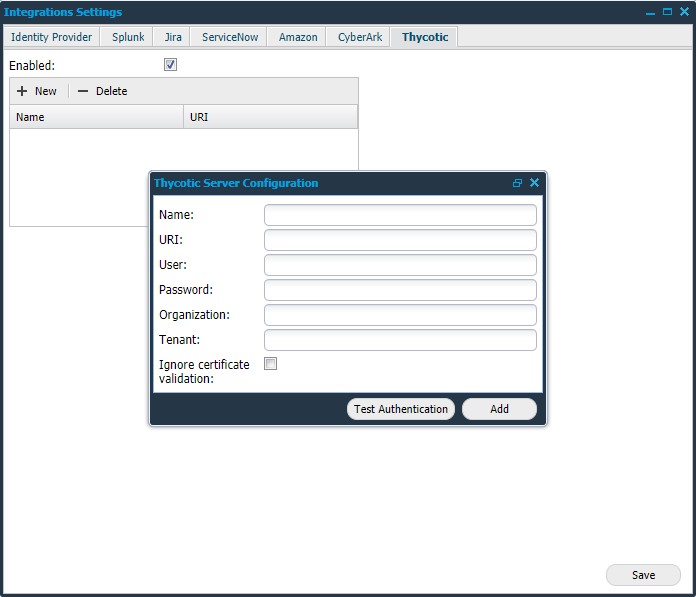
Go to Main Menu > Settings > Integrations.
-
Select the Thycotic tab.
-
Configure Thycotic Sever:
|
Option |
Description |
|---|---|
|
Enabled |
Click on this field to enable Thycotic. |
|
Name |
Provide a name for this configuration. |
|
URI |
Provide your Thycotic Secret server URI. |
|
User |
Provide your Thycotic user name. |
|
Password |
Provide your Thycotic password. |
|
Organization (optional) |
Provide the name of the organization that should be queried in a Thycotic Cloud setup. |
|
Tenant (optional) |
Provide the tenant for Thycotic Cloud setup. |
|
Ignore certificate validation |
It is recommended to leave this box unchecked. Check this box only when there is no trusted certificate available. |
|
Test Authentication |
Click on this button to test the authentication status. |
|
Add |
Click to add the configuration settings. |
-
Click Save.
After enabling Thycotic, the authentication can be configured on a target, target group, or a scan policy.
Target / Target Group
-
Go to Main Menu > Netsec > Manage Targets.
-
Target: Edit a target to setup the Authentication.
-
Target Group: Right-click on a group and select Set Target Authentication.
-
-
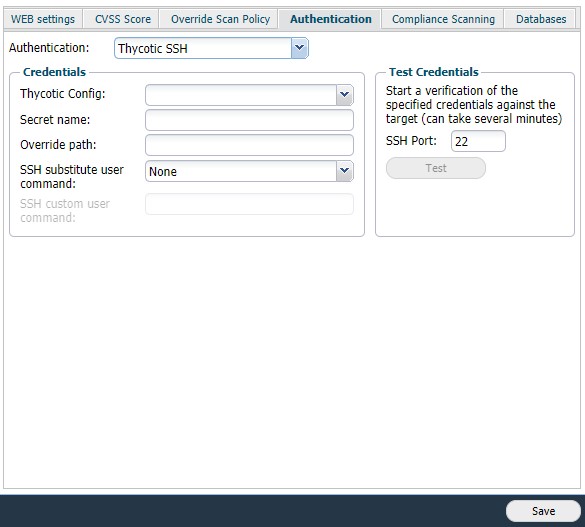
Select Thycotic SMB or Thycotic SSH from the drop-down list, to use the respective authentication.

-
Fill in the Credentials:
|
Option |
Description |
|---|---|
|
Thycotic Config |
Select the config from the drop-down list. |
|
Secret name |
Provide the name of the Secret.
When the user provides a phrase, it searches for the name matching the given phrase. The first name matched is used. ${IP} will get replaced by the target IP. ${HOSTNAME} will get replaced by the host name of the target. |
|
Override path |
Provide a new path to cancel using the existing path. |
|
SSH substitute user command |
The use of the following commands is to execute commands with a different user/privilege escalation.
|
|
SSH custom user command |
This field is available when the user selects custom in the SSH substitute user command field. Add a custom command for escalating privilege. |
|
SMB allow NTLMv1 |
Check this box to enable the authentication using NTLMv1. |
|
Enable remote registry |
If enabled, the scanner initiates the Remote Registry service with the given details. Disable the service when the scan is finished. |
-
Click Test to start a verification.
-
Click Save to enable the current settings.
Scan Policy
-
Go to Main Menu > Netsec > Scan Scheduling > Scan Policy.
-
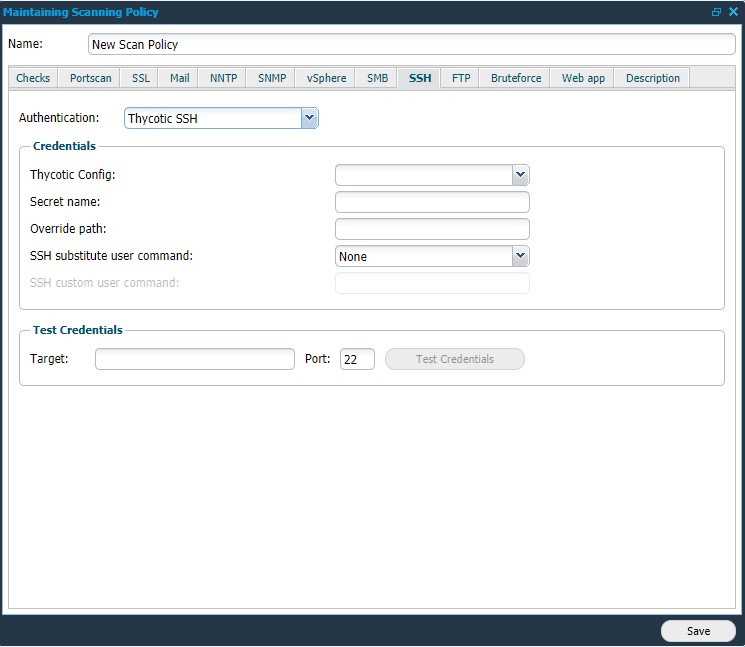
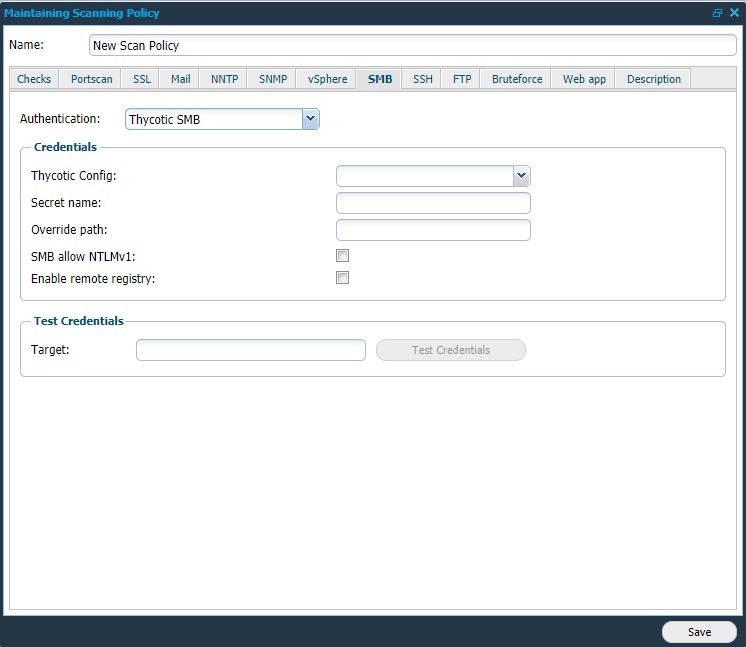
Edit a scan policy to setup the Authentication. Under SMB and SSH tabs, Thycotic SSH and Thycotic SMB are now visible as new options.
-
Click on any of the options to use the respective authentication.
-
Provide your Credentials:
|
Option |
Description |
|---|---|
|
Thycotic Config |
Select the config from the drop-down list. |
|
Secret name |
Provide the name of the Secret. When the user provides a phrase, it searches for the name matching the given phrase. The first name matched is used. ${IP} will get replaced by the target IP. ${HOSTNAME} will get replaced by the host name of the target. |
|
Override path |
Provide a new path to cancel using the existing path. |
|
SSH substitute user command |
The use of the following commands is to execute commands with a different user/privilege escalation.
|
|
SSH custom user command |
This field is available when the user selects custom in the SSH substitute user command field. Add a custom command for escalating privilege. |
|
SMB allow NTLMv1 |
Check this box to enable the authentication using NTLMv1. |
|
Enable remote registry |
If enabled, the scanner initiates the Remote Registry service with the given details. Disable the service when the scan is finished |
-
To start verification, provide the target IP or Hostname and click on Test Credentials.
-
Click Save to enable the current settings.
Related Articles
- ServiceNow - Legacy
- Identity Provider Settings
- Okta Identity Provider Configuration
- Database Connector (HIAB only)
- Microsoft Entra ID (Azure AD) Identity Provider Configuration
- SNMP (HIAB only)
- ADFS Identity Provider Configuration
- Splunk
- Amazon
- Atlassian Jira
- Syslog (HIAB only)
- Thycotic
- OneLogin Identity Provider Configuration
- CyberArk
- LDAP/AD