Last updated: 2026-04-02
Purpose
The purpose of this article is to provide setup information on the Azure AD integration.
Introduction
The Microsoft Entra ID Identity Provider Configuration (previously Azure AD) feature describes how to integrate the Outpost24 platform, including OUTSCAN and HIAB, with Microsoft Azure Active Directory to enable Single Sign-On (SSO). The configuration establishes a trust relationship between the platform and Entra ID using the Security Assertion Markup Language (SAML) protocol. During the setup process, metadata is exchanged between the service provider and the identity provider, and authentication attributes are mapped so that Entra ID can verify user identities and provide the required authentication information during login.
Using Entra ID as an identity provider centralizes authentication and allows organizations to leverage their existing identity infrastructure for secure access to the platform. Users can authenticate through Entra ID and then access the Outpost24 tools without maintaining separate credentials. This approach improves security by allowing organizations to apply centralized identity policies such as access control and strong authentication methods, while also simplifying the login experience through Single Sign-On.
This document provides step by step instructions on how to connect the Outpost24 tools, OUTSCAN and HIAB, with Entra ID in order to enable Single Sign On capability. The SSO can be initiated from both Service Provider and Identity Provider sides: respectively from Outpost24 tools, OUTSCAN, HIAB and Microsoft Azure portal side, myapps.microsoft.com.
Getting the SP Metadata File
You will require the SP metadata file from the Outpost24 tool you wish to integrate with.
On the Outpost24 Tool
-
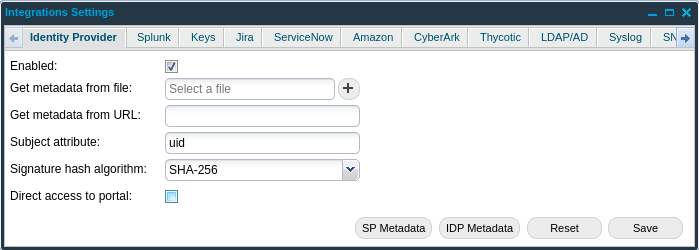
Navigate to Main Menu > Settings > Integrations > Identity Provider
-
Select the Enabled checkbox and click the SP Metadata button
Microsoft Entra ID (Azure AD) Configuration
-
Login to https://portal.azure.com.
-
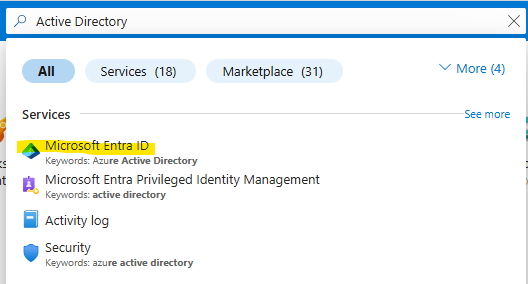
Once in the portal, in the navigation bar search Active Directory.
-
Select Microsoft Entra ID.
Creating a new Enterprise Application
-
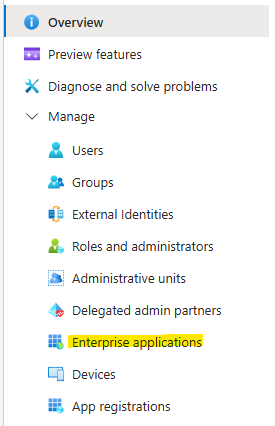
In the sidebar navigation, select Enterprise Applications.
-
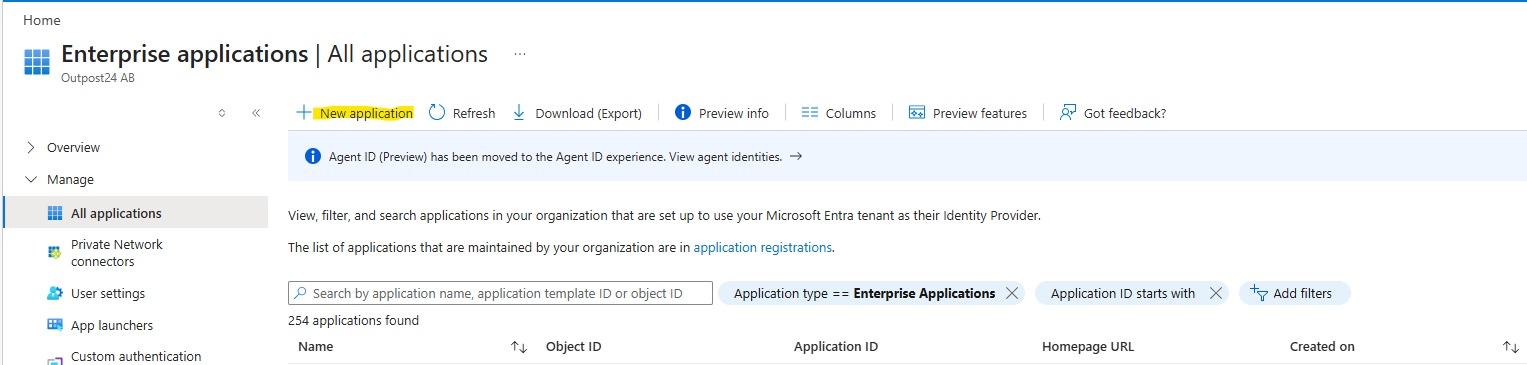
Select the + New application button.
-
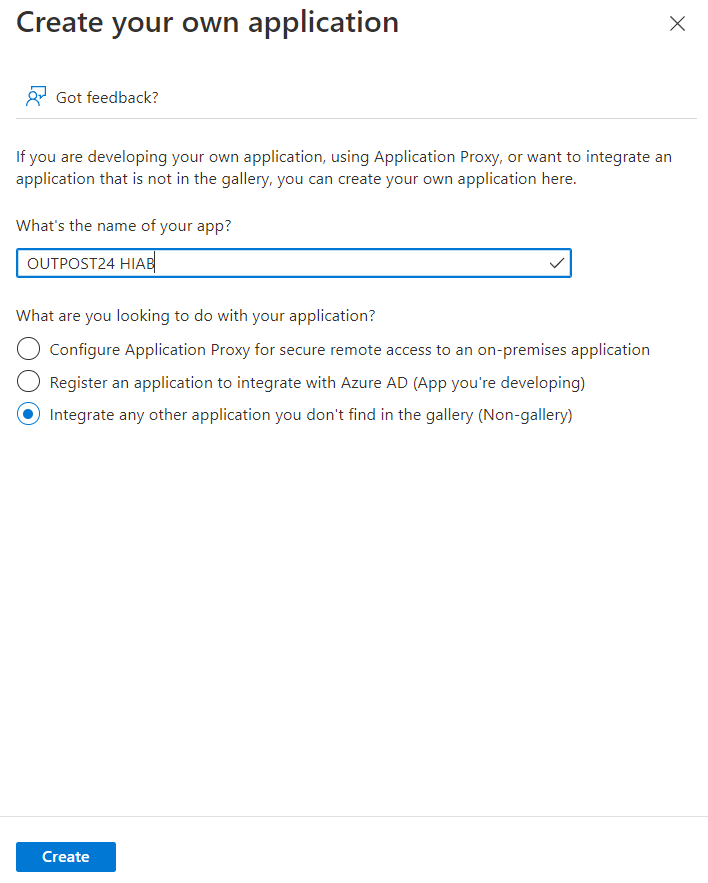
In the Add an application screen, select the + Create your own application button and in the left panel select the Non-gallery application, and give the application a name that is recognizable and click Add. Azure will create the application ready for configuration.

-
Customize your newly created enterprise by uploading the O24 logo. This logo is displayed on the http://myapps.microsoft.com portal and enhances the user experience.
-
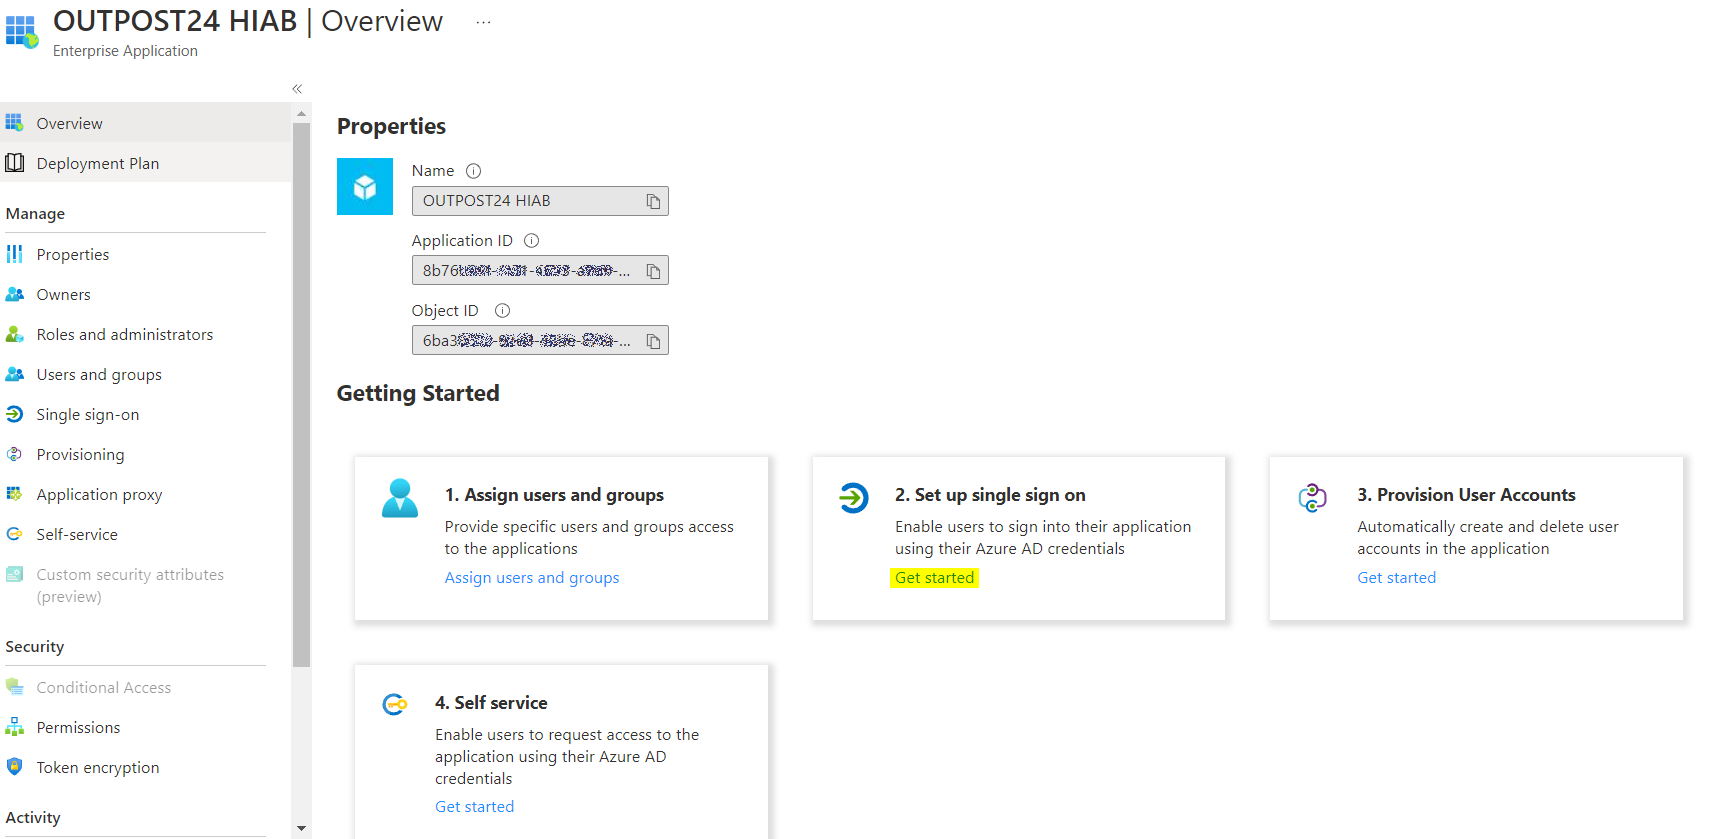
In the Enterprise applications section select <OUTPOST24 HIAB>
-
Then select Properties.
-
Select the Logo.
-
Select a file containing the OP24 logo.
-
The O24 logo file size can not exceed 100.4 kB.
Allowed file formats
-
jpeg
-
jpg
-
gif
-
png
-
bmp
Setting up Single Sign On
-
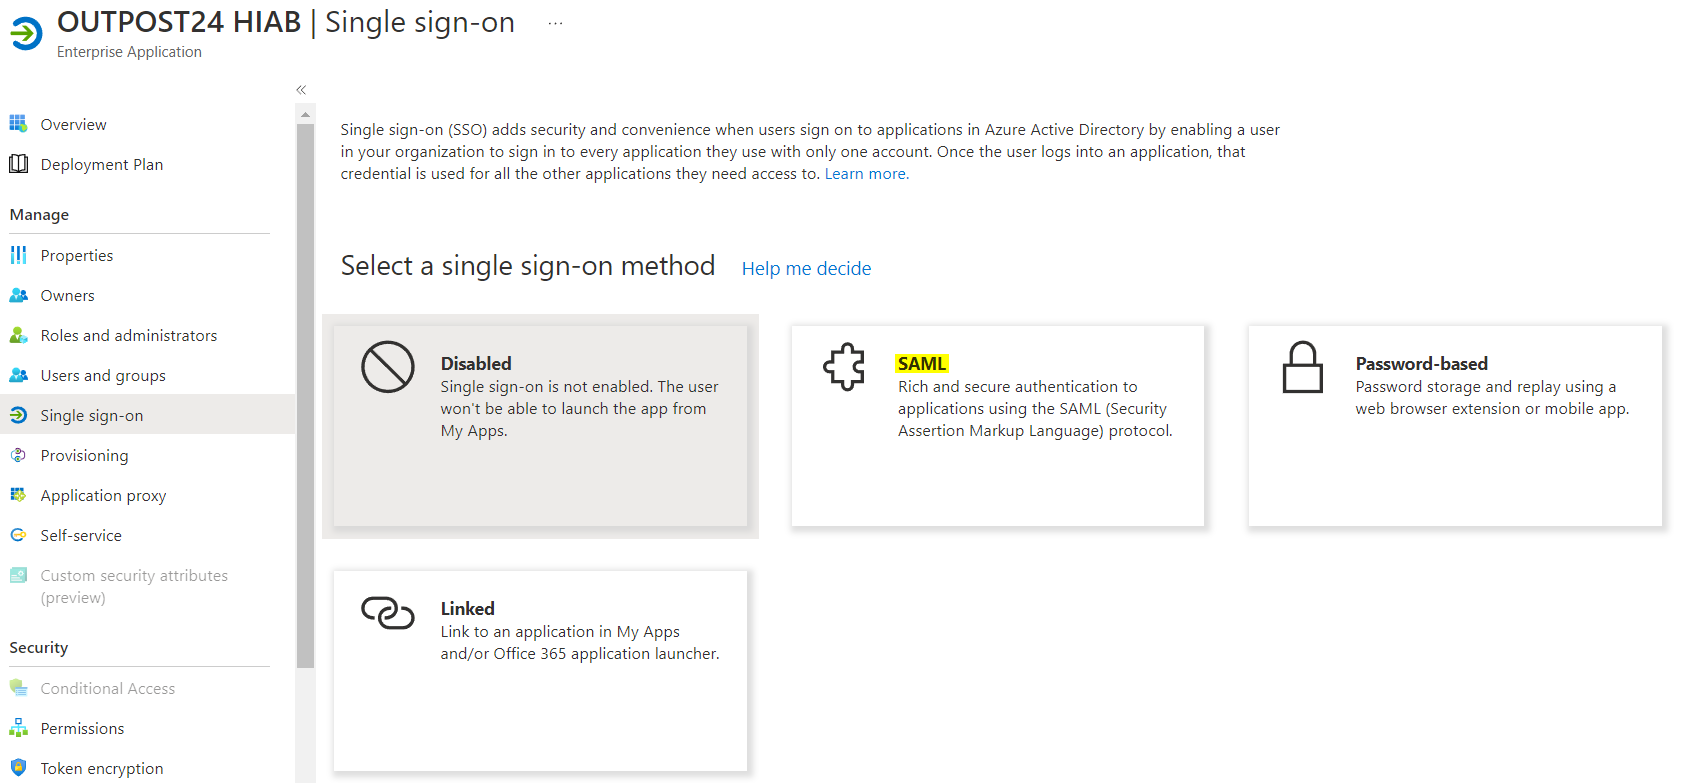
In the Getting Started section select Set up single sign on and select the SAML option.
a) Select the Upload metadata file and navigate to the downloaded Outpost24 metadata file from the previous steps. This populates the fields under the Basic SAML Configuration view that you can Edit.
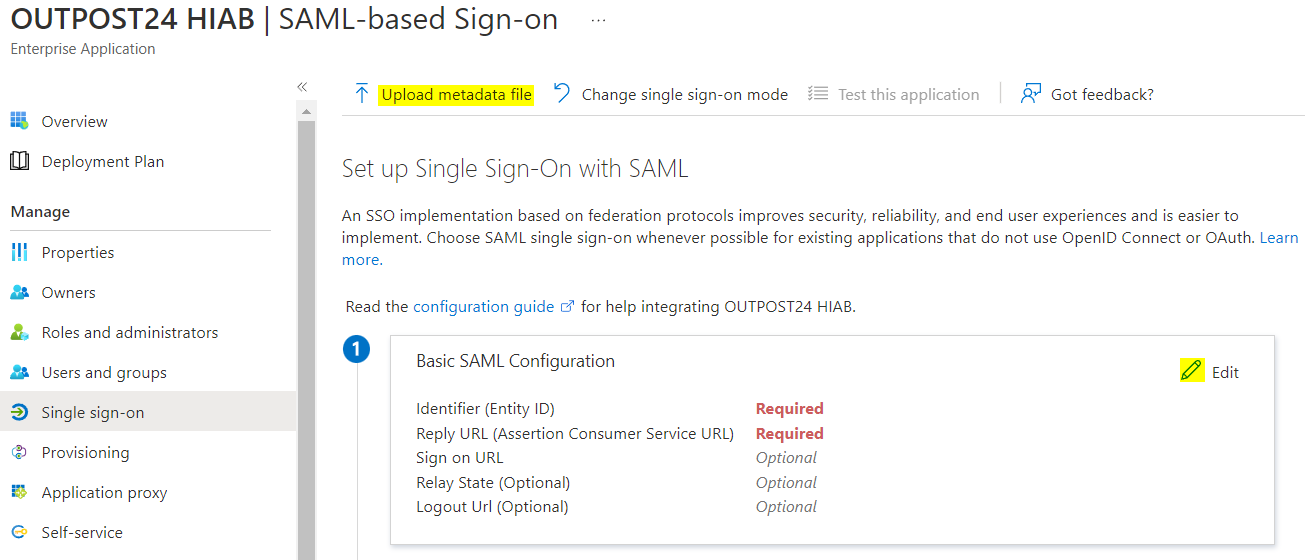
Entity ID should show: https://<IP>/opi/XMLAPI?ACTION=SHOWSPMETADATA&UUID=<uuid>
Reply URL should show: https://<IP>/opi/XMLAPI?ACTION=SAMLRESPONSE&UUID=<uuid>
Sign on URL field should remain empty.
Where IP is the <IP> of the Outpost24 Tool you are integrating with and where <uuid> is the universal unique identifier that identifies your account.
OUTSCAN Configuration
In case you are configuring this for OUTSCAN, <IP> value is the OUTSCAN FQDN: http://outscan.outpost24.com
-
Define Attributes and Claims:
a) Click Edit under the User Attributes and Claims section.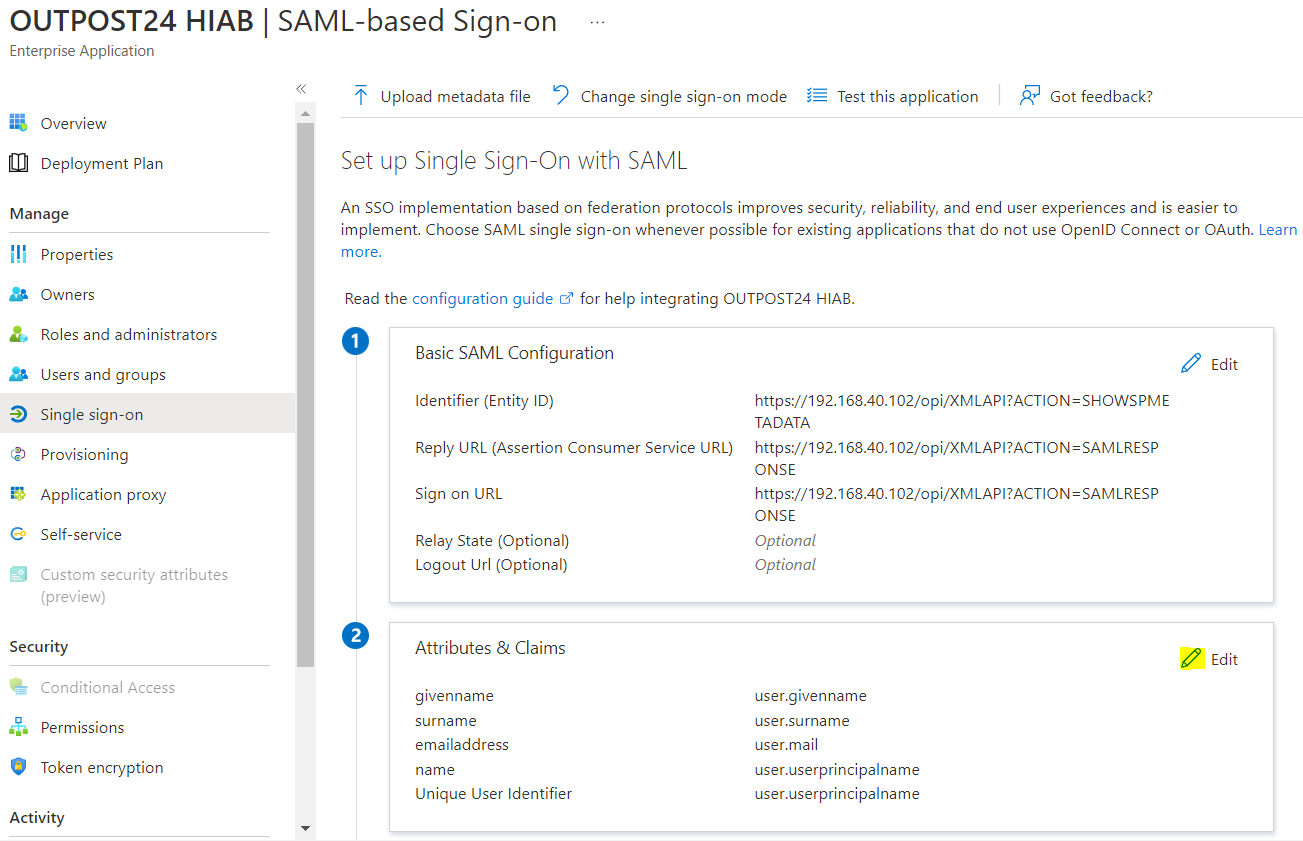
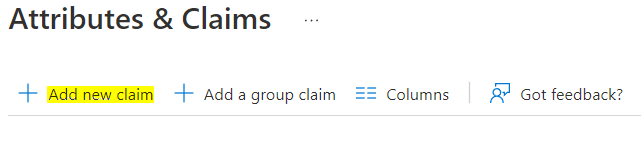
b) Click the + Add new Claim button.
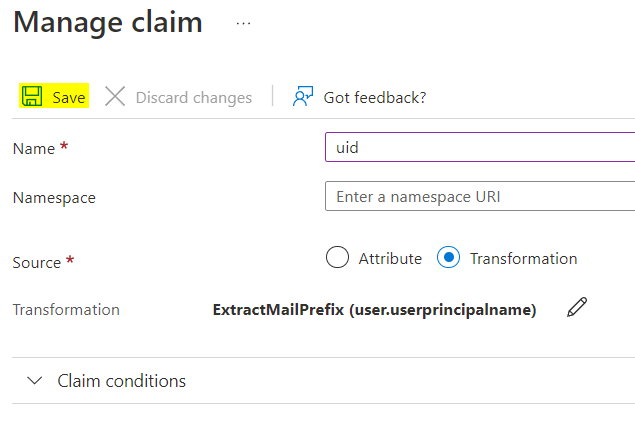
c) Configure the following information in the Manage Claim screen.
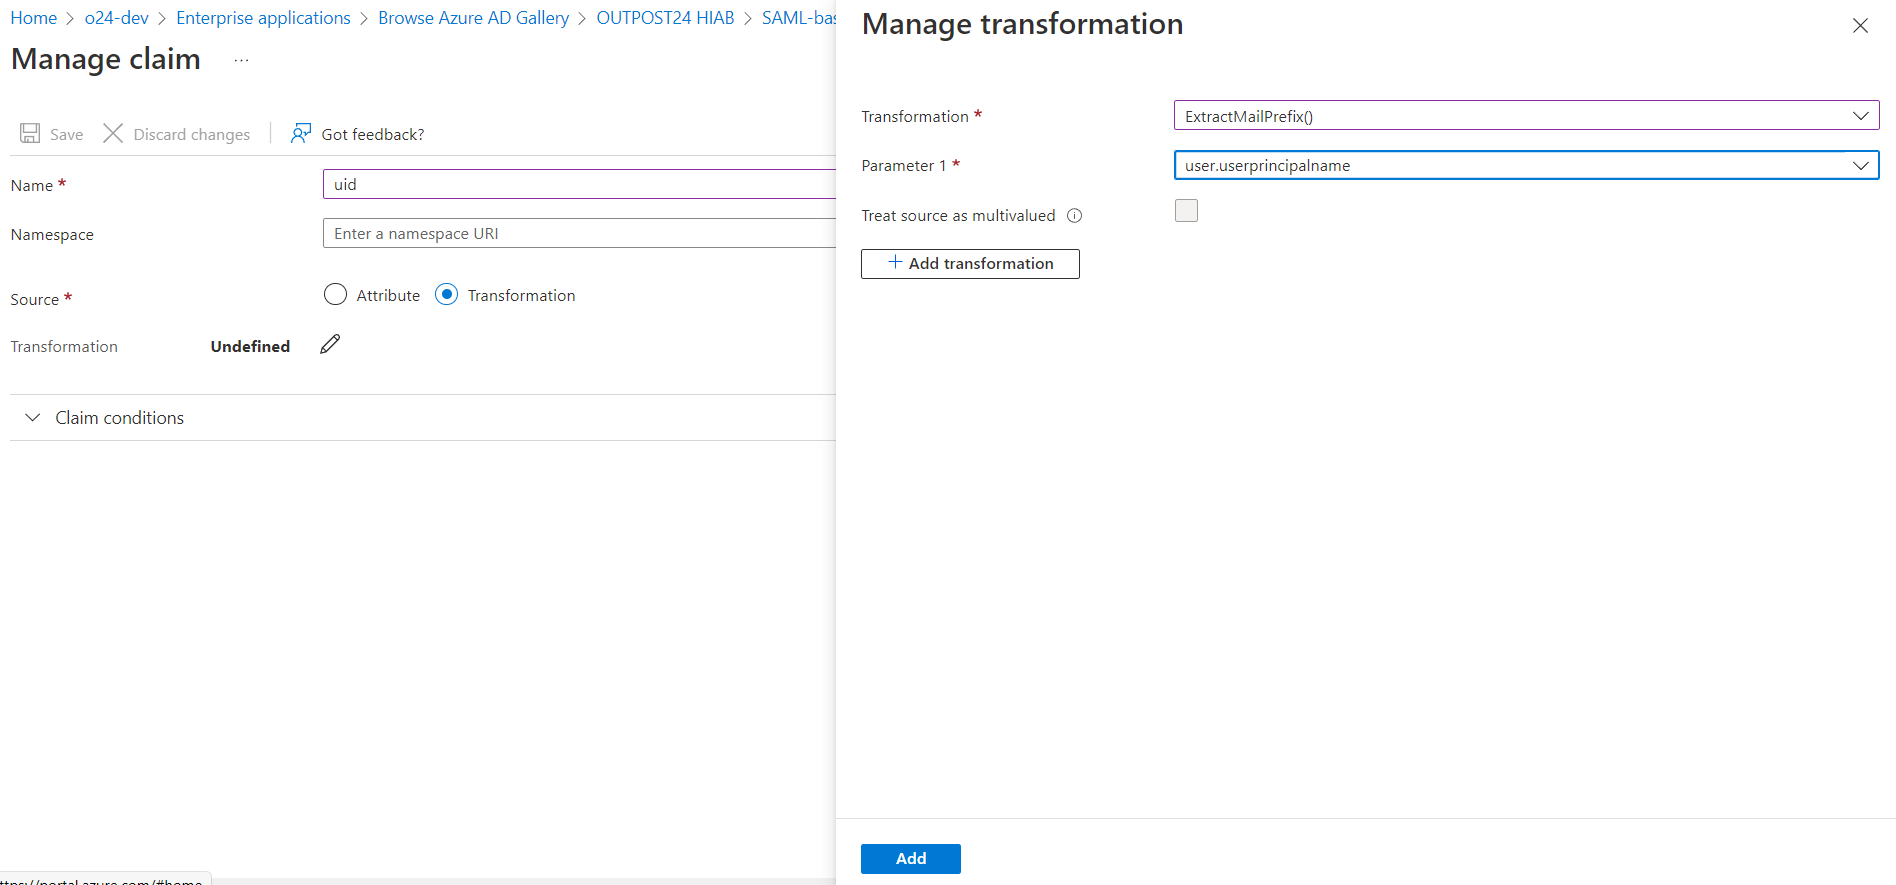
Claim Name requirement
Make sure that the Name for the claim match the Subject attribute you entered in the Identity Provider section of the Integrations Settings panel on HIAB/OUTSCAN (default being uid).
Namespace: can be left blank
Source: Select the Transformation radio button
Claim Name considerations
uid is a reserved name in Outpost24 software to truncate the USERNAME to the part below the @ sign, meaning that if you want to use an email address as USERNAME, you can not use uid as Claim name, but you can use any other string (such as emailAddress).
Claim Name requirement
Make sure that the Name for the claim match the Subject attribute you entered in the Identity Provider section of the Integrations Settings panel on HIAB/OUTSCAN (default being uid).
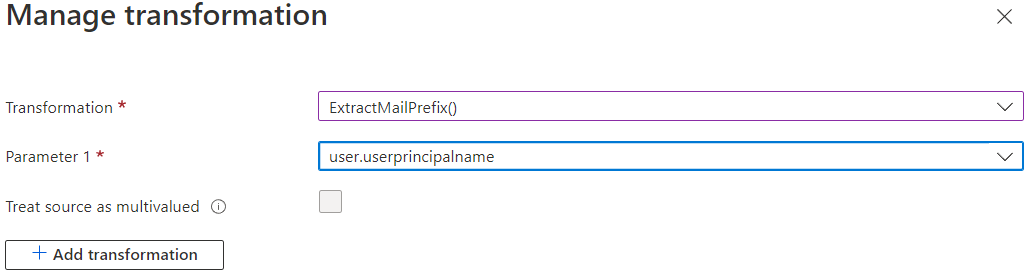
d) In the Manage Transformation pop up view enter the following information.
|
Recommended settings |
|---|
|
Transformation: ExtractMailPrefix() Parameter 1: user.userprincipalname Those settings correspond to standard practice to be able to login with a USERNAME matching the part below the @ sign in the user's email address. For instance, if the user's email address is firstname.lastname@somedomain.com, then the user will be able to login using firstname.lastname as username once configured in HIAB/OUTSCAN. Claim Transformation considerations By default, Azure ID populates the User Principal Name of Identity section of a user with the email address when creating the user. Depending on your configuration, it may happen that this field is empty and that the email address of the user is set in the Email of the Contact Info section of the user. In this case, replace the Parameter.1 with user.mail. |
Custom advanced settings
In order to create some custom advanced settings using some specific attribute or different transformation option, please ensure that all select fields and user.x value are properly populated for all the user in the Azure Active Directory.
Please also ensure that the results of your claim configuration match the USERNAME for the HIAB/OUTSCAN user.
e) Click the Add button. The transformation field now show the configuration you just created.
f) Click the Save button.
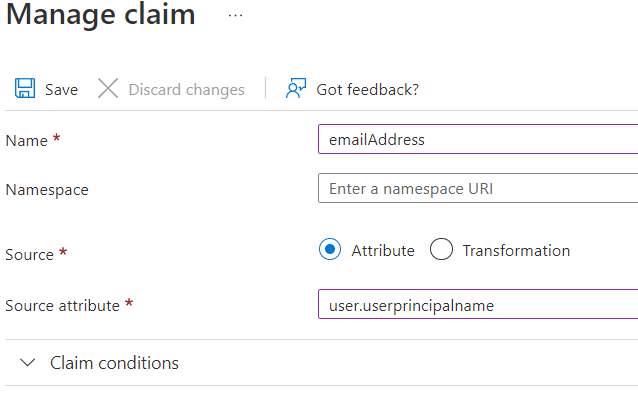
If you want to use an email address as USERNAME in Outpost24 software, create a Claim that does not use uid (which is a reserved name in Outpost24 software) as name and that refers to an attribute that contains an email address such as in the sample below:
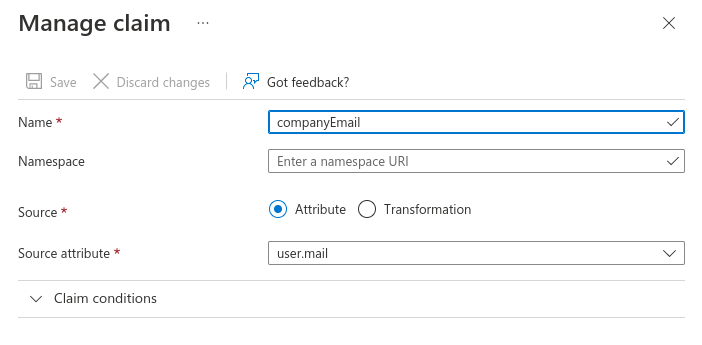
Example
In this example the user emails registered on Azure AD (for example, User Contact info Email) match the user names set on Outscan | HIAB (main account and sub users) and the Subject attribute in Identity Provider view shall be set to 'companyEmail'.
You can name the claim on Azure AD as you want (except 'uid' which is a reserved word) then you must name the same in subject attribute of the Identity Provider view.
-
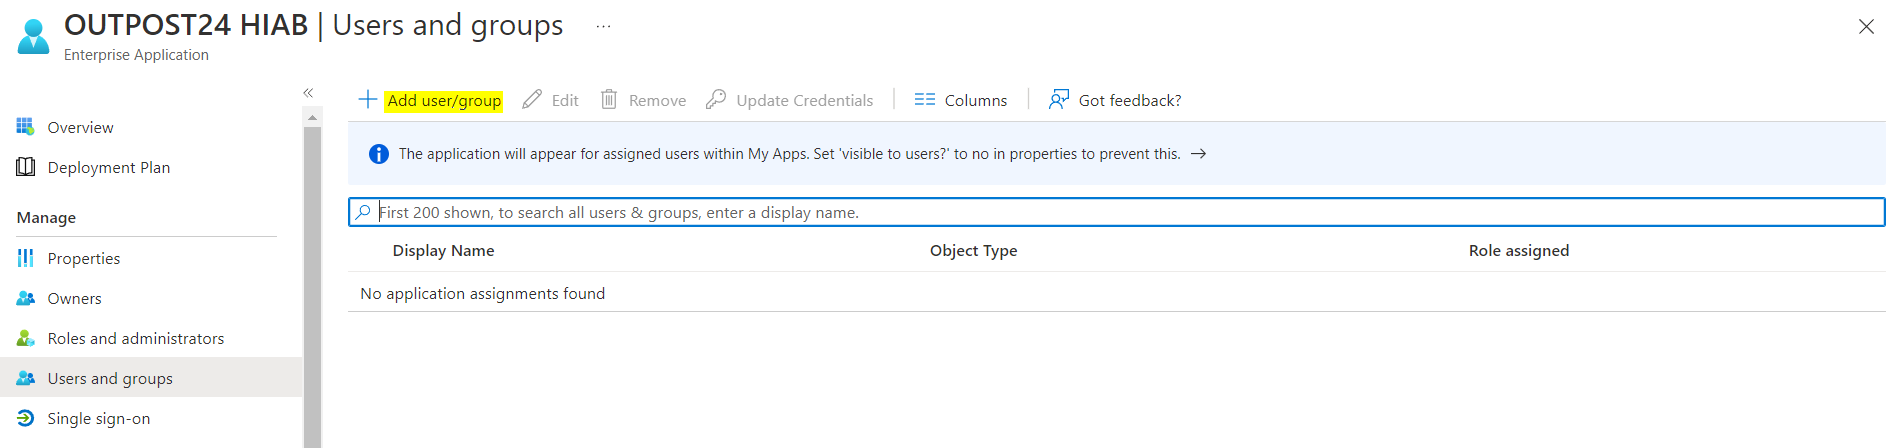
Grant users access to the enterprise application you have defined
Important: Grant access to the Enterprise Application
By default Azure AD, does not grant access to the Enterprise application to any user. The access have to be granted in the User and Groups section of the applications, by clicking on the + Add user/group button.
-
Return to the Outpost24 HIAB Application configuration screen.
OUTSCAN or HIAB Configuration
In order to configure OUTSCAN/HIAB to use SAML single sign on, you need to achieve the following steps:
-
Retrieve the metadata file describing the identity provider
-
Adjust the metadata file (if needed)
-
Upload the metadata file in OUTSCAN/HIAB
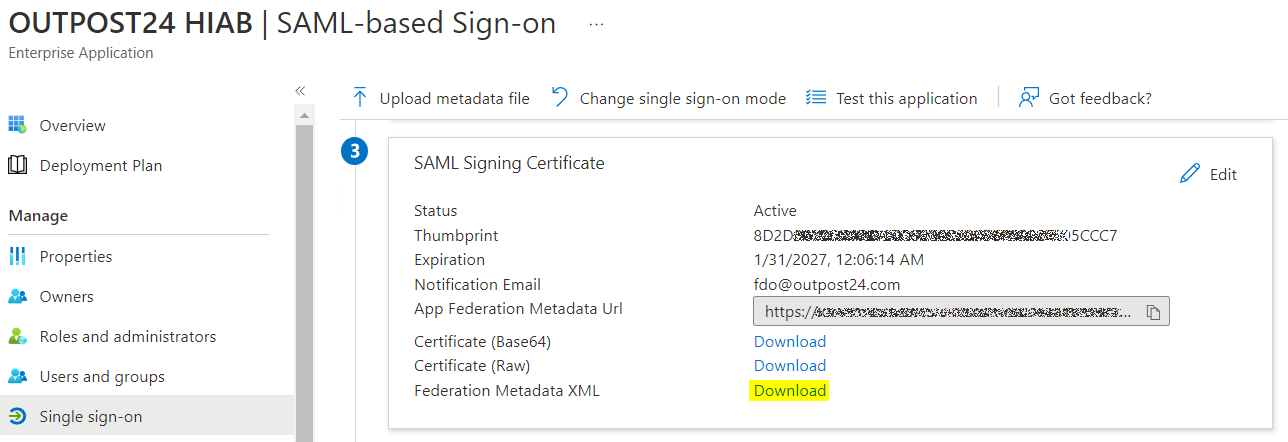
Retrieve Identity Provider Metadata file
Under section 3 of the SAML-based Sign On screen > SAML Signing Certificate. Download the Federation Metadata XML file. You receive a XML file which is named the name of the application you have created in Azure.
Adjust Identity Provider Metadata File
To integrate an Identity Provider (IdP) in OUTSCAN or HIAB, you have to upload the SAML Metadata file describing the IdP. This file must comply to the SAML standard.
Note that the IDP XML file needs to have the validUntil. EntraID fails to include it, and it needs to be added manually.
For example, the IDP XML doc can look like this when downloaded from EntraID
<EntityDescriptor xmlns="urn:oasis:names:tc:SAML:2.0:metadata" ID="_a15c3da4-XXXX-XXXX-XXXX-XXXXd95cf81a" entityID="https://sts.windows.net/7bd2XXXX-XXXX-XXXX-XXXX-XXXX950663ea/">
...
</EntityDescriptor>
Add the validUntil value just before the very end of the EntityDescriptor opening element:
<EntityDescriptor xmlns="urn:oasis:names:tc:SAML:2.0:metadata" ID="_a15c3da4-XXXX-XXXX-XXXX-XXXXd95cf81a" entityID="https://sts.windows.net/7bd2XXXX-XXXX-XXXX-XXXX-XXXX950663ea/" validUntil="2030-01-01T00:00:00">
...
</EntityDescriptor>
Upload the SAML Metadata File
Adjust the SAML metadata file from your identity provider to meet platform requirements and enable successful Single Sign-On integration in OUTSCAN or HIAB.
Set Up Identity Provider
An Identity Provider (IdP) offers user authentication as a service. It is a trusted provider that allows the use of single sign-on (SSO) to access other application. SSO enhances usability by reducing password fatigue as passwords are maintained on your IdP.
Configure identity provider settings to enable SAML-based single sign-on and centralized authentication for secure access to OUTSCAN or HIAB.Ensure that the Subject attribute in the integration settings match the claim name in Azure AD
Verifying Integration Functionality
SP initiated SSO, for example from Outpost24 tool
-
Navigate to the login screen for the Outpost24 Tool
-
Enter the Outpost24 username (part below the @ sign in the user's email address as previously recommended settings) of the user added to the Outpost24 Application within Azure
-
Click single sign on and you will be redirected to login via the Azure portal.
The users AD account will need to be added to the Outpost24 Application in Azure to successfully login.
IdP initiated SSO, for example from http://myapps.microsoft.com
-
Login to http://myapps.microsoft.com .
-
Click on <OUTPOST24 HIAB> and you are redirected to Outpost24 Application, depending on settings to either NetSec UI or Portal UI.
Related Articles
- ServiceNow - Legacy
- Identity Provider Settings
- Okta Identity Provider Configuration
- Database Connector (HIAB only)
- Microsoft Entra ID (Azure AD) Identity Provider Configuration
- SNMP (HIAB only)
- ADFS Identity Provider Configuration
- Splunk
- Amazon
- Atlassian Jira
- Syslog (HIAB only)
- Thycotic
- OneLogin Identity Provider Configuration
- CyberArk
- LDAP/AD