Last Updated: 2026-03-23
Purpose
This article describes how to create and manage automation rules in the Outpost24 Portal.
Introduction
Auto Actions in the Outpost24 Portal enable automated tag management across various resource types based on pre-defined conditions. By configuring automation rules, tags can be automatically added to or removed from resources such as assets, findings, and compliance records whenever they match specified criteria. This reduces manual effort, ensures consistent tagging across your environment, and supports downstream workflows that depend on accurate tag assignments.
Each automation rule combines a View Template (which defines the matching conditions through filters) with one or more tag actions (add or remove). When a resource matches the filters defined in the selected view template, the configured tag actions are executed automatically.
Requirements
-
It is assumed that the reader has basic access to the OUTSCAN/HIAB account to access the Portal.
-
The user must be assigned a role with Automation Rules set to View and Manage in order to create, edit, or delete automation rules. Users with View permission can see rules but cannot modify them.
Accessing Auto Actions
To access the Auto Actions:
-
Navigate to Configuration > Auto Actions in the Main Menu.
The Auto Actions view displays a table listing all configured automation rules.
Table Columns
The following columns are available in the Auto Actions table:
|
Column |
Description |
|---|---|
|
Name |
The name of the automation rule. |
|
Enabled |
A toggle switch indicating whether the rule is active. Disabled rules are not executed. |
|
Built-in |
Indicates if this is a built-in rule. Read-only. |
|
Priority |
A numeric value (1 through 10) that controls execution order for rules of the same resource type. Lower values execute first. For built-in rules, order is always 0 and they execute before any customer-defined rules. Customer-defined rule order starts at 1. |
|
Type |
The resource type the rule applies to (for example, Assets, Findings, or Compliance). |
|
Triggers |
The triggers that activate this rule. Must be valid triggers for the rule type. If not specified, the rule matches all triggers for its type. |
|
Tags |
Tags assigned to the rule itself for organizational purposes. |
|
Created |
The date and time the rule was created. |
|
Updated |
The date and time the rule was last modified. |
|
Created By |
The user who created the rule. |
|
Updated By |
The user who last modified the rule. |
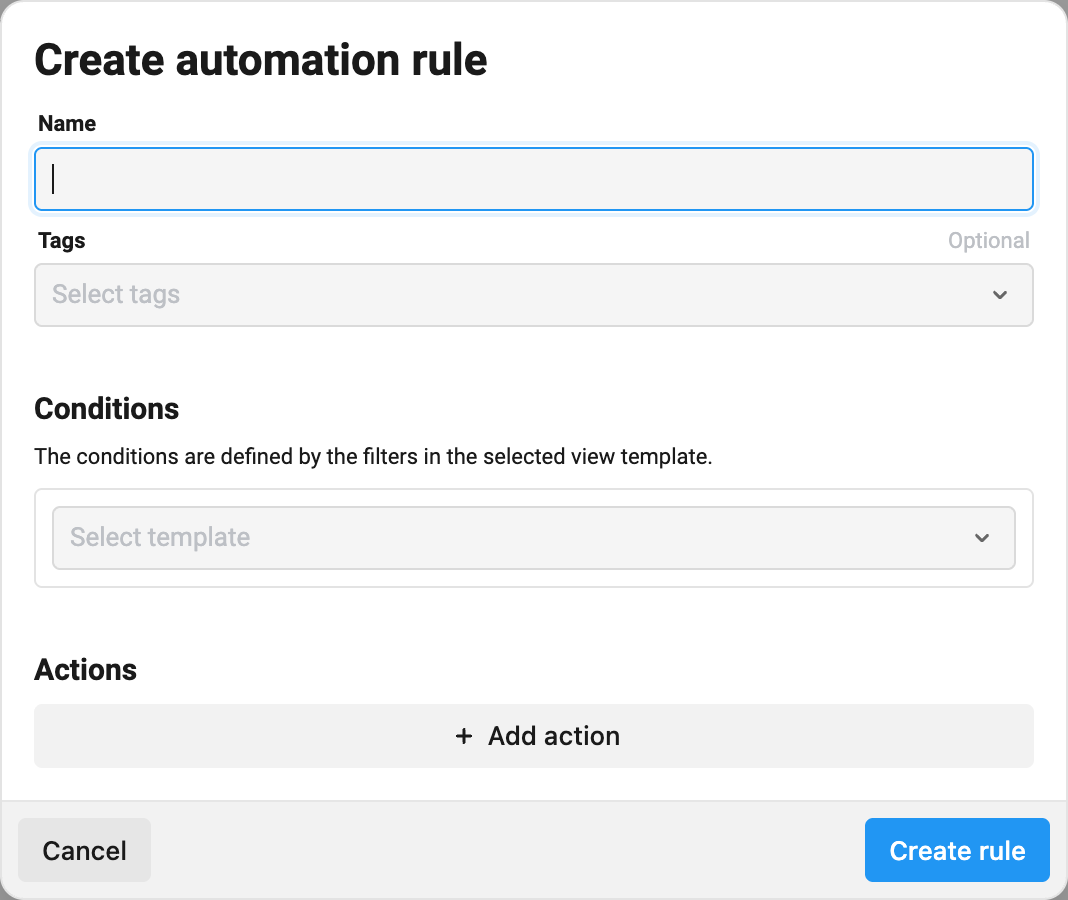
Creating an Automation Rule
To create a new automation rule:
-
Click the Create new automation rule button in the action bar above the table.
-
Enter a Name for the rule.
-
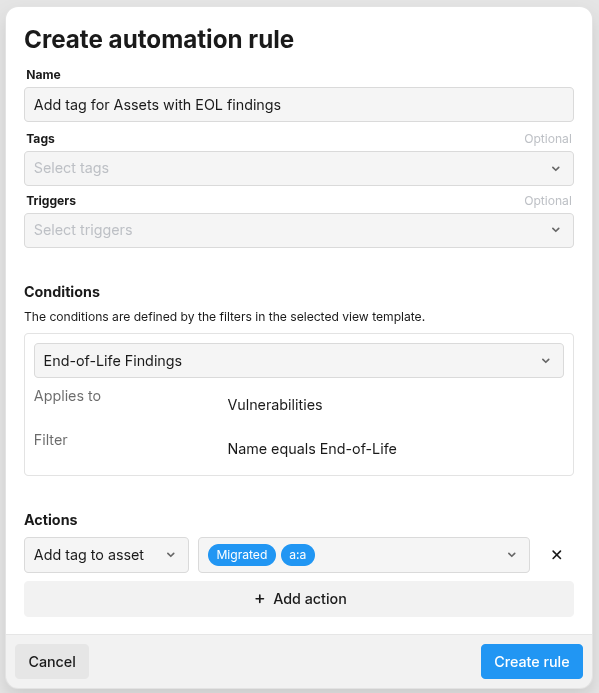
Optionally, assign tags to the rule by clicking the tag input field and selecting tags from the list.
-
In the Conditions section, select a view template from the dropdown. The view template defines which resources will match the rule.
-
If no suitable view template exists, click the Create New button to open the New View Template dialog and create one. See the section below for details.
-
In the Actions section, select an action type from the dropdown.
-
Select the tag or tags to add or remove.
-
Optionally, click Add Action to add additional actions to the same rule.
-
Click the Save button.
Available Action Types
The following action types are available, depending on the selected resource type:
|
Action Type |
Description |
Available For |
|---|---|---|
|
Add Tag |
Adds the specified tag to matching resources. |
All resource types |
|
Remove Tag |
Removes the specified tag from matching resources. |
All resource types |
|
Add Tag to Asset |
Adds the specified tag to the asset associated with the matching finding or informational item. |
Findings, Informational types only |
|
Remove Tag from Asset |
Removes the specified tag from the asset associated with the matching finding or informational item. |
Findings, Informational types only |
|
Change Status |
Changes the status of the matching finding. Requires a target status and supports an optional comment. |
Findings only |
Supported Resource Types
Automation rules can target the following resource types:
-
Asset Groups
-
Assets
-
Scan Configurations
-
Findings (Vulnerabilities)
-
Users
-
Managed Reports
-
Compliance
-
Workflows
-
Products (Informational)
-
Ports (Informational)
-
Services (Informational)
-
Certificates (Informational)
Triggers
Each trigger is associated with a specific resource type. A rule can only use triggers that match its type.
|
Trigger |
Resource Type |
|---|---|
|
|
Asset Groups |
|
|
Assets |
|
|
Assets |
|
|
Scan Configurations |
|
|
Findings |
|
|
Findings |
|
|
Findings |
|
|
Users |
|
|
Managed Reports |
|
|
Compliance |
|
|
Workflows |
|
|
Information Products |
|
|
Information Products |
|
|
Information Ports |
|
|
Information Ports |
|
|
Information Services |
|
|
Information Services |
|
|
Information Certificates |
|
|
Information Certificates |
Change Status
The change status action transitions a finding to a new status. A comment is always automatically added to the finding when the status is changed. The comment is constructed as follows:
Status transition line — Always included. Describes the old and new status, e.g. Status changed from present to irreproducible.
Automation rule line — Always included for automation rule transitions. References the rule name and ID, e.g. Changed by automation rule "My Rule" (ID: 42).
User comment line — Included only if the rule's changeStatus action specifies a comment field, e.g. Comment: test comment
For example, given a rule named "Mark not seen as irreproducible" with ID 5 and a comment of "No longer detected by scanner", the resulting comment on the finding would be:
Status changed from present to irreproducible.
Changed by automation rule "Mark not seen as irreproducible" (ID: 5).
Comment: No longer detected by scanner
If no comment is specified in the rule, only the first two lines are added.
The available target statuses are:
-
PRESENT
-
PENDING_VERIFICATION
-
IRREPRODUCIBLE
-
FIXED
-
ACCEPTED
-
FALSE_POSITIVE
Standard status transition rules apply — not all transitions are valid. Invalid transitions are silently skipped during rule execution.
Built-in Rules
Built-in rules are system-managed rules. They cannot be created, modified, or deleted — the only allowed operation is enabling or disabling them.
The following built-in rule exists:
-
Change not seen findings status to irreproducible — When a finding is no longer seen in a scan (trigger: FINDING_NOT_SEEN), its status is automatically changed to irreproducible.
Editing an Automation Rule
To edit an existing rule:
-
Right-click the rule in the table to open the context menu.
-
Click Edit.
-
Make the necessary changes and click the Save button.
Or:
-
Click the rule name to open the details panel on the right side.
-
Click the Edit button.
-
Make the necessary changes and click the Save button.
Changing Rule Priority
To change the execution priority of a rule:
-
Right-click the rule in the table to open the context menu.
-
Click Change Priority.
-
Enter a new priority value (1 through 10).
-
Click Save.
Note: Priority controls execution order only among rules of the same resource type. Rules targeting different resource types execute independently.
Enabling or Disabling a Rule
To enable or disable a rule without deleting it:
-
Click the toggle switch in the Enabled column for the corresponding rule.
Disabled rules remain in the table but are not executed. They can be re-enabled at any time.
Deleting an Automation Rule
To delete a rule:
-
Right-click the rule in the table to open the context menu.
-
Click Delete.
The rule is permanently removed.
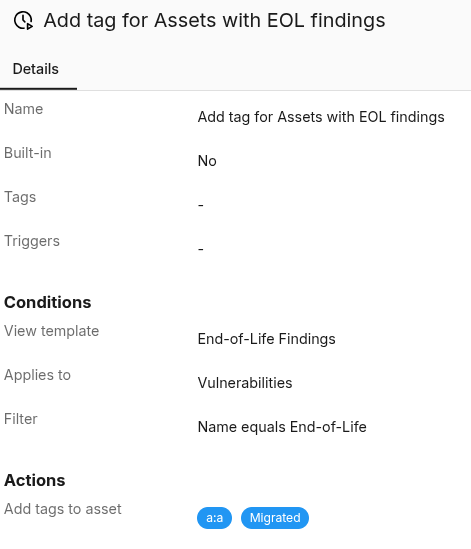
Viewing Rule Details
When clicking on a rule in the table, a details panel is displayed on the right side of the window. The panel shows:
-
The rule name and ID.
-
An enable/disable toggle.
-
Tags assigned to the rule.
-
The selected view template and its type.
-
A read-only preview of all filters defined in the view template.
-
All configured actions with their associated tags.
Creating a View Template from the Rule Dialog
When creating or editing a rule, a new view template can be created directly from the conditions section:
-
Click the Create New button in the view template selection area.
-
Enter a Name for the view template.
-
Select a Type from the dropdown.
-
Add one or more filters by selecting a field, entering a value, and clicking Add.
-
Click the Create and Use button.
The newly created view template is automatically selected for the current rule.
Rules use only filters from view templates. Additional settings such as columns and sorting can be configured later in the View Templates view for other purposes.
Tag Input
The tag input field supports the following search syntax:
|
Search Pattern |
Behavior |
|---|---|
|
Plain text (for example, |
Searches for tags where the key or value contains the search term. |
|
Colon-prefixed (for example, |
Searches for tags where the value contains the search term. |
|
Key:Value (for example, |
Searches for tags where the key contains the first term and the value contains the second term. |
Tags that are already selected are excluded from the search results. Clicking a tag adds it to the selection. Clicking the remove icon on a selected tag removes it.
Change Status Input
The change status action changes the status of a matching finding and adds a comment to it.
|
Field |
Required |
Description |
|---|---|---|
|
|
Yes |
The target finding status. Must be one of: |
|
|
No |
An optional comment to include in the automatically generated status transition comment. If provided, it is appended after the status transition and automation rule reference lines. |
IAM Permissions
Access to automation rules is controlled through IAM roles. The following permission levels are available for the Automation Rules module:
|
Permission Level |
Description |
|---|---|
|
Deny |
The user cannot access the Auto Actions view. |
|
View |
The user can view automation rules and their details but cannot create, edit, or delete them. |
|
View and Manage |
The user can create, edit, delete, and manage automation rules. |
For more information on managing roles, see Role Management.
Related Articles