Last Updated: 2020-03-18
Purpose
This article provides setup information on the CyberArk integration.
Introduction
The CyberArk integration enables secure use of privileged credentials stored in a CyberArk vault during vulnerability scanning and authenticated access. CyberArk is a privileged account security and password-vault solution, and by linking it to OUTSCAN or HIAB you can centralize credential management while the platform retrieves authentication secrets at scan time. This integration is especially valuable for environments where security policy requires that sensitive credentials are controlled by a vault, reducing exposure and helping maintain audit-ready authenticated scans across internal and external targets.
CyberArk provides a privileged account security solution and password vault. It is required to have the CyberArk AIM suite to use the integration.
CyberArk is supported in HIAB and OUTSCAN for both internal and external IP addresses.
CyberArk authentication cannot be configured on the policy level, only on the target level.
Define the Application Manually via CyberArk
To define the Application manually via CyberArk’s PVWA (Password Vault Web Access) Interface:
-
Log on with a user allowed to managed applications (Manage Users authorization is required)
-
Go to Applications tab, click Add Application; the Add Application page is displayed.
-
Fill with the pre-defined APPID the customer should use, specified in the Name field.
Set Up CyberArk in OUTSCAN or HIAB
To set up CyberArk in OUTSCAN or HIAB:
-
Go to Main Menu > Settings > Integrations.
-
Select the CyberArk tab.
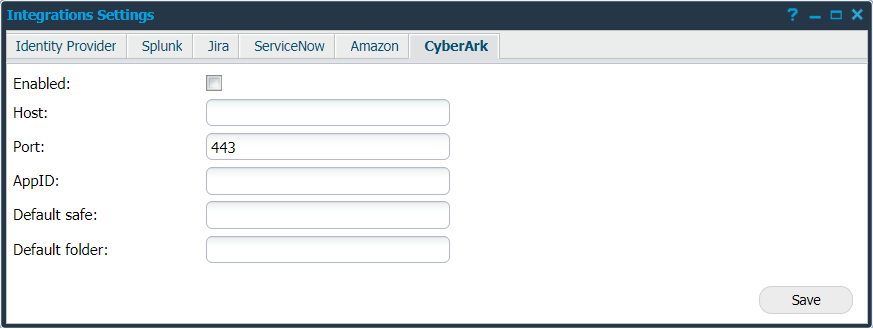
Provide the below information to use CyberArk:
|
Option |
Description |
|---|---|
|
Enabled |
Click on this field to enable CyberArk. |
|
Host |
Provide the hostname to the CyberArk server. |
|
Port |
Provide the port that CyberArk accepts connections on. |
|
AppID |
Enter the application ID, an authentication token from CyberArk. |
|
Default safe |
Provide the CyberArk safe name to be used as default. |
|
Default folder |
Provide the folder to search for secrets. |
|
Save |
Click on this button to save your current settings. |
-
Click Save.
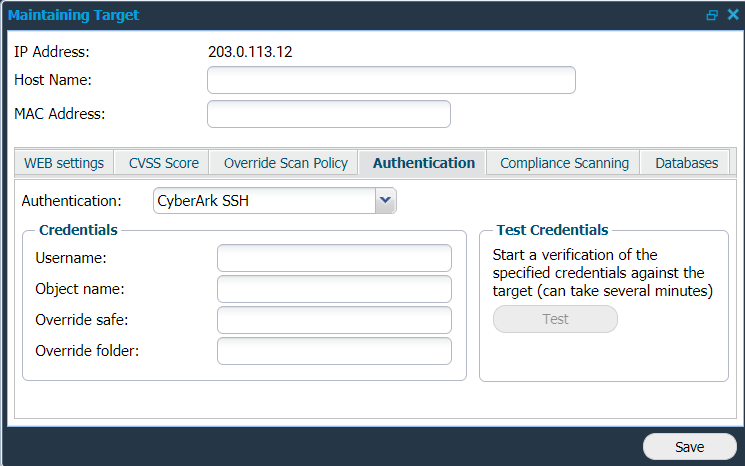
After enabling CyberArk:
-
Go to Main Menu > Netsec > Manage Targets.
-
Edit a target to setup the Authentication.
CyberArk SSH and CyberArk SMB are now visible as new options. -
Click on any of the options to use the respective authentication.
-
Provide your Credentials:
|
Option |
Description |
|---|---|
|
Username |
Provide your username to use when authenticating to the target. |
|
Object name |
Check your CyberArk Vault administrator and provide the object name. It is the name of the "secret" (which contains the specific credential). |
|
Override safe |
Provide a different safe name in case you wish to override the existing safe name. |
|
Override folder |
Provide a different folder name in case you wish to override the existing folder names. |
The Override settings provide the ability to change (override) them on a specific target.
-
Click Test to start a verification.
-
Click Save to enable the current settings.
Related Articles
- ServiceNow - Legacy
- Identity Provider Settings
- Okta Identity Provider Configuration
- Database Connector (HIAB only)
- Microsoft Entra ID (Azure AD) Identity Provider Configuration
- SNMP (HIAB only)
- ADFS Identity Provider Configuration
- Splunk
- Amazon
- Atlassian Jira
- Syslog (HIAB only)
- Thycotic
- OneLogin Identity Provider Configuration
- CyberArk
- LDAP/AD