Last updated: 2019-07-04
Purpose
This article provides information on how to set up and use either a Lightweight Directory Access Protocol (LDAP) or an Active Directory (AD) server with the HIAB.
Introduction
The LDAP/AD integration enables the HIAB platform to connect to an external directory service such as Lightweight Directory Access Protocol (LDAP) or Microsoft Active Directory (AD). This integration allows the system to authenticate users against the organization’s existing directory infrastructure instead of maintaining separate user accounts within the platform. By relying on centralized directory services, organizations can manage authentication and access control through their established identity management systems while maintaining consistent user information across environments.
In addition to authentication, the integration can also be used to import user accounts and network assets directly from the directory service into the scanning platform. User attributes such as names, email addresses, and group memberships can be mapped from the directory to the platform, enabling automatic assignment of roles and permissions based on organizational groups. The same directory data can also be used to discover and import devices that exist in the directory, allowing them to be added as scanning targets.
By integrating LDAP or Active Directory with the platform, organizations can centralize identity management, reduce administrative overhead, and ensure that vulnerability scanning targets and user access are aligned with the organization’s existing directory structure. This approach improves operational efficiency while supporting secure and consistent access management across the vulnerability management environment.
Setting up LDAP/AD
To set up LDAP/AD, follow the below procedure:
-
Go to Main Menu > Settings > Integrations.
-
Select LDAP/AD tab.
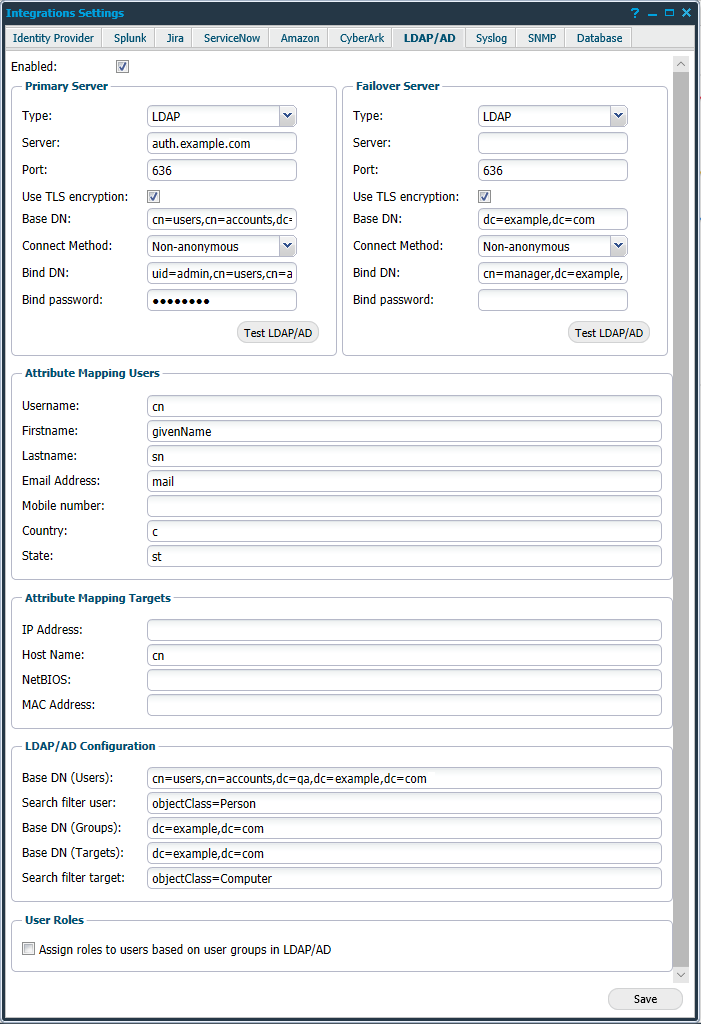
The elements of the LDAP/AD tab are described below:
-
Enabled: Tick to enable the use of LDAP/AD feature.
Primary Server and Failover Server
The system allows you to define both Primary Server and Failover Server.
The Failover Server is accessed if the Primary Server is unavailable when required. The following options are available for both Primary and Failover servers.
|
Option |
Description |
|
Type |
Select if you want to use an LDAP or an AD server to authenticate users against the directory, importing targets, and users into HIAB. |
|
Server |
Define the network location of the LDAP or AD server. |
|
Port |
Displays the default port used by LDAP or AD server when TLS encryption is enabled. Can be changed if required.
|
|
Use TLS Encryption |
Must be checked if the server use TLS (Transport Layer Security) during the connection phase. |
|
Base DN |
Enter the base domain name, ex: "dc=ad,dc=local" If you have an Active Directory server, then you should also provide the Domain in a simple form like "ad.local". This is used when we supply the username in the authentication process against the active directory server.
|
|
Connect Method |
Define if the connection should be Anonymous or Non-anonymous. Base DN is the domain where AD is located and Bind DN is the account which the HIAB should use to access the AD.
|
|
Bind DN |
If the Connect Method is Non-anonymous, provide the domain name to use when authenticating with the server. |
|
Bind Password |
Supply the Bind Password for the above domain name. |
|
Test LDAP/AD |
Once all the required settings are supplied, check the configuration by pressing Test LDAP/AD button for respective sections. |
Import and specific mapping settings for the user and target integration are located under respective settings sections.
Attribute Mapping Users
Provide the LDAP server attribute names that corresponds to the fields mentioned below.
|
Option |
Description |
|
Username |
Your username |
|
Firstname |
Your first name |
|
Lastname |
Your last name |
|
Email Address |
Your email address |
|
Mobile number |
Your mobile number |
|
Country |
Your country name |
|
State |
Your state name |
Attribute Mapping Targets
Provide the LDAP server attribute names that corresponds to the fields mentioned below.
|
Option |
Description |
|
IP Address |
Target IP address |
|
Host name |
Target hostname |
|
NetBIOS |
Target NetBIOS name |
|
MAC Address |
Target MAC address |
LDAP/AD Configuration
|
Option |
Description |
|
Base DN (Users) |
Enter the base domain name. This is used only when importing users. |
|
Search filter user |
Provide any phrase to filter further. |
|
Base DN (Groups) |
Enter the base domain name. This is used to import user groups when a user is authenticated. |
|
Base DN (Targets) |
Enter the base domain name. This is used only when importing targets. |
|
Search filter target |
Provide a phrase to filter further. |
User Roles
The User Roles section allows you to define if roles should automatically be assigned to imported user, based on already defined group belongings in the LDAP/AD tree. If enabled, you can define a matching field on each user role in the HIAB. If they match, that user role is then automatically assigned to the imported user. The matching field is present in the Maintaining User Role section when you edit or create a new role.
Example:
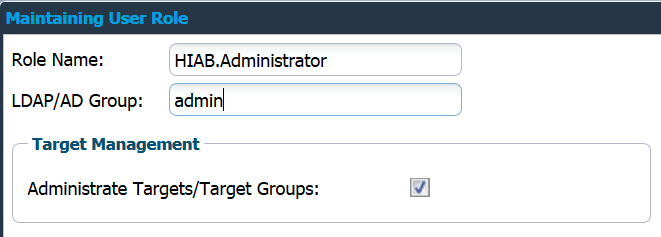
In the above example, HIAB.Administrator is automatically assigned to users that belong to the group admin in the LDAP/AD tree.
Click Save to save the current settings.
Integrate Users
Once the LDAP/AD feature has been enabled:
-
Go to Main Menu > Settings > Manage Users.
-
Click on Import from LDAP/AD in the Manage User Accounts section to open a window where you can filter which users to import into the system.

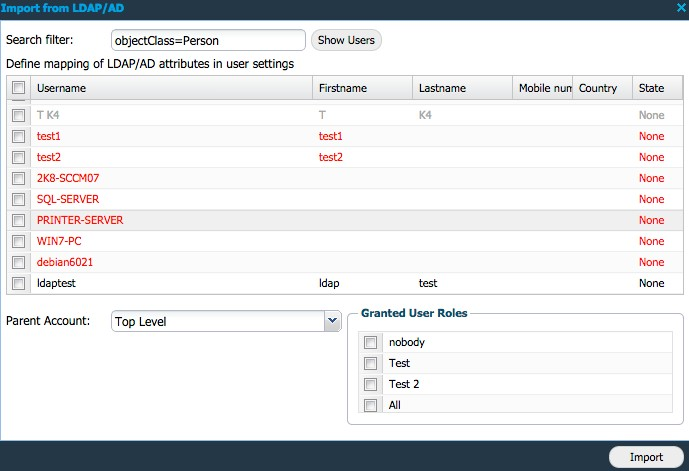
If the text is marked red as above, it implies that the user details either does not contain all required fields or it has content which is not allowed to use. Grey text indicates that the user already exists in the system.
A user is valid if the following criteria are fulfilled:
-
Username must be longer than 1 character.
-
First name must exist.
-
Last name must exist.
-
Email address must be valid.
Do not use any comma sign in any of the above inputs as it is interpreted as a comma separation.
If the country is omitted or not available, then it is set to the country of the logged in user. The country is used when selecting the time zone for the user so that the time is reported correctly in the GUI.
The Parent Account setting allows you to import users in different levels if required.
Mapping can be changed in Main Menu > Settings > Integrations > LDAP/AD
Verify Users
Once the user is imported, you can verify the authentication and see the associated groups for that user.
Go to Manage User Accounts, right click on the user and select LDAP/AD Lookup as shown below.
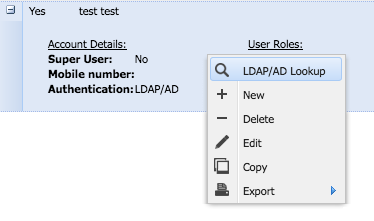
This displays the LDAP/AD Lookup window:
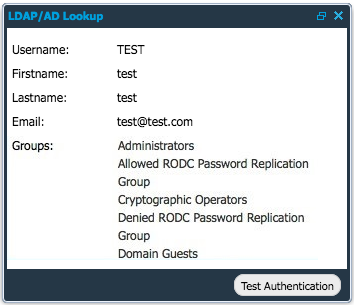
Only 10 groups are visible when doing the test authentication.
Here, you can view the different values for the user along with the defined groups associated with him/her.
Click on Test Authentication to verify the user's authentication.
Integrate Targets
Once the LDAP/AD feature has been enabled:
-
Go to Main Menu > Netsec > Manage Targets.
-
Click on Import from LDAP/AD while adding +New targets.
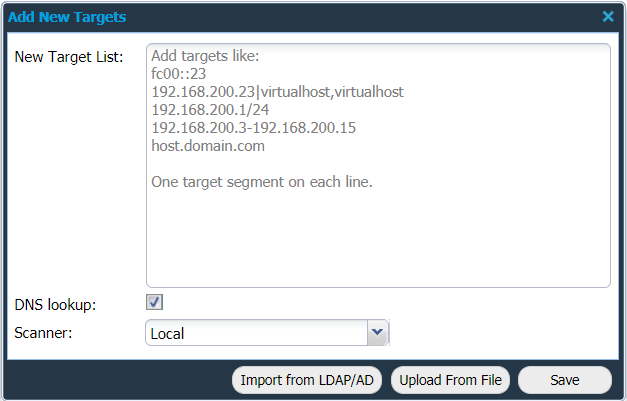
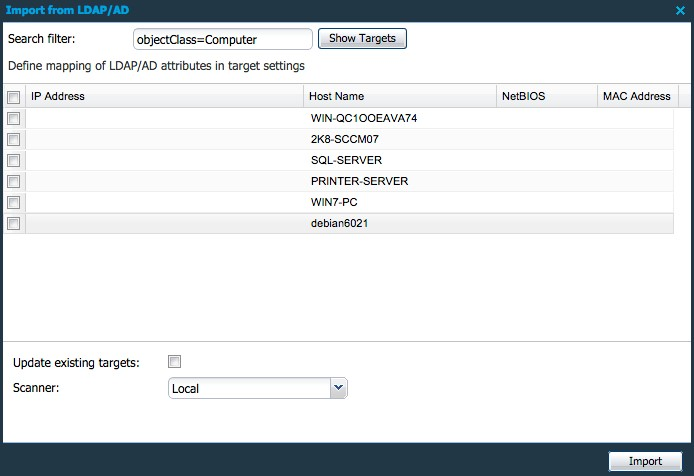
This opens a new window where you can filter which targets to import into the system. If the line is marked red then the target details either does not contain all required fields, or it has content that is not allowed to use.
A target is valid if the following criteria is provided:
-
IP address or hostname.
-
MAC address is formatted correctly. If applicable.
If Update existing targets checkbox is ticked, the Import updates the available targets.
The Scanner option is only available if you have a distributed environment (multiple HIAB instances connected) and it determines which scanner will execute the scans against those targets associated with it.
Mapping can be changed in Main Menu > Settings > Integrations > LDAP/AD.
Related Articles
- ServiceNow - Legacy
- Identity Provider Settings
- Okta Identity Provider Configuration
- Database Connector (HIAB only)
- Microsoft Entra ID (Azure AD) Identity Provider Configuration
- SNMP (HIAB only)
- ADFS Identity Provider Configuration
- Splunk
- Amazon
- Atlassian Jira
- Syslog (HIAB only)
- Thycotic
- OneLogin Identity Provider Configuration
- CyberArk
- LDAP/AD