Last Updated: 2024-01-18
Purpose
This document provides information to the appliance administrator/network technician on how to install and configure multiple HIAB appliances when setting it up for the first time in the organization’s environment.
Introduction
In Outpost24, the HIAB Distribution Settings feature supports scaling your scanning architecture by enabling multiple HIAB appliances to work in concert across locations. By pairing scanner and scheduler nodes, you can distribute scan workloads closer to target networks, reduce latency, and improve throughput. This distributed model ensures that scans are localized yet centrally controlled, provides resilience through appliance failover, and helps you manage larger environments efficiently.
Prerequisites
-
This document assumes that the reader has access to the HIAB.
-
Make sure that the HIABs can communicate over TCP port 443 with each other to use them in a distributed model.
Pairing Scheduler and Scanner
From Scheduler
Step 1: Add Scanners
Log in to the Scheduler appliance.
Go to Main Menu > Settings > Distribution.
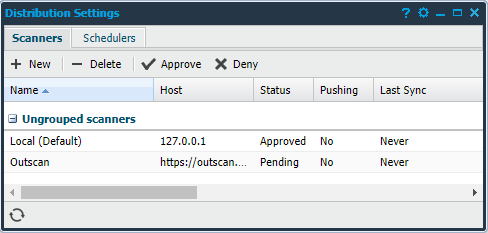
In the Scanners tab,
-
A HIAB to be used as a scanner is added.
-
The available HIABs to use as scanners are displayed.
After a scanner node has been approved, the HIAB is ready for distributed scanning.
To scan on different HIABs, you must define targets to execute on different scanner nodes.
OUTSCAN can be set as a scanner, only if the HIAB External license is available. This allows scans to be performed using OUTSCAN, and the reports are stored on the HIAB.
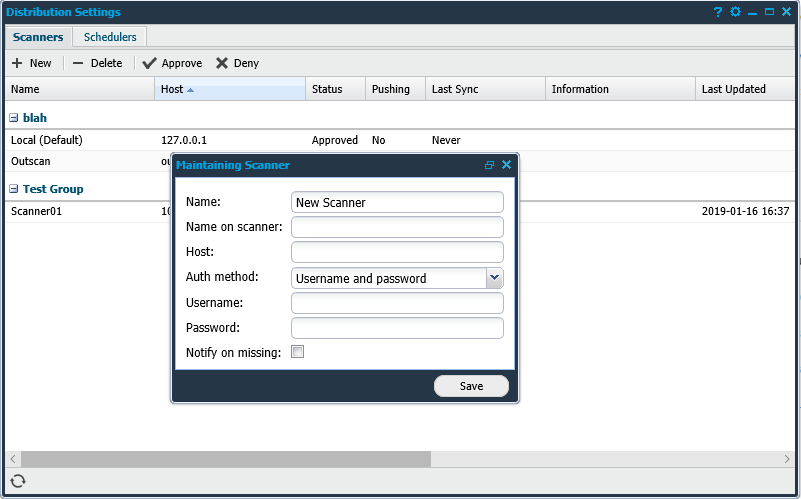
New is used to add a scanner appliance for the scheduler to communicate.
|
Option |
Description |
|---|---|
|
Name |
Provide a name to use for this scanner. |
|
Name on scanner |
Provide a name to use for this HIAB on the scanner. |
|
Host |
The IP address or host name of HIAB to be added as a scanner. |
|
Auth. method |
Choose between authentication methods.
|
|
Username |
Username of the main user on the HIAB to be added as a scanner. |
|
Password |
Password of the main user on the HIAB to be added as a scanner. |
|
Token |
Provide the token from the appliance that you want to add. See Access Tokens. |
|
Notify on Missing |
If enabled, sends a notification whenever communication to the scanner is not possible or in other words, if the scanner goes missing. |
Fill the required fields and click Save.
Unless an error message is shown, you have now registered the scanner on the scheduler HIAB.
Delete: Deletes the scanner from this HIAB. The deleted scanner is marked as inactive to allow it to re-register when required.
Approve/Deny: When a HIAB requests to be added as a scanner, that scanner must be approved or denied on the scheduler. Click Approve to allow, otherwise click Deny.
Step 2: Configure the Scanner
Any scanner under Pending status has two additional options when right-clicked, Approve and Deny.
Right-click on an entry to configure that scanner. Options vary depending on the type of the scanner.
Distributed HIABs
|
Option |
Icon |
Description |
|
|---|---|---|---|
|
Enable Pushing/ Disable Pushing |
|
To change the pushing mode, right-click the appliance and select Enable pushing or Disable pushing. Communication can be performed in either way. It is not recommended to enable polling/pushing in both directions. See Additional Information. |
|
|
Set as Default |
|
Sets the appliance as default scanner. |
|
|
Set as Normal/APPSEC SCALE scanner |
|
Toggle between a normal or APPSEC SCALE scanner. |
|
|
Assign to Group |
|
Assign to Group allows you to cluster scanners and select the group instead of an individual node when scanning. |
|
|
Update Now |
|
This option forces the scanner to perform an update immediately. |
|
|
Debug |
|
Debug will execute a tcpdump while trying to communicate with the selected server. All communication during that period will be dumped and displayed. |
|
|
Renew signature key |
|
Click to clear cache and refresh the signature key for the HIAB. |
|
|
New |
|
Used to create a new scanner appliance where the scheduler will communicate to the scanner. |
|
|
Delete |
|
Deletes the scanner from this HIAB. The scanner will be marked as inactive to allow it to re-register again. |
|
|
Edit |
|
Select Edit to change the name of the scanner. |
|
|
Audit Log |
|
Opens the audit log of the scanner. |
|
|
Export |
|
|
HTML: Exports the currently visible data as HTML. |
|
|
CSV: Exports the currently visible data to a .CSV file. |
||
OUTSCAN
|
Option |
Icon |
|
Description |
|
|---|---|---|---|---|
|
Approve |
|
Approves the appliance as scanner. |
||
|
Deny |
|
By clicking, implies that the selected appliance cannot be used as a scanner. |
||
|
Set as Default |
|
Sets the appliance as default scanner. |
||
|
New |
|
Used to create a new scanner appliance where the scheduler will communicate to the scanner. |
||
|
Delete |
|
Deletes the scanner from this HIAB. The scanner will be marked as inactive to allow it to re-register again. |
||
|
Edit |
|
You can also change the name of the scanner by selecting Edit. |
||
|
Audit Log |
|
Opens the scanners Audit Log. |
||
|
Export |
|
|
HTML: Exports the currently visible data as HTML. |
|
|
|
CSV: Exports the currently visible data to a .CSV file. |
|||
Local Host
|
Option |
Icon |
Description |
||
|---|---|---|---|---|
|
Set as Normal/APPSEC SCALE scanner |
|
Allows to toggle between a normal or APPSEC SCALE scanner. This option is available only if it is an external device. It is not possible to turn the scheduler into a Scale scanner, a new/second scanner must be deployed for the purposes of Scale scanning.
|
||
|
Assign to Group |
|
Assign to Group allows you to cluster scanners and select the group instead of an individual node when scanning. |
||
|
New |
|
Used to create a new scanner appliance where the scheduler will communicate to the scanner. |
||
|
Delete |
|
Deletes the scanner from this HIAB. The scanner will be marked as inactive to allow it to re-register again. |
||
|
Audit Log |
|
Opens the audit log of the scanner. |
||
|
Export |
|
|
HTML: Exports the currently visible data as HTML. |
|
|
|
CSV: Exports the currently visible data to a .CSV file. |
|||
View
Clicking on the arrow next to the name of any column allows you to customize the columns to be displayed. The available options are:
|
Column |
Description |
|
Active |
Displays if the scanner is active or not. |
|
AWS Scanner |
Displays if the scanner is an Amazon Web Services scanner or not. |
|
Host |
Displays the IP address or host name of the scanner. |
|
Information |
Displays the additional information about the status. |
|
Last Sync |
Displays the timestamp when the scanner last reported to the Scheduler. |
|
Last Updated |
Displays when the scanner was last updated. |
|
MAC Address |
Displays the MAC address of the scanner. |
|
Name |
Displays the name of the scanner. |
|
Pushing |
Determines if the scheduler should connect to the scanner. |
|
Rules Version |
Displays the current version of the rules on the connected device. |
|
Scanner Type |
Displays if the scanner is set up as a normal or APPSEC SCALE scanner. |
|
Scanning Disabled |
Displays if Scanning is disabled or not. |
|
Scanning Engine Version |
Displays the current Scanning Engine Version on the connected device. |
|
Status |
Displays if the scanner is approved or not. |
|
UI Application Version |
Displays the current UI Application version on the connected device. |
|
Use Proxy |
Enable, if this connection should communicate over the defined proxy server. It should be configured in the Server Settings. |
|
XML Application Version |
Displays the current XML Application version on the connected device. |
Step 3: Approve / Deny Scheduler
To approve or deny the request sent by Scheduler, log in to the Scanner appliance.
Go to Main Menu > Settings > Distribution.
In the Schedulers tab, available schedulers are displayed.
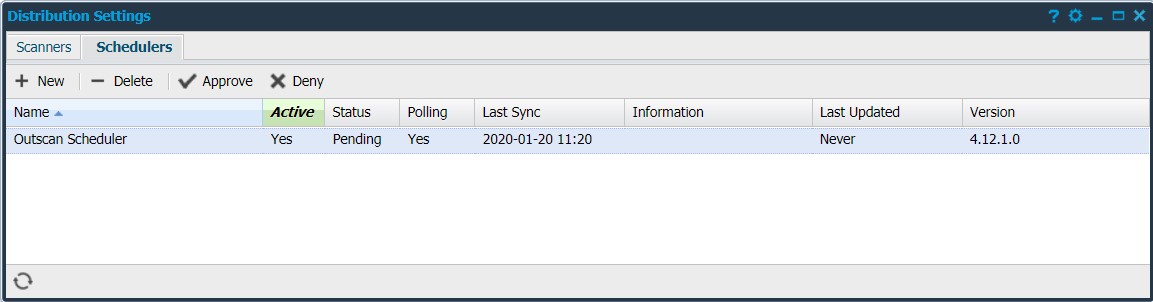
-
Scheduler status displays pending until it is approved.
-
Select the scheduler and right-click to approve the communication.
Reregister Scanner
If a scanner has been deleted from a single instance in the distributed setup, the status is marked as No under Active column.
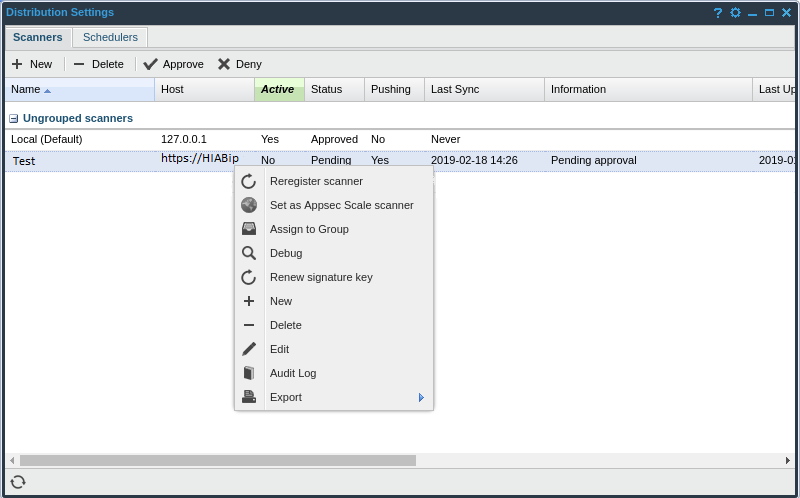
To re-register a deleted scanner:
-
Right-click on that entry.
-
Select Reregister scanner.
-
It opens the maintaining scanner window with the predefined data. Update the required fields and click Save.
-
The appliance needs to be approved to enable it as a scanner.
From Scanner
To initiate the communication between scheduler and scanner from the scanner,
Log in to the Scanner appliance.
Step 1: Add Scheduler
Go to Main Menu > Settings > Distribution.
In the Schedulers tab,
New sends a request to a scheduler HIAB.
|
Option |
Description |
|---|---|
|
Name |
Provide a name to use for this scheduler. |
|
Name on Scheduler |
Provide the name of the HIAB displayed on the scheduler. |
|
Host |
Displays the IP address or host-name of the scheduler. |
|
Auth. method |
Choose between authentication methods. • Username and password
|
|
Username |
Provide the user name of the main user on HIAB scheduler. |
|
Password |
Provide the password of the main user on HIAB scheduler. |
|
Token |
Provide the token from the appliance that you want to add. See Access Tokens. |
Delete: Deletes the scheduler from this HIAB. By doing this, the scheduler is not allowed to run distributed scans on this HIAB any longer.
Approve is used to approve a scheduler when the scheduler adds the scanner.
Deny is used to deny the request.
Step 2: Configure the Scheduler
Right-clicking on any Scheduler name provides you with a drop-down menu for that specific scheduler.
|
Option |
Icon |
Description |
|
|---|---|---|---|
|
Debug |
|
Debug will execute a tcpdump while trying to communicate with the selected server. All communication during that period will be dumped and displayed. |
|
|
New |
|
Used to create a new scanner appliance where the scheduler will communicate to the scanner. |
|
|
Audit Log |
|
Opens the Schedulers Audit log. |
|
|
Export |
|
|
HTML: Exports the currently visible data as HTML. |
|
|
CSV: Exports the currently visible data to a .CSV file. |
||
View
Clicking on the arrow next to the name of any column allows you to customize what columns will be shown out of the following:
|
Column |
Description |
|
Active |
Displays if the scanner is active or not. |
|
Host |
Displays the IP address or hostname of the scanner. |
|
Information |
Displays the additional information about the status. |
|
Last Sync |
Displays the timestamp when the scanner last reported to the HIAB. |
|
Last Updated |
Displays when the scanner was last updated. |
|
MAC Address |
Displays the MAC address of the scanner. |
|
Name |
Displays the name of the scanner. |
|
Polling |
Determines if the scanner will connect to the scheduler. |
|
Status |
Displays if the scanner is approved or not. |
|
Use Proxy |
Enable, if this connection should communicate over the defined proxy server. |
|
Version |
Displays the current version on the connected device. |
Step 3: Approve / Deny Scanner
To approve or deny the request sent by Scheduler, log in to the Scheduler appliance.
Go to Main Menu > Settings > Distribution.
In the Scanners tab, requested scanners list is displayed.
To pair the scheduler to the scanner:
-
Click on the row that has the previously supplied scanner name.
-
Click on the Approve button.
The two appliances are now paired and distributed scanning is available.
Communication Direction
To change the communication direction, first disable the active mode on relevant appliance, and then enable the desired mode . If the communication is set up so it communicates in both directions, it reverts to the Scanner polling the Scheduler by default.
Example: When pushing mode is enabled, disable pushing for relevant scanner in the Scanner tab on the Scheduler, then enable polling in the Scheduler tab on the Scanner.
Pairing
Once the appliances are paired, re-pairing is not required even if the IP changes. Update the information on the scanner where it can locate the scheduler.