Purpose
This document provides users with a comprehensive overview of the Compliance scanning from HIAB or OUTSCAN.
Introduction
A compliance scan is performed to assess a target against a set of rules as per security standards. The result shows if the target is compliant with the standards selected for the scan.
Compliance scanning can not be performed by agents.
Requirements
This document has been elaborated under the assumption the reader has access to the HIAB or OUTSCAN account, and Portal Interface.
To access the Compliance Scanning module, go to:
Main Menu > Compliance Scanning.
Run a Compliance Scan
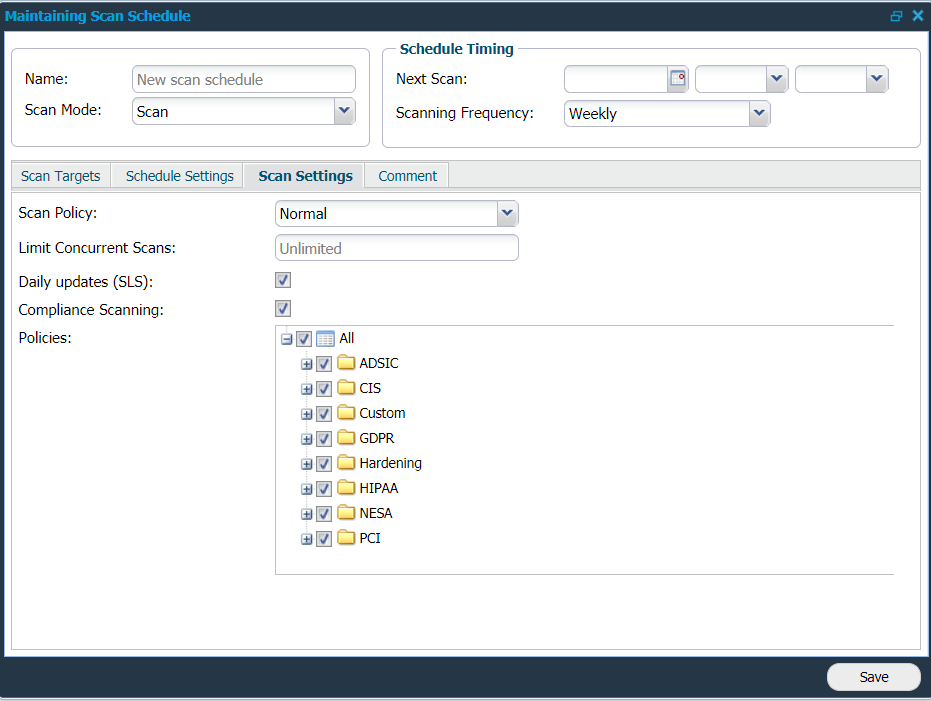
Scans must be scheduled through Scan Scheduling.
-
Go to Main Menu > Netsec > Scan Scheduling.
-
Click Edit or New scan schedule to open Maintaining Scan Schedule window.
-
Select targets to scan.
-
Set the required schedule settings.
-
Enable Compliance Scanning checkbox, including one or more security standards, located under Scan Settings.
-
You can browse each folder and set specific item to run against each target.
Example: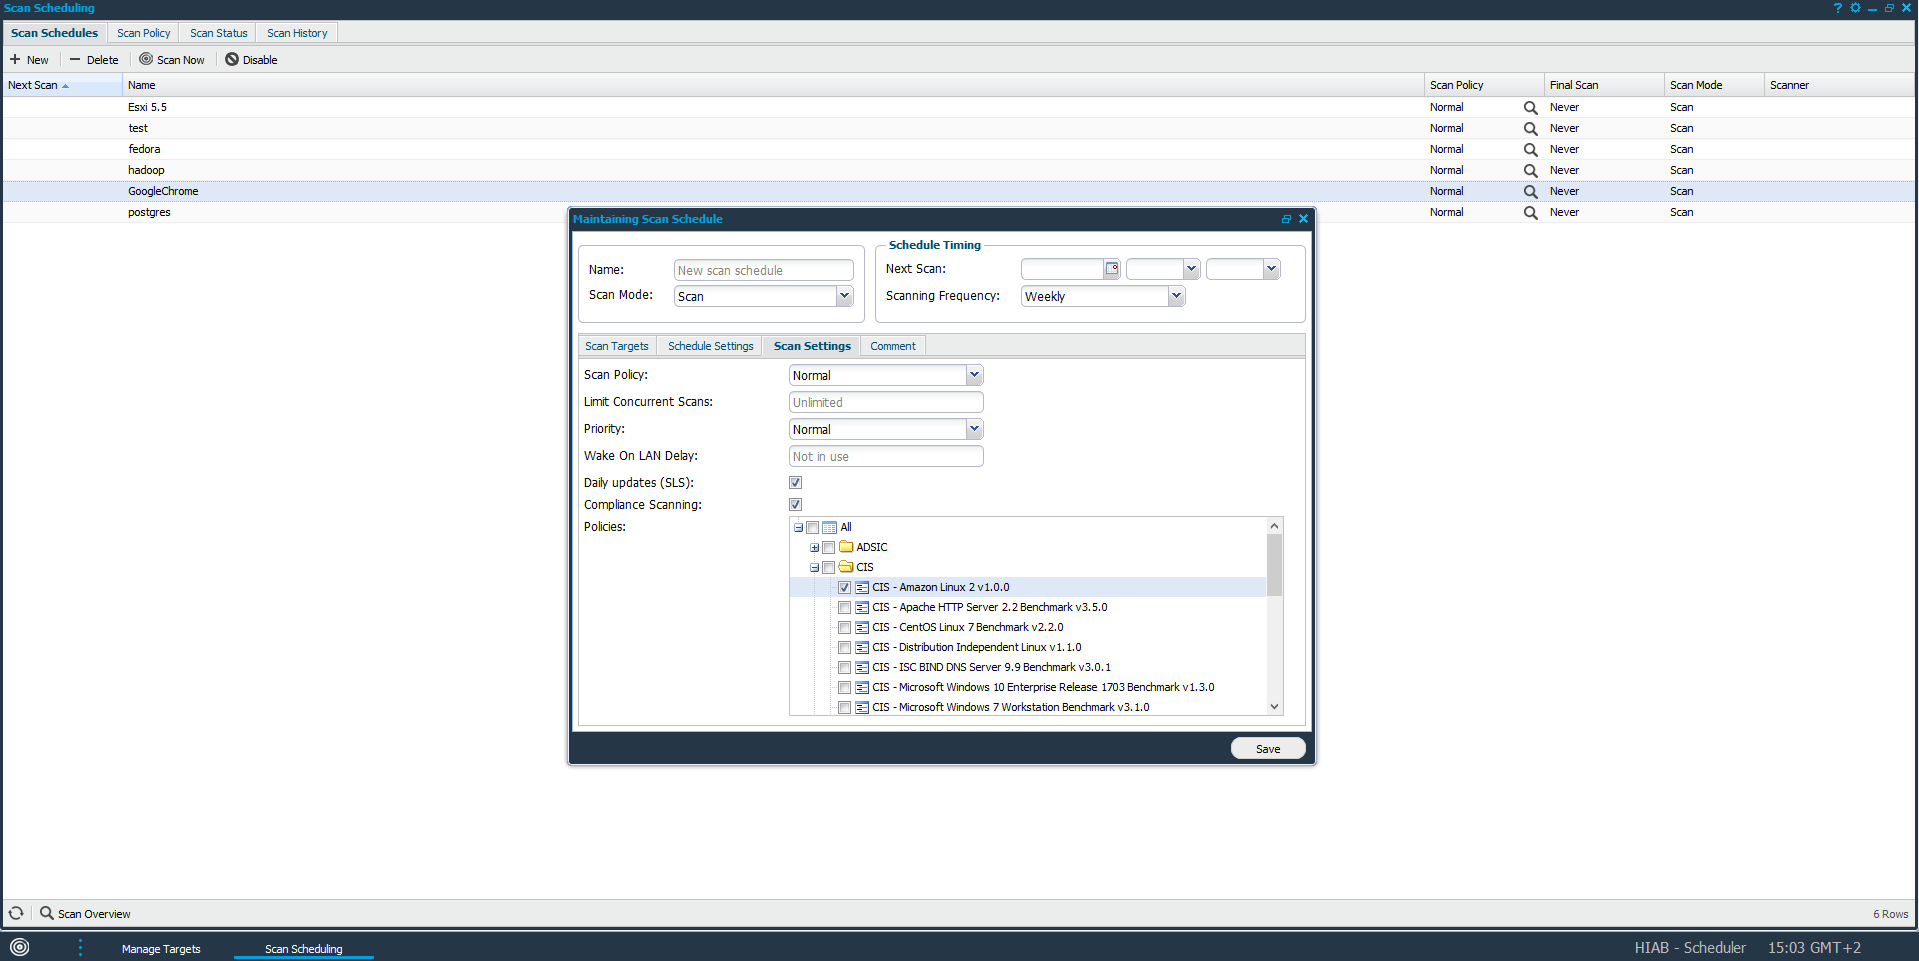
-
-
Click Save to enable the changes.
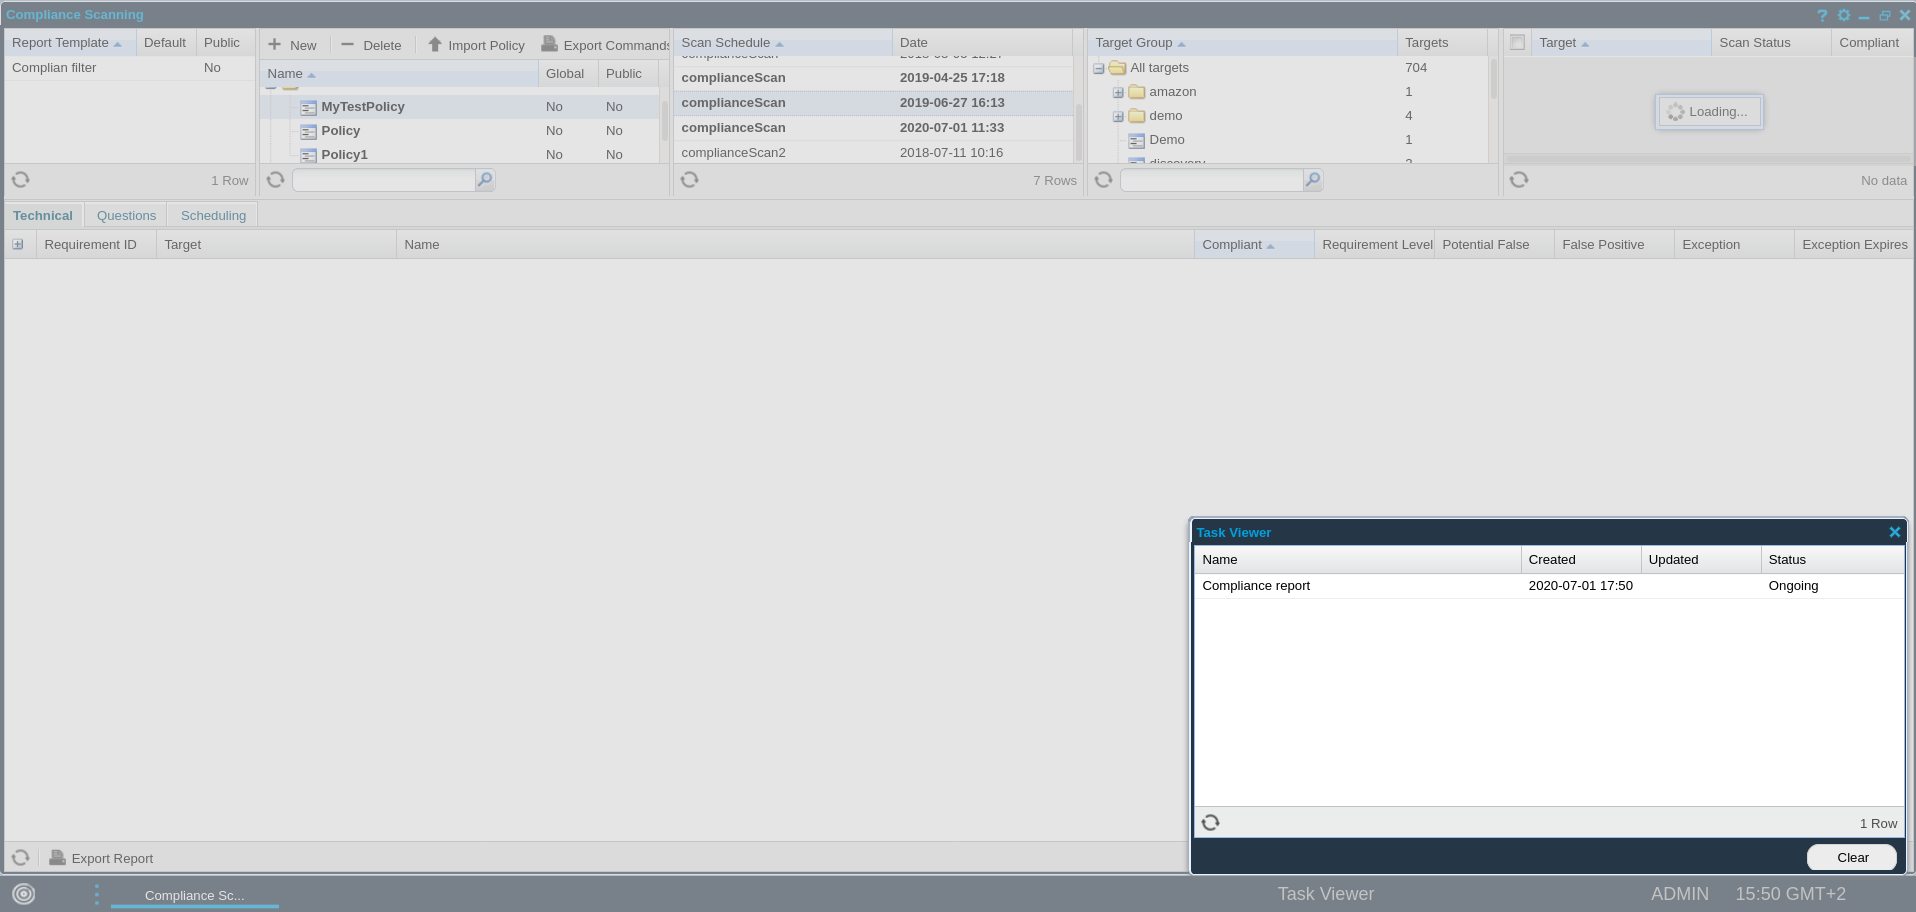
The interface is divided into two sections, Top and Lower. Refer to the respective sections for detailed information.
Top Section
This section is used to set the required parameters in creating a report. A compliance report is created for each scan of a target.
The compliance policy and scan schedule are the mandatory parameters. Target group and Target are optional parameters to further refine the report.

Generating the Compliance report for a compliance policy based on current findings may take a long time. When it takes more than 90 seconds, the progress can be viewed in the Task Viewer tab located at the bottom right of the task bar. Task Viewer appears for a user only if there is at least one task in the list. The three possible states for a task appearing in Task Viewer are:
-
In Progress
-
Done
-
Error

Select Report Template
The Report Template grid is displayed in the top left corner of the window when there is a saved report template. It is not visible the first time you access the Compliance module.
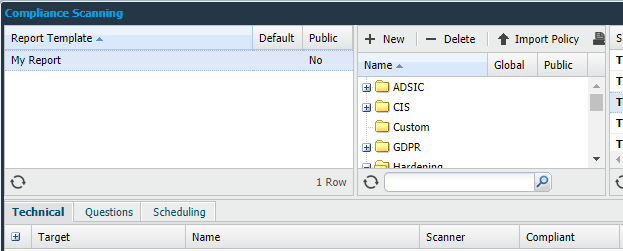
Select Compliance Policy
A compliance policy is a hierarchical representation of set of rules defined for an application or an operating system. These predefined sets of rules include single or multiple requirements. It is checked against a target when a compliance scan is performed.
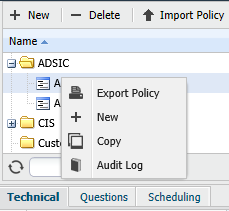
Select policies from the list, to check the compliance status associated with that policy. By right clicking any policy, the following options are presented:
|
Option |
Description |
|
Export Policy |
Export the selected policy, this saves the policy locally as a .xml file. |
|
New (user defined) |
Add a new policy. A New compliance policy can be added to implement compliance checks based on the requirements of the organization.
|
|
Copy |
Copy settings of the selected policy to customize a policy when required. |
|
Audit Log |
View the audit log for the selected policy. It contains the list of changes done on the policy like, requirement, date and username. |
New and Copy actions create policies under Custom folder. Only policies that are available in the Custom folder are editable.
Add a New Compliance Policy / Edit Compliance Policy
Outpost24 provides a generic set of rules that are tied up to the respective security standards. Similarly, rules that are organization specific can be added using + New or Copy functionalities in combination with Inherit Policy.
To create a compliance policy, click + New, or right-click an existing policy and select Copy to open the Edit Compliance Policy window.
+ New
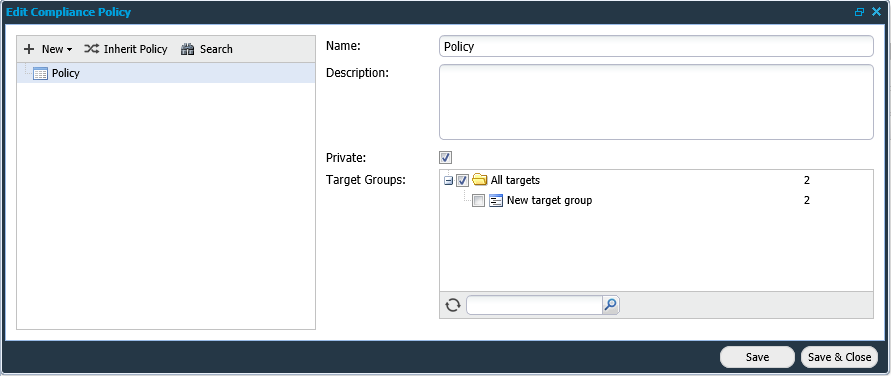
The following attributes are configurable:
|
Option |
Description |
|
Name (Required) |
Provide a name for the policy. |
|
Description (Required) |
Define the behavior of the policy. |
|
Private |
Choose if the policy should be private or public, and if it should be accessible by all the sub users of a user. |
|
Target Groups |
Apply policy to specific target groups. |
Click on the Save & Close button to apply the settings. Click on Save to continue editing the new policy by adding a list of user-defined requirements.
Create a Requirement
A requirement, commonly referred as rule, is a condition to be either fulfilled or not. During a compliance scan, it is required that all the requirements of the policy are met, for targets to be compliant with that policy.
A requirement can be added only to a new policy or when customizing an existing policy.
Requirements can be organized as a hierarchy tree. It is convenient for categorizing and maintaining subsets of requirements.
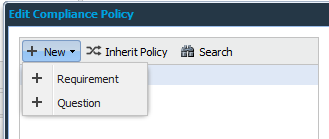
Click on + New and then + Requirement to add a new requirement.
Enter the required information and click on the Save or Save & Close button.
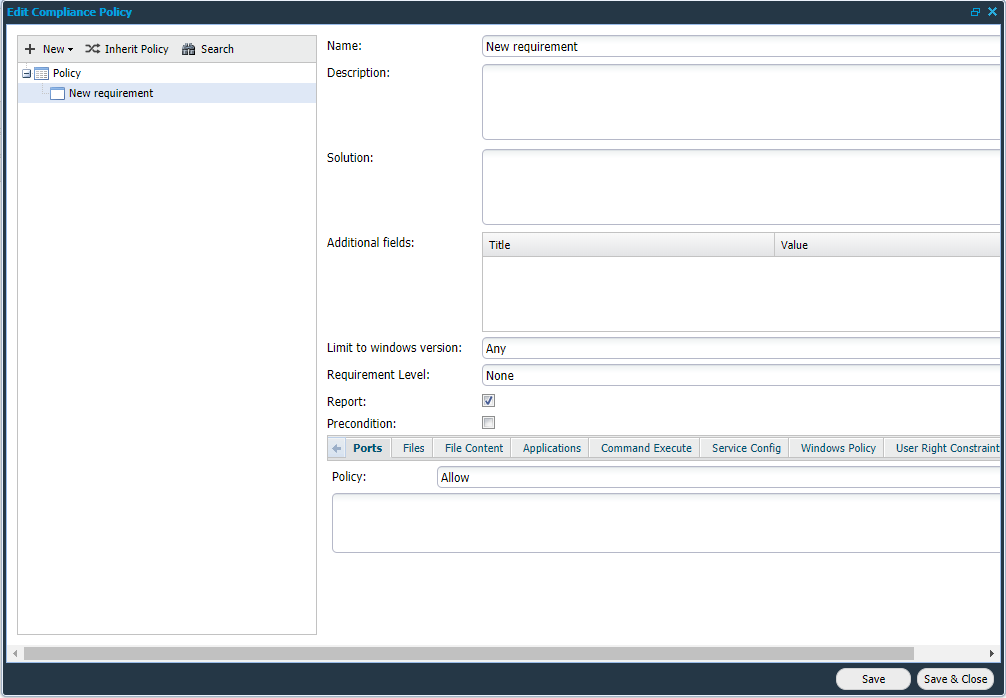
The following attributes are configurable:
|
Option |
Description |
|
Name (Required) |
Provide a name for the requirement. |
|
Description (Required) |
Describe the behavior of the new requirement and the impact if the requirement is not fulfilled. |
|
Solution (Required) |
Provide the steps to remediate. |
|
Additional fields |
Right-click in this field and choose New to add additional fields to the requirement. These are shown whenever you expand the requirement in the report. |
|
Limit to windows version |
Whitelist a requirement for that specific version of windows. |
|
Requirement Level |
Set the level of importance depending on the nature of the requirement. None: No level is set. Best Practice: By selecting this, you set the requirement as optional. It lowers the attack surface of your organization. Critical: By selecting this, you set the requirement as mandatory. Failure leads to decrease in the final benchmark score. |
|
Report |
By unchecking, this specific requirement will not be reported in the compliance report. |
|
Precondition |
If Precondition is enabled, it checks if the parent requirement is met before evaluating the child requirement. The test does not proceed to the child requirement if the parent requirement is not met. All sub-requirements saved under it are part of the scan if and only if the preconditions are met. 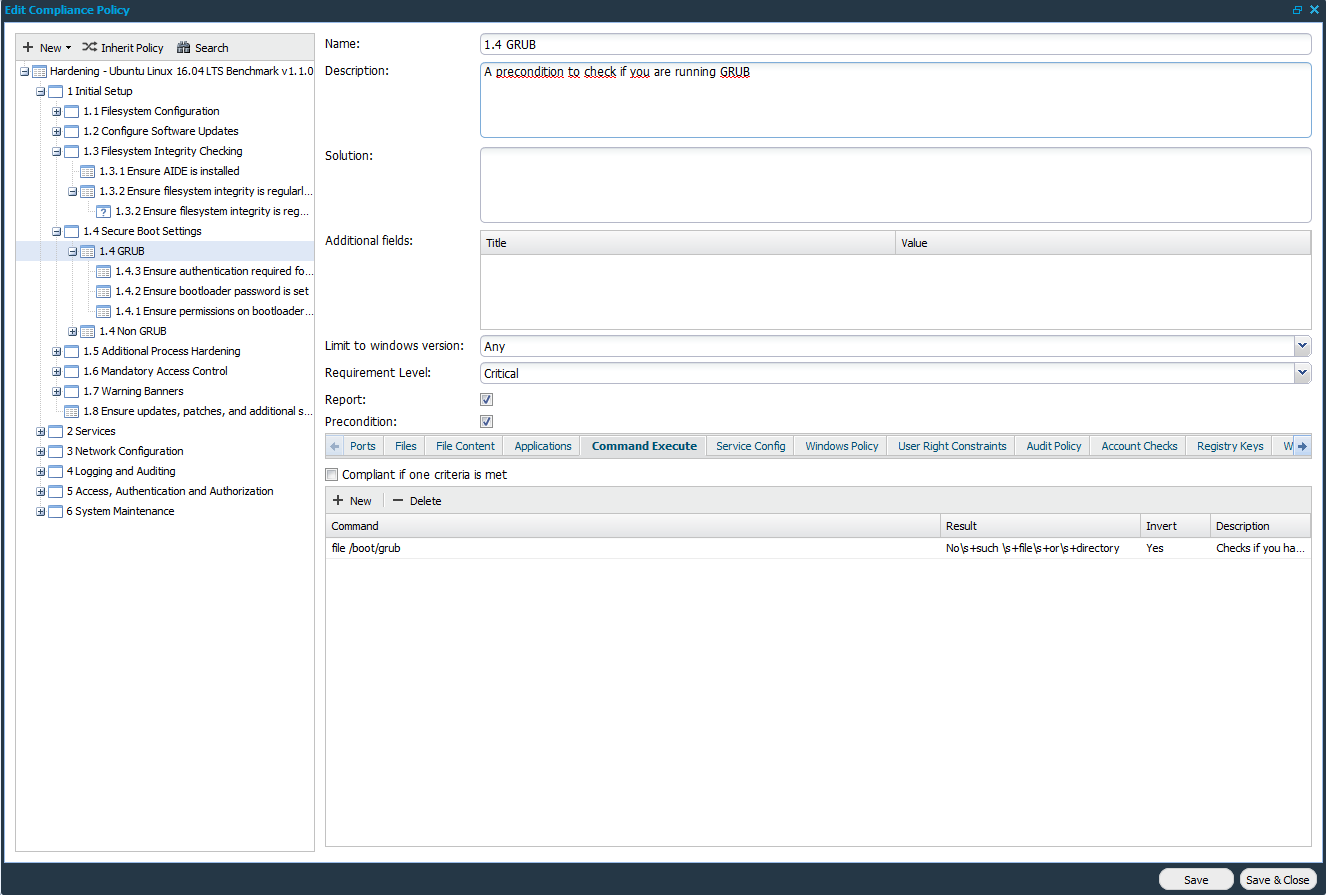
|
When a requirement is not fulfilled, the compliance test fails, and the status is returned as not compliant.
At the bottom of the Edit Compliance Policy window, there are several tabs where you can configure various requirements for Linux, Windows, Applications, Databases and so on. They are:
Ports
Indicate which ports should be allowed or disallowed.
Choose a policy to apply:
-
Disallow
-
Allow
-
Exactly
Files
Identify the files permission level that shall be enforced. Set the permission level on files. A requirement applies to a single file. You can define several individual file permissions, one per line.
Only applicable in Linux.
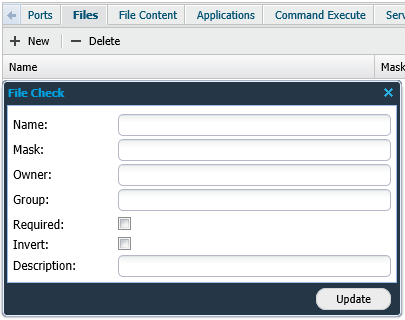
|
Option |
Description |
|
Name (Required) |
Provide the absolute path of the file. |
|
Enter the octal value of file permissions. For example, 640. |
|
|
Owner |
Provide the owner of the file. |
|
Group |
Provide the group owner of the file. |
|
Required |
Enforce to check if the file exists. The test fails if the file does not exist in the given path. |
|
Invert |
Invert the test. |
|
Description (Required) |
Provide the requirement description. Example: 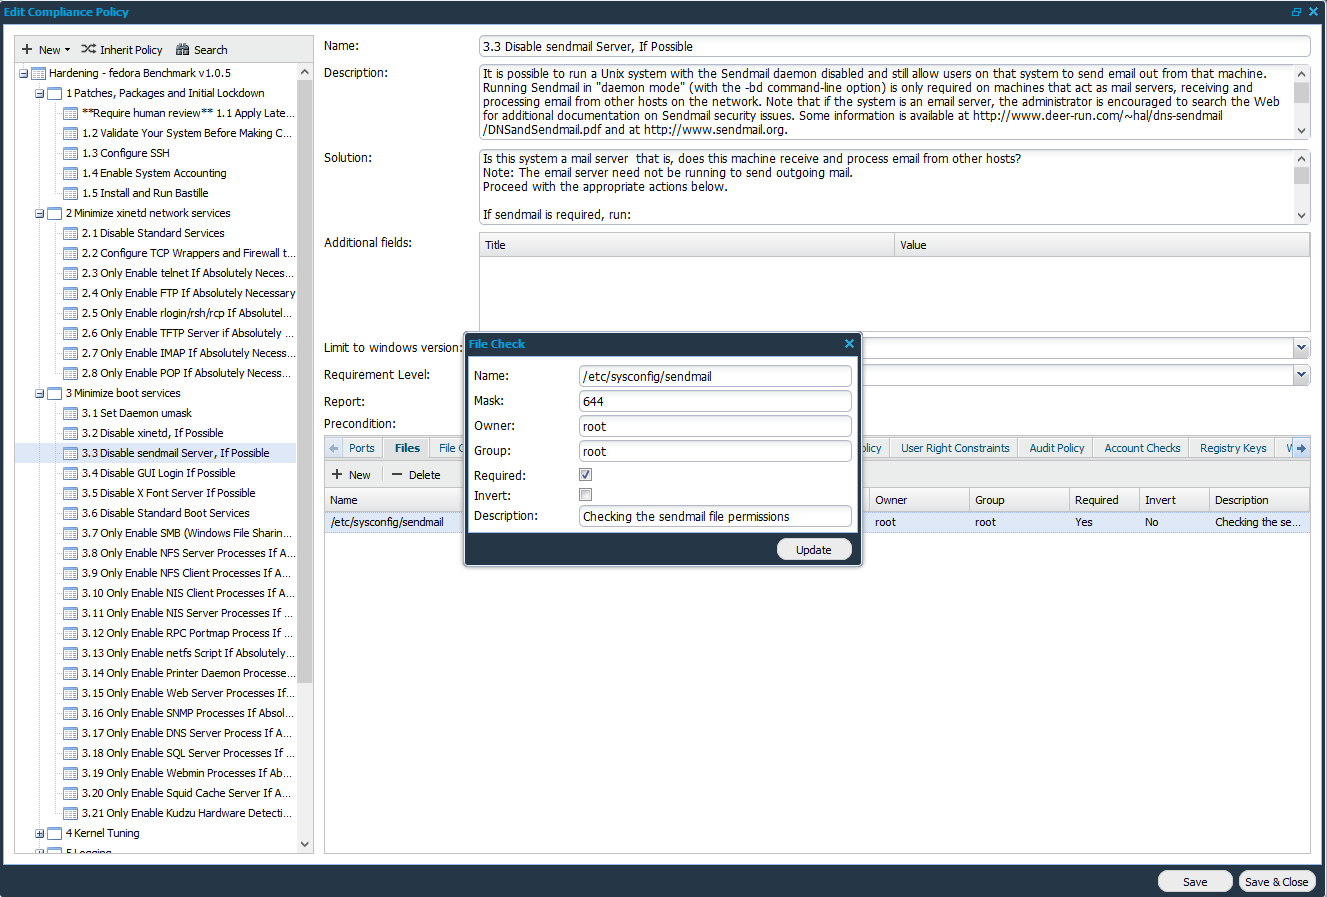
|
Click Update to save the changes.
Mask
Mask consists of octal representation of the expected file permissions.
File permissions are constructed by combinations of
-
Read (4)
-
Write (2)
-
Execute (1)
and each position represent either the user(owner), group, or other (all other users). Scanner treats OR between different combinations of each position and AND between each position.
If the file has the permission 640, it means that the file has read(4) + write(2) for the user, and read(4) for the group, and no permissions (0) for all other.
The scanner checks each position, first 6 then 4 and then 0. The value 6 (Read + Write) is created by combining 4 (read) and 2 (write). So, the possible combinations are 6, 4, and 2 (read+write, read, and write).
The scanner interprets as 6 or 4 or 2 or 0 AND 4 or 2 or 0 AND 0, (6|4|2|0) & (4|2|0) & (0). This returns a positive if found.
If the file has the permission set as 740, read+write+execute for the user, the scanner would return a negative, since execute=1 is not part of the expected combinations.
File Content
Provide the details of the content to be checked in a file.
Only applicable in Linux.
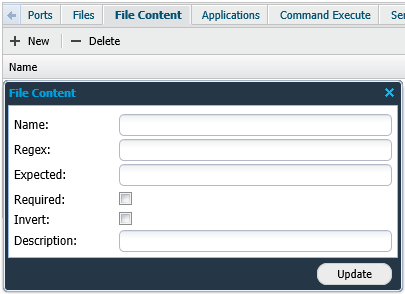
|
Option |
Description |
|
Name (Required) |
Provide the absolute path of the file. |
|
Regex (Required) |
Provide the POSIX extended regular expression to select set of lines. Example: ‘^user =*’ gives lines starting with ‘user=’ Expressions are case sensitive. |
|
Expected (Required) |
Provide the POSIX extended regular expression for what is expected to be present in the selected set of lines. |
|
Required |
Enforce to check if the file exists. The test fails if the file does not exist in the given path. |
|
Invert |
Invert the test. |
|
Description (Required) |
Provide the requirement description. |
Click Update to save the changes.
Applications
Add applications that needs to be checked. Version number of the installed application can also be added to the check.
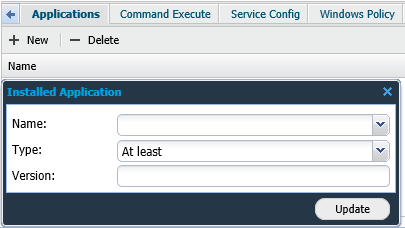
|
Option |
Description |
|
Name (Required) |
Select name of the application from the drop-down list. |
|
Type |
When comparing with the version number of the application, choose between:
|
|
Version |
Mention the version of the application. Setting the version to 0 matches everything.
|
Click Update to save the changes.
Command Execute
Provide the Linux command to be executed on the target.
Only applicable in Linux.
When there are several commands, enabling the Compliant if one criterion is met box executes all commands as if connected with an OR function, and only require one criterion to be compliant. If Compliant if one criterion is met is left unchecked, it is needed that all criteria is met.
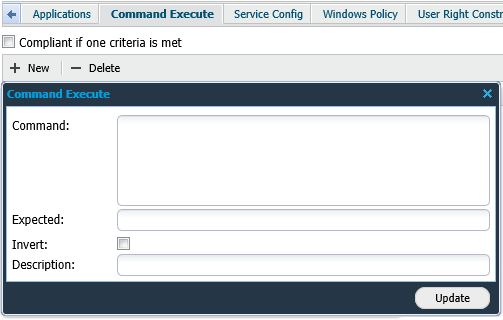
|
Option |
Description |
|
Command (Required) |
The Linux command to be executed on the target. The command may be prefixed with sudo escalation when substitute command is selected in Authentication tab and need to be written supporting such style. In other words, pipes with greps run with lower privileges.
|
|
Expected (Required) |
Provide the expected result. |
|
Invert |
Invert the test. |
|
Description (Required) |
Provide the requirement description. |
Click Update to save the changes.
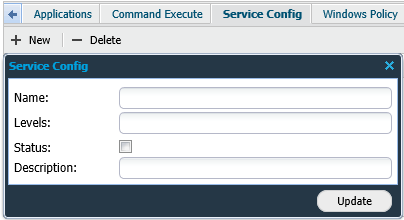
Service Config
The Service Config tab checks the levels of a service running on an initd system. Provide the details of the service config.
Only applicable in Linux.
|
Option |
Description |
|
Name (Required) |
Provide a name for the service. |
|
Levels |
Define the level(s) of the service. |
|
Status |
Set if the service should be enabled or disabled. |
|
Description (Required) |
Provide the requirement description. |
Click Update to save the changes.
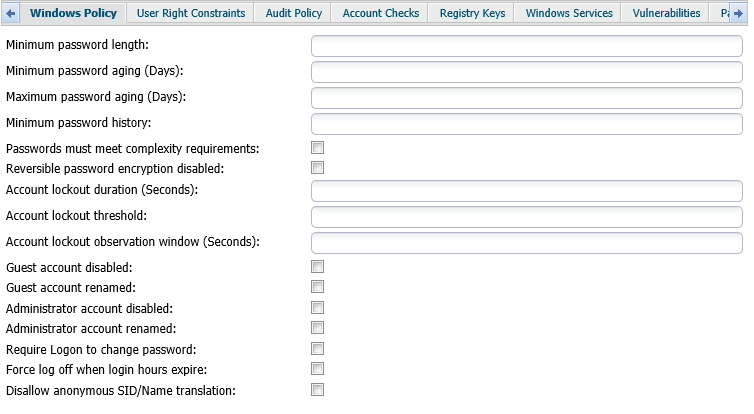
Windows Policy
Allows you to check various user settings like passwords, password length, and so forth.
Only applicable in Windows.
|
Option |
Description |
|
Minimum password length |
The minimal length of the password. |
|
Minimum password aging (Days) |
Minimum number of days after the password can be changed. |
|
Maximum password aging (Days) |
Maximum number of days after the password must be changed. |
|
Minimum password history |
Number of previous passwords that the user cannot use. |
|
Passwords must meet complexity requirements |
Tests, when enabled, if passwords meet the password complexity requirements. |
|
Reversible password encryption disabled |
Tests, when enabled, if reversible password encryption is disabled. |
|
Account lockout duration (Seconds) |
The amount of time, in seconds, that an account can be locked due to Lockout-Threshold being exceeded. |
|
Account lockout threshold |
Maximum number of invalid logon attempts that are permitted before the account is locked out. |
|
Account lockout observation window (Seconds) |
The range of time, in seconds, in which the system increments the number of incorrect logon attempts. |
|
Guest account disabled |
Enabling this adds checks to test if account for Guest user, a user with privilege level 0, is disabled. |
|
Guest account renamed |
Enabling this adds checks to test if account for Guest user, a user with privilege level 0, is renamed. |
|
Administrator account disabled |
Enabling this adds checks to test if account for Administrator user, a user with privilege level 2, is disabled. |
|
Administrator account renamed |
Enabling this adds checks to test if account for Administrator user, a user with privilege level 2, is renamed. |
|
Require Login to change password |
Enabling this adds checks to test if it is required to be logged in to change the password. |
|
Force logoff when login hours expire |
Enabling this adds checks to test if the user is logged off when the login hours has expired. |
|
Disallow anonymous SID/Name translation |
Enabling this adds checks to test if anonymous SID/Name translation is disallowed. |
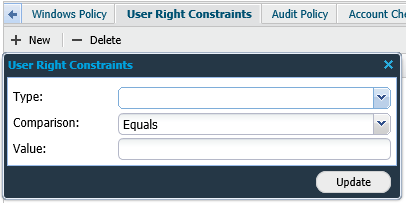
User Right Constraints
Allows you to check the user/group privileges on various services. Set the user privileges.
Only applicable in Windows.
|
Option |
Description |
|
Type (Required) |
Choose from the drop-down list. |
|
Comparison |
Select the condition:
|
|
Value |
Provide a semi-colon separated list of users or groups applicable to chosen user right. |
Click Update to save the changes.
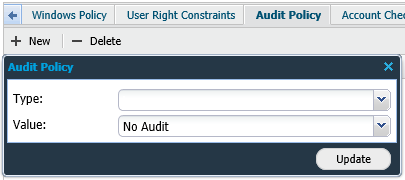
Audit Policy
Allows you to check the audit levels set to various operations. Set the required Audit Policy and an Audit Event.
Only applicable in Windows.
|
Option |
Description |
|
Type (Required) |
Select audit policy from the drop-down list. System
|
|
Logon/Logoff
|
|
|
Object Access
|
|
|
Privilege Use
|
|
|
Detailed Tracking
|
|
|
Policy Change
|
|
|
Account Management
|
|
|
DS Access
|
|
|
Account Logon
|
|
|
Value |
Choose the Audit Level to test:
|
Click Update to save the changes.
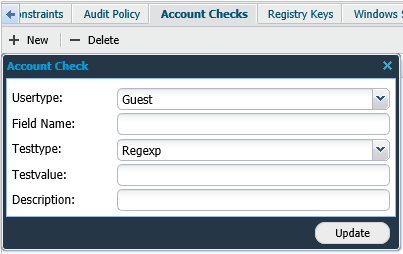
Account Checks
Allows you to check for various properties of a user type.
Only applicable in Windows.
|
Option |
Description |
|
Usertype |
Choose the type of user:
|
|
Field Name (Required) |
Define the structure you want to check against the usertype. Example: name, password_age, code_pages. |
|
Testtype |
Choose the type of test:
|
|
Testvalue (Required) |
Provide the expected test value to compare against the result. |
|
Description (Required) |
Provide the requirement description. |
Click Update to save the changes.
Registry Keys
Allows you to conduct checks on a registry key value pair. Define policy on Windows keys.
Only applicable in Windows.
|
Option |
Description |
|
Path (Required) |
Provide the registry path. |
|
Key (Required) |
Define the Windows key. |
|
Type |
Choose between:
|
|
Value |
Provide the value for the Windows key. |
|
Description (Required) |
Describe the behavior of the check. |
Click Update to save the changes.
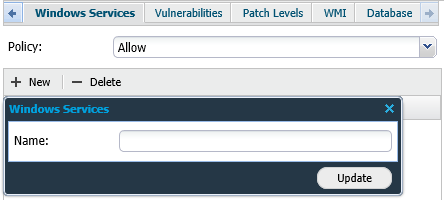
Windows Services
Set the policy on the Windows services the system should contain.
Only applicable in Windows.
|
Option |
Description |
|
Policy |
Choose between:
|
|
Name (Required) |
Provide a name for the service. |
Click Update to save the changes.
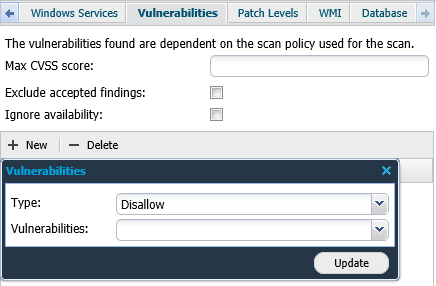
Vulnerabilities
Allows you to check existence of specific vulnerabilities on the target. The vulnerabilities found depends on the scan policy used for the scan.
While running a Compliance Only scan, it is triggered as non-compliant.
|
Option |
Description |
|
Max CVSS score |
Define the maximum CVSS scoring allowed on the target. |
|
Exclude accepted findings |
Enable to exclude all accepted findings. |
|
Ignore availability |
Enable to ignore a vulnerability which only has an availability impact. |
|
Type |
Choose between:
|
|
Vulnerabilities (Required) |
Define the vulnerability that should be required or disallowed on the target. |
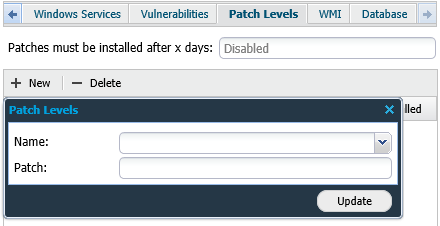
Patch Levels
Allows you to check for patches installed on the target. Select the application and add the patch information for the fix.
While running a Compliance Only scan, it is triggered as non-compliant.
|
Option |
Description |
|
Patches must be installed after x days |
Provide the number of days. |
|
Name (Required) |
Define the application name. |
|
Patch (Required) |
Set the patch level. |
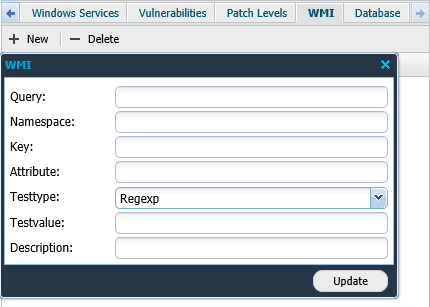
WMI
Allows to run Windows Management Instrumentation (WMI) on the target. Define WMI queries to be executed on the target.
|
Option |
Description |
|
Query (Required) |
Enter the WMI Select* query. |
|
Namespace (Required) |
Provide the WMI namespace. |
|
Key (Required) |
Provide the Key. A Key qualifier indicates whether the content is part of the namespace. |
|
Attribute (Required) |
Name of the column that should be tested in the namespace of the given query. |
|
Testtype |
Choose the type of test:
|
|
Testvalue (Required) |
Provide the expected test value to compare against the results of the query. |
|
Description (Required) |
Describe the check. |
Click Update to save the changes.
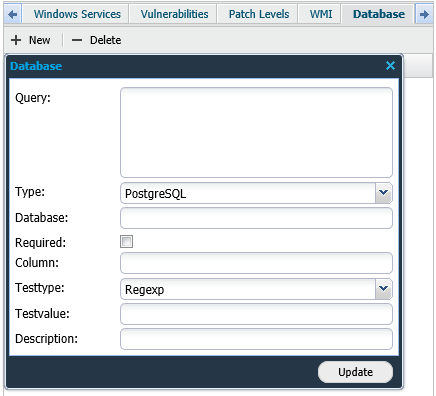
Database
Allows to run database queries on the target configured database. Define the queries.
Database must be authenticated on the target before running this check. See Database Authentication for configuration settings.
|
Option |
Description |
|
Query (Required) |
Enter the database Select* query. |
|
Type |
Choose the type of connection:
|
|
Database |
This field is matched against the database field set in Authentication section and reports only on that. |
|
Required |
If enabled, runs the test even if no database exists on the target. |
|
Column (Required) |
Provide the column name that should be tested. |
|
Testtype |
Choose the type of test:
|
|
Testvalue (Required) |
Provide the expected test value to check against the query result. |
|
Description (Required) |
Describe the behavior of the check. |
Click Update to save the changes.
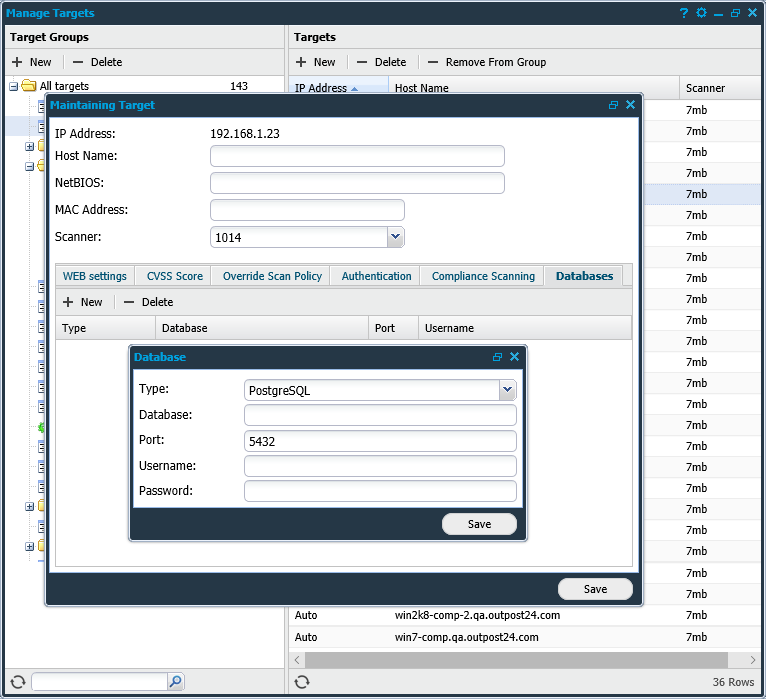
Database Authentication
Database Authentication is set on the target within Manage Targets.
The DB account credentials are specific to each target which explains the purpose when identifying a target.
To edit the Database Authentication,
-
Go to Main Menu > Netsec > Manage Targets.
-
Right click the target you wish to authenticate against, select Edit and go to the Databases tab.
-
To add credentials, click New and provide the following information:
|
Option |
Description |
|
Type |
Select the type of the database, choose between:
|
|
Database |
Define which database the scanner should connect to. |
|
Port |
Set which port the scanner should connect on. |
|
Username |
Provide the username used for the authentication. |
|
Password |
Provide the password used for the authentication. |
Click Save to enable the settings.
Create a Question
To add a Soft Compliance Policy, click + New in the policy tree on the left-hand side of the window to open the Edit Compliance Policy window.
Click + New and then click + Question.
Enter the required information and click the Save or Save & Close button.
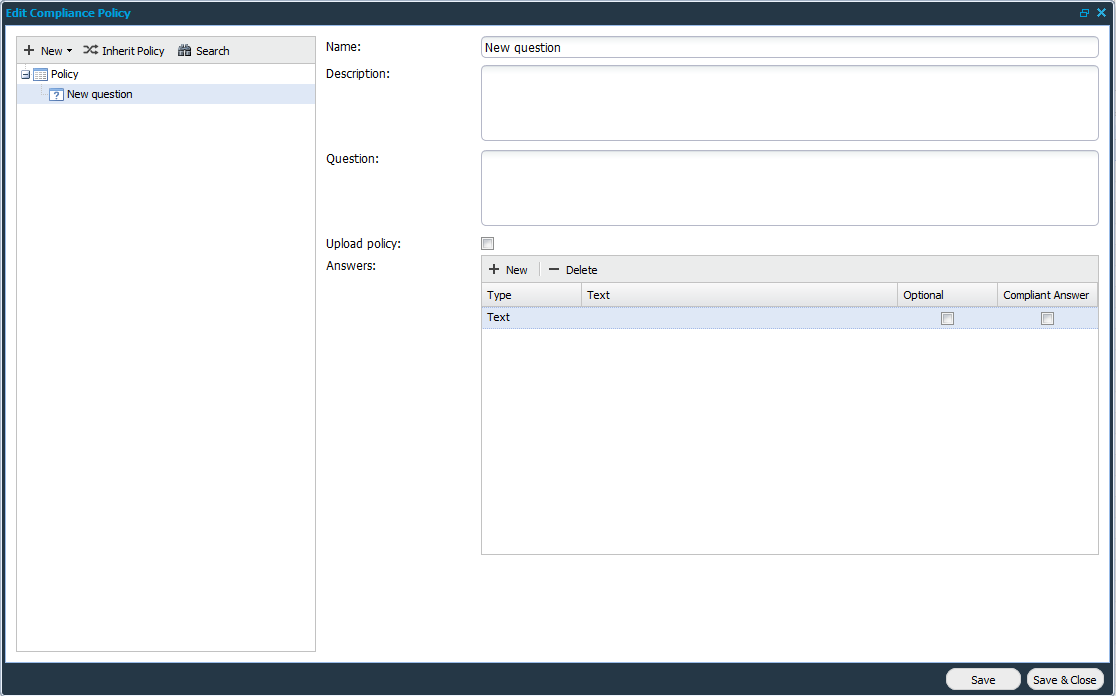
The following attributes are configurable:
|
Option |
Description |
|---|---|
|
Name |
Provide a name for the check. |
|
Description |
Provide a description for the check such as, rational and/or impact if the requirement is not met. |
|
Question |
Add a question to know if the check is implemented. Must be added manually.
|
|
Upload policy |
Select Upload policy to be able to add a file attachment to the question. |
|
Answers |
Click +New to select the type of result. Choose between:
|
Inherit Policy
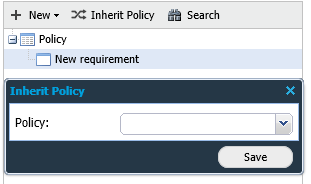
Click on Inherit Policy button to inherit a policy. This toggles a new window with a drop-down menu in which, a predefined policy can be chosen from which to inherit from. This option is also available by right-clicking any entry within the Requirements Tree and choosing Inherit Policy.
Policies provide prescriptive guidance for establishing a secure configuration posture for the system the policy is constructed for. By inheriting a policy, several known requirements are predefined and makes the setup of a scan easier, also making sure that known vulnerabilities are not overlooked.
You can always add more requirements/questions to the new policy.
Delete Policy
To remove a policy,
-
Go to the Custom folder and expand to view the list of custom policies.
-
Right-click on the policy to be removed and select Delete.
To remove only a specific requirement for a policy,
-
Right-click on the policy
-
Choose Edit, right-click on the requirement you wish to remove, and select Delete.
It is not possible to remove a predefined compliance policy. Remove Policy is applicable only to the policies listed within the Custom directory.
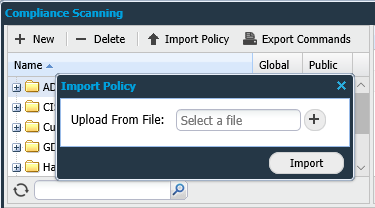
Import and Export Policy
Exporting a policy is done by right-clicking the policy to export and select Export Policy. This export the policy in .xml format.
Importing a policy is done by using Import Policy within the Policy section, choose which policy to import and press Import. Policies are imported only to the Custom folder.
Select Scan Schedule
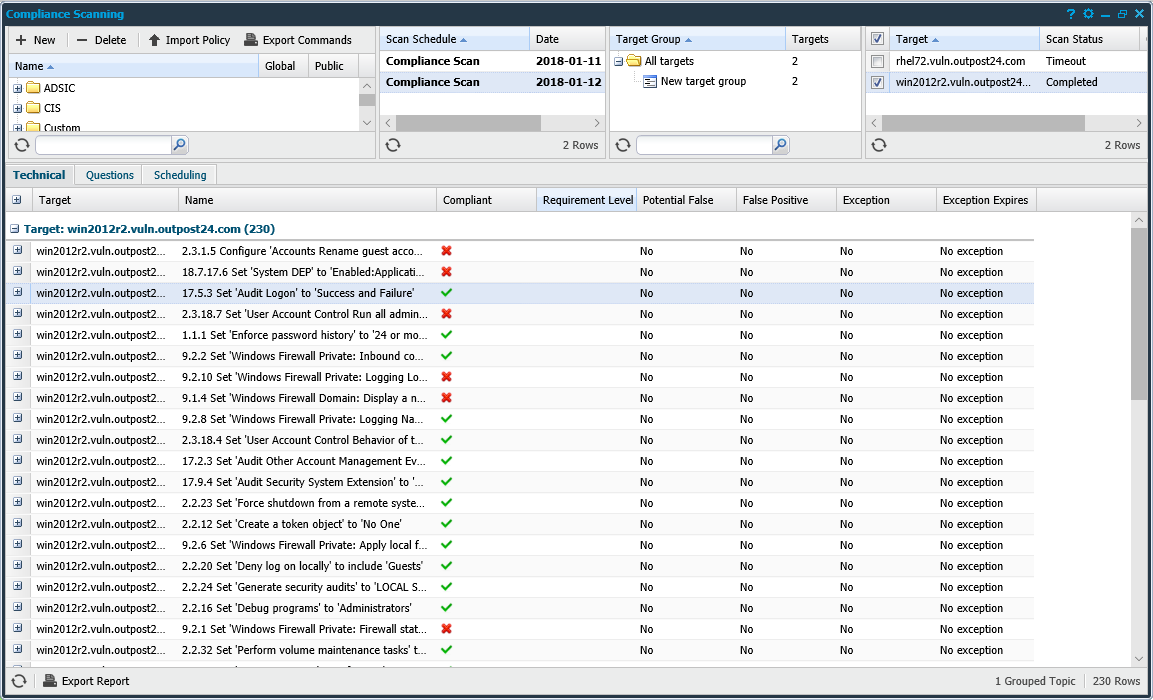
The Scan Schedule grid lists the scans executed with compliance scan option enabled. The available columns list the name, date and time of a scan schedule. Select a scan schedule to view the details in the lower section of the window.
Select Target Group
The Target Group grid lists the user-defined target groups within the system. Select a target group to view the details in the lower section of the window.
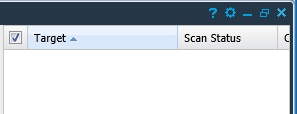
Select Target Grid
The Target grid displays targets listed under the selected Target Group. Select targets to view the compliance findings in the lower section of the window.
Based on the Compliance Policy applied, you can see if the targets are compliant or not, in the Compliant column.
|
|
- Compliant |
|
|
- Not compliant |
Right-clicking any target allows you to choose one of these two options:
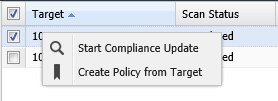
|
Option |
Description |
|
Start Compliance Update |
Selecting this option opens a new window listing several checks. 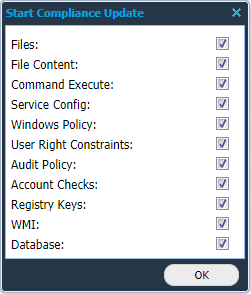
|
|
Create Policy from Target |
Create a compliance policy based on the selected target. |
Lower Section
The compliance report is generated with respect to the options selected in the top section. The Lower section displays the compliance findings based on the selection in the top section.
-
Technical
-
Questions
-
Scheduling
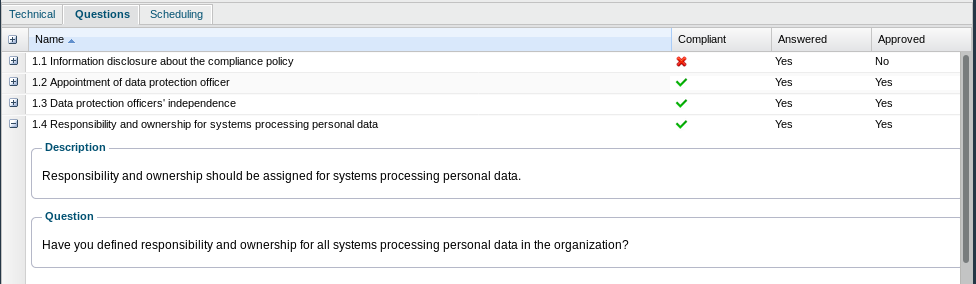
It is important to refer to the soft compliance policies that are listed under Questions tab, while performing an assessment on the compliance report.
Technical
The Technical tab presents the compliance results from the scan.
To customize the view, click the arrow next to any column name and choose from the options presented in the table.

|
Option |
Description |
|
|
Compliant |
Shows if the result is compliant or not. |
|
|
|
Compliant |
|
|
|
Not Compliant |
|
|
|
Marked as an exception |
|
|
Exception |
Yes, if the result has been marked as an exception. |
|
|
Exception Expires |
Date when the exception expires. |
|
|
False Positive |
Yes, if the result has been marked as a False Positive. |
|
|
Host Name |
The targets host name. |
|
|
Name |
The name of the requirement/control. |
|
|
Platform |
The targets platform. |
|
|
Potential False |
Displays if the result is a potential false positive. |
|
|
Requirement level |
Displays the levels of the requirement based on the benchmark. |
|
|
|
None: No level is set. It is recommended to set a requirement level.
|
|
|
|
Best Practice: By selecting this, you set the requirement as optional level. It lowers the attack surface of your organization. |
|
|
|
Critical: By selecting this, you set the requirement as mandatory level. Failure leads to decrease in the final benchmark score. |
|
|
Scanner |
Name of the scanner where the scan was executed. Only visible if at least one scanner is registered.
|
|
|
Target |
The IP address of the target. |
|
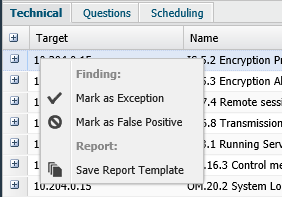
Right-clicking any result allows you to choose one of the following three options:
|
Option |
Description |
|
Mark as Exception |
Mark a result which is not compliant as an exception. Only available for non-compliant results.
|
|
Mark as False Positive |
Mark a result as False Positive. Checking Send Information to the Outpost24 Vulnerability Research and Development Team forwards this False Positive to the Outpost24 Team for investigation. Only available for non-compliant results.
|
|
Save Report Template |
Allows you to save the current filter settings as a Report Template. |
Questions
The Questions tab lists the compliancy questions that need to be answered and approved to be compliant. To customize the view, click the arrow next to any column name and select desired columns from the drop-down menu.
|
Option |
Description |
|
|
Answered |
Shows if the question has been answered. |
|
|
Approved |
Shows if the answered question has been approved. |
|
|
Compliant |
Shows if the result is compliant or not. |
|
|
|
Compliant |
|
|
|
Not Compliant |
|
|
Name |
The name of the requirement/control. |
|
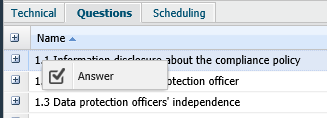
Right-clicking any finding allows you to edit the answer to the question and if it should be approved or rejected:
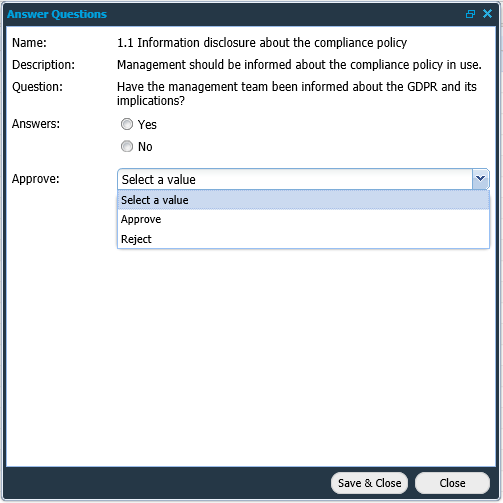
|
Option |
Description |
|
Name |
The name of the compliance policy. |
|
Description |
Description of the policy. |
|
Question |
Condition of the policy. |
|
Answers |
A text box can be used to add extra information.
|
|
Approve |
|
Scheduling
The Scheduling tab allows for maintenance of scheduled reports or adding new schedules.

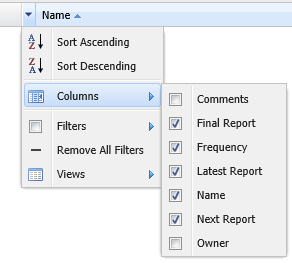
Clicking the arrow next to the name of any grid column allows to select columns that should be displayed:
|
Option |
Description |
|
Comments |
Displays comments about the report. |
|
Final Report |
Displays the date and time until when the report is scheduled. |
|
Frequency |
Displays how frequently the report is generated. |
|
Latest Report |
Displays the date and time of the most recent report. |
|
Name |
Displays the name of the report. |
|
Next Report |
Displays the date and time when the next report is scheduled. |
|
Owner |
Displays the name of the user who scheduled the report. |
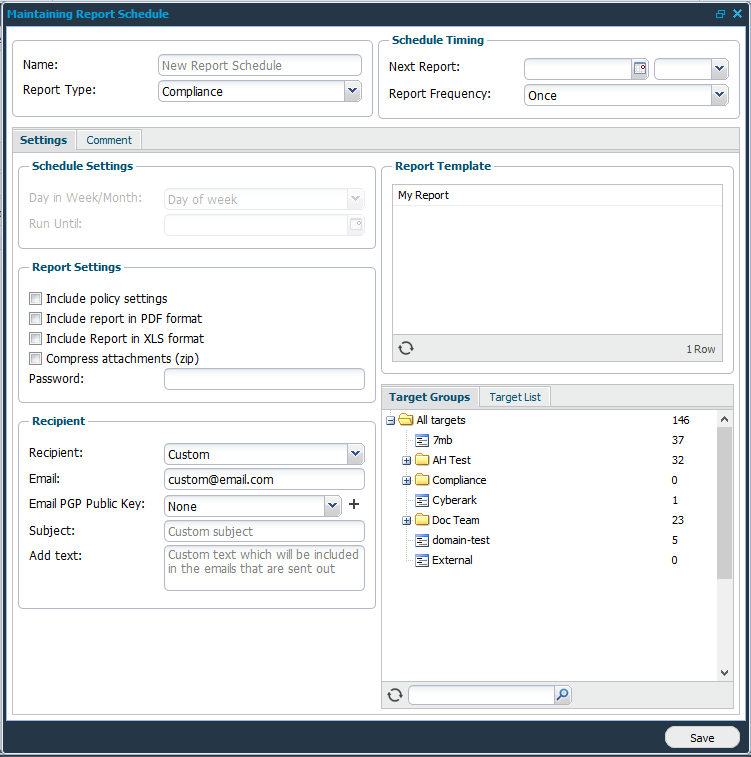
Maintaining a Compliance Report Schedule
Maintaining Report Schedule allows you to create or edit an existing compliance report schedule.
-
Click +New to create a report schedule, or
-
Right-click on any existing schedules, select Edit to open the Maintaining Report Schedule window.
|
Option |
Description |
|---|---|
|
Name |
Provide a name for the scheduled report. |
|
Report Type |
Compliance |
Schedule Timing
|
Option |
Description |
|---|---|
|
Next Report |
The next date and time, this report should be sent to the recipient. |
|
Report Frequency |
Define how frequently the report should be sent out.
Once – Report is sent only once. Weekly – Every week, starting on the day set in Next Report. Monthly – Every month, starting on the day set in Next Report. Bimonthly – Every second month, starting on the day set in Next Report. Quarterly – Every third month, starting on the day set in Next Report. Fortnightly – Every second week, starting on the day set in Next Report. Daily – Every day, starting on the day set in Next Report. |
Schedule Settings
The Schedule Settings are activated depending on the value of the Report Frequency. It allows you to configure the day in week or month the report should run.
|
Option |
Description |
|---|---|
|
Day in Week/Month |
|
|
Run Until |
Run Until allows you to set an end date for when the report period should end. |
Report Settings
|
Option |
Description |
|---|---|
|
Include policy settings |
Enable to include policy settings in the report. |
|
Include report in PDF format |
Attach the report as a PDF file. |
|
Include report in XLS format |
Attach the report as a XLS file. |
|
Compress attachments (zip) |
It allows you to create a zip attachment which decreases its size. |
|
Password |
Enter a password to export a password protected report. |
Recipient
|
Option |
Description |
|---|---|
|
Recipient |
Add the user from the drop-down list. Custom is only available if you have super user privileges. |
|
Email (Required) |
Add email address if Recipient is Custom. |
|
E-mail PGP Public Key |
An error message pops up when None is selected. You must supply a public PGP key.
|
|
Subject |
Add subject for email. |
|
Add text |
Add text that needs to be included in the email. |
Report Template
Select a Report Template.
Target Groups
Select a target group that should be included in the report.
Target List
Select targets from the target group that should be included in the report.
Click Save to enable the settings.
Delete a Schedule
Click on Delete to remove the selected entry.
Send Now
Allows you to send the report immediately.
Disable
Allows you to disable schedules permanently or temporarily.
Only available if you have scheduled timing for the next report.
Additional Functionalities From Scheduling
Right-click on a report schedule to view the available options:
|
Option |
Description |
|---|---|
|
Send Now |
Allows you to send the report immediately. |
|
Disable |
Allows you to disable schedules permanently or temporarily. |
|
New |
Create a new report schedule. |
|
Delete |
Remove the selected report schedule. |
|
Copy |
Use the settings of selected entry while creating another report schedule. |
|
Audit Log |
Click to view the Audit log related to that report. |
|
Export |
Click to export the report in HTML or CSV format. |
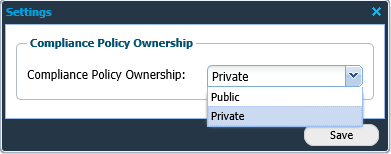
Privacy Settings
Click on the Settings icon located in the upper right corner.
In Settings, the Compliance Policy Ownership can be set to either Public or Private. This setting determines if the policies will be visible for all users within the tool by default, or only for the user who created the policy.