Last updated: 2022-06-16
Purpose
This article provides instructions on how to set up and configure Active Directory Federation Services (ADFS) for OUTSCAN, or HIAB using the Security Assertion Markup Language (SAML) protocol.
Introduction
The Active Directory Federation Services (ADFS) Identity Provider configuration enables integration between an organization’s identity infrastructure and the Outpost24 security platforms, such as Outscan and HIAB. This integration uses the Security Assertion Markup Language protocol to establish federated authentication and enable Single Sign-On (SSO) for users accessing these applications. By configuring ADFS as the Identity Provider, authentication requests from the Outpost24 platform are redirected to the organization’s ADFS environment, where user credentials are validated before access is granted.
This feature is designed to centralize authentication and align the platform with enterprise identity management practices. By relying on ADFS for authentication, organizations can enforce consistent access policies, reduce the need for multiple credentials, and integrate with existing directory services such as Active Directory. The SAML-based federation allows secure exchange of authentication assertions between the Identity Provider and the service provider, ensuring that users can access the platform through a trusted identity system while maintaining strong authentication controls and streamlined user management.
Setting up ADFS
To set up ADFS with OUTSCAN, follow the steps in this document.
When setting up the ADFS, note that trusted certificates at the front-end machine can be updated at regular intervals requiring an update of the ADFS configuration.
OUTSCAN or HIAB Configuration
In order to configure OUTSCAN or HIAB to use ADFS as identity provider, you need to perform the following steps:
-
Retrieving the metadata file describing the identity provider
-
Adjust the metadata file (if needed)
-
Uploading the metadata file in OUTSCAN or HIAB
Retrieve Identity Provider Metadata file
ADFS is providing an URL to download the SAML Metadata file. Simply open the following URL in a browser and save the file locally.
The URL is as follow: https://<ADFS_FQDN_OR_IP>/FederationMetadata/2007-06/FederationMetadata.xml
Adjust Identity Provider Metadata file
Adjust the SAML metadata file from your identity provider to meet platform requirements and enable successful Single Sign-On integration in OUTSCAN or HIAB.
Setup Identity Provider
To set up Identity Provider, see the Identity provider settings article.
Enable the ADFS Integration on OUTSCAN
Make sure that the previous section has been performed before continuing.
-
Upload the updated metadata from ADFS as Get Metadata from file.
-
If the ADFS configuration is set to use SHA-1 as Secure hash algorithm, then change Signature hash algorithm from the default SHA-256 setting to SHA-1.
-
Click Save.
-
Log out.
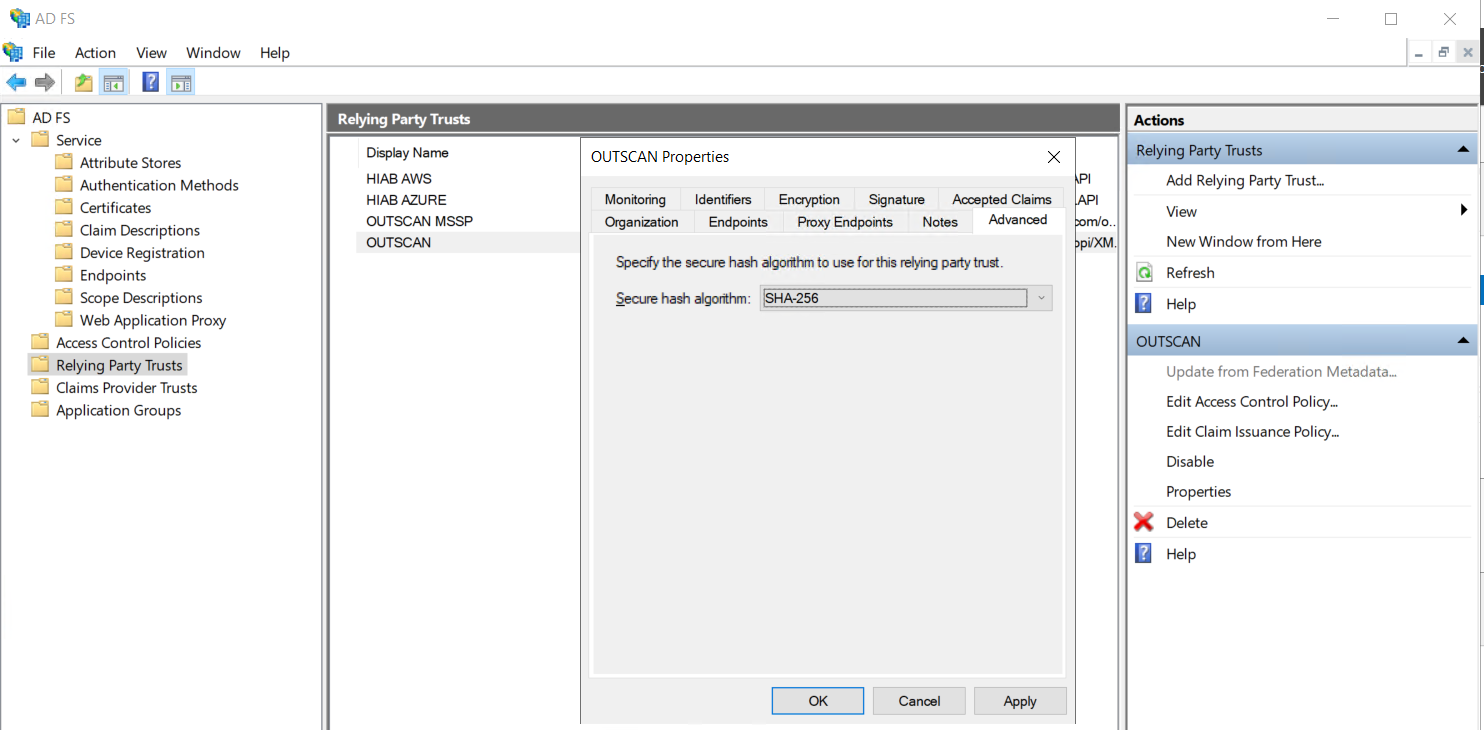
Check ADFS Configuration for Secure Hash Algorithm
To find out the settings for Secure hash algorithm configured in the Relying Party Trust in the ADFS configuration, edit the Properties and open Advanced tab to display this setting.
Download OUTSCAN Metadata
-
Log in on
https://outscan.outpost24.comor your HIAB. -
Go to Main Menu > Settings > Integration.
-
Select the Identity Provider tab.
-
Click SP Metadata at the bottom of the Integration Settings window.
-
Click Save.
-
Log out.
Configure ADFS Relying Party Trust
-
Open ADFS Management.
-
Click Add Relying Party Trust.
-
Select Claims aware.
-
Click Start.
-
Select Import data about the relying party from file.
-
Select the OUTSCAN metadata file.
-
Click Next.
-
Change Display name to Outscan, this will be the name of the Relying Party Trust.
-
Click Next.
-
Choose Access Control Policy, Permit everyone is default.
-
Click Next.
-
Review settings and click Next.
-
Click Close.
-
Select Relying Party Trust with name Outscan.
-
Click Properties.
-
Select the Identifiers tab.
-
Add https://outscan.outpost24.com/opi/XMLAPI as Relying party identifier.
The Identifiers tab contains a line like the following https://outscan.outpost24.com/opi/XMLAPI?ACTION=SAMLRESPONSE&UUID=1c428568-91ff-4c40-8537-d0d523b22ed3 where 1c428568-91ff-4c40-8537-d0d523b22ed3 is actually the <customeruuid> value.
The <customeruuid> is required when setting the claims, so it is recommended that you extract our <customeruuid> value from here.
-
Select the Advanced tab.
-
If SHA-1 is required change the Secure hash algorithm to SHA-1.
-
Click Apply.
-
Then click OK.
Configure ADFS Authentication Methods
-
Open ADFS Management.
-
Select Authentication Policies or if that does not exist, expand Services and select Authentication Methods.
-
Click Edit for Primary Authentication Methods.
-
Make sure Forms Authentication is enabled for section Intranet.
-
Click Apply.
-
Then click OK.
Disable ADFS Revocation Checks
-
Open PowerShell prompt.
-
Run command:
Get-AdfsRelyingPartyTrust -Name Outscan | Set-AdfsRelyingPartyTrust -SigningCertificateRevocationCheck None -EncryptionCertificateRevocationCheck None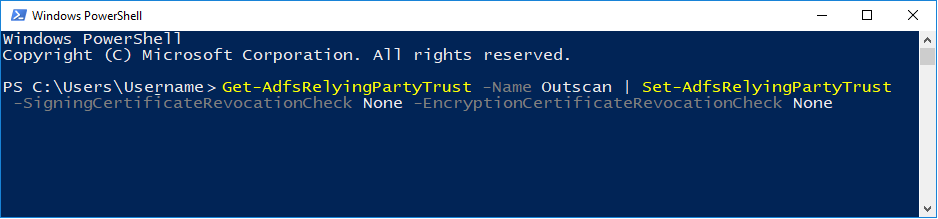
Configure ADFS Claim Rules
-
Open ADFS Management.
-
Select Relying Party Trust with name Outscan.
-
Click Edit Claim Issuance Policy.
-
Click Add Rule.
-
Select Send Claims using a Custom Rule.
-
Click Next.
-
Enter rule name Create session identifier.
-
Enter the following in the custom rule field:
c1:[Type == "http://schemas.microsoft.com/ws/2008/06/identity/claims/windowsaccountname"] && c2:[Type == "http://schemas.microsoft.com/ws/2008/06/identity/claims/authenticationinstant"]
=> add(store = "_OpaqueIdStore", types = ("https://outscan.outpost24.com/internal/sessionid"), query = "{0};{1};{2};{3};{4}", param = "useEntropy", param = c1.Value, param = c1.OriginalIssuer, param = "", param = c2.Value);
outscan.outpost24.com can be changed to a local address in self-hosted environments.
-
Click Finish.
-
Click Add Rule.
-
Select Send Claims using a Custom Rule.
-
Click Next.
-
Enter rule name Create transient name identifier.
-
Enter the following in the custom rule field:
c:[Type == "https://outscan.outpost24.com/internal/sessionid"]
=> issue(Type = "http://schemas.xmlsoap.org/ws/2005/05/identity/claims/nameidentifier", Issuer = c.Issuer, OriginalIssuer = c.OriginalIssuer, Value = c.Value, ValueType = c.ValueType,
Properties["http://schemas.xmlsoap.org/ws/2005/05/identity/claimproperties/format"] = "urn:oasis:names:tc:SAML:2.0:nameid-format:transient",
Properties["http://schemas.xmlsoap.org/ws/2005/05/identity/claimproperties/spnamequalifier"] = "https://outscan.outpost24.com/opi/XMLAPI?ACTION=SHOWSPMETADATA&UUID=<customeruuid>");
outscan.outpost24.com can be changed to a local address in self-hosted environments.
<customeruuid> must be replaced by the customer uuid value that matches your integration use case. You can find your customer uuid value in identifiers tab as mentioned earlier in a note.
-
Click Finish.
-
Click Add Rule.
-
Select Send LDAP Attributes as Claims.
-
Click Next.
-
Enter rule name Send uid.
-
Select Attribute Store.
-
Select the LDAP field that contains the Outscan username (like SAM-Account-Name) as LDAP Attribute.
-
Enter uid as Outgoing Claim type.
-
Click Finish.
-
Click Apply and then OK.
Test the Integration
SP Initiated SSO, for example from Outpost24 OUTSCAN/HIAB
-
Go to https://outscan.outpost24.com/ or alternatively to https://<hiab-ip-address>/)
-
Enter your username.
-
Press on Single Sign-On.
-
Enter your credentials on the ADFS page you have been redirected to.
-
Press Sign In.
-
You are redirected back to OUTSCAN and authenticated.
If 2-factor authentication is enabled on OUTSCAN, you are required to provide it before you are logged in.
IdP Initiated SSO, for example from the ADFS Web Portal
-
Login to the ADFS Web Portal.
-
Select the application you want to access for example Outpost24 OUTSCAN/HIAB.
-
Authenticate to ADFS.
-
You are redirected to Outpost24 NetSec or Portal UI depending on your identity provider settings.
Tested version
|
OS |
Version |
Build |
ADFS Version |
Status |
|---|---|---|---|---|
|
Windows Server |
2016 |
|
3.0 |
WORKING |
|
Windows Server |
2019 Datacenter Edition |
17763 |
10.0.17763.1131 |
WORKING |
References
https://docs.microsoft.com/en-us/windows/desktop/srvnodes/active-directory-federation-services
Related Articles
- ServiceNow - Legacy
- Identity Provider Settings
- Okta Identity Provider Configuration
- Database Connector (HIAB only)
- Microsoft Entra ID (Azure AD) Identity Provider Configuration
- SNMP (HIAB only)
- ADFS Identity Provider Configuration
- Splunk
- Amazon
- Atlassian Jira
- Syslog (HIAB only)
- Thycotic
- OneLogin Identity Provider Configuration
- CyberArk
- LDAP/AD