Last Updated: 2021-10-19
Purpose
This article describes how to perform a restore from a backup file in the HIAB.
Introduction
This article outlines the process for restoring a HIAB from a backup file, which can be sourced from FTP, SCP, CIFS, NFS servers, or uploaded from a local machine. Users are instructed to navigate to Main Menu > Settings > Maintenance > Backup to initiate the restoration. The steps include importing the backup file, either from a network or local source, and confirming the replacement of existing data. Troubleshooting guidance is provided for issues related to outdated HIAB images, suggesting users download the latest version if necessary. See HIAB Backup for more information on how to perform a backup.
Available only on HIAB scheduler.
Restoring a HIAB
To restore the HIAB appliance from a backup, navigate to the following location in HIAB.
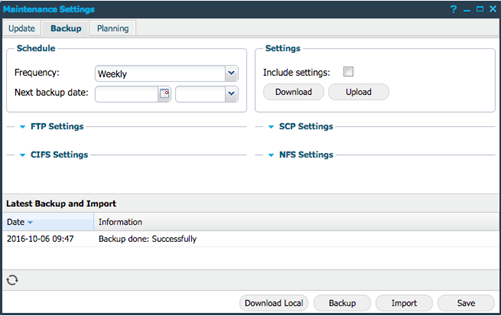
Go to Main Menu > Settings > Maintenance > Backup.
The maintenance portal is where you manage updates and backups for the HIAB itself.
HIABs can be restored from FTP, SCP, CIFS, or NFS servers. You will need to reconfigure these settings if you wish to use this method. Alternatively, you can upload a local backup from your local machine.
-
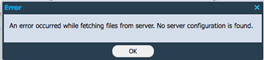
Click on Import. If you receive the below error, do not worry. You have simply not configured your server information to restore the backup from. If you are restoring from a local file, select OK and move on to the next step.
-
For network based backups, select your backup file and click Import.
-
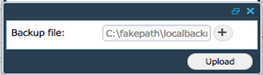
For local based backups, choose Upload local select the file you wish to restore from and click Upload.
-
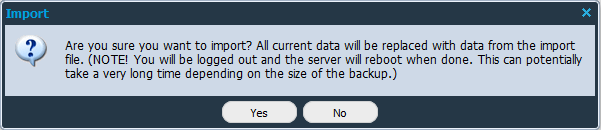
Select Yes on any pop-up stating all data will be replaced after the restore.
You can refresh the Latest Backup and Import section to see when your backup has completed.
If you refresh and see Server not responding, then the backup will be completed and you can refresh the entire page.
Troubleshooting
Re-enrolling an old HIAB Image
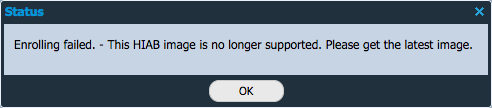
When re-enrolling a HIAB to factory defaults or restoring a HIAB, an error message can be displayed stating that the HIAB image is no longer supported. This occurs when the build image was not one of the latest images, and needs to be updated.
To solve that issue, download the latest version and use that.
Related Articles
- Windows 10/Windows 2019 Server
- HIAB Updates
- General Information about SMB/WinRM Scanning
- Change Risk Levels
- Removing an Agent from Windows
- ServiceNow - Legacy
- Windows 8.1
- Netsec Filters
- Discovering the Agent in OUTSCAN
- Technical Specification
- Account Settings
- How to Test SMB Authentication
- Windows 2016 Server
- Identity Provider Settings
- HIAB Server Settings
- Installing a Linux Agent
- Okta Identity Provider Configuration
- Scanning-Less Scanning
- Check Connectivity to Agent Server
- Scan Scheduling Errors
- Overview
- Event Notification Module
- HIAB Maintenance Settings
- HIAB Deployment Guide
- Database Connector (HIAB only)
- Azure AD Identity Provider Configuration
- Add Comments
- Target Groups
- Checking if Agent is Running
- Core Installation
- Windows 2008 R2 Server
- Agent Installation Introduction
- Automatic Asset Joining With Netsec
- Manage Users
- Firewall Setup for Agents
- Scanning Range
- SNMP (HIAB only)
- ADFS Identity Provider Configuration
- Splunk
- Agent Call Home
- Advanced Report Filters
- Accept Risks
- SMB Authentication from OUTSCAN/HIAB
- Virtual HIAB Appliance
- Using the Agent Info Command
- Amazon
- User Roles
- Removing an Agent from Linux
- Retrieving the Agent UUID
- Atlassian Jira
- Understanding Scanner and Scheduler
- Finding the Agent Version
- Create and Edit Event Notifications
- Installing a macOS Agent
- Syslog (HIAB only)
- Setting Up an Agent Using System Proxy
- ServiceNow - App
- Thycotic
- DNS Lookup in UI and in Console
- HIAB Console
- Auditing Guide
- Adding Agent Attributes
- HIAB Distribution Settings
- Run Verification Scans
- Agent Latest Version
- Finding New Agents In OUTSCAN
- Setting up a HIAB as an Appsec Scale Scanner
- Hardening the HIAB
- Performing a PCI DSS Scan
- Two Factor Authentication
- Attributes
- Firewall Rules
- HIAB Enrollment
- Supported Platforms for Authenticated SSH Scanning
- Authenticated Scanning Using WinRM
- OneLogin Identity Provider Configuration
- Windows 7
- HIAB Remote Support
- Compliance Scanning
- Manage Targets
- Assign Tasks
- Authenticated Scanning Using SSH
- Tickets Quick Start Guide
- Retrieving Results From the Agent in OUTSCAN
- Appliance Logs
- Converting Normal with Webapp Scans (Netsec) to Portal Workflows
- Updating the Agent
- Troubleshooting SMB Authentication
- Agent Licensing
- Mark as False Positives
- Installing a Windows Agent
- Using Farsight in Netsec
- Testing Target System for Open TCP Ports
- HIAB Restore
- Scan Stages
- Request Clarifications
- HIAB Setup Guide
- Updating Agent Attributes
- CyberArk
- LDAP/AD
- Checking if the Agent has Produced Results
- ArcSight (HIAB only)
- HIAB E-mail Whitelisting
- Adjust Identity Provider SAML Metadata File
- Scanning Critical Industrial Devices/Machines
- Reporting Tools
- Scan Scheduling
- Scanning Performance and Impact Tuning
- PCI Compliance Scanning
- Configuring and Accessing the HIAB console using SSH
- User Groups
- Create Users
- HIAB Remote SSH Guide
- Download Agents
- Create Targets
- Windows 2012 R2 Server
- HIAB Backup
- Report Scheduling
- Access Tokens
- O24AUTH
- Complementary Authenticated Scan on Default Credentials
- Authenticated Scanning Using SMB
- Dynamic Target Group