Last Update: 2026-04-01
Purpose
This article describes how to set up SSH Credentials in the Portal.
Introduction
SSH Credentials enable secure connections to assets for authenticated scanning by configuring SSH-based authentication details, such as usernames, passwords, and strongly recommended private keys, within the Portal’s Credentials view. This feature supports privilege escalation through commands like sudo, doas, or custom options, ensuring flexible and secure access to systems, particularly Linux, Unix, or Solaris environments. By setting up SSH Credentials, security teams can perform authenticated scans to identify vulnerabilities with elevated permissions, enhancing the accuracy of security assessments. The integration with private key encryption and passphrase protection strengthens data security, making it essential for organizations aiming to maintain robust access control and compliance during vulnerability management processes.
Adding SSH Credentials
Requirements
Although username+password only configurations are allowed, a private SSH-key is STRONGLY recommended for this operation.
Windows
To check if SSH is installed:
-
Open a command terminal and run the
sshcommand.
C:\Users\JohnDoe>ssh
-
If SSH is installed, it will display some help text:
C:\Users\JohnDoe>ssh
usage: ssh [-46AaCfGgKkMNnqsTtVvXxYy] [-B bind_interface]
           [-b bind_address] [-c cipher_spec] [-D [bind_address:]port]
           [-E log_file] [-e escape_char] [-F configfile] [-I pkcs11]
           [-i identity_file] [-J [user@]host[:port]] [-L address]
           [-l login_name] [-m mac_spec] [-O ctl_cmd] [-o option] [-p port]
           [-Q query_option] [-R address] [-S ctl_path] [-W host:port]
           [-w local_tun[:remote_tun]] destination [command]

C:\Users\JohnDoe>
-
Create the key by running the
ssh-keygencommand:
C:\Users\JohnDoe>ssh-keygen -t rsa -b 4096
Generating public/private rsa key pair.
Enter file in which to save the key (C:\Users\JohnDoe/.ssh/id_rsa):
Enter passphrase (empty for no passphrase):
Enter same passphrase again:
Your identification has been saved in C:\Users\JohnDoe/.ssh/id_rsa.
Your public key has been saved in C:\Users\JohnDoe/.ssh/id_rsa.pub.
The key fingerprint is:
SHA256:YSDOYF58kEbRekZhRrh2FxOIl/5cdPMgyrh/tAyOwFs azuread\johndoe@DESKTOP-AD5B8S3
The key's randomart image is:
+---[RSA 4096]----+
|       o+X@o..   |
|     .+o+X*.o    |
|     .o.O=++ .   |
|      .*=B=      |
|      .+E=o.     |
|       .o+       |
|        . . .    |
|         . + .   |
|          ..+    |
+----[SHA256]-----+

C:\Users\JohnDoe>
Unix
To generate a SSH-key:
-
Run the
ssh-keygencommand:
$ ssh-keygen -t rsa -b 4096
Generating public/private rsa key pair.
Enter file in which to save the key (/home/user/.ssh/id_rsa): /home/user/test
Enter passphrase (empty for no passphrase):
Enter same passphrase again:
Your identification has been saved in /home/user/test.
Your public key has been saved in /home/user/test.pub.
The key fingerprint is:
SHA256:YSDOYF58kEbRekZhRrh2FxOIl/5cdPMgyrh/tAyOwFs user@client.example.com
The key's randomart image is:
+---[RSA 4096]----+
| E+ . +.o        |
| o = * B .       |
|  o = + o        |
| o . o           |
|. + + o S        |
| o.o +   . . .   |
|ooo + . o o =    |
|.+o. + + =.= .   |
|o=. . o =+o.o    |
+----[SHA256]-----+
$
Adding Credentials
-
Log in to OUTSCAN. See the Logging in to the portal article on how to access the Portal.
-
In the Portal menu view, click the Configuration → Credential.
-
Click the Create credentials button to open the create credentials form.

Setting up SSH Credentials
-
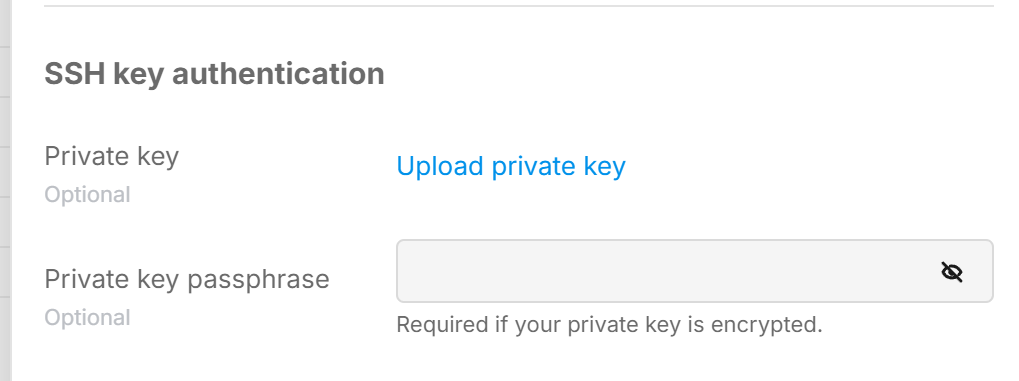
In the drop-down menu select SSH.
-
Enter a Role.
-
Enter a Username.
-
Enter a Password.
The password field can be used by both or either the authentication step or the substitute user command. In practice neither Password or Private key will be required to do anything, however, there are no such requirement asserted by the UI or API today.
-
Select Substitute user command: sudo, doas, sesu, dzdo, pfexec from the drop down menu, or provide a custom command on the line beneath.
The use of the following commands is to execute commands with a different user/privilege escalation.
|
Command |
Description |
|---|---|
|
sudo |
This command is found in most of the Linux based systems (or can be installed). Used to execute commands as a different user (other than the one used to log in). From the tools perspective, it uses root account to perform the commands. |
|
doas |
It is an OpenBSD based command. 95% of its features are like sudo. https://man.openbsd.org/doas |
|
sesu |
It is an IBM implementation of su. |
|
dzdo |
Used in Linux/Unix (can be installed at will). An alternative to sudo. |
|
pfexec |
Mostly used in Solaris. |
|
custom |
It gives a flexibility to use a custom defined privilege escalation command. When this option is selected, a field labeled SSH custom user command is ungrayed for typing in the custom command. |
-
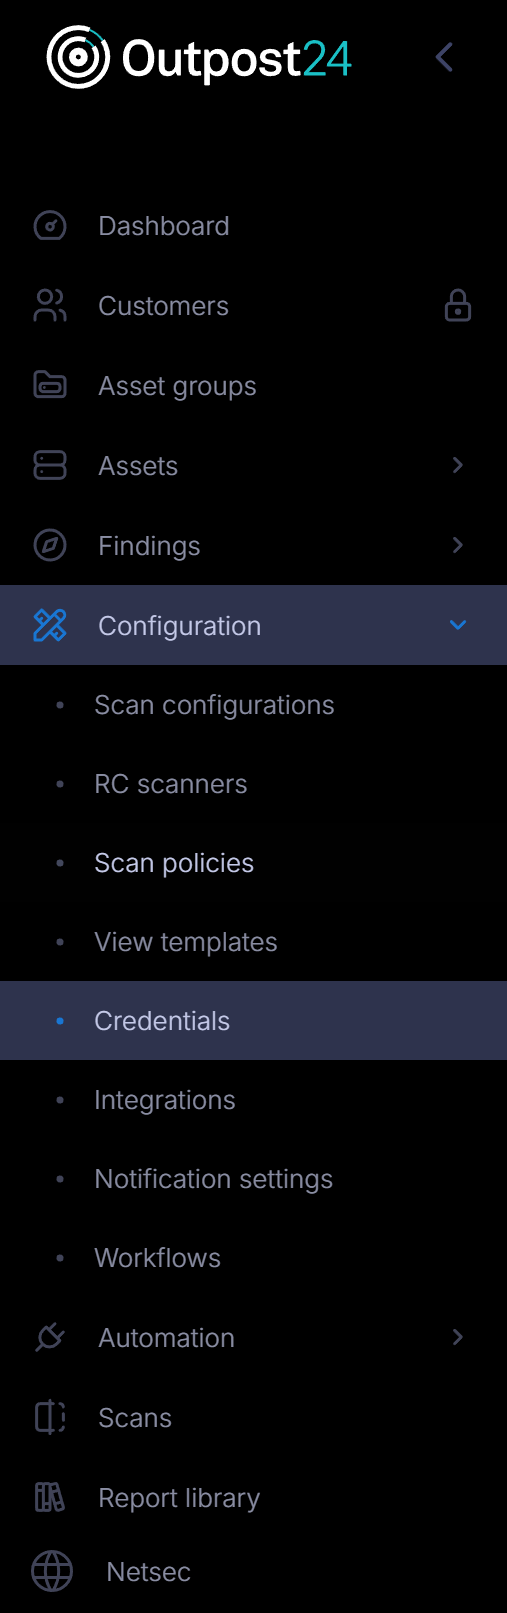
Click the blue Upload Private Key button.
-
This opens a file upload window.
-
Select a file. See Requirements section on how to create a private key in SSH.
-
Click Open button lower right corner to upload.
-
-
Add the passphrase to the private key.
This is required if you have uploaded a private key and that private key is encrypted with a passphrase.
-
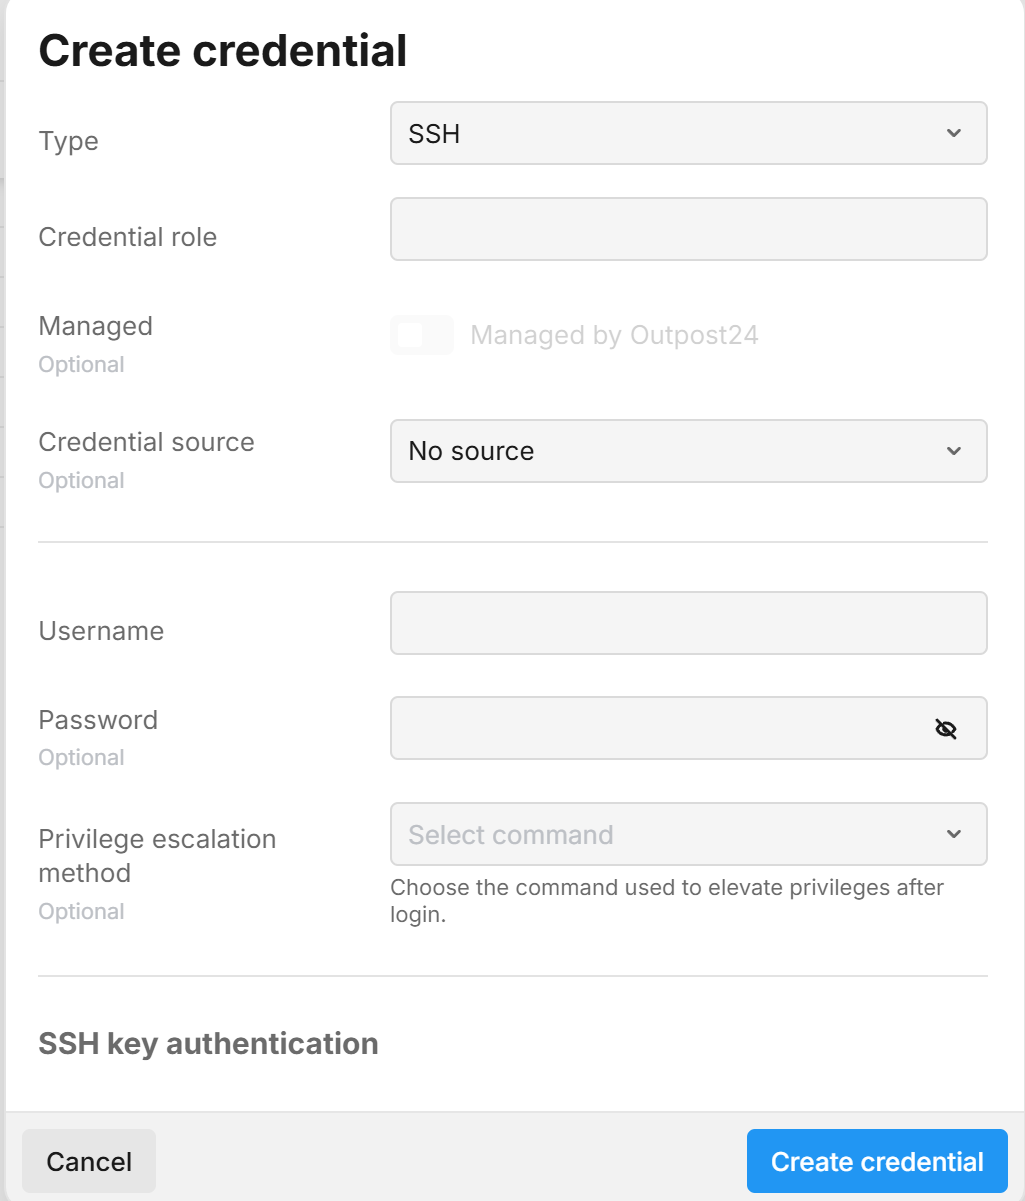
Custom tags that help categorize and organize the credential. Tags can be used to group resources and control access.
Resource Groups represent sets of tags Users are authorized to use when creating credentials. Selecting a resource group will automatically apply its associated tags to the credential. Users with limited access must select at least one resource group to ensure the credential is created with tags they are permitted to use. Users may also add additional custom tags if needed.
-
Click the blue Add button.
Related Articles