Purpose
The purpose of this document is to provide users with an overview of the PCI Scanning module for OUTSCAN. This document has been elaborated under the assumption the reader has access to the OUTSCAN Account, and Portal Interface.
Introduction
Outpost24 is a certified Approved Scanning Vendor (ASV) by the PCI Security Standards Council and offers OUTSCAN PCI, an extension of our OUTSCAN vulnerability management tool designed specifically to verify and prove PCI DSS compliance. OUTSCAN PCI examines network perimeters, identifies vulnerabilities and inventories actionable remedies, and can repeatedly scan until all criteria are met to effectively protect the integrity of cardholder data and verify compliance.
To access the PCI Scanning module, navigate to Main Menu > PCI Scanning.
Interface Sections
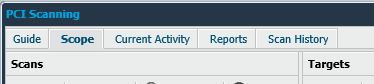
The PCI Compliance Scanning interface consist of five tabs.
-
Guide
-
Scope
-
Current Activity
-
Reports
-
Scan History
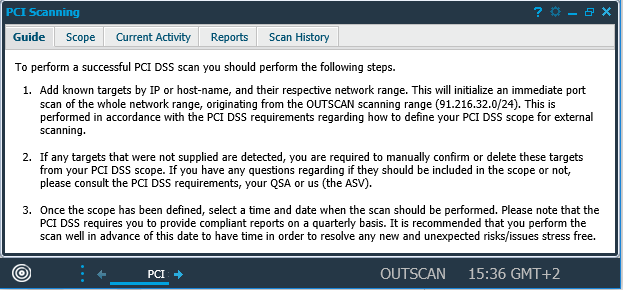
Guide
The Guide tab is the welcome page for the PCI Scanning and is displayed every time the PCI Compliance module is started. It provides a quick guide on how to set up and run scans.
Scope
The Scope tab is used to set up the scope of the scans, the left Scans part is used to create schedules to run. These can either be scheduled to run at a specific time or be started manually.
The Scope tab consists of two sections:
-
Scans
-
Targets
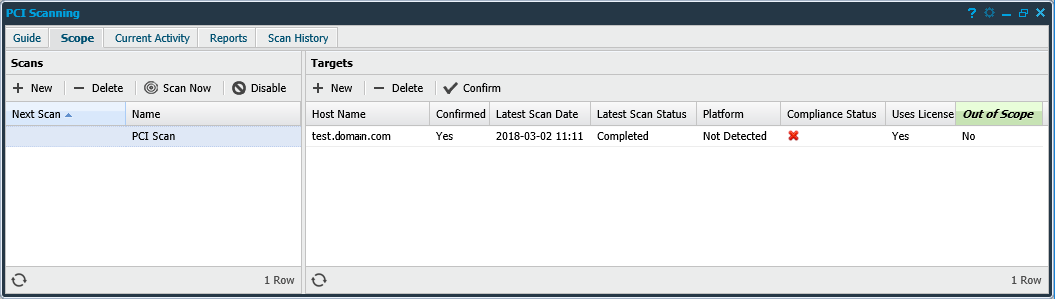
Scans
The Scans section consists of all defined scan schedules along with information about each schedule.
|
Option |
Description |
|---|---|
|
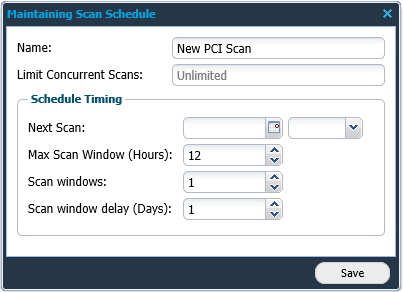
New |
Displays the Maintaining Scan Schedule window where a new scan schedule can be set up. |
|
Delete |
Removes a scan schedule from the list. |
|
Scan Now |
Start the scan manually. |
|
Disable |
Stops the schedule from running a scan. |
Edit - To edit a schedule object right-click on it and select Edit.
Grid Window - The grid that shows the scan schedules is configurable. Clicking on the arrow next to the name of any grid column allows you to customize what columns that will be shown out of the following:
|
Option |
Description |
|
Latest Scan Date |
The last time the schedule was executed. |
|
Latest Scan Status |
The status of the latest schedule execution. |
|
Name |
The name of the scan schedule. |
|
Next Scan |
The date when the next scan occur, if empty it will not start automatically. |
Target
In the Target section, targets can be selected for scanning. For each scan of a target, a compliance report is created.
In the Target Ranges field, you can enter a range of targets to be scanned.
When adding a target range, a discovery scan is performed to find all the alive targets in the range. These are added to the schedule as unconfirmed targets, and need to be confirmed or they should be deleted if they are not part of the PCI scanning scope.
A target can only exist in one PCI scan job.
|
Option |
Description |
|---|---|
|
New |
Displays the Add New PCI Target window where new targets can be set up. When adding a domain or a network ranges, OUTSCAN scans for all hosts available automatically. All the found hosts are listed in the Targets section. The Add New PCI Target window is also displayed by default the first time PCI Scanning is started.
|
|
Delete |
Removes the hosts that should not be part of the scan. |
|
Confirm |
Selects and add found hosts to the scan. |
You are required to confirm or delete these targets from the PCI DSS scope. If you have any questions regarding if they should be included in the scope or not, refer to the PCI DSS requirements or your QSA.

Edit - To edit a target right-click on it and select Edit.
Grid Window - The grid that shows the targets is configurable. Clicking on the arrow next to the name of any grid column allows you to customize what columns will be shown out of the following:
|
Option |
Description |
|---|---|
|
IP Address |
The IP address of the target. |
|
Host Name |
The targets host name. |
|
Out of Scope |
If the target is out of scope. |
|
Confirmed |
If the target is confirmed to be part of the PCI scanning scope or not. |
|
Latest Scan Date |
The most recent date that a scan was run. |
|
Latest Scan Status |
Status of the most recent scan. |
|
Virtual Host Names |
A list of virtual host names. |
|
MAC Address |
The targets MAC address. |
|
Hidden URLs |
A list of hidden URLs for the webapp scanner to crawl. Hidden URLs are URLs that cannot be reached by crawling the default address. |
|
Platform |
The platform detected on this target. |
|
Compliance Status |
The latest compliance status for this target. |
|
Uses License |
If target uses license. |
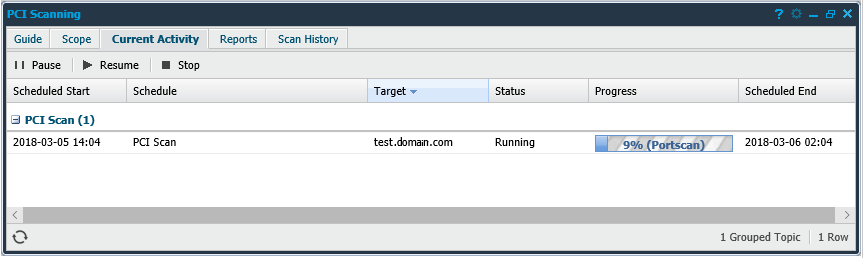
Current Activity
In the Current Activity tab, the progress of the current scans is monitored. The scans can be paused, resumed, and stopped at any time during the scanning process.
|
Option |
Description |
|---|---|
|
Pause |
Pause the selected scan. |
|
Resume |
Resume the selected scan. |
|
Stop |
Stop the selected scan. |
Export HTML - To export the currently visible data from the grid, right click on any entry and select Export HTML. This generates an HTML page with data can be saved or copied from.
Grid Window - The grid that shows the status is configurable. Clicking on the arrow next to the name of any grid column allows you to customize what columns that will be shown out of the following:
|
Option |
Description |
|
Scheduled Start |
The time the scan was scheduled to start at. |
|
Schedule |
The name of the schedule. |
|
Target |
The target IP. |
|
Status |
The current status. |
|
Progress |
The progress of the scan. |
|
Scheduled End |
When the scan will be terminated, unless already finished. |
|
Service |
The name of the service. |
|
Host name |
The name of the host being scanned. |
|
Scanner |
The name of the scanner performing the scan. |
Reports
The Reports tab shows the results of the completed scans and consists of two parts.
-
Upper part – Listing the completed scans and targets with their results.
-
Lower part – Showing the different findings for each scan and target.
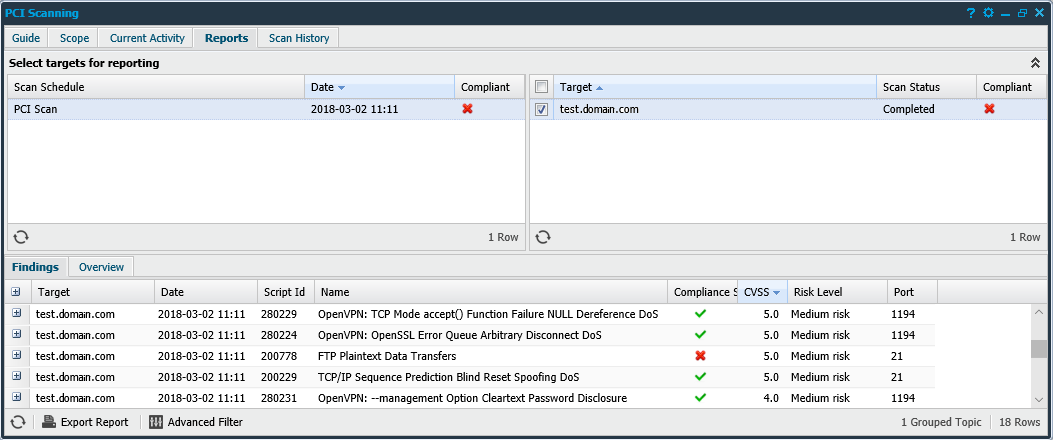
Upper part
Consists of two fields where you can select the targets from the Scope tab for reporting.
-
Scan Schedule
-
Target

Lower part
Consists of two tabs
-
Findings
-
Overview
Findings tab
The Findings tab shows the specific findings for each target and whether it is compliant or not.

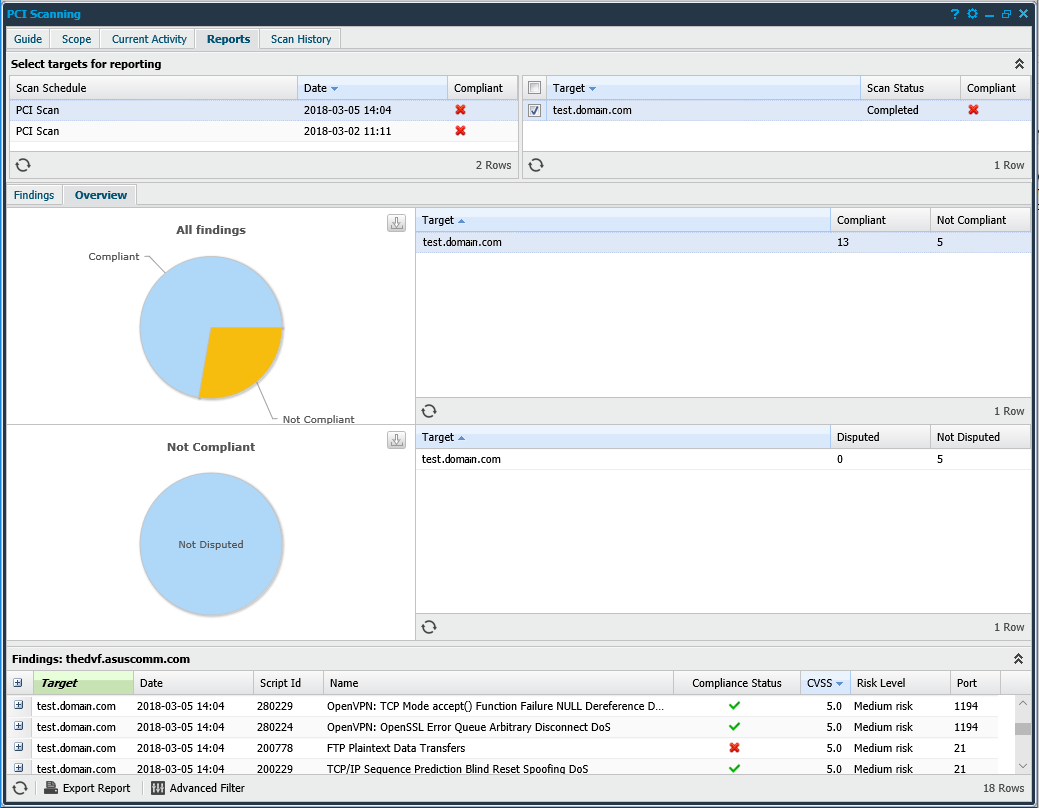
Overview tab
The overview tab provides charts together with the detailed findings. The charts can be exported as a PNG-file by clicking the download icon in the top right corner of the chart field.
Scan History
The Scan History tab shows all the PCI scans performed by the system.
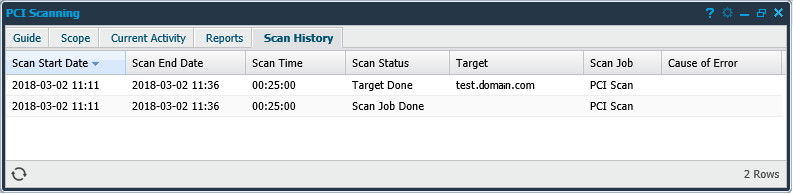
Show Scan Results: If you right click on a scan that ended successfully you have the option to show the report for this scan. This can be done both on individual targets and on complete scan schedules.
Export HTML: To export the currently visible data from the grid, right click on any entry and select Export HTML. This generates an HTML page with data that can be saved or copied from.
Grid Window: The grid that shows the scan history is configurable. Clicking on the arrow next to the name of any grid column allows you to customize what columns that will be shown out of the following:
|
Option |
Description |
|
Scan start date |
The time when the scan started. |
|
Scan end date |
The time when the scan finished. |
|
Scan status |
How the scan ended. |
|
Target |
This field can be a target IP, schedule name, or a discovery scan name. |
|
Scan Job |
The name of the scan job. |
|
Scan duration |
The total scan time for this job. |
|
Cause of error |
An additional information field which can show why a scan failed. |
Retention Period
According to PCI SSC regulation, the ASV Company must adhere to all requirements to protect sensitive and confidential information.
This information must be available upon request by PCI SSC and its Affiliates for a minimum of three (3) years. For that reason the PCI scan data is not removed before this three year period.
Performing a PCI DSS Scan
For information on how to perform a PCI DSS Scan, see the Performing a PCI DSS Scan article.
Glossary
|
Abbreviation |
Description |
|
ASV |
Approved Scanning Vendor |
|
CVE |
Common Vulnerabilities and Exposures |
|
CVSS |
Common Vulnerability Scoring System |
|
DSS |
Data Security Standard |
|
PCI |
Payment Card Industry |
|
QSA |
Qualified Security Assessor |
References