Last Updated: 2026-04-14
Purpose
This article describes the layout of the Reports and its content.
Introduction
Reports in the Outpost24 Portal provide a structured way to analyze and present vulnerabilities, compliance issues, delta comparisons, and remediation solutions for one or multiple assets, enabling security teams to gain actionable insights into their environment. Reports allows users to generate tailored reports with customizable detail levels—such as summary, management, or detailed views—in formats like PDF for visual clarity, Excel for tabular data, or XML for system integration, with options for secure compression and password protection. By supporting on-demand generation or scheduled delivery via email, direct download, or storage in the Report Library, reports streamline security assessments, facilitate compliance with industry standards, and enhance decision-making by delivering precise, accessible data to stakeholders. Reports integration with view templates and tag-based scoping ensures focused reporting, while alignment with CVSS v2 metrics and OWASP-guided SWAT testing provides robust vulnerability analysis, making it essential for maintaining a secure and compliant infrastructure.
Requirements
It is assumed that the reader has basic access to the OUTSCAN/HIAB account.
Reports
Report types:
-
Vulnerabilities
-
Delta
-
Solutions
Ways to export:
-
Finding based reports - can be exported for one or more findings from the Vulnerabilities or Solutions views and contain all the selected vulnerability findings.
-
Asset based reports - can be exported for one or more assets from the Asset view and contain all vulnerability findings associated with the selected assets.
-
Asset group based reports - can be exported for one or more asset group from the Asset group view and contain all vulnerability findings associated with the selected asset groups.
View Templates
View Templates are saved views which include applications, filters, grouping, and columns. Reports use View Templates to filter the reports by predefined templates. There are some built in templates, but more can be customized by the user.
For more information, see View Templates.
Report Levels
The detail level can be adjusted based on the target recipient of the report. The amount of information varies in each type, thus making each report exclusive depending on the functionality and audience. There are three report levels available:
-
Management
-
Summary
-
Detailed
All reports contain the following sections:
-
Title page
-
Report information
-
Executive summary
Additionally, depending on the selected report level, the following sections will be included:
|
Report Type / Report Level |
Management |
Summary |
Detailed |
|---|---|---|---|
|
Technical details |
(no additional sections) |
Web application summary |
Web application summary
|
Title Page
This is the first page of each report with the title and the date when the report was generated:
Name and content may differ between Management, Summary, or Detailed reports.


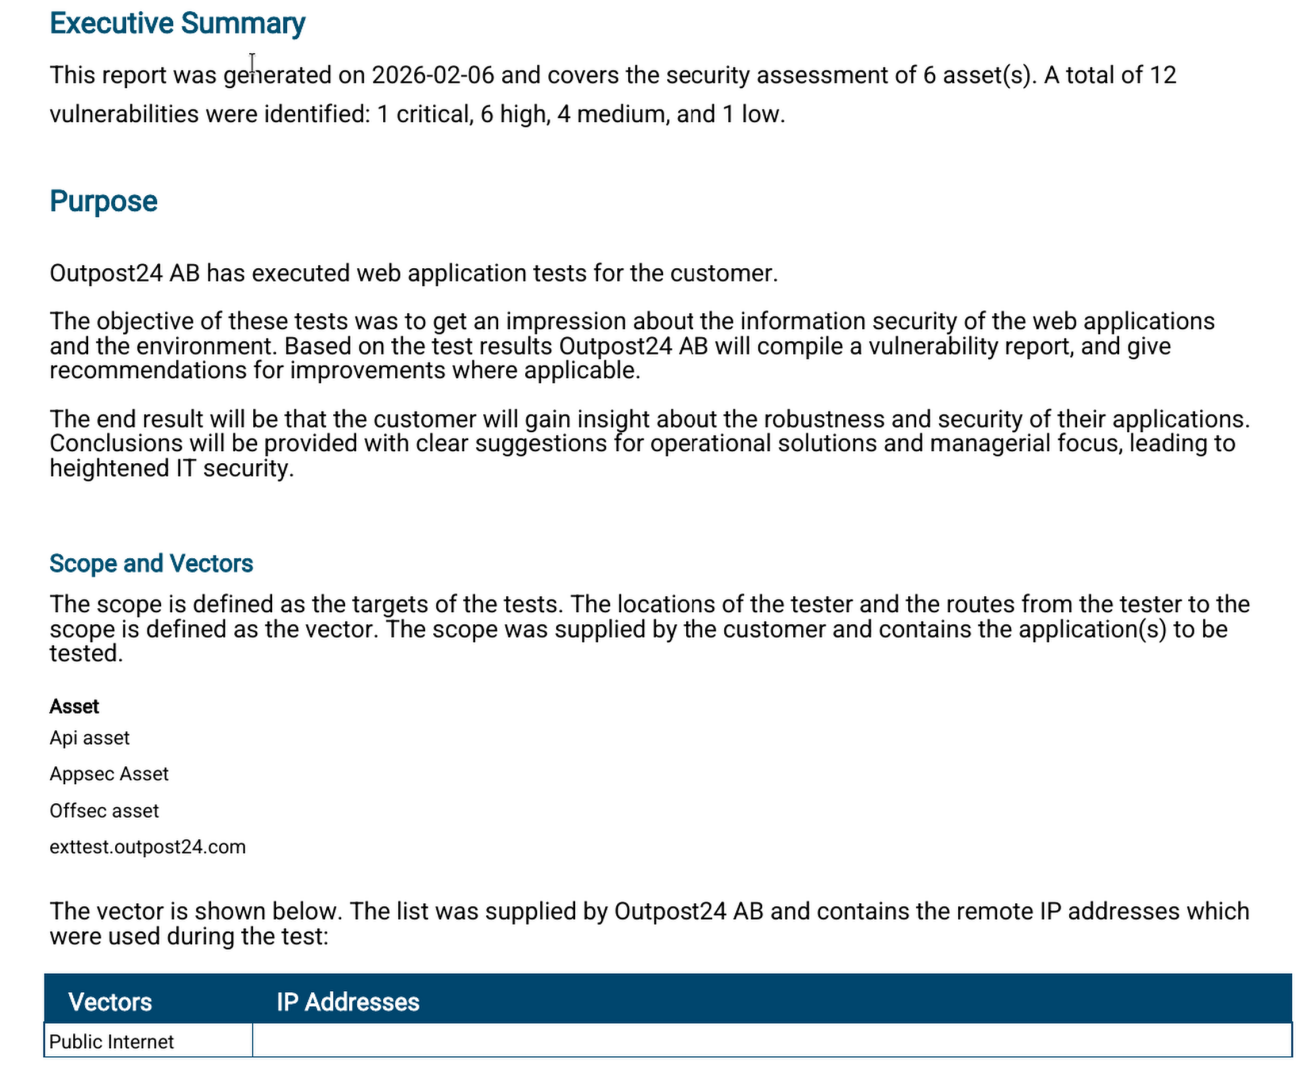
Executive Summary
The Executive Summary shows the trend information, risk families and solutions. It provides a highly visual overview which is informative and useful to report findings to the top management:
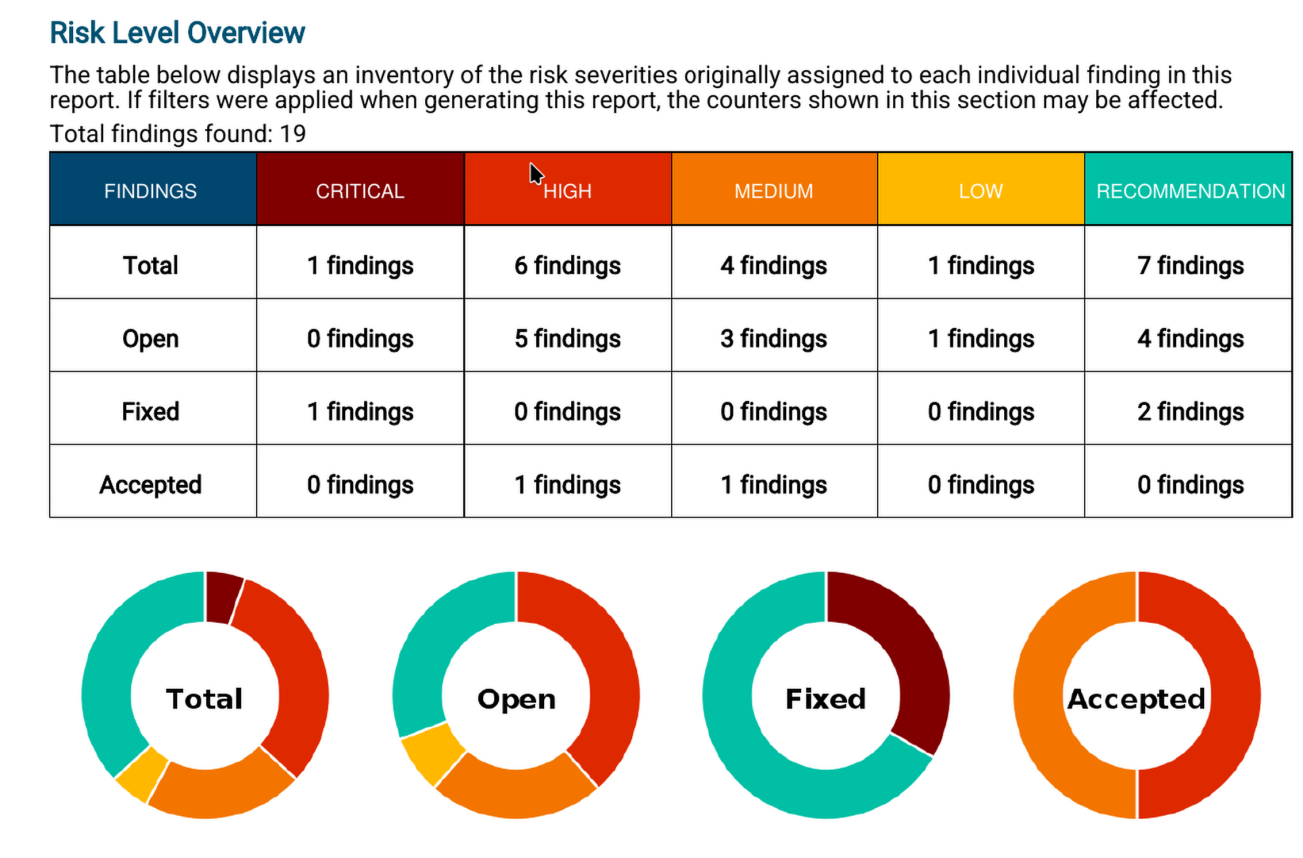
The Risk Level Overview presents a summary table and visual charts showing the number of findings per severity, broken down by status, to give a clear snapshot of risk distribution and remediation progress.
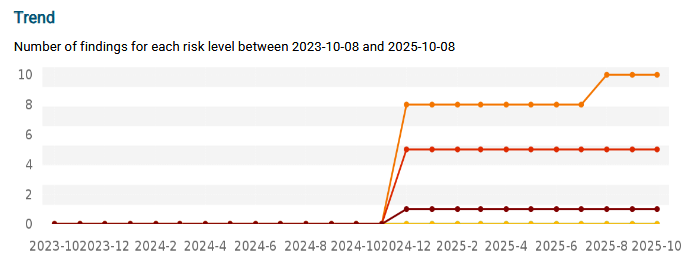
Trend
Trend shows how each risk level changes over time.
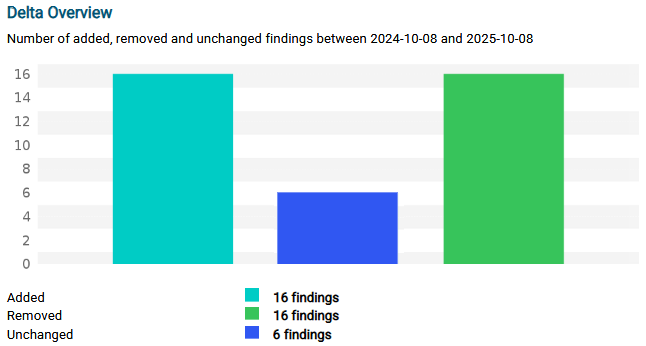
Delta Overview
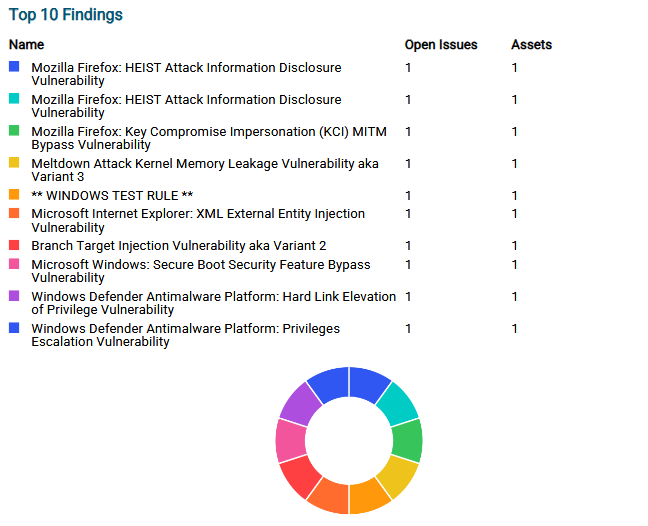
Top 10 Findings
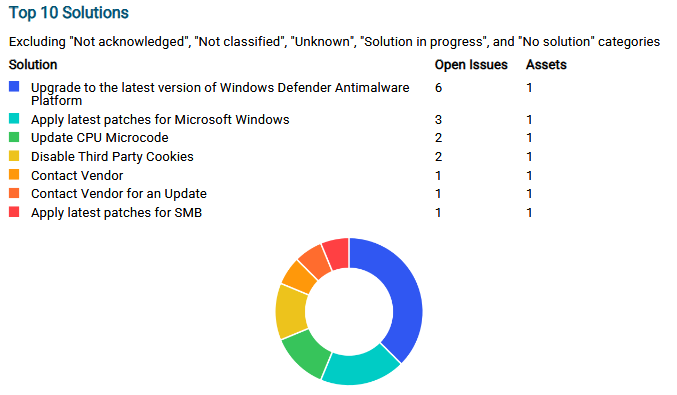
Top 10 Solutions
Risk Summary
This section provides the information like, number of findings and their severity, number of virtual hosts discovered, and scanning interval.

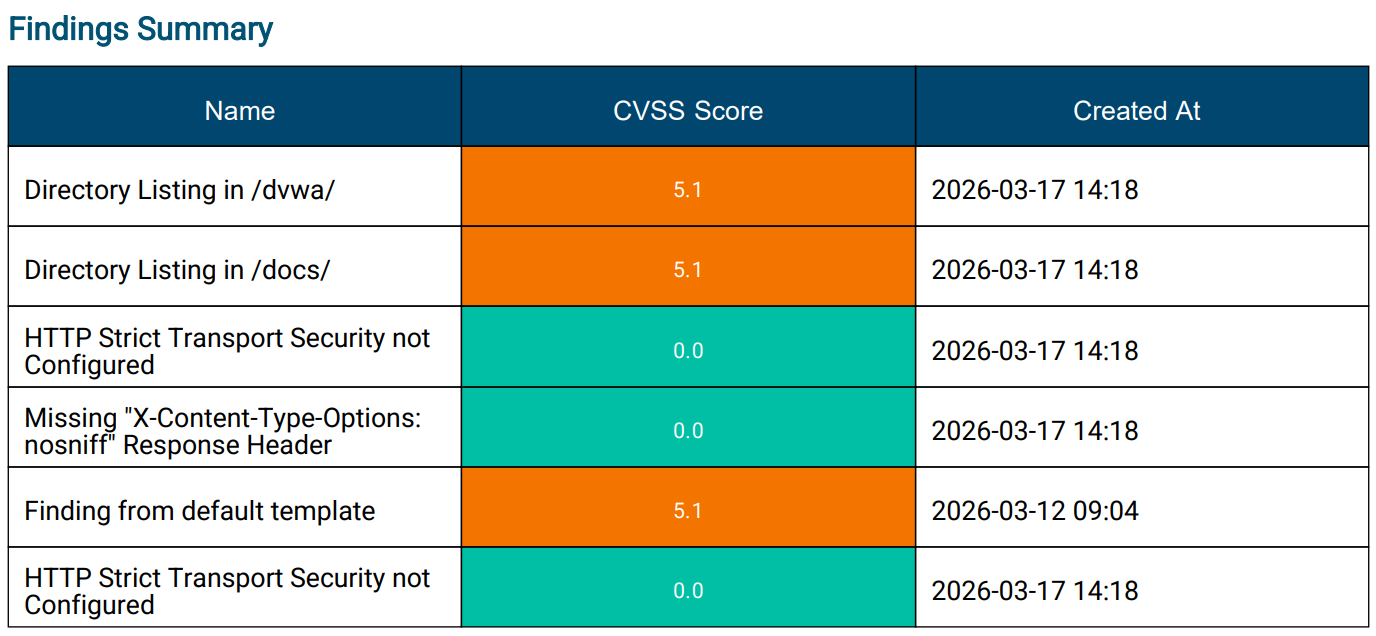
Findings summary
This section lists the specific vulnerabilities included in the report. It is an optional table that can be added to Management and Summary level PDF reports by selecting the Include Summary table option during report creation.
Risk Details
The Risk Details section provides information such as Risk factor, CVSS scores, Description, Status, CWE, CAPEC, OWASP, Impact, Solution among others.
The Risk Details are only available when selecting a detailed report.
Risk
Status - Indicates the different statuses for a finding. Can be marked as:
-
Accepted - Displays if the risk is accepted or not
-
False Positive - The scanner is finding a risk that has been marked by someone to be a false positive and is not supposed to pick up on.
-
Fixed - Shows if the vulnerability has been marked as fixed.
-
Irreproducible - AppSec not able to reproduce finding
-
Pending Verification - Shows if there is any pending verification request
-
Present - (Default) Shows that a Finding is present after scanning
Status verified - A text that is “This fix has been verified by a security consultant” if an APPSEC/OFFSEC finding was marked as FIXED by a GhostLabs consultant or “This fix has not been verified by a security consultant” if by customer user.
Tags - Displays the available tags associated with the finding.
Risk factor
CVSS - The Common Vulnerability Scoring System (CVSS) provides a way to capture the principal characteristics of a vulnerability and produce a numerical score reflecting its severity. The numerical score can then be translated into a qualitative representation such as Low, Medium, High, and Critical to help organizations properly assess and prioritize their vulnerability management processes
Description - A detailed explanation of the finding with information about the nature of the vulnerability and its potential impact on the affected system.
Information
Solution - The solution section provides an actionable advice on how to remediate the vulnerability as well as detailed information about the context of the vulnerability where it was found.
Category - Solution category: Workaround, Patch, Update, Contact Vendor,
Reference
Vendor - Links to vendor for information about the solution
Advisory - Links to advise about the solution
CVE - Common Vulnerabilities and Exposures (CVE) entry of the vulnerability. CVE is a list of publicly disclosed computer security flaws that's been assigned a CVE ID number. https://www.cve.org/
CWE - Common Weakness Enumeration (CWE™) is a community-developed list of common software and hardware weaknesses that have security ramifications. A weakness is a condition in a software, firmware, hardware, or service component that, under certain circumstances, could contribute to the introduction of vulnerabilities.
Bugtraq - Bugtraq ID of the vulnerability.
CAPEC - Common Attack Pattern Enumerations and Classifications (CAPEC™) is a catalog of known cyber security attack patterns used to prevent attacks. Same information as in the Detailed tab.
OWASP Top 10 2004, 2013, 2017, 2021 - The Open Worldwide Application Security Project (OWASP) Top 10 is a standard awareness document for developers and web application security, and represents a broad consensus about what the most critical web application security flaws are.
Farsight risk - <num> The Likelihood feature in Outpost24® Farsight provides an easier way to address vulnerabilities that are relevant and may impact an organization irrespective of the CVSS score or the presence of an exploit for a vulnerability.
Farsight risk delta - <num>
Farsight risk update date - <date>
Threat activity - <date>
Age - Number of days since the finding was first detected.
Check ID
External references - shows the related reference links for a finding as comma-separated URLs.
Explicit Exceptions
The following tests were not executed during the testing:
Denial of Service Attacks - The result of a denial of service attack might cause the application to cease normal behavior. Therefore, attacks of this type will not be executed, unless explicitly requested by the customer.
Social Engineering - In social engineering, an adversary attempts to gain access or otherwise manipulate an application by attacking the people and employees with privileged access, e.g. by enticing them to divulge information.
Physical Security - Physical security is the protection of personnel, hardware, programs, networks, and data from physical circumstances and events that could cause serious loss or damage to an enterprise, agency, or institution.
OWASP Top 10 Description
The OWASP API Top 10 2023 and OWASP MOBILE Top 10 2024’s ranks and names to the following sections of the report: Executive Summary, Risk Summary. Depending on the type of the asset group(s) on which the report is generated for, the corresponding OWASP info is displayed. If the asset group is of type API, then OWASP API Top 10 is included. If the asset group is of type Mobile, OWASP Mobile Top 10 is included. For all other asset group types, the normal OWASP Top 10 is included.
In the Risk Details section, each vulnerability show which rank, if any, of the OWASP Mobile Top 10 or OWASP API Top 10 that it is categorized as. For example:

OWASP API Top 10 2023
The OWASP API Top 10 is a powerful awareness document for web application security, which represents a broad consensus
about what the most critical web application security flaws are.
|
API1 |
Broken Object Level Authorization |
APIs tend to expose endpoints that handle object identifiers, creating a wide attack surface of Object
|
|
API2 |
Broken Authentication |
Authentication mechanisms are often implemented incorrectly, allowing attackers to compromise
|
|
API3 |
Broken Object Property Level Authorization |
This category combines API3:2019 Excessive Data Exposure and API6:2019 - Mass Assignment,
|
|
API4 |
Unrestricted Resource Consumption |
Satisfying API requests requires resources such as network bandwidth, CPU, memory, and storage.
|
|
API5 |
Broken Function Level Authorization |
This is commonly a result of insecure default configurations, incomplete or ad hoc configurations, open
|
|
API6 |
Unrestricted Access to Sensitive Business Flows |
APIs vulnerable to this risk expose a business flow - such as buying a ticket, or posting a comment -
|
|
API7 |
Server-Side Request Forgery |
Server-Side Request Forgery (SSRF) flaws can occur when an API is fetching a remote resource without
|
|
API8 |
Security Misconfiguration |
APIs and the systems supporting them typically contain complex configurations, meant to make the
|
|
API9 |
Improper Inventory Management |
APIs tend to expose more endpoints than traditional web applications, making proper and updated
|
|
API10 |
Unsafe Consumption of APIs |
Developers tend to trust data received from third-party APIs more than user input, and so tend to adopt
|
OWASP Mobile Top 10 2024
The OWASP Mobile Top 10 helps developers and security teams prioritize what to protect in mobile apps. It is based on real-world data such as vulnerability databases, incident reports, assessments. It also provides guidance on mitigations and how to fix or reduce risk.
|
M01 |
Improper Credential Usage |
Improper Credential Usage refers to vulnerabilities that arise from security weakness in mobile applications. These vulnerabilities can be exploited through hard coded credentials in the code or improper management of credential, leading to sever technical and business impacts. |
|
M02 |
Inadequate Supply Chain Security |
A supply chain consists of the organizations, individuals, activities, resources, and technologies involved in creating and distributing a product or service from supplier to customer. Attackers can exploit vulnerabilities in a mobile app’s construction by inserting malicious code during development. This can lead to data theft, user surveillance, or full control of the device. Detecting this vulnerability is challenging, but the technical an business impacts are severe. |
|
M03 |
Insecure Authentication/Authorization |
Ensuring secure authentication and session management in mobile applications is crucial to prevent unauthorized access to sensitive data and backend systems. Mobile devices, offering biometric authentication, must enforce these measures constantly. Insecure authorization processes risk exposing unauthorized data or functions, particularly when decisions are made locally rather than on centralized servers. While offline access is legitimate requirement, it introduces security challenges. Secure communication with backend systems or smart devices via various protocols like Wi-Fi or Bluetooth is essential to safeguard data integrity and user privacy in mobile applications. |
|
M04 |
Insufficient Input/Output Validation |
Insufficient validation of external data in mobile apps, such as user inputs, can lead to serious threats like SQL injection, cross-site scripting (XSS), and command injection. These vulnerabilities may result in unauthorized access, data manipulation, and compromise of the app’s functionality and backend systems. While easily detected, they can have severe technical and business impacts. |
|
M05 |
Insecure Communication |
Most mobile applications require ways to communicate with backend systems or local smart devices, either through direct client- server communication , or through an intermediate API. It is pivotal that communication takes place in a secure way. Regardless of the type of transmission, including among others: Wi-Fi, Bluetooth, NFC, and Cellular communication. |
|
M06 |
Inadequate Privacy Controls |
Application-specific privacy controls protect Personally Identifiable Information (PII). such as names, addresses, credit card details, emails, IP-addresses, and sensitive on health, religion, sexuality, and political opinions. This information is valuable to attackers for identity theft, fraud, financial misuse, blackmail, and data damage. |
|
M07 |
Insufficient Binary Protections |
Reverse engineering mobile apps can expose critical information and lead to security breaches. Attackers may exploit this by distributing maliciously modified versions of apps through third-party stores, resulting in data theft and reputational damages. While all mobile apps are vulnerable to code tampering, evaluating the effectiveness of Root and Jailbreak detection can mitigate these risks. Poor code quality, although not a direct security issue, can create vulnerabilities exploited by malware and phishing, emphasizing the need for robust security controls in mobile app development. |
|
M08 |
Security Misconfiguration |
Extraneous, or irrelevant, functionality is especially interesting to identify and further scrutinize for an attacker. Such |
|
M09 |
Insecure Data Storage |
Insecurely stored data by the application may provide a platform of attack for adversaries or may expose Personally Identifiable Information (PII) or other sensitive information stored within the application, elsewhere on the mobile device or cloud storage. |
|
M10 |
Insufficient Cryptography |
Insecure cryptography methods enable attackers to breach systems and access protected information. They may attempt to decipher encryption codes, use brute force to guess passwords, or exploit weaknesses in encryption setup. This allows them to read encrypted data, manipulate encryption processes, or gain unauthorized access to accounts, leading to data leaks and falsification of information. Attackers include those attempting to decrypt data for unauthorized access, insiders misusing access or sharing keys, government entities for espionage, cyber criminals exploiting weak encryption for theft or fraud, and hackers discovering flaws in encryption methods. |
Common Vulnerability Scoring System (CVSS) v2 Description
The Common Vulnerability Scoring System (CVSS) is a free and open industry standard for assessing the severity of computer system security vulnerabilities. CVSS attempts to assign severity scores to vulnerabilities, allowing responders to prioritize responses and resources according to threat. Scores are calculated based on a formula that depends on several metrics that approximate ease of exploit and the impact of exploit. Scores range from 0 to 10, with 10 being the most severe. While many utilize only the CVSS Base score for determining severity, Temporal and Environmental scores also exist, to factor in availability of mitigation and how widespread vulnerable systems are within an organization, respectively.
Access Complexity (AC)
|
Metric Value |
Description |
|---|---|
|
High (H) |
Specialized access conditions exist. For example:
|
|
Medium (M) |
The access conditions are somewhat specialized; the following are examples:
|
|
Low (L) |
Specialized access conditions or extenuating circumstances do not exist. The following are examples:
|
Access Vector (AV)
|
Metric Value |
Description |
|---|---|
|
Local (L) |
Vulnerability exploitable with only local access requires the attacker to have either physical access to the vulnerable system or a local (shell) account. Examples of locally exploitable vulnerabilities are peripheral attacks such as Firewire/USB DMA attacks, and local privilege escalations (e.g., sudo). |
|
Adjacent Network (A) |
Vulnerability exploitable with adjacent network access requires the attacker to have access to either the broadcast or collision domain of the vulnerable software. Examples of local networks include local IP subnet, Bluetooth, IEEE 802.11, and local Ethernet segment. |
|
Network (N) |
A vulnerability exploitable with network access means the vulnerable software is bound to the network stack and the attacker does not require local network access or local access. Such vulnerability is often termed "remotely exploitable". An example of a network attack is an RPC buffer overflow. |
Authentication (Au)
|
Metric Value |
Description |
|---|---|
|
Multiple (M) |
Exploiting the vulnerability requires that the attacker authenticate two or more times, even if the same credentials are used each time. An example is an attacker authenticating to an operating system in addition to providing credentials to access an application hosted on that system. |
|
Single (S) |
One instance of authentication is required to access and exploit the vulnerability. |
|
None (N) |
Authentication is not required to access and exploit the vulnerability. |
Confidentiality Impact (C)
|
Metric Value |
Description |
|---|---|
|
Partial (P) |
There is considerable informational disclosure. Access to some system files is possible, but the attacker does not have control over what is obtained, or the scope of the loss is constrained. An example is a vulnerability that divulges only certain tables in a database. |
|
Complete (C) |
There is total information disclosure, resulting in all system files being revealed. The attacker is able to read all of the system's data (memory, files, etc.) |
|
None (N) |
There is no impact to the confidentiality of the system. |
Integrity Impact (I)
|
Metric Value |
Description |
|---|---|
|
Partial (P) |
Modification of some system files or information is possible, but the attacker does not have control over what can be modified, or the scope of what the attacker can affect is limited. For example, system or application files may be overwritten or modified, but either the attacker has no control over which files are affected or the attacker can modify files within only a limited context or scope. |
|
Complete (C) |
There is a total compromise of system integrity. There is a complete loss of system protection, resulting in the entire system being compromised. The attacker is able to modify any files on the target system. |
|
None (N) |
There is no impact to the integrity of the system. |
Availability Impact (A)
|
Metric Value |
Description |
|---|---|
|
Partial (P) |
There is reduced performance or interruptions in resource availability. An example is a network-based flood attack that permits a limited number of successful connections to an Internet service. |
|
Complete (C) |
There is total information disclosure, resulting in all system files being revealed. The attacker is able to read all of the system's data (memory, files, etc.) |
|
None (N) |
There is no impact to the availability of the system. |
Test case appendix - SWAT
SWAT is a hybrid service delivery covering automated monitoring and web application scanning as well as at least quarterly penetration testing, including application logics, of web applications under service.
The test-cases are oriented around the OWASP TESTING GUIDE, and for the application the following controls has been performed. Note that a control will be marked as audited either if found present and audited, or were found not present and hence not auditable - This to show that the application has been audited for this class of risks.

Related Articles