Last Updated: 2023-08-15
Purpose
This article describe how to check if the Agent have produced results that can be uploaded to OUTSCAN.
Introduction
In Outpost24, after an agent runs a scheduled scan, it must generate result files and upload them to OUTSCAN via the API. The Checking if the Agent has Produced Results feature helps administrators verify whether those result files exist locally before submission. By inspecting specific result directories on Windows or Linux hosts, you can confirm that scans have executed, that output files are present and being updated, and thus ensure that no data is stuck or delayed in transit.
How To Check if the Agent Scan has Produced Results
When a scheduled scan has been performed, the result is submitted to the API. Failing to submit to the API will leave the results for the next call home. To check if a result has been produce by the scan to be uploaded follow the steps in this document.
Windows
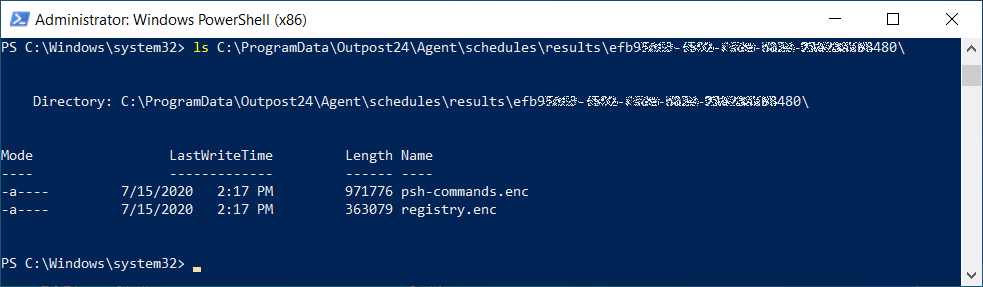
Open a file Explorer or Windows PowerShell as administrator and enter the following command:
ls C:\ProgramData\Outpost24\Agent\schedules\results\
Linux
Login to you Linux system with an account that has admin privileges or is able to elevate privileges and become root and run the following command:
sudo ls -la /var/cache/o24-agent/schedules/results
Example
In both cases, this directory contains the results for the Agent. Each schedule is a directory of type (UUID) that contains 1 to 2 encrypted files: commands.enc (for Linux), psh-commands.enc and registry.enc (for Windows).
Windows example:
Linux example:
You can also check the date and time of each file to ensure they are updated and changing.
If you have several UUID sub directories, it means you have configured several schedules, and you are getting several results matching the schedules.
Related Articles
- Windows 10/Windows 2019 Server
- HIAB Updates
- General Information about SMB/WinRM Scanning
- Change Risk Levels
- Removing an Agent from Windows
- ServiceNow - Legacy
- Windows 8.1
- Netsec Filters
- Discovering the Agent in OUTSCAN
- Technical Specification
- Account Settings
- How to Test SMB Authentication
- Windows 2016 Server
- Identity Provider Settings
- HIAB Server Settings
- Installing a Linux Agent
- Okta Identity Provider Configuration
- Scanning-Less Scanning
- Check Connectivity to Agent Server
- Scan Scheduling Errors
- Overview
- Event Notification Module
- HIAB Maintenance Settings
- HIAB Deployment Guide
- Database Connector (HIAB only)
- Azure AD Identity Provider Configuration
- Add Comments
- Target Groups
- Checking if Agent is Running
- Core Installation
- Windows 2008 R2 Server
- Agent Installation Introduction
- Automatic Asset Joining With Netsec
- Manage Users
- Firewall Setup for Agents
- Scanning Range
- SNMP (HIAB only)
- ADFS Identity Provider Configuration
- Splunk
- Agent Call Home
- Advanced Report Filters
- Accept Risks
- SMB Authentication from OUTSCAN/HIAB
- Virtual HIAB Appliance
- Using the Agent Info Command
- Amazon
- User Roles
- Removing an Agent from Linux
- Retrieving the Agent UUID
- Atlassian Jira
- Understanding Scanner and Scheduler
- Finding the Agent Version
- Create and Edit Event Notifications
- Installing a macOS Agent
- Syslog (HIAB only)
- Setting Up an Agent Using System Proxy
- ServiceNow - App
- Thycotic
- DNS Lookup in UI and in Console
- HIAB Console
- Auditing Guide
- Adding Agent Attributes
- HIAB Distribution Settings
- Run Verification Scans
- Agent Latest Version
- Finding New Agents In OUTSCAN
- Setting up a HIAB as an Appsec Scale Scanner
- Checking Schedules from OUTSCAN in Agent
- Hardening the HIAB
- Performing a PCI DSS Scan
- Two Factor Authentication
- Attributes
- Firewall Rules
- HIAB Enrollment
- Supported Platforms for Authenticated SSH Scanning
- Authenticated Scanning Using WinRM
- OneLogin Identity Provider Configuration
- Windows 7
- HIAB Remote Support
- Compliance Scanning
- Manage Targets
- Assign Tasks
- Authenticated Scanning Using SSH
- Tickets Quick Start Guide
- Retrieving Results From the Agent in OUTSCAN
- Appliance Logs
- Converting Normal with Webapp Scans (Netsec) to Portal Workflows
- Updating the Agent
- Troubleshooting SMB Authentication
- Agent Licensing
- Mark as False Positives
- Installing a Windows Agent
- Using Farsight in Netsec
- Testing Target System for Open TCP Ports
- HIAB Restore
- Scan Stages
- Request Clarifications
- HIAB Setup Guide
- Updating Agent Attributes
- CyberArk
- LDAP/AD
- Checking if the Agent has Produced Results
- ArcSight (HIAB only)
- HIAB E-mail Whitelisting
- Adjust Identity Provider SAML Metadata File
- Scanning Critical Industrial Devices/Machines
- Reporting Tools
- Scan Scheduling
- Scanning Performance and Impact Tuning
- PCI Compliance Scanning
- Configuring and Accessing the HIAB console using SSH
- User Groups
- Create Users
- HIAB Remote SSH Guide
- Download Agents
- Create Targets
- Windows 2012 R2 Server
- HIAB Backup
- Report Scheduling
- Access Tokens
- O24AUTH
- Complementary Authenticated Scan on Default Credentials
- Authenticated Scanning Using SMB
- Dynamic Target Group