Last Updated: 2025-10-23
Purpose
This article describes how to set up a Network Host Assessment scan.
Introduction
In Outpost24, the Network Host Assessment is a scanning configuration that evaluates the security posture of individual network hosts, such as servers, workstations, or network devices. This assessment identifies the operating system and installed software applications on the host, assessing their vulnerability to known exploits and attacks. It also evaluates the configuration of the host, including the security of network services, access controls, and patch levels. Configuration errors or misconfiguration can create security vulnerabilities that can be exploited by attackers. The results of the assessment can be used to prioritize vulnerabilities and develop a plan for remediation that includes applying security patches, reconfiguring access controls or network services, or implementing additional security controls such as intrusion detection or prevention systems. Regular network host assessments are essential, as new vulnerabilities can be introduced when software is updated or new applications are installed.
Setting up a Network Host Assessment
Requirements
Before initiating the Network Host Assessment, it is recommended to perform a discovery scan to gain an overview of the organization's IT assets. For additional information, refer to: Network Discovery.
Set up
-
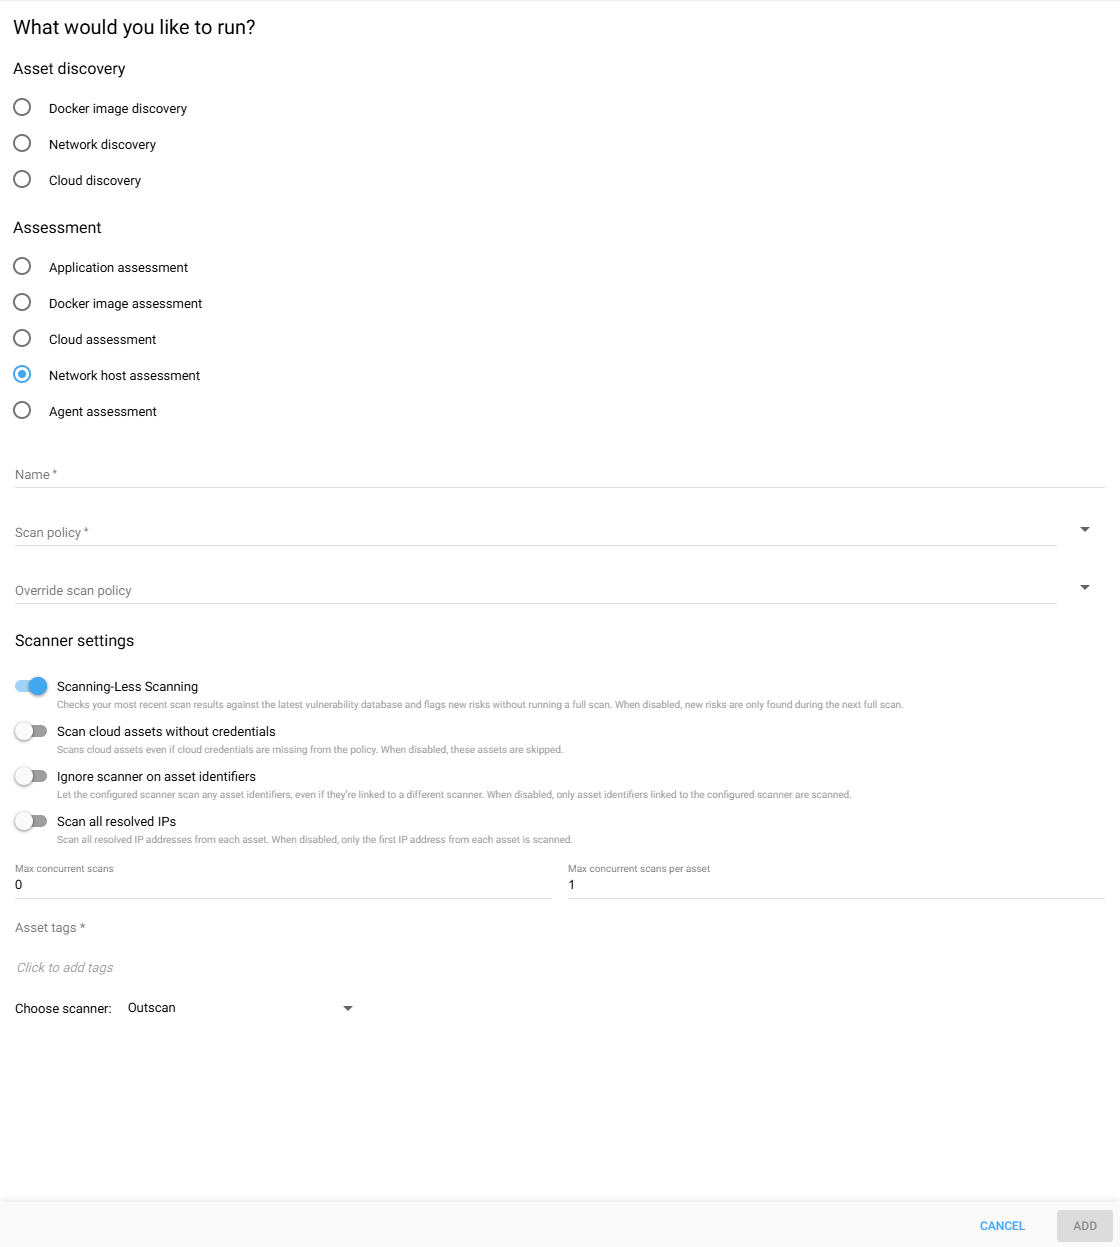
Select Network host assessment.
-
Fill in the Name input field with a descriptive name for the intended assessment.
-
Select Policy from the drop-down menu. To create a new scan policy, refer to: Scan Policies.
-
Optionally, select an Override scan policy from the drop-down menu. For a more detailed description of this parameter, refer to: Policy Settings.
-
Toggle the Scanning-Less Scanning switch button to enable or disable this option. For a comprehensive understanding of this feature, refer to: Scanning-Less Scanning.
-
Toggle the Scan Cloud Assets Without Credential switch to continue scanning assets even if no cloud credentials are found. If disabled, such assets will be skipped.
-
If the Ignore scanner on asset identifiers switch is disabled, asset associations will only be scanned using scanners that match the specified scanner field. Otherwise, they can be scanned with any available scanner.
-
If the Scan all resolved IPs switch button is enabled, the scan will scan all the IP addresses resolved from assets. Otherwise, only the first resolved IP address will be scanned.
-
The Max Concurrent Scans field sets the maximum number of scans that can run at the same time. Set the value to 0 for no limit.
-
The Max Concurrent scans per asset field determines how many scans can concurrently run against a single asset. Set the value to 0 disables this restriction.
-
Select Asset tags to filter which assets are included in the scan. You can select multiple tags, and only assets that contain all of the selected tags will be scanned. For example, if you select
worldwideandlocation:hanoi, only assets that have both tags will be included (This is especially useful when you want to narrow down scans for more precise targeting). -
Click on the blue Add button in the lower right corner to add the configuration.
Related Articles
- Windows 10/Windows 2019 Server
- General Information about SMB/WinRM Scanning
- Windows 8.1
- Scan Blueprint
- How to Test SMB Authentication
- Docker Image Assessment
- Windows 2016 Server
- How to Scan AWS ECR Images
- Scanning-Less Scanning
- Scan Scheduling Errors
- Network Host Assessment
- Core Installation
- Windows 2008 R2 Server
- Scanning Range
- SMB Authentication from OUTSCAN/HIAB