Last updated: 2026-06-02
Purpose
This document describe how to perform a PCI Scan.
Introduction
Outpost24 is a certified Approved Scanning Vendor (ASV) by the PCI Security Standards Council and offers OUTSCAN PCI, an extension of the OUTSCAN vulnerability management tool designed specifically to verify and prove PCI DSS compliance. OUTSCAN PCI examines network perimeters, identifies vulnerabilities and inventories actionable remedies, and can repeatedly scan until all criteria are met to effectively protect the integrity of cardholder data and verify compliance.
Performing a PCI Scan
For a successful PCI DSS scan, perform the following steps.
Add Targets
Filling in IPs but not hostnames, causes VHOST lookups to fail during scanning, causing SSL/TLS certificate validation errors.
-
Click on the Scope tab.
-
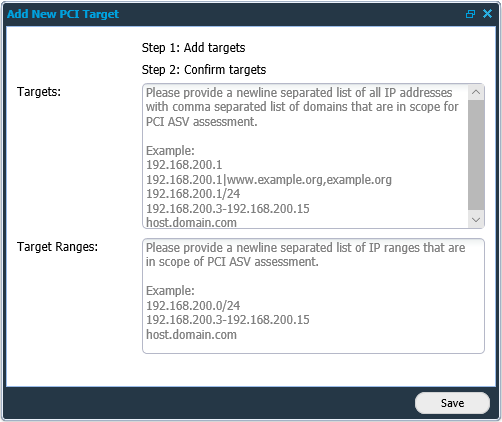
In the Target field, click New to open the Add New PCI Target window.
If this is the first time the PCI scan is performed, the Add New PCI Target window opens automatically.
-
Add known targets by IP or host-name, and their respective network range.
This immediate initialize a port scan of the whole network range, originating from the OUTSCAN scanning range (91.216.32.0/24). This is performed in accordance with the PCI DSS requirements regarding how to define your PCI DSS scope for external scanning.
Targets
Provide a newline separated list of all IP addresses with comma separated list of domains that are in scope for PCI ASV assessment.
Example:192.168.200.1 192.168.200.1|www.example.org,example.org 192.168.200.1/24 192.168.200.3-192.168.200.15 host.domain.com
Target Ranges
Provide a newline separated list of IP ranges that are in scope for PCI ASV assessment.
Example:192.168.200.1/24 192.168.200.3-192.168.200.15 host.domain.com
-
Click Save.
-
Manually confirm or delete unsupplied targets from the PCI DSS scope that were detected.
You are required to confirm or delete these targets from the PCI DSS scope. If you have any questions regarding if they should be included in the scope or not, refer to the Payment Card Industry (PCI) Data Security Standard Requirements and Security Assessment Procedures Version 4.0.1 June 2024, your QSA or us (the ASV) for target.
-
Once the scope of targets has been defined, Click New in the Scans field to open the Maintaining Scan Schedule.
-
Select a time and date when the scan should be performed and click Save, or click Scan Now to start the scan manually.
The PCI DSS requires you to provide compliant reports on a quarterly basis. It is recommended to perform the scan well in advance of this date to have time to resolve any new and unexpected risks/issues.
Report
Once the scan has finished, you receive an email notification and you can log in to see the report. The report state if you are compliant or not and this information is included in all the sections, so you can determine which issues are causing any compliance failure.
Address and resolve all vulnerabilities that are affecting the PCI DSS compliance.
Should a finding be wrong or report on the wrong premises (false positive). Then you can right click on the entry and select the option Dispute. To successfully dispute a finding, provide a full chain of evidence (when, where, and how) along with the documentation.
That disputes are NOT to be submitted to the PCI SSC. Should you need help, such as what to present in the dispute, contact the Outpost24 Support.
Any findings that cannot be re-mediated may be mitigated by having compensating controls put in place. Refer to the Payment Card Industry (PCI) Data Security Standard Requirements and Security Assessment Procedures Version 4.0.1 June 2024 (Appendix B and C) for further information regarding requirements for compensating controls.
Some findings require a special note to be supplied where you justify the business need for the detected service. If any comments are required, a dialog window opens before the report is exported. It is also possible to add the Special Note field to the reporting grid to determine their presence earlier, right clicking on the entry displays the option Comment special note in the context menu.
Export Report
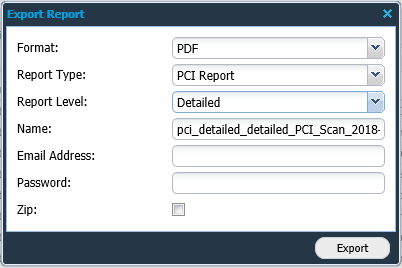
A report can be exported using the Export Report option visible on the bottom left of PCI Scanning window. Reports can be customized using different reporting formats, types and levels.
Format
A report can be exported in the most commonly and widely used document formats.
The available reporting formats are as follows:
-
PDF: This is the most commonly used reporting format. The reports generated in PDF format can be password protected.
-
Excel: The reports generated using excel format, have a lot of tabular information, which can be useful when reporting information to IT/Security department or similar divisions.
-
XML: This format is the default industry standard used for data exchange and integration. The reports generated in XML format are typically used for integration and automation.
Report Type
There are several report types, depending on the setup and license not all of them will be visible. Based on the type of scan and the type of information, select the corresponding report type.
-
PCI Report
-
Vulnerability
-
Group Vulnerability
-
Web App Discovery
Report Level
The report level helps you manage reports based on management hierarchy. It helps you generate the correct report based on how much information is needed and in which form. It can be observed that the information varies in the figures above, thus making each report exclusive depending on its functionality and audience.
There are three reporting levels:
-
Detailed
-
Summary
-
Management
Detailed
The Detailed report is the longest report that can be generated. It has in depth technical information about findings, targets, risk-levels, CVSS, report and additional information about the finding. The report contains six chapters and has detailed information about all the vulnerabilities and targets. This report is mostly directed towards system administrators and security consultants in an organization.
Summary
The Summary report is the ideal sized report with report information, executive summary and target summary. This report provides just about the right information required by the IT department of any organization.
Management
The Management level report gives us a summary of the vulnerabilities and risks reported. It gives a good graphical overview of findings, risks, and top solutions. This report is ideal while reporting to higher management.
Other Information
Name
Provide the name of the report in this section. If left blank, a name is created as per the selected options.
Email Address
Supply an email address in this field to send the report via email instead of downloading.
The email address can be set globally in the Settings menu in top right corner.
Password
Enter a password in this field to password protected the report.
The password can be set globally in the Settings menu in top right corner.
Include Attachments (Zip)
If selected, the exported report is compressed with zip compression as standard.
Acknowledgements
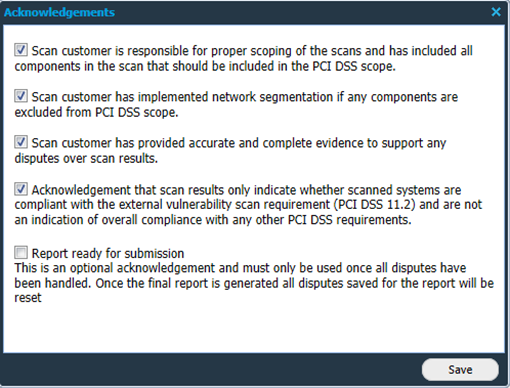
After clicking Export, the Acknowledgement window is displayed. Select the boxes that apply and click Save to complete the export.
That the four first tick boxes need to be selected before saving and committing the export.
Disputing a Finding
A PCI Dispute means that the customer formally challenges a vulnerability reported by the scan because they believe the result should not affect PCI compliance.
A dispute is typically raised when the customer determines that the finding is:
-
A false positive – the vulnerability does not actually exist but are still registered in the findings.
-
Not applicable – the reported condition does not apply to the scanned system or environment.
-
Already mitigated – controls are in place that effectively reduce or eliminate the risk, even if the scan still detects a condition.
The purpose of the dispute process is to allow the customer to submit evidence to the ASV (Approved Scanning Vendor) so the finding can be reviewed and, if justified, excluded from impacting compliance status.
How to Dispute a PCI Scan Finding
If a finding looks incorrect:
-
Locate the vulnerability finding in the scan results.
-
Right-click the finding.
-
Select Dispute.
What the Customer Must Provide
A dispute must include complete supporting evidence that enables the ASV to independently evaluate the challenge.
The submission should establish a full chain of evidence that explains:
-
When the mitigation was implemented or verification was performed.
-
Which affected asset, IP address, host, service, or environment the evidence applies to.
-
How the vulnerability was mitigated, why the finding is incorrect, or how compensating controls prevent exploitation.
The evidence must be detailed enough for the ASV to validate either that the finding is a false positive, or that compensating controls are implemented and maintained.
For detailed requirements, refer to:
-
Section 7.7 – Managing False Positives and Other Disputes
-
Section 7.8 – Addressing Vulnerabilities with Compensating Controls
in the PCI DSS Approved Scanning Vendor Program Guide v4.0.
How to Check the Dispute Status

Under Reports > Findings (Tab) You can include 3 columns called Disputed, Dispute Accepted, and Dispute Status.
-
Disputed - Yes or No says whether a finding is disputed or not by the scan customer.
-
Dispute Accepted - Yes or No says whether the disputed Finding is accepted or rejected by the ASV.
-
Dispute Status - Pending or Accepted or Rejected displays the current status of the disputed finding.
Glossary
|
Abbreviation |
Description |
|---|---|
|
ASV |
Approved Scanning Vendor |
|
CVE |
Common Vulnerabilities and Exposures |
|
CVSS |
Common Vulnerability Scoring System |
|
DSS |
Data Security Standard |
|
PCI |
Payment Card Industry |
|
QSA |
Qualified Security Assessor |
Reference
External Reference