Last updated: 2023-02-14
Purpose
This article describes how to create targets.
Introduction
The Create Targets feature in OUTSCAN and HIAB is used to define and manage the assets that will be assessed by the vulnerability scanning platform. A target represents a system or resource such as an IP address, hostname, network range, or fully qualified domain name (FQDN) that the platform can scan for vulnerabilities. Targets are created in the Manage Targets view and can be added individually or imported in bulk from sources such as CSV files, LDAP/Active Directory, or ServiceNow or by conducting a Discovery Scan. During creation, administrators can configure attributes such as DNS or NetBIOS lookups, assign scanners, define business criticality, and add additional metadata. Targets can also be edited to configure authentication methods, web-specific settings, and CVSS impact factors, enabling more accurate scanning and reporting.
Organizations should use the feature to ensure that all relevant infrastructure assets are properly defined and included in the vulnerability management process. By centrally registering systems and enriching them with attributes such as exposure level, business criticality, and authentication credentials, teams can perform more accurate scans and prioritize remediation based on the importance of each asset. The ability to import targets from external systems and organize them into groups also improves scalability and operational efficiency, enabling security teams to manage large and complex environments while maintaining visibility over their attack surface.
Icon List
|
Icon |
Name |
Description |
|---|---|---|
|
|
New |
Clicking New opens the Add New Targets window. The newly created targets will belong to the currently selected target group. |
|
|
Show Groups |
Show all target groups in which this target has been added to. |
|
|
Audit Log |
To see the changes made to a certain entry, right click on it and select Audit log. This show a dialog with all the changes made to the object that were made by you or one of the users that you administrate. |
|
|
Lookup |
Filter the target group grid. |
|
|
Delete |
Clicking Delete while having any targets selected deletes them from the system. Multiple targets can be selected for deletion by holding shift while selecting the targets. Reports for the selected targets are not deleted.
|
|
|
Edit |
To edit a target, right-click on it and select Edit. This allows you to set the Hostname, MAC Address, label the systems importance which is used to calculate CVSS scores, and set Virtual host, hidden URLs. It also includes settings to set target to override scan policy. |
|
|
Export |
To export data from the grid, right click on any entry and select either to export it as HTML or CSV (comma separated values) in the sub menu. This gives you either a HTML page or a CSV file with data that you can save or copy data from. |
|
|
Settings |
Global settings for Target Management |
|
|
Scan |
Create a scan schedule for the target group. |
|
|
Label Target, Update from ServiceNow, Set Policies on Target |
By right-clicking on a target you can choose to update specific labels or attributes on the target. |
|
|
Show Scanner, Set Scanners on Targets |
Lists or set scanners on targets groups. |
|
|
Refresh |
Refresh the grid |
|
|
Label Targets,Update from ServiceNow, Set Policies on Targets |
By right-clicking on a target group you can choose to update specific labels or attributes on the targets in that group. |
|
|
Set Target Authentication |
Select available authentication from a drop down menu |
|
|
Column Menu |
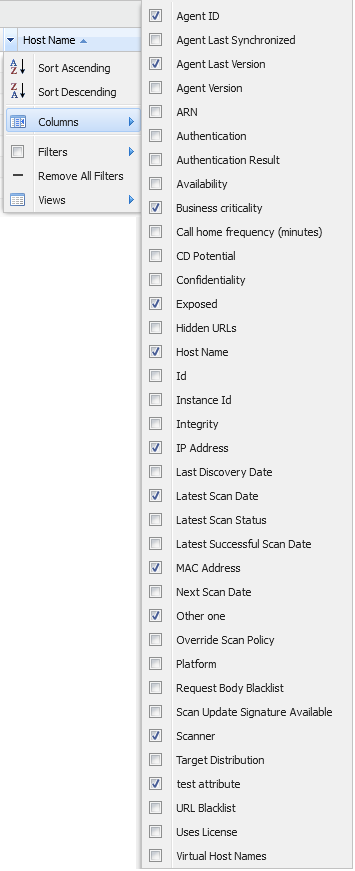
To add or remove columns, hover the mouse over any column name and click the down pointing arrow. |
Managing Targets
Create a New Target
Targets are added under the Manage Target section, which is accessible either using the icon on the desktop of from the menu at the bottom left of the GUI.
To create a target:
-
Open the Manage Targets module in Main Menu > Netsec > Manage Targets.
-
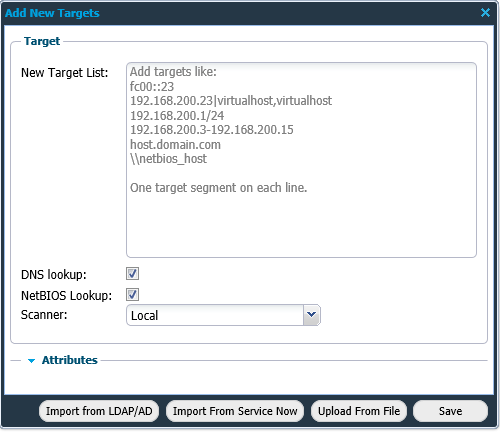
Click on + New in the Targets field to display the Add New Targets window.
|
Format |
Description |
|---|---|
|
fc00::23 |
IPv6 |
|
192.168.200.23|virtualhost,virtualhost |
IPv4 |
|
192.168.200.1/24 |
CIDR |
|
192.168.200.3-192.168.200.15 |
IP range |
|
FQDN |
|
|
\\netbios_host |
netBIOS hostname |
-
Fill in the required information in the form fields and click Save.
Targets can also be imported from a Comma Separated Values (csv) file, LDAP/AD, or ServiceNow by clicking on respective Import/Upload button.
|
Option |
Description |
|---|---|
|
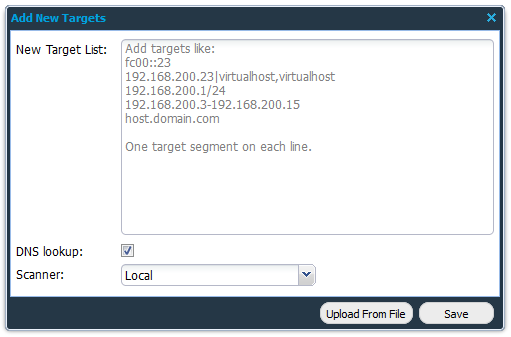
New Target List |
Add one or multiple targets using the presented help text. Private IP addresses cannot be added when using OUTSCAN.
|
|
DNS Lookup |
Select if a DNS look-up should be performed when adding the IP addresses to the system to get the host name in the system. |
|
NetBIOS Lookup (HIAB only) |
Select if a NetBIOS look-up should be performed when adding the IP addresses to the system to get the host name in the system. |
|
Scanner (HIAB only) |
Set which scanner that should scan the defined targets. Default is set to local and that is referring to the machine that you are logged on to. If you have a distributed network with multiple scanners that is accepted by the scheduler, you will be able to choose which scanner to use in the drop-down menu. If you have a HIAB External license, the OUTSCAN scanner is also available in the drop-down and should be used if public IPs are to be scanned from the OUTSCAN SaaS solution. |
|
Attributes |
This option is used to add additional information about the target. This is displayed as a column with the given field name in the Managed Targets grid. |
|
Upload From File |
Import a previously exported target group file or custom Comma Separated Values (csv) file. |
|
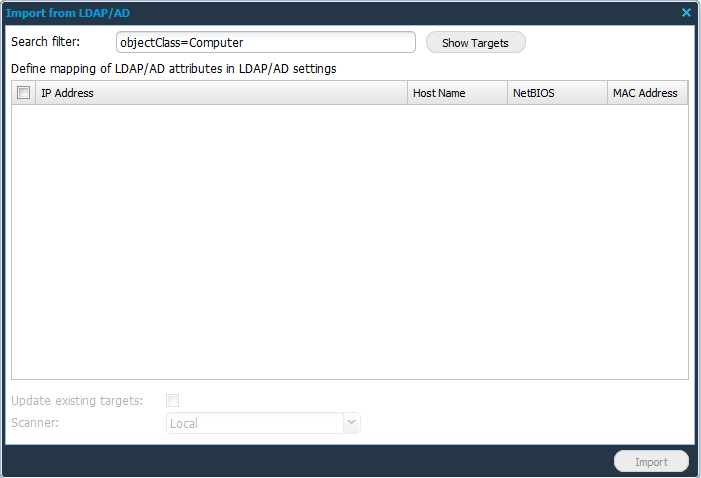
Import from LDAP/AD |
Import targets from LDAP/AD. |
|
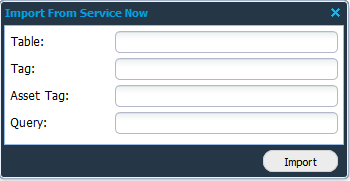
Import From ServiceNow |
Import targets from ServiceNow. |
Certain tasks like adding a large/multiple networks can take a long time. When it takes more than 90 seconds, the progress can be viewed in the Task Viewer tab located at the bottom right of the task bar. Task Viewer appears for a user only if there is at least one task in the list. The three possible states for a task appearing in Task Viewer are:
-
In Progress
-
Done
-
Error
Import from LDAP/AD
The Import from LDAP/AD button displays a window where you can select which targets to import into the HIAB.
|
Option |
Description |
|---|---|
|
Search Filter |
Standard LDAP search filter. See Search Filter Syntax on Windows Dev Center for more information. |
Import From ServiceNow
The Import from ServiceNow button displays a window where you can select which targets to import into the HIAB from ServiceNow.
|
Option |
Description |
|---|---|
|
Table |
Table name containing the targets in ServiceNow. |
|
Tag |
Tags are text labels in ServiceNow associated with items such as records and pages. |
|
Asset Tag |
The Asset tag refers to assets in ServiceNow Asset Management system. |
|
Query |
Search query to retrieve the ServiceNow targets. |
Upload From File
Adding targets from a CSV-file.
-
Click the + New button in the Targets view.

-
Click the Upload From File button.
-
Import the exported target group file or custom Comma Separated Values (csv) file by clicking the + button to select a file.

|
Option |
Description |
|---|---|
|
Upload From File |
Select a file to import. |
|
Separator |
Define what separator is used in the file.
|
|
Text Delimiter |
Define what text delimiter is used in the file.
|
|
Skip First Line |
Select this to skip the first line.
|
-
Click Next to continue.
-
Once uploaded, continue with mapping the files information to the target by selecting the appropriate subject in the drop-down menus.
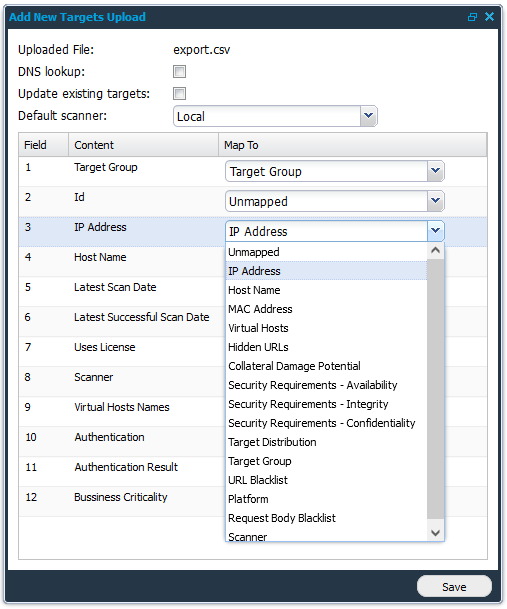
-
Finish by clicking the Save button.
Inspecting and Editing Targets
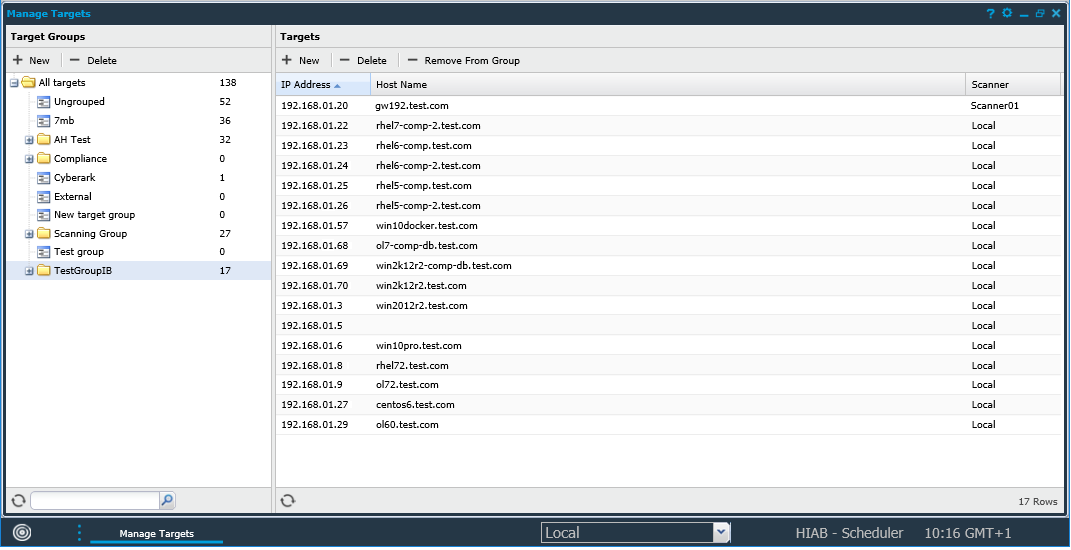
Once targets have been added into a group it will look like this.
Some of the columns does not get populated until the target has been scanned.
To add or remove columns, hover the mouse over any column name and click the down pointing arrow ![]()
|
Options |
Description |
|
Agent ID |
The Agent universally unique identifier (UUID). If blank, the agent has passed its end of life and should be updated. |
|
Agent Last Synchronized |
The last date when agent called home.
|
|
Agent Last Version |
Agent Last Version column shows a boolean Yes or No when an O24 agent is installed on the target and respectively matches or does not match the last available agent version. |
|
Agent Version |
Current version of the agent. If blank, the agent has passed its end of life and should be updated. |
|
ARN |
The Amazon Resource Name, used to find Amazon Web Services targets during scanning. |
|
Authentication |
Flag if authentication is defined on this target. |
|
Authentication Result |
The last results of when the authentication where used. |
|
Availability |
The targets availability, used for CVSS score calculation. |
|
Business Criticality |
This attribute describes how important the target is.
|
|
Call home frequency (minutes) |
Agent call home frequency. The agent call home frequency depends on the amount of agents that is deployed. When setting up an agent for the first time, the agent call home frequency is set to one hour, but is recalculated after enrollment to avoid overloading the agent server when deploying large amounts of agents. |
|
CD Potential |
The targets collateral damage potential, used for CVSS score calculation. |
|
Confidentiality |
The targets confidentiality, used for CVSS score calculation. |
|
Exposed |
This attribute can be set to determine if the target is exposed to the internet or not. It is automatically set for certain IP ranges but can be changed later. |
|
Hidden URLs |
A list of hidden URLs for the web app scanner to crawl. Hidden URLs are URLs that cannot be reached by crawling the default address. |
|
Host Name |
The targets host name. |
|
Instance ID |
Instance ID for Amazon Web Service targets. |
|
Integrity |
The targets integrity, used for CVSS score calculation. |
|
IP Address |
The IP address of the target. |
|
Last Discovery Date |
The last date the IP was detected in a discovery scan. |
|
Latest Scan Date |
The most recent date that a scan was run. |
|
Latest Scan Status |
Status of the most recent scan. |
|
Latest Successful Scan Date |
The date when the last successful scan was executed against this target. |
|
MAC Address |
The targets MAC address. |
|
NetBIOS |
The targets NetBIOS name. |
|
Next Scan Date |
The next date and time when this target will be scanned. |
|
Override Scan Policy |
Shows if the settings for the targets overrides the scan policy. This can be done by editing the target and setting specific scan settings for that target only. |
|
Platform |
The detected OS platform of the target. |
|
Request Body Blacklist |
Shows the request body blacklist for the target. |
|
Scan Update Signature Available |
Shows if there is a scan update signature available for the target. |
|
Scanner (HIAB only) |
Scans against the target will be executed by this scanner. Only visible when at least one scanner is registered. |
|
Target Distribution |
The targets distribution, used for CVSS score calculation. |
|
URL Blacklist |
Shows the URL Blacklist for the target. |
|
Uses License |
Shows if this target is using your license or not. |
|
Virtual Host Names |
Shows the hostnames of any virtual hosts. |
Edit a Target
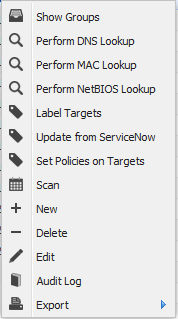
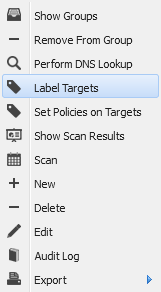
When right clicking on any target in the Target section the following menu are displayed:
|
Options |
Description |
|
Show Groups |
Show all target groups in which this target has been added to. |
|
Perform DNS lookup |
To perform a DNS lookup on an individual target, right-click on the target and select Perform DNS lookup. This tries to determine the targets host name and store that information in the system. |
|
Perform MAC Lookup
|
To perform a MAC lookup on the selected target, right-click on the target and select Perform MAC Lookup. |
|
Perform NetBIOS lookup (HIAB only) |
To perform a NetBIOS lookup on the selected target, right-click on the target and select Perform NetBIOS Lookup. |
|
Label Targets |
By right-clicking on a target you can choose to update specific labels or attributes on the target(s). |
|
Update from ServiceNow |
Update the target with information from ServiceNow. |
|
Set Policies on Targets |
Select policies for the target. |
|
Scan |
Create Scan Schedule for the selected target.
|
|
New |
Add a new target. See Create Targets. |
|
Delete |
Clicking Delete while having any targets selected deletes them from the system. Multiple targets can be selected for deletion by holding shift while selecting the targets. Reports for the selected targets are not deleted. |
|
Edit |
To edit a target, right-click on it and select Edit |
|
Audit log |
To see the changes made to a certain entry, right click on it and select Audit log. This show a dialog with all the changes made to the object that were made by you or one of the users that you administrate. |
|
Export |
To export data from the grid, right click on any entry and select either to export it as HTML or CSV (comma separated values) in the sub menu. This gives you either a HTML page or a CSV file with data that you can save or copy data from. The CSV export function in the grid has a limit of 100k rows. |
|
Show Scan Results |
Shows latest scan results for this target in the Reporting Tools. |
|
Remove from group |
Clicking on Remove from group while one or more targets have been selected, removes them from the group. |
To edit a target:
Right click on the specific target and select Edit ![]()
The Maintaining Target window is displayed.
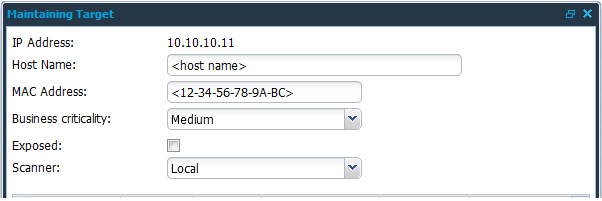
In the top of the window you find the general information about the target that you are editing such as:
|
Options |
Description |
|---|---|
|
IP Address |
The targets IP address |
|
Hostname |
The targets hostname |
|
MAC Address |
The targets MAC address The field MAC-Address does not get populated until the target has been scanned. |
|
Business criticality |
The targets business criticality select from Low, Medium, High, or Criticality |
|
Exposed |
Toggle if the target is exposed on internet or not. |
|
Scanner |
Select scanner. Local or available scanners. |
The following tabs are present in the Maintaining Target window:
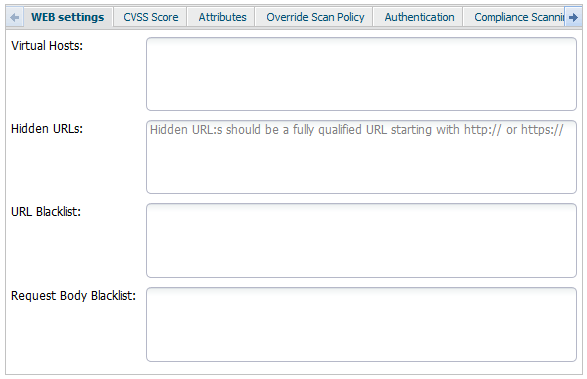
WEB Settings
|
Options |
Description |
|
Virtual Hosts |
If there are one or multiple virtual hosts on the target, you can add them here. Up to 10 virtual hosts can be defined per target. |
|
Hidden URLs |
Add URLs that cannot be crawled from the default site. URLs that are added here will be crawled separately. |
|
URL Blacklist |
Add URLs that you would like the scanner NOT to scan. Most common blacklisted URL is the site’s logout URL to prevent the scanner from logging itself out. |
|
Request Body Blacklist |
Add body blacklists. |
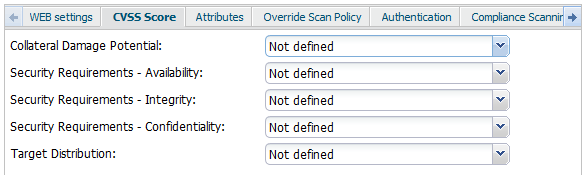
CVSS Score
Use the drop-down menus in this tab to evaluate the impact of a security breach on the target. Grade the availability, integrity, confidentiality, along with the Collateral Damage Potential and this will be considered when the CVSS score is being set. This is done to personalize the CVSS scores as some targets are more valuable than other.
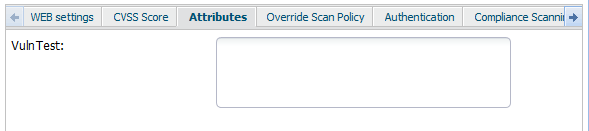
Attributes
This tab is only displayed if the user has one or more custom attributes configured to be shown in Targets. This is to add the ability to add additional information about the target.
Target attributes can be set in Main Menu > Settings > Account > Attributes tab.
See Attributes for information on how to add personal attributes columns.
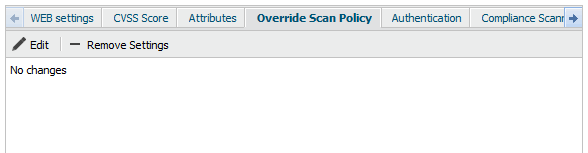
Override Scan Policy
This tab will give you the ability to set what vulnerabilities will be searched/not searched for on this target. This will override the scan policy used for the scan of this target.
For more information about scan policies, see Scan Scheduling document.
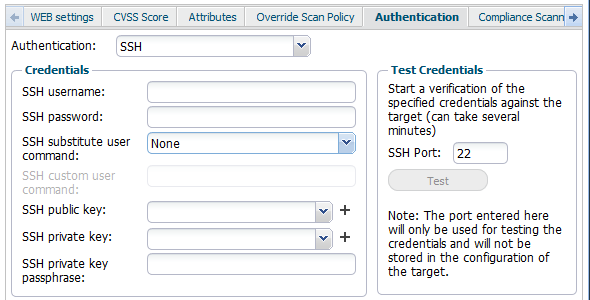
Authentication
Use this tab to fill in information that will help the scanner to authenticate against the target every time it gets scanned. Authentication allows the scanner to access registry keys and perform sudo-commands which greatly increases the scan accuracy.
SSH
See Authenticated Scanning using SSH for more information.
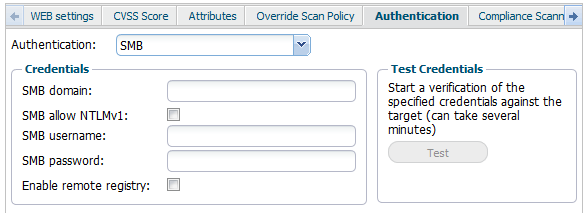
SMB
Contains the authentication settings and credentials used to enable Authenticated Scanning using SMB.
For more information, see Authenticated Scanning using SMB.
|
Option |
Description |
|
SMB domain |
The SMB domain to use when scanning the remote host. |
|
SMB allow NTLMv1 |
Whether to allow authentication using NTLMv1. |
|
SMB username |
The username to use when attempting to log on to the remote host via SMB. |
|
SMB password |
The password to use when attempting to log on to the remote host via SMB. |
|
Enable remote registry |
If this option is checked, the scanner starts the Remote Registry Service using the provided user details and once finished, disable the service again. |
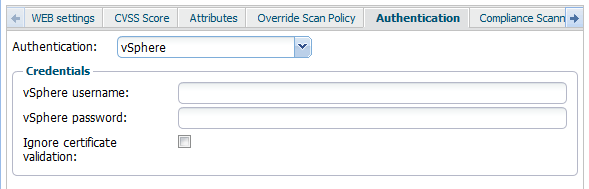
vSphere
Contains the authentication/configuration settings for the VMware vSphere. If configured, they are used when scanning targets running this service.
vSphere credentials are only used if a compliance scan is running. In addition, the target must have a ESXI compliance policy enabled.
|
Option |
Description |
|---|---|
|
vSphere username |
The username to use when attempting to log on to vSphere. |
|
vSphere password |
The password to use when attempting to log on to vSphere. |
|
Ignore certificate validation |
Allows the authentication and operations to continue even if the vSphere certificate is not valid. |
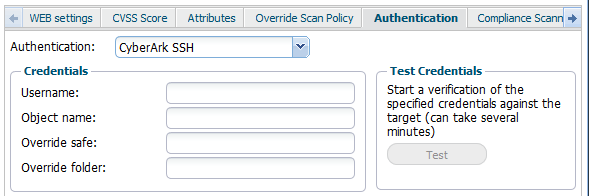
CyberArk SSH
Contains the authentication settings and credentials used to enable Authenticated Scanning using CyberArk SSH.
See Integrations for more information.
|
Option |
Description |
|---|---|
|
Username |
Provide your username to authenticate against CyberArk Server. |
|
Object name |
Check your CyberArk Vault administrator and provide the object name. |
|
Override safe |
Provide a different safe name in case you wish to override the existing safe name. |
|
Override folder |
Provide a different folder name in case you wish to override the existing folder names. |
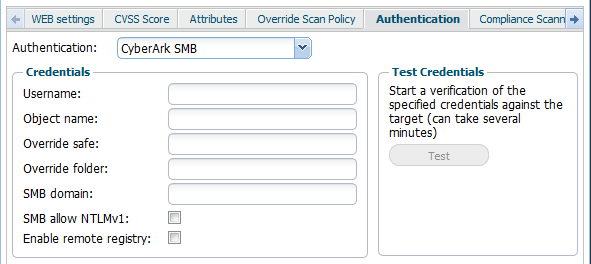
CyberArk SMB
Contains the authentication settings and credentials used to enable Authenticated Scanning using CyberArk SMB.
See CyberArk SMB for more information.
|
Option |
Description |
|---|---|
|
Username |
Provide your username to authenticate against CyberArk Server. |
|
Object name |
Check your CyberArk Vault administrator and provide the object name. |
|
Override safe |
Provide a different safe name in case you wish to override the existing safe name. |
|
Override folder |
Provide a different folder name in case you wish to override the existing folder names. |
|
SMB domain |
The SMB domain to use when scanning the remote host. |
|
SMB allow NTLMv1 |
Whether to allow authentication using NTLMv1. |
|
Enable remote regestry |
If this option is checked, the scanner starts the Remote Registry Service using the provided user details and once finished, disable the service again. |
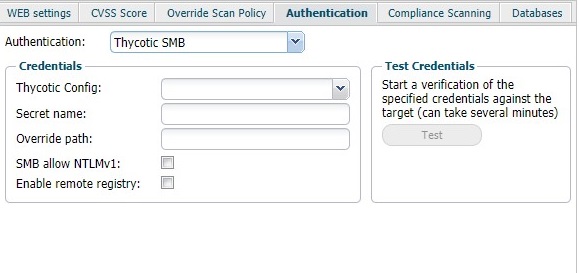
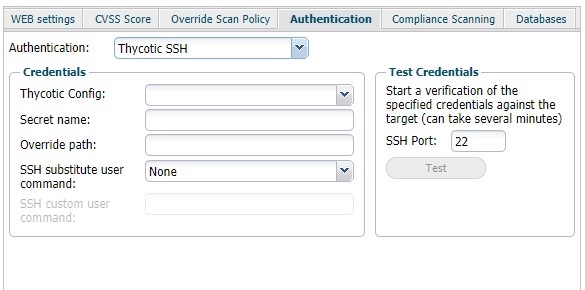
Thycotic SSH /SMB
Contains the authentication settings and credentials used to enable Authenticated Scanning using Thycotic SSH or Thycotic SMB.
See Thycotic for more information.
|
Option |
Description |
|---|---|
|
Thycotic Config |
Select the config from the drop-down list. |
|
Secret name |
Provide the name of the Secret. When the user provides a phrase, it searches for the name matching the given phrase. The first name matched is used. ${IP} will get replaced by the target IP. ${HOSTNAME} will get replaced by the host name of the target.
|
|
Override path |
Provide a new path to cancel using the existing path. |
|
SSH substitute user command |
The use of the following commands is to execute commands with a different user/privilege escalation.
|
|
SSH custom user command |
This field is available when the user selects custom in the SSH substitute user command field. Add a custom command for escalating privilege. |
|
SMB allow NTLMv1 |
Check this box to enable the authentication using NTLMv1. |
|
Enable remote registry |
If enabled, the scanner initiates the Remote Registry service with the given details. Disable the service when the scan is finished. |
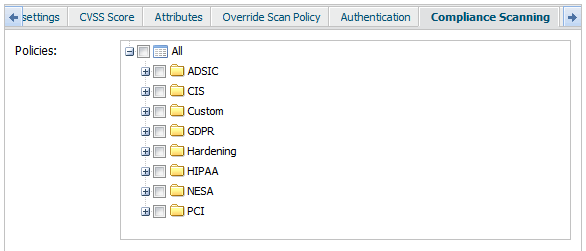
Compliance Scanning
The Compliance Scanning tab is available if you have a Compliance Scanning license.
The policies for the Compliance Scanning can be set only through Maintaining Scan Schedule window. Refer to Scan Scheduling guide for detailed information.
Databases
Use this tab to fill in information that will help the scanner to authenticate against a database on the target. This is only used when running a compliance scan and if a SQL database has been defined.
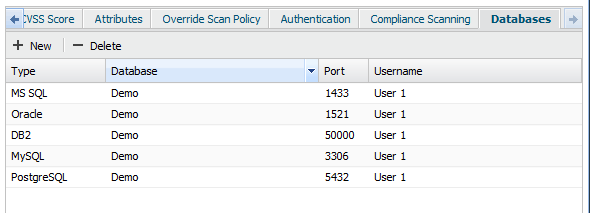
The settings for the database targets can be edited by right-click a database and and select edit in the menu.
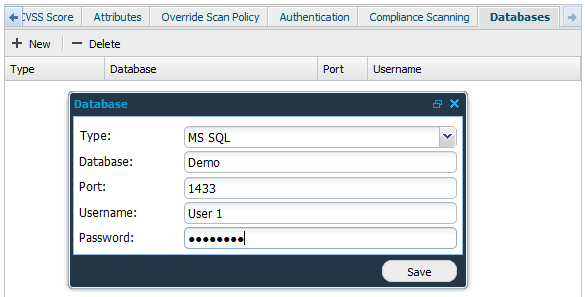
|
Option |
Description |
|---|---|
|
Type |
Select one of the database types from the drop-down menu:
|
|
Database |
Name of the database. |
|
Port |
The port number database connector is using to communicate. |
|
Username |
The username used to authenticate against external database server. |
|
Password |
The password used to authenticate against external database server. |
Label Targets
-
Right click the target.
-
Select Label targets in list.
-
Select labels from drop-down menus.
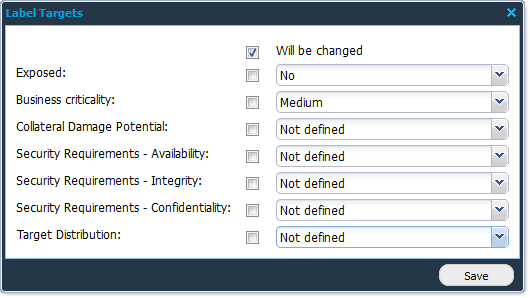
Note that the checkbox to the left of the drop-down must be checked for the value to be set.
|
Option |
Description |
|---|---|
|
Exposed |
Yes/No |
|
Business criticality |
Low, Medium, High , Critical |
|
Collateral Damage Potential |
Not Defined, None, Low, Low-Medium, Medium-High, High |
|
Security Requirements - Availability |
Not Defined, Low, Medium, High |
|
Security Requirements - Integrity |
Not Defined, Low, Medium, High |
|
Security Requirements - Confidentiality |
Not Defined, Low, Medium, High |
|
Target distribution |
Not Defined, None, Low, Medium, High |
-
Click Save.
Scanning a Target
To set up a scan schedule from a single target:
-
Go to Main Meny > Netsec > Manage Targets.
-
Select the target you want to scan
-
Right click a target and select Scan
-
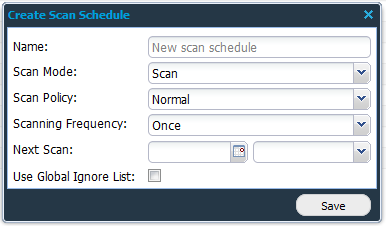
In the Create Scan Schedule window, fill in:
|
Option |
Description |
|---|---|
|
Name |
Name of the schedule. |
|
Scan Mode |
Select scan mode:
|
|
Scan Policy |
Scan Policy enables you to configure each scan to suit your network environment.
|
|
Scanning Frequency |
Scanning Frequency defines how often the scan schedule should run. |
|
Next Scan |
Displays the date of the next scan (if scheduled). |
|
Use Global Ignore List |
The Global Ignore List is a default ignore list of targets that is excluded from scanning.
|
Related Articles