Last Updated: 2021-10-22
Purpose
This article is a comprehensive overview of how to navigate in the 64-bit HIAB console to configure, update, and harden the appliance.
Introduction
The article serves as a detailed guide for navigating and configuring the HIAB console, focusing on tasks such as managing network settings, maintenance, and remote support functionalities. It outlines the Main menu options, including network configuration, testing connections, and password management, while emphasizing the importance of proper setup for effective remote support and troubleshooting. Users are instructed on how to configure network settings, proxy and NTP settings, and manage bandwidth limitations, along with steps for performing updates and maintenance actions. Additionally, the guide covers tools available for diagnostics, password management, and activating remote support, ensuring users can efficiently operate the HIAB appliance.
Requirements
This document has been elaborated under the assumption that the reader has access to the HIAB appliance and its console.
Getting Started
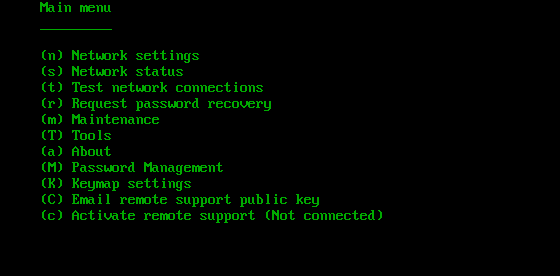
Once the HIAB is booted (or if you connect to the appliance via SSH), the Main menu is displayed.
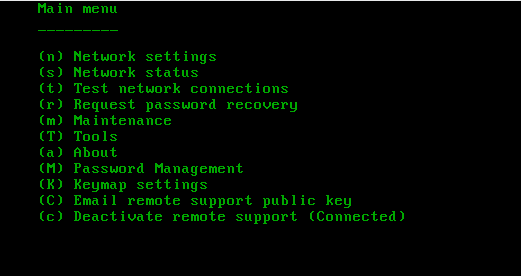
The Main menu is a multi-choice menu that allows you to access different sections of the configuration of the HIAB. From the Main menu, you can configure, update, and harden the HIAB.
The below table displays the available options and their functionalities.
|
Option |
Description |
Function |
|---|---|---|
|
n |
Network settings |
Configure network settings like virtual hosts, static and dynamic interfaces, gateways, name servers and interface speed. |
|
s |
Network status |
See the status for your current network settings. |
|
t |
Test network connections |
Test all your network connections required to run Outpost services. |
|
r |
Request password recovery |
Recover passwords for HIAB user. |
|
m |
Maintenance |
Perform various maintenance actions such as updates, reboots and removals. |
|
T |
Tools |
This section gives you access to system commands like ping, trace route, and DNS lookup. |
|
a |
About |
Displays your HIAB's current versions, uptime, memory and disk usage. |
|
M |
Password management |
Set a password for your HIAB so that future users need to present a set password to access the HIAB console. |
|
K |
Keymap settings |
Choose your key map settings so that it corresponds to the keyboard you are using. |
|
C |
Email remote support public key |
Email the public remote support key to Outpost24. This is required for remote support connection to succeed. |
|
c |
Remote support |
Activating Remote Support allows the support staff of Outpost24 to access the backend of the HIAB. This is used for troubleshooting purposes. |
The options are case sensitive.
Most of the options in the Main menu have one or multiple submenus. The submenus are not listed in the above table.
Configuring HIAB
Check the below sections to configure HIAB as per your requirement.
Configure Network Settings
Press n in the Main menu to access the Network Settings. In the Network Settings you are provided with options that enables you to configure the HIABs network settings.
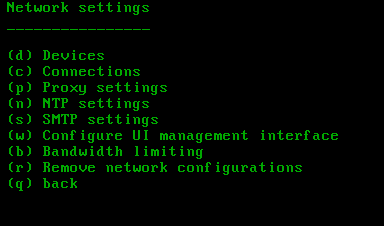
The below table displays the available options and their functionalities.
|
Option |
Description |
Function |
|
d |
Devices |
This section shows you what devices the HIAB is connected to. |
|
c |
Connections |
In this section, you can configure all the connections for the HIAB. |
|
p |
Proxy settings |
This section allows you to connect the HIAB to a proxy server. The following actions will utilize the proxy:
|
|
n |
NTP settings |
This section allows you to connect the HIAB to a NTP server. |
|
s |
SMTP settings |
This section allows you to connect the HIAB to a SMTP server. |
|
w |
Configure UI management interface |
This section lets you set up which active interfaces the HIAB should listen. Additional actions possible in this section are configuring pingable for interfaces and restarting the HIAB's HTTP server. For yes it responds with ICMP rejects to TCP connects on closed ports and respond to ICMP requests while set to no it drops such requests. |
|
b |
Bandwidth limiting |
Set a bandwidth limit for the HIAB. |
|
r |
Remove network configurations |
This option removes all existing network settings from the HIAB. |
|
q |
Back |
Go back to previous menu. |
Connections
Press c in the Network settings menu to access Connections. The following window is displayed:
In the Connections menu, all available interfaces is listed. You can activate, deactivate, and/or delete existing interfaces. By using the arrows keys on the keyboard, you can navigate to an entry and then use one of the set hotkeys to perform the intended action.
You can also add Ethernet, VLAN, and Bond by performing the following actions:
The following guides below start from the Connections menu.
Adding Ethernet
-
Select option e.
-
Enter the connection name, for example MyEth.
-
Enter one device from all listed interfaces in the parentheses, for example eth0.
Adding VLAN
-
Select option v.
-
Enter the connection name, for example MyVLAN.
-
Enter the device name, for example Vlan.
-
Enter one parent device from all listed interfaces in the parentheses, for example eth0.
-
Enter the VLAN id, for example 123.
Adding a Bond
-
Select option b.
-
Enter the connection name, for example MyBond.
-
Enter the device name, for example Bond1.
-
The bond will then be added to the list of connections. Use the arrow keys and the action Modify selected connection to configure it further.
Adding a Team
-
Select option t.
-
Enter the connection name, for example MyTeam.
-
Enter the device name, for example Team1.
-
The team will then be added to the list of connections. Use the arrow keys and the action Modify selected connection to configure it further.
To modify your connections and assign IP's to them, you need to perform the following steps:
-
Select option m. The following window is displayed:
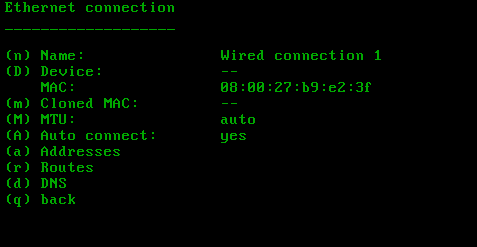
-
Select option a to modify the addresses for the interface. The following window is displayed:
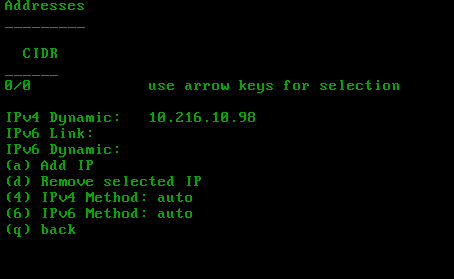
When an interface is activated, the IPv4 and IPv6 method is set to auto which states that DHCP is used by the HIAB to obtain the IP. You can also add static addresses under auto, but it will not be successful without a DHCP lease.
For more information on this, please refer to the Red Hat Enterprise Linux 7 Networking Guide en US.
To add a static IP, you need to perform following steps:
-
Select either 4 or 6, depending on which IP version you are using.
-
Enter manual and press enter.
-
Press a to add IP.
-
Enter the desired IP address, for example 192.168.2.3/24 and press Enter.
Specified in CIDR.
Once a change is made, you must deactivate and reactivate the interface for the changes to be active.
You should now be back in the Ethernet connection window. In this menu, you are also able to add custom Routes and DNS.
To Add Custom Routes (optional)
-
Select option r.
-
Select option a.
-
Enter the destination, for example 192.168.1.2/24.
Specified in CIDR.
-
Enter next hop (optional).
-
Enter Metric for the route.
-
Press q to go back to Ethernet connection menu.
Set Domain Name Servers (optional):
-
Select option d.
-
Select option a.
-
Enter the IP of the DNS server, for example 192.168.1.3.
-
Select q to go back to the Ethernet connection menu.
Configure Proxy Settings
The HIAB may be configured to use a proxy when communicating with other devices. The use of a proxy is setup by performing the following steps (starting from the Network Settings menu):
-
Select option p.
-
Select option t to choose which type of proxy you wish to connect to.
-
Select type:
0 disables the use of proxy
4 socks version 4
a socks version 4a
5 socks version 5
h HTTP/HTTPS proxy -
Select option h, enter the proxy address, for example 192.168.100.2.
-
Select option p, enter the proxy port, for example 8080.
To add a password, follow the below steps:
-
Select option u.
-
Enter the user name for the proxy service, for example myusername.
-
Select option a.
-
Enter the password for the above username, for example mypassword.
-
Select option d to update the proxy settings.
Configure NTP Settings
The HIAB can be configured to use a time service in order to keep the clock accurate. To define the usage of NTP server, you need to perform the following steps (starting from the Network Settings menu):
-
Select option n.
-
Select option s.
-
Enter the IP address or hostname of the NTP server. You can also add an NTP pool instead of a specific server.
Configure SMTP Settings
The HIAB can be configured to use a SMTP relay server if the network does not allow communication out using port 25.
You can also configure sasl authentication for SMTP.
Performing the following steps will set up the use of a SMTP relay (Starting from Network Settings menu):
-
Select option s.
-
Select option a.
-
Enter the SMTP relay server, for example smtp.mycompany.com.
To specify another port than 25 in SMTP, add the port number to the smtp address in the server relay window.
Example: mail.myhost:587 where the port number in this case is 587.
Configure UI Management Interface
The HIAB can be configured to show only the user interface on a specific interface instead of allowing it on all available interfaces (which it does by default). In order to change this, you need to perform the following steps (Starting from the Network Settings menu):
-
Select option w.
-
Use the arrow keys to select on which interface you wish to change the settings.
-
Use options p and t to toggle (enable/disable) the different functions per interface. If pingable results in any change, disable the response on ping. You are not allowed to have the HTTP server listen to all interfaces.
-
If you make any changes to the HTTP server, restart that service for the changes to take effect. Select the option r to restart.
Bandwidth Limiting
You can limit the amount of outbound traffic from the HIAB which is configured in this section. Define the network for which you would like to set a limit and then define the maximum amount of data sent to that network. To configure the bandwidth limitation, perform the following steps (Starting from the Network Settings menu):
-
Select option b.
-
Select option a.
-
Enter network, for example 192.168.1.1/24.
Specified in CIDR.
-
Enter the bandwidth limit in Kbit/s, for example 400.
Network Status
Press s in the main menu to access the Network Status.
Test Network Connections
To access Test Network Connections, press t in the Main menu. In this section, you can test your network connections. Option t in the Main menu will confirm whether the HIAB can connect to outside services or not. Select option r to start the network test.
For more information, choose option d and you are presented with a tcpdump from the last performed network test, that information may be useful when troubleshooting.
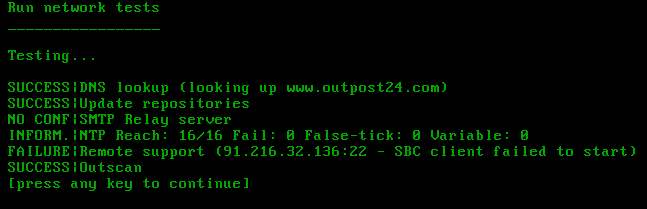
The result of test is determined by INFORM. Following ramifications will occur if the test results in a FAILURE:
DNS lookup: Lacks the possibility to look up host names based on IP addresses and lacks support for sending emails directly.
Update repositories: No updates will be possible. Out of band updates may be an option if preferred.
Before enrollment is conducted, the key isn't available and it will produce a failure until enrolled.
SMTP Relay Server: If the HIAB is not allowed to send emails directly, it will use the SMTP relay host for sending emails. If this is not defined, there will not be any email notifications sent.
NTP server: The INFORM. presented by NTP will reflect values retrieved from the chronyc sources command. The reach expresses how many of the last 8 polls for the different servers have succeeded.
Example: 16/16 means all the latest 8 polls from both servers have succeeded. Fail indicates the count of servers to which connectivity has been lost or whose packets do not pass all tests. It is also shown at start-up, until at least 3 samples have been gathered from it. False-tick indicates the count of servers which chronyc thinks is a false-ticker (i.e. its time is inconsistent with a majority of other sources). Variable indicates the count of servers whose time appears to have too much variability. There is no simple way to boil this down to a binary SUCCESS or FAILURE.
Remote support: No remote assistance will be available.
Outscan: No scans can be executed using the HIAB EXTERNAL service even if a license is available.
HIAB (effective since the 64-bit version) cannot be enrolled if this fails.
Request Password Recovery
Press r in the main menu to access Request Password Recovery. If the main account's password is lost, you can request for a recovery link to be sent from the console.
For recovery link email to be delivered, the HIAB needs to be able to send emails. This means, it is required to configure the email feature correctly.
The password link will also be available on the screen, even if the HIAB is not properly configured to send out emails.
To request a new password, perform the following steps:
-
Select option e. Insert a recipient email address for the recovery link, different to the one registered to the main account; for example myemail@mycompany.com.
-
Select option r. The recovery link is sent from HIAB to the provided email address. It is also displayed on screen.
Or
-
Select option r. The recovery link is displayed on screen.
Maintenance
Press m in the main menu to access the Maintenance. In this section, you find all the actions necessary for maintaining the HIAB:
Update
The HIAB can perform updates for its installed software and scripts directly from the console. If the HIAB has not yet been enrolled, the update option will not be available.
It is instead replaced by an enroll option. Perform the following steps (starting from the Maintenance menu):
If the HIAB is not yet enrolled:
-
Select option e.
-
Enter the credentials for your Main user.
If the HIAB is enrolled:
-
Select option u.
-
Select option d to start the update process.
Reboot
To reboot the HIAB appliance, select option b in the Maintenance menu and enter yes to confirm.
The HIAB will reboot immediately without any additional confirmation being required.
Shutdown
To shut down the HIAB appliance, select option s in the Maintenance menu and enter yes to confirm.
If you wish to abort, press Ctrl+C. This will restart the console menu application and bring you back to the main menu.
Remove All Scan Data
This option can be used for deleting all scan data from the appliance when necessary. for example an exchange of the appliance or upon returning the device to service.
The following steps are required to remove all scan data (starting from the Maintenance menu):
-
Select option r. Read the information that is displayed on the screen until you fully understand what will happen once you proceed with this action.
-
Type yes if you are certain, and press Enter.
The HIAB will remove all scan data and return to the main menu.
Restore Server to Default State
This option allows you to restore the HIAB appliance to default state from the console.
The following steps are required to perform a restore (starting from the Maintenance menu):
-
Select option d. Read the information that is displayed on the screen until you fully understand what will happen once you proceed with this action.
-
Type yes if when certain, and press Enter.
The HIAB will restore itself to default state and reboot.
Tools
Press T in the main menu to go to Tools. In this section, you can perform various tasks to determine if HIAB is working properly.
Mail Queue
The HIAB has its own SMTP server, which it uses to send out emails. for example reports or event notifications.
To see the mail queue, do the following step (starting from the Tools menu):
-
Select option m.
Ping to a Host
The HIAB can PING other hosts for the administrator to determine if the network configuration allows it to connect to other networks properly.
To PING a host, do the following steps (starting from the Tools menu):
-
Select option p.
-
Enter the host name or IP, for example 192.168.100.1.
-
Press Enter to return to the tools menu.
Traceroute to a Host:
The HIAB can perform a trace route to other hosts for the administrator to determine if the network configuration allows it to connect to other networks correctly.
To trace route to a host, do the following steps (starting from the Tools menu):
-
Select option t.
-
Enter the host name or IP, for example 192.168.100.1.
-
Press Enter to return to the tools menu.
DNS Lookup:
The HIAB can perform a DNS lookup of a host for the administrator to determine if the DNS service works correctly. To do a DNS lookup, do the following steps (starting from the Tools menu):
-
Select option d.
-
Enter the host name or IP, for example 192.168.100.1.
About
Press a in the main menu to access the About. This section displays the details of your 64-bit HIAB's version, memory used, disk space and copyrights.
Password Management
Press M in the main menu to access Password Management. The HIAB appliance can be set up to demand a password to gain access to the console when you have physical access to the appliance.
To set this up, do the following steps:
-
Select option s.
-
Enter a password like "mysecretpassword", confirm the password.
Once a password is set, an extra option is added in the main menu Logout, using the hotkey L. This allows you to lock the appliance.
To unlock the appliance, enter the set password.
No password recovery is available for this feature.
Keymap Settings
Press K in the main menu to access the Keymap Settings. By default, the standard key map is us. However, if you are using another keyboard you can configure the key map in this section.
Choose between 500+ key maps to find the one that matches your setup.
To change the key map, you need to perform the following steps:
-
Browse through all the available key maps by using the up and down arrows. For quicker browsing through the entries, use ENTER and BACKSPACE to move eight entries up or down the list.
-
Select option c, when the arrow is pointing at the desired keymap.
-
Select option r to restore to the default keymap.
Email Remote Support Public Key
Press C in the main menu to go to Email remote support public key. Sending the public SSH key of the HIAB will allow the support team at Outpost24 to access the backend of your HIAB, once remote support has been activated.
To send the email, please perform the following steps:
-
Select option e to enter the recipient email address (support@outpost24.com is default).
-
Select option r to send the public key to entered email address.
Activate Remote Support
By activating Remote Support, you allow the support team at Outpost24 to access the backend of your HIAB. This is mainly used for troubleshooting if any issues occur during the operational use of your HIAB.
HIAB Console
To Activate the Remote Support in the HAIB Console, press c while in the Main menu.
To Deactivate, press c again.
HIAB User Interface
To Activate the Remote Support in the HAIB GUI, navigate to Main Menu > Support.
Right Click Enabling Remote Support allows support to connect to the machine.

If a successful connection is to be made between your HIAB and Outpost24's remote support server, the following criteria must be fulfilled:
-
The HIAB must be able to communicate outwards on port 22 to Outpost24 through any firewall/IDS/IPS. See HIAB Firewall Rules for details.
-
Deep package inspection must be turned off for the communication between the HIAB and the remote support server.
-
If proxy is used, disable this for the connection as this could interfere.
Use the Test Network Connections to determine if the communication to our remote support server is successful.