Last updated: 2025-04-03
Purpose
This article provides users with an overview of the Scan Scheduling feature in OUTSCAN and HIAB.
Introduction
The Scan Scheduling feature in OUTSCAN and HIAB manages when and how vulnerability scans run against defined targets or target groups. The feature is available in the Scan Scheduling view, where administrators create, configure, and monitor scan schedules. A schedule defines the scan mode (Scan, Discovery, Discovery/Scan, or Compliance), the target scope, the scan policy, and the execution timing. Users configure parameters such as the next scan time, scan frequency, and scan window duration. Additional settings control concurrent scans, scan priority, discovery protocols, and policy selection. The module also provides visibility into scan status and scan history, allowing administrators to track active scans, review results, and analyze previous scan activity.
Use Scan Scheduling to automate vulnerability assessments and maintain continuous visibility of their attack surface. Automated schedules ensure that scans run at defined intervals without manual execution. Regular discovery scans identify new assets in the network, while scheduled vulnerability scans detect security issues on known systems. Centralized scheduling also controls scan timing, limits resource usage through concurrency settings, and organizes scanning across large environments. This automation supports consistent vulnerability detection, improves operational efficiency, and maintains up-to-date security assessments.
Requirement
This document has been elaborated under the assumption that the reader has access to the OUTSCAN/HIAB account and Portal Interface with a Netsec subscription.
Scheduling
When it comes to scheduling in large organizations/networks, the best practice is to create schedule groups of targets as discussed in the Managed Targets and manage them from that section instead of the Maintain Schedule section.
Best practice includes that regular discovery scans should be performed on all network ranges to avoid having targets within the network that are not properly documented.
The event system (reference) can be used to notify the organization about these newly detected (or removed) assets in an automated way.
To access the Scan Scheduling module, go to
Main Menu > Netsec > Scan Scheduling.
The Scan Scheduling window allows you to view and configure Scan Schedules, Scan Policies, Scan Status, and Scan History.
General Grid Customization
The Scan Scheduling grid can be customized and allows for personalized views, filters, and choices on which columns to display. Along with the columns, attribute text columns can be added.
Icon List
|
Option |
|
Description |
|---|---|---|
|
|
New |
Creates a new scan schedule. |
|
|
Delete |
Deletes the selected scan schedule. |
|
|
Scan Now |
Immediately initiates the selected scan schedules. |
|
|
Disable |
Disables the next scan of the selected scan schedules (if any). |
|
|
Edit |
Edit the settings of a scan schedule. |
|
|
Copy |
Make a copy of a saved scan schedule. |
|
|
Audit Log |
Shows the changes made to a certain entry. |
|
|
Export |
Exports data as HTML or CSV. This opens either a HTML page or a CSV file from which data can be saved or copied from. |
|
|
Resume |
Resume paused scans. |
|
|
Pause |
Pause running scans. |
|
|
Stop |
Stop running scans. |
|
|
Settings |
Open the global settings for this module. |
|
|
Column Menu |
Opens a menu to configure grid columns. |
Global Settings
The global settings can be accessed by clicking the settings ![]()
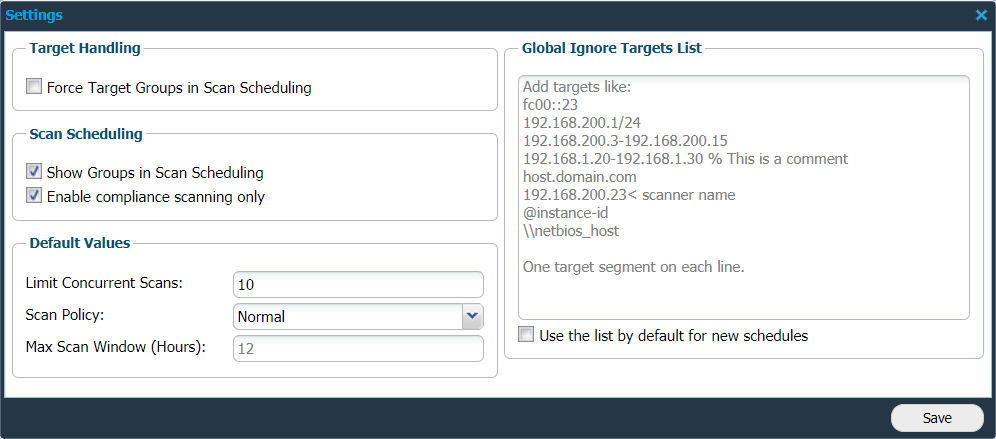
Target Handling
|
Option |
Description |
|---|---|
|
Force Target Groups in Scan Scheduling |
If checked, user cannot add target list in the Edit Scan Schedule window, enforcing to select a target group instead. |
Scan Scheduling
|
Option |
Description |
|---|---|
|
Show Groups in Scan Scheduling |
Checking this makes the Groups section visible in the Scan Scheduling grid. It can be used to group scan schedules. |
|
Enable compliance scanning only |
If checked, Compliance Only Scanning is enabled and available in Scan Mode list. |
Default Values
These settings can be changed later in the Scan Schedule module, but only within the scope of the values configured here.
|
Option |
Description |
|---|---|
|
Limit Concurrent Scans |
Set the maximum limit on how many concurrent scans can be done. Limit concurrent scans determines how many targets within a scan the system run simultaneously. |
|
Scan Policy |
Any scan policy can be selected from this field. |
|
Max Scan Window (Hours) |
Set number of hours for the scan window. This feature allows you to run a scan over multiple time slots. Max Scan Window determines for how long the scheduled scan can continue. Once the scan window ends, all scans that are not finished either timeout or continue in the next scan window. In HIAB, set this value to 0 to run the scan until it is finished.
|
Global Ignore Target List
The Global Ignore Target List lets you create a default ignore list of targets that is excluded from scanning.
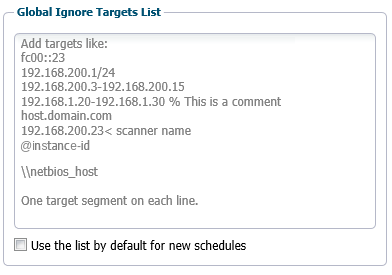
Host names given in the Global Ignore Targets List are not resolved in the Scan Schedule Ignore Target List.
Select the Use the list by default for new schedules check box to make the Global Ignore Targets Lists default for new scan schedules.
Changes to the Global Ignore Target List do not affect older schedules that has already been saved.
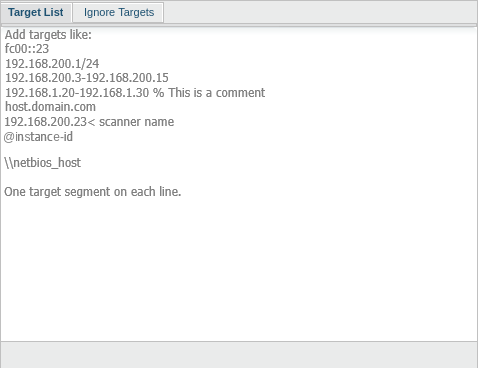
Ignore Target List
|
Format |
Description |
|---|---|
|
fc00::23 |
IPv6 |
|
192.168.200.1/24 |
IPv4 subnet |
|
192.168.200.3-192.168.200.15 |
IPv4 range |
|
192.168.1.20-192.168.1.30 % This is a comment. |
Add a comment by adding a %-sign after the address. |
|
host.domain.com |
Fully Qualified Domain Name |
|
192.168.200.23< scanner name |
There could be multiple targets with same IP/hostname linked to different scanners. For example: 192.168.0.1 on Scanner01
When adding an IP connected to multiple scanners, the scanner name should be provided along with the target using the format given below:
|
|
@instance-id |
Instance ID for Amazon Web Service targets. |
|
\\netbios_host |
Network Basic Input/Output System name. |
The default values entered here cannot be changed from the Scan Schedule. However, values can be added to the default list in the Scan Schedule. These added values can be changed or deleted in the Scan Schedule window.
Enabling the Use the list by default for new schedules ensures that new schedules uses the default Global Ignore Target List.
Filters
Specific filtering is explained for each tab in the corresponding sections. To enable filtering, click on the arrow next to the name of any column and select Filters. Depending on the existing kind of data, various options are displayed.
The expand arrow for the columns is only visible when hovering the mouse pointer over the column name.
For information regarding general filters, see Netsec Filters document.
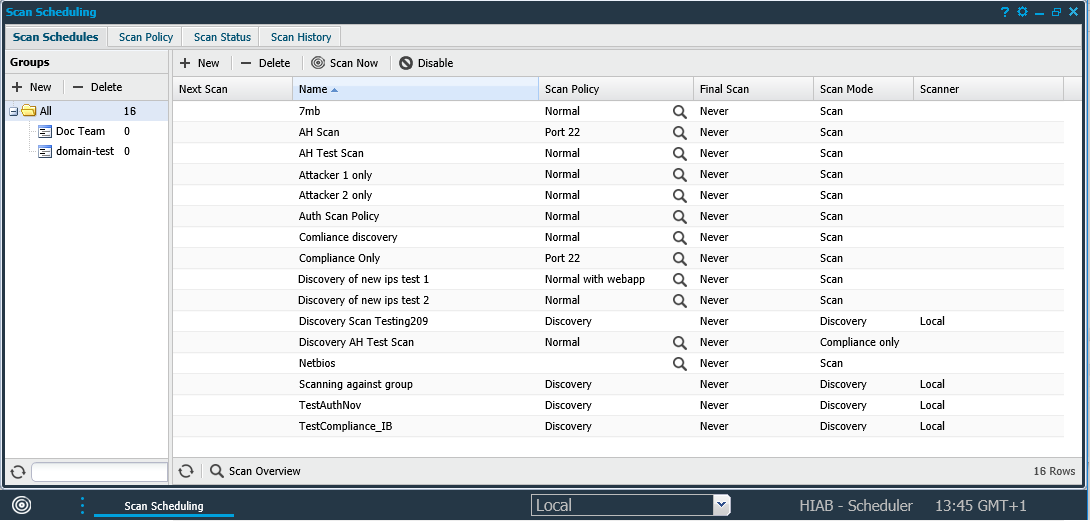
Scan Schedules
In the Scan Schedules tab, scans can be configured to run against a specific target, a group of targets, or a preconfigured target group. A schedule can be set to repeat at a certain interval. This section consists of all defined Scan Schedules, along with information about each schedule.
There are four options:
-
New

-
Delete

-
Scan Now

-
Disable

Right clicking on a specific schedule/entry reveals further options:
-
Edit

-
Copy

-
Audit Log

-
Export

Customizing Scan Schedule Grid
In addition to the general customization in section General Grid Customization, each tab allows for specific customization for each tab.
Columns
The displayed information varies upon selecting different columns. By clicking the arrow ![]()
|
Column |
Description |
|---|---|
|
Average Scan Duration |
Shows the average scan duration for each scan schedule. |
|
Compliance Scan |
Shows if compliance scanning is enabled in the scan schedule. |
|
Final Scan |
Displays a date when the final scan is scheduled, if it is set in Run Scan Schedule Until field. |
|
Frequency |
Frequency of how often the scan schedule should run. |
|
Latest Scan Date |
Displays the date of the latest performed scan. |
|
Latest Scan Duration |
Displays the duration of the latest scan. |
|
Latest Scan Status |
Displays the status of the latest scan. |
|
Maintainer |
Displays which user is the maintainer of that scan schedule. |
|
Max Scan Time (Hours) |
Displays the defined maximum length of the scan window in hours. |
|
Name |
The name of the scan schedule. |
|
Next Scan |
Displays the date of the next scan (if scheduled). |
|
Priority |
User can set priority to the scan schedule. |
|
Scan Mode |
Displays what kind of scanning mode the scan schedule is using. |
|
Scan Policy |
Displays which scan policy is set for the scans. |
|
Scanner (HIAB only) |
Displays which scanner is used during the scans when the mode is set to Discovery or Discovery/Scan. The scanner set on target is used during scanning if mode is set to Scan. |
|
Targets |
Displays the number of targets in the specific scan schedule. |
Attribute
Along with the above columns, up to 10 more attribute text columns can be added to personalize the view.
To add additional columns:
-
Go to Main Menu > Settings > Account.
-
Select Attributes tab.
-
Right click on any undefined fields, and click Edit.

-
Provide a name for the column to be added.
-
Enable Active field.
-
Enable Scheduling field to add this column to the Scan Scheduling window.
Scan Mode Filters
For general filter settings, refer to Netsec Filters.
To enable filtering, click on the arrow next to the name of any column and select Filters. Depending on the existing kind of data, various options are presented.
Filter based on the scan modes.
|
Option |
Description |
|---|---|
|
Discovery |
Filter entries with mode Discovery. |
|
Discovery/Scan |
Filter entries with mode Discovery/Scan. |
|
Scan |
Filter entries with mode Scan. |
|
Compliance only |
Filter entries with mode Compliance only. |
Create a Schedule
Click on +New to add a scan schedule. The Maintaining Scan Schedule window is displayed.
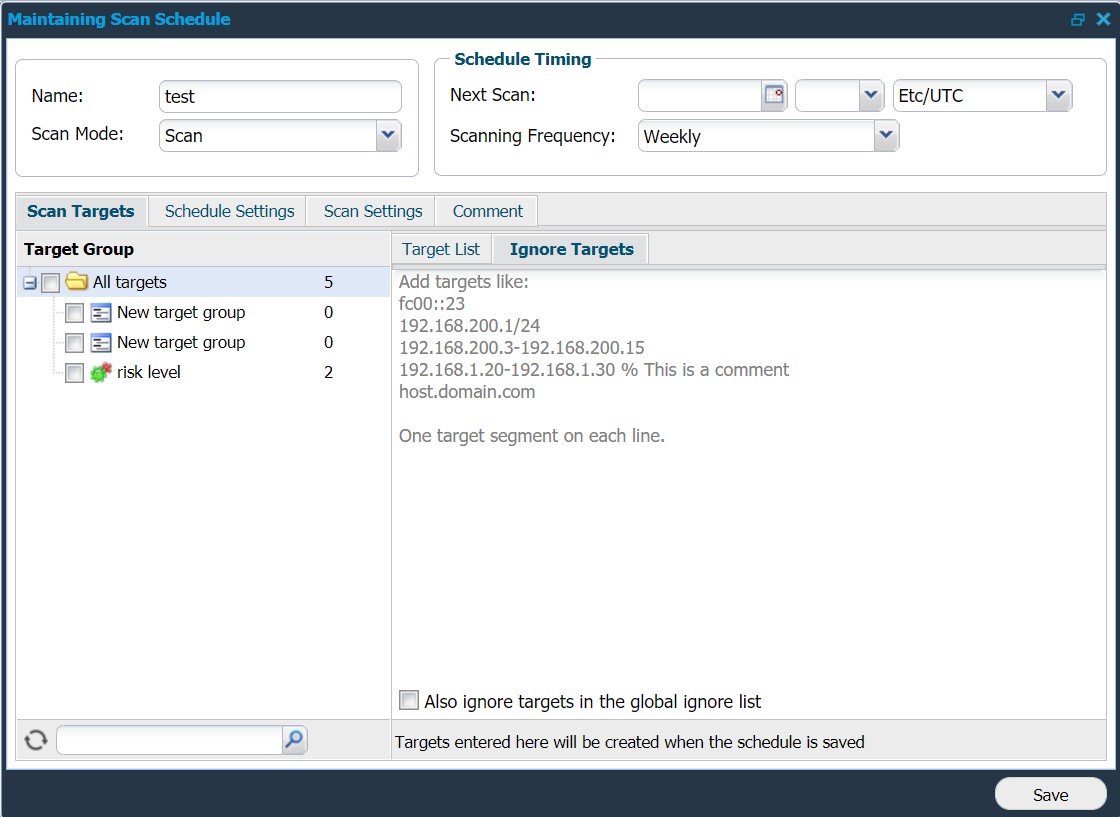
|
Option |
Description |
|---|---|
|
Name |
Provide a name for the scan schedule. |
|
Scan Mode |
Choose a mode from the drop-down list.
While setting this, a warning is displayed stating that not everything will run. |
Schedule Timing
|
Option |
Description |
|
Next scan |
Choose date and time when the next scan should run. With the new time zone selector, you can now schedule a scan at a certain time regardless of daylight saving changes. |
|
Scanning Frequency |
Choose how frequently a scan should run. The available options are:
|
The scan frequency can be changed manually at any time.
Scan Targets Tab
|
Option |
Description |
|---|---|
|
Target Group |
Choose a target group that should be scanned. |
|
Target List |
Add targets or target lists to scan. |
|
Ignore Targets |
The target(s) added in the Ignore Targets section are excluded from the scan. This tab is only active when choosing Discovery or Discovery/Scan in Scan Mode. See Target List Table. |
Target List
In the Target List tab, targets can be added to the scan schedule.
The Target List tab uses the same format as the Global Ignore Target List to add targets that should be scanned.
See Target List Table for accepted formats.
Ignore Targets
In the Ignore Targets tab, targets can be added to the Global Ignore Target List to be excluded from the scanning process.
The Ignore Targets tab uses the same format as the Global Ignore Target List. See Target List Table for accepted formats.
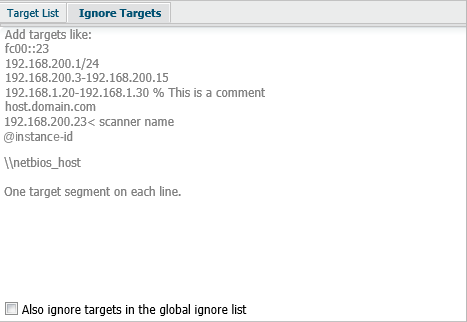
Host names given in the Ignore List tab isl only resolved and removed from the Target List for discovery scans.
Scan hosts given in Ignore Targets List will only be removed from the Target List by exact match of their host name and not by resolving to IPs
If the Scan schedule was created with a Global Ignore Target List active, the Also ignore targets in the global ignore list check box is selected by default. Unselecting the check box results in disengaging the Global Ignore Target List from this schedule. See Global Ignore Target List.
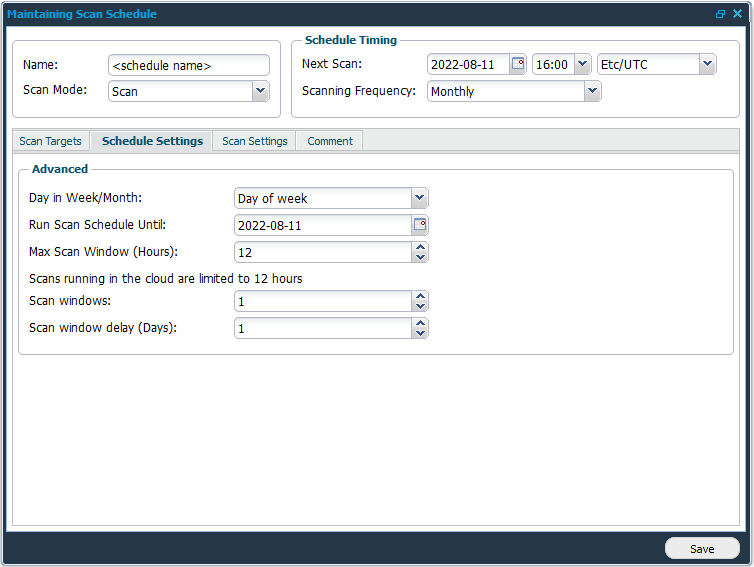
Schedule Settings Tab
|
Option |
Description |
|---|---|
|
Day in Week/Month (depending on Scanning Frequency) |
Should you schedule a scan for the 10th of August, it would be on Wednesday the 2nd week of the month. Day of week - in 30 days it will schedule the next scan to run on the closed Wednesday so the next scan will likely be on the 7th of the 14th of September. Day of month - the scan will run on the 10th every month so the next scan will be 10th of September which is a Saturday. Day of week in month - it will run on Wednesday on the second week of the month and the next scan would be on 7th of September.
|
|
Run Scan Schedule Until |
Set date until when the scheduled scan should run. The Run Scan Schedule Until indicates the last day that the job will execute, once this day has passed, the job is considered inactive. To allow the job to continue forever, leave this field blank. |
|
Max Scan Window (Hours) |
Set number of hours for the scan window. This feature allows you to run a scan over multiple time slots. Max Scan Window determines how long the scheduled scan can continue. Once the scan window ends, all scans that are not finished either timeout or continue in the next scan window. Scans running on OUTSCAN are limited to 12 hours.
|
|
Scan windows |
The number of Scan Windows. Scans that are not finished within the specified number of scan windows are reported as timeouts. |
|
Scan window delay (Days) |
Mention the interval between two scan windows. The delay between scan windows in presented in days. This together with Scan windows, allows for scanning a target in a specified scan window and resuming the next time the scan window occurs. |
|
Maintainer |
The Maintainer field is used to define who should be the owner of this scanning job. This affects who is alerted when or if scan notifications are set up in the Event system. |
Advanced Settings Options
Depending on which Scanning Frequency you select in the Schedule Timing area, the settings options differs.
|
Settings Option |
Scan Now |
Once |
Weekly |
Monthly |
Bimonthly |
Quarterly |
Fortnightly |
Daily |
Every other day |
|---|---|---|---|---|---|---|---|---|---|
|
Day in week/month |
|
|
|
|
|
|
|
|
|
|
Run Scan Schedule Until |
|
|
|
|
|
|
|
|
|
|
Max Scan Window (Hours) |
|
|
|
|
|
|
|
|
|
|
Scan windows |
|
|
|
|
|
|
|
|
|
|
Scan window delay |
|
|
|
|
|
|
|
|
|
|
Maintainer |
|
|
|
|
|
|
|
|
|
You can always create the schedule with one of the settings and open the schedule overview in the bottom of the schedules to see when it will run the coming scans.
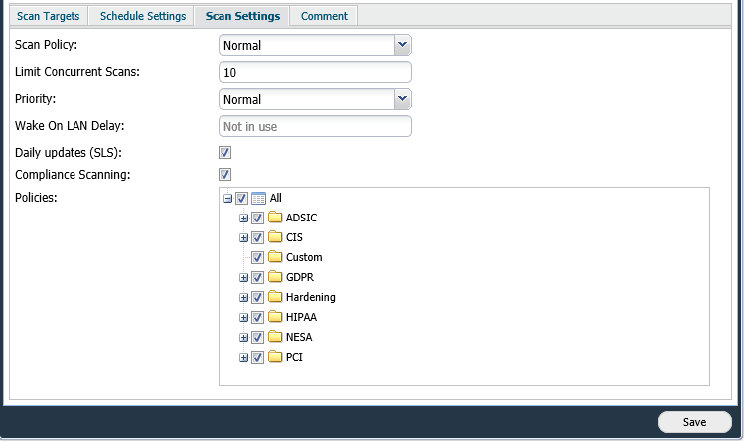
Scan Settings Tab
The Scan Settings tab allows you to set up the scan procedure by selecting which policy to use, number of concurrent scans, priority level and so on.
|
Option |
Description |
|
Scan Policy |
Select any scan policy from the drop-down menu.
See Scan Policy section on how to create new scan policies. |
|
Limit Concurrent Scans |
Limiting concurrent scans determines how many targets within a scan the system run simultaneously. Recommended to leave it empty. |
|
Priority
|
Set the priority of the scan. |
|
Wake on LAN Delay
|
Delay in minutes to start scanning after Wake on LAN Delay signal to the target. |
|
Daily Updates (SLS) |
Check this box to enable SLS feature.
|
|
Compliance Scanning |
Check this box to enable Compliance Scanning. When compliance scanning is enabled, all scripts are executed during scanning and all ports are tested.
|
|
Policies |
Default Value: All policies are selected. Deselect All and select one or more policies from the available options. When a compliance policy is selected, the scanner only performs the checks specific to that policy.
|
Discovery Settings Tab
Selecting Discovery reveals the Discovery Settings tab. Under the Discovery Settings tab you can define the settings to use when detecting targets and what actions should be taken upon the found targets.

|
Option |
Description |
|---|---|
|
Import Targets from LDAP/AD (HIAB only) |
When selected, LDAP/AD Configuration area is displayed instead of Protocols. 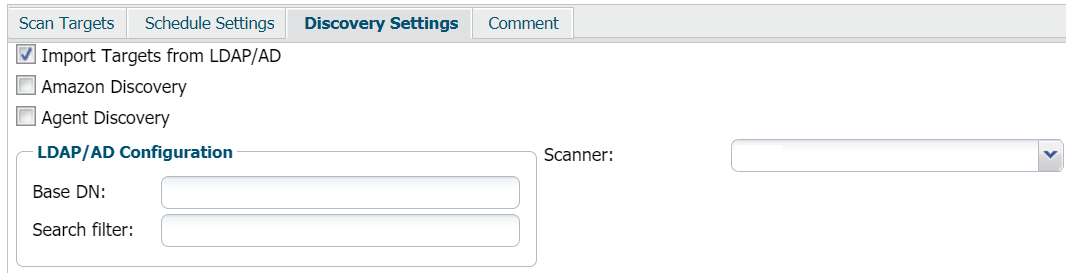
|
|
Amazon Discovery |
When selected, AWS Configuration area is displayed instead of Protocols. 
ARN - Amazon Resource Name |
|
Agent Discovery |
Select Agent Discovery to do a discovery scan for enrolled agents. |
|
Protocols |
In the protocol section you can choose to disable or enable specific protocols to be utilized during the discovery. If you have a switch which answers to all ARP requests then it is recommended that you disable this protocol since otherwise every target that you scan will be considered alive. The ICMP protocol is also known as ping. Select which protocol to use during the discovery scan
|
|
Ports to scan |
The Ports to Scan field allow you to define additional ports for the discovery to test against. Enter the ports you would like to scan in the in a comma separated format: 443 for single ports, 110-143 for port ranges. You can also use def to get the default ports. Example:
|
|
Ignore RST Packets |
The discovery scan will omit RST responses (which may originate from another device on behalf of the scanned end-point) when determining if the end-point is alive. |
|
Scanner |
If the HIAB has distributed scanners registered you also get the option to select which node should run the discovery scan by selecting Scanner. Selecting Local will run the discovery scan on the current HIAB, the other names are defined when registering a scanner. Targets created during a scan will be created with the associated scanner node that performs the discovery scan. |
|
Advanced Report Filters |
This section is used to further filter the packages before marking the target as alive. Write a BPF expression to add an advanced filter. See below reference: 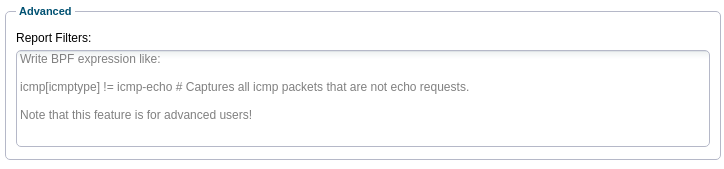
Even if you do not of send an ARP message, you may still get an ARP response which marks the target as alive. By setting a filter to remove the ARP messages, the scanner will not report on ARP responses. For further information, see Advanced Filters. |
|
Add found Targets to Target Group |
Add Found Targets To Target Group is used to select a target group to add the targets that are found to be alive to. |
|
Add Only Not Existing Targets |
Targets not already defined in the system will be added to the selected group, in other words, if the target already is in a different group, then it will not be added to this specific group when this option is enabled. |
|
Empty Target Group Before Adding |
To clear the target group before adding the targets, select Empty Target Group Before Adding. This option should be enabled if you only want the group to contain targets that were determined to be alive at the last time of scan. If you instead would like to have the group contain all targets ever being alive within the given range, then disable this option. |
|
NetBIOS lookup on targets |
This will perform a NetBIOS lookup of the target (only available if a WINS server is defined in the settings - HIAB only). |
|
Customize Targets |
There are additional attributes which can be configured here, they are:
|
A discovery/scan runs a discovery first and then scans the discovered targets. If it does not run an Agent discovery it will not discover any agents and thus will not scan them. This is an expected behavior.
Scanning a target with too many vhosts may lead to scan timeout. In case of faulty target, for example more than max vhost a warning message is displayed added to the discovery scan as follows:
Warning: <faulty-target-number> target(s) with more than <vhost-max> virtual hosts, target_name:vhost_number, <target-name>:<vhost-number>
Attributes Tab
The Attributes tab is visible only if there are any custom attributes defined on the schedule objects.
Comment Tab
Add any comment in the field.
Click Save to save the current settings.
Create Scan Schedule on a Single Target
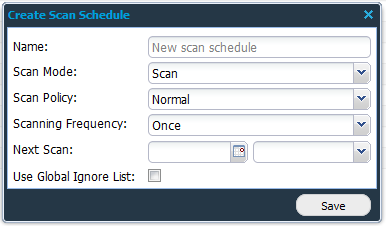
To set up a scan schedule from a single target:
-
Go to Main Meny > Netsec > Manage Targets.
-
Select the target you want to scan
-
Right click a target and select Scan
-
In the Create Scan Schedule window, fill in:
|
Option |
Description |
|---|---|
|
Name |
Name of the schedule. |
|
Scan Mode |
Select scan mode:
|
|
Scan Policy |
Scan Policy enables you to configure each scan to suit your network environment.
|
|
Scanning Frequency |
Scanning Frequency defines how often the scan schedule should run. |
|
Next Scan |
Displays the date of the next scan (if scheduled). |
|
Use Global Ignore List |
The Global Ignore List is a default ignore list of targets that is excluded from scanning.
|
Scan Policy
The Scan Policy tab enables you to configure each scan to suit your network environment.
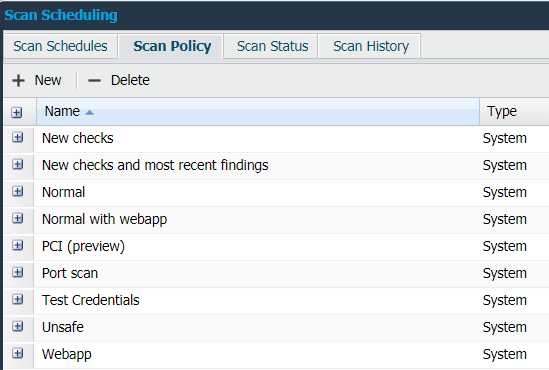
The scan policies with type System are predefined and available by default. These cannot be delete or edited directly without providing a new name.
To create a customer policy:
-
Right click on any entry and select Edit.
-
Provide a new name before saving since it is a system policy.
-
The newly defined policy is added to the list with Type: User defined.
-
Click on + sign located to left of policy name to view detailed information regarding that scan policy.
To create a scan policy:
-
Click on + New button.
To edit an existing policy:
-
Right click on it and select Edit. The Maintaining Scan Policy window is opened.
Checks
All vulnerability checks are divided into families. In the Vulnerability Families area, select which script families should be included in the policy. All families can be selected/deselected once by enabling the Script Family Name field.
|
Option |
Description |
|
Filter Checks |
|
|
Perform Safe Vulnerability checks only |
Enable this field to stop checks from exploiting vulnerabilities to find them. Disabling safe checks can exploit a vulnerable target. |
|
Filter new checks |
This is used to enable only those checks which have been added since the last scan. |
|
Filter most recent findings |
Adds all of the checks which were found during the last scan. |
|
Filter Potential False Positives |
By enabling this field, all findings which are marked as a potential false positive are excluded from the scan report. |
|
Disable Logins |
Allows the scan policy to disable all default logins. If any authentication is added to a host or scan policy, it is still used for authenticated scanning. |
|
Filter out fallback kernels |
Only evaluates vulnerabilities for the current running kernel and filters all the findings related to older but installed kernel packages. |
|
Complementary authentication scan |
|
|
Run complementary authentication scan |
The scanner checks for any available default credentials on various services from a list of different vendors. For more information, see Complementary Authenticated Scan on Default Credentials. |
|
Virtual host list |
|
|
IP |
Add IP as a virtual host |
|
Hostname |
Add hostname as a virtual host. |
|
Reverse DNS |
Add reverse DNS as a virtual host. |
In the Vulnerability Checks, you can choose checks which are to be included in the report. The search bar at the top allows you to search the vulnerabilities to easily find the checks you are looking for.
Portscan
Contains the setup for the port scanner, which is used to scan the targets for open ports.
|
Option |
Description |
|
Select portscan speed |
Three different modes are available which initiates the scan in different packets per second (pps) rates:
|
|
TCP Port Range |
Enter the port range in the following format: 443, -250, 65000-, 110-143, !80. This translates into scanning ports 443, 1-79, 81-250, 65000-65535, and 110-143. Valid keywords to put into this field are def and none. To exclude ports, add an exclamation mark (!) followed by the port number, for example 1-100, !22 scan ports 1-100 but exclude 22. The default value def tells OUTSCAN to portscan its default port list of approximately 5500 TCP ports. |
|
UDP Port Range |
Enter the port range in the following format: 443, -250, 65000-, 110-143, !80. This translates into scanning ports 443, 1-79, 81-250, 65000-65535, and 110-143. Valid keywords to put into this field are def and none. To exclude ports, add an exclamation mark (!) followed by the port number, for example 1-100, !22 scan ports 1-100 but exclude 22. The default value def tells OUTSCAN to portscan its default port list of approximately 100 UDP ports. Scheduling more than 10000 ports in UDP scanning will influence the overall scan time. Roughly it can take over an hour per 20000 ports. |
|
Default unscanned port state |
Ports that were not included in the TCP or UDP port range are to be considered to be in this state by the vulnerability scanner:
|
|
UDP port unreachable scan |
Supplements the UDP port scanning by processing ICMP port unreachable packets (enabling this option and selecting many UDP ports may result in the scan timing out). |
|
Use netstat details |
Use netstat details when determining if ports are open on the device. The quick option use the open port details without a verification scan to confirm that the ports are open. The verify option run a port scan against the ports found when running the netstat details to determine that the port is available externally on the device. |
|
Include normal portscan |
If no ports were determined by using the netstat information the scanner falls back to the defined scanning range for this schedule/target. |
|
Use details from SSH port |
From which open port (if multiple) is the port details used in the scan gathered. |
SSL
Contains the settings for any SSL service found when scanning targets with this policy.

|
Option |
Description |
|
Client Certificate Authentication |
|
|
Private key file |
An SSL private key to use when negotiating SSL with the remote host. |
|
Private key passphrase |
A passphrase to use with the SSL private key provided to use when negotiating SSL with the remote host. |
|
Certificate file |
SSL Certificate file to use when negotiating SSL with the remote host. The certificate must be in PEM format. |
|
CA Bundle |
|
|
Trusted CAs file |
An SSL client Certificate Authority file to use when negotiating SSL with the remote host. The certificate must be in PEM format. |
To upload the SSL private key file, SSL client ca file, and SSL certificate file:
-
Click on the + symbol located to the right of each drop-down menu to open the Maintaining Files window.
-
Click +New to open the Upload File window.
-
Click on the + symbol to the right of File row to choose your file.
-
Click Save and followed by Close.
Mail
Contains the settings for the different mail protocols available when scanning targets with this policy.
|
Option |
Description |
|
SMTP sender address |
The sender address when scanning SMTP mail servers. |
|
SMTP recipient |
The recipient address when using SMTP mail servers. |
|
SMTP 3rd party domain |
A third-party domain to use when scanning SMTP mail servers. |
|
IMAP username |
The username to use when attempting to log on to the remote host via IMAP. |
|
IMAP password |
The password to use when attempting to log on to the remote host via IMAP. |
|
POP2 username |
The username to use when attempting to log on to the remote host via POP2. |
|
POP2 password |
The password to use when attempting to log on to the remote host via POP2. |
|
POP3 username |
The username to use when attempting to log on to the remote host via POP3. |
|
POP3 password |
The password to use when attempting to log on to the remote host via POP3. |
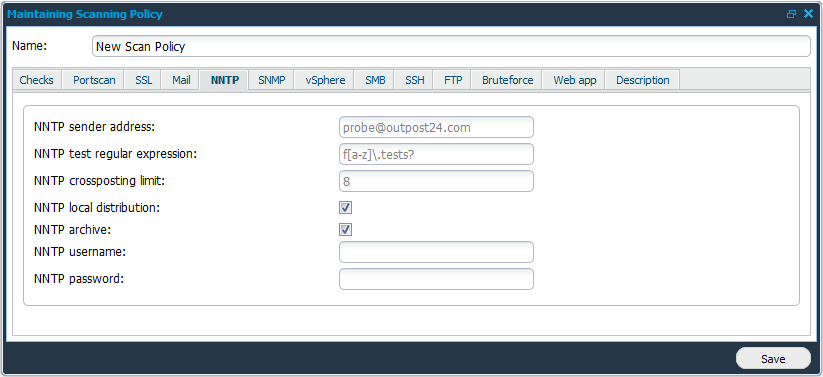
NNTP
Contains the settings for any news server found when scanning targets with this policy.
|
Option |
Description |
|
NNTP sender address |
The sender address to use when scanning NNTP servers. |
|
NNTP test regular expression |
A regular expression for an NNTP newsgroup name that the remote host may be aware of. |
|
NNTP crossposting limit |
The maximum number of newsgroups allowed to post to simultaneously. |
|
NNTP local distribution |
If the scanner should set the Distribution field to local or not. |
|
NNTP archive |
If the scanner should use archiving in NNTP transactions. |
|
NNTP username |
The username to use when attempting to log on to the remote host via NNTP. |
|
NNTP password |
The password to use when attempting to log on to the remote host via NNTP. |
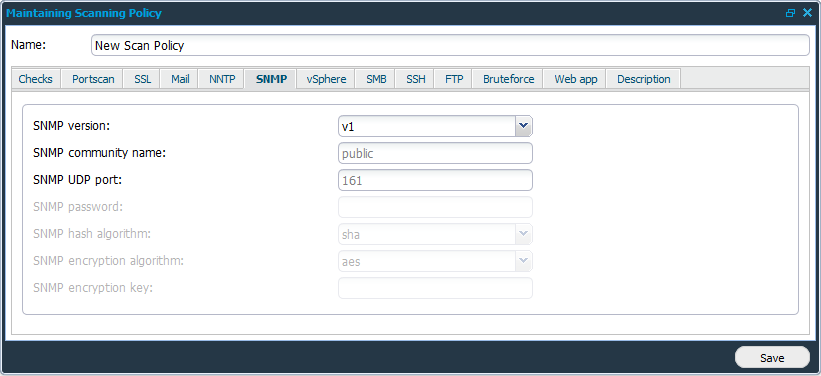
SNMP
Contains the authentication settings and credentials used to enable Authenticated Scanning using SNMP.
|
Option |
Description |
|
SNMP version |
The SNMP version on the remote host.
|
|
SNMP community name |
The community string or user to use when scanning the remote host. |
|
SNMP UDP port |
The UDP port to use when scanning SNMP. |
|
SNMP password |
The password to use when attempting to log on to the remote host via SNMP. |
|
SNMP hash algorithm |
The hash algorithm to use while negotiating with remote host via SNMP.
|
|
SNMP encryption algorithm |
The encryption algorithm to use while negotiating with remote host via SNMP.
|
|
SNMP encryption key |
The encryption key (passphrase) to use while negotiating with remote host via SNMP. |
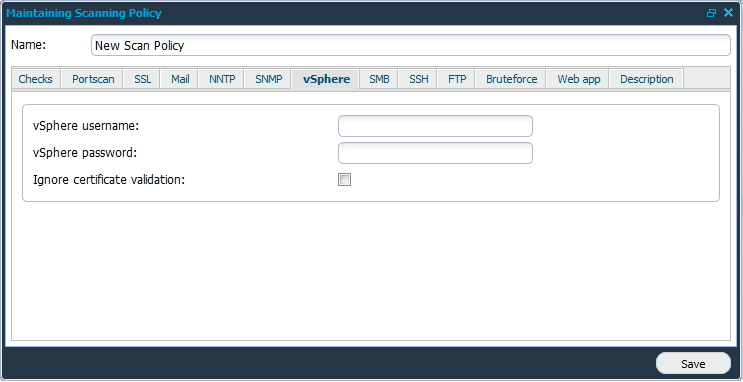
vSphere
vSphere credentials are only used if a compliance scan is running. In addition, the target must have a ESXI compliance policy enabled.
Contains the authentication/configuration settings for the VMware vSphere. If configured, they are used when scanning targets running this service.
|
Option |
Description |
|---|---|
|
vSphere username |
The username to use when attempting to log on to vSphere. |
|
vSphere password |
The password to use when attempting to log on to vSphere. |
|
Ignore certificate validation |
Allows the authentication and operations to continue even if the vSphere certificate is not valid. |
SMB
Contains the authentication settings and credentials used to enable Authenticated Scanning using SMB. For more information, see Authenticated Scanning Using SMB document.
Thycotic SMB is now available as an additional option if Thycotic integration has been configured. For more information, see Thycotic document.
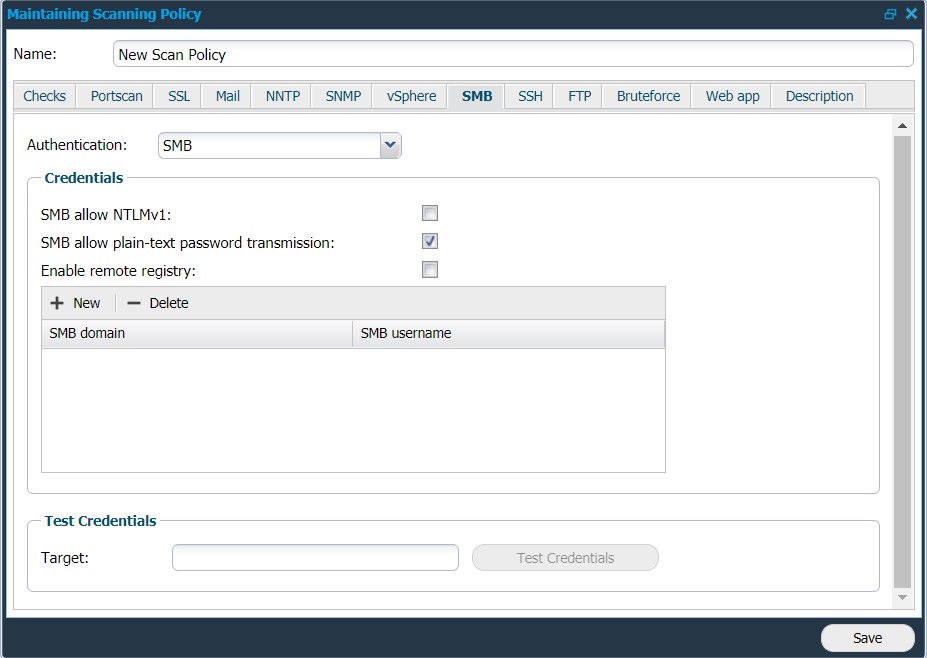
Click on +New to add the SMB credentials.
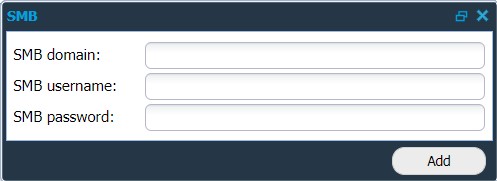
Click Add after providing the details.
|
Option |
Description |
|
SMB domain |
The SMB domain to use when scanning the remote host. |
|
SMB username |
The username to use when attempting to log on to the remote host via SMB. |
|
SMB password |
The password to use when attempting to log on to the remote host via SMB. |
|
SMB allow NTLMv1 |
Whether to allow authentication using NTLMv1. |
|
SMB allow plain-text password transmission |
Whether to allow scanning using plain-text password transmission. |
|
Enable remote registry |
If this option is checked, the scanner starts the Remote Registry Service using the provided user details and once finished, disable the service again. |
|
Target Credentials |
|
|
Target |
Enter a Target to test the credentials and click Test Credentials. There could be multiple targets with same IP/hostname which must be linked to different scanners. For example: 192.168.0.1 on Scanner01
To test the credentials on one of these targets, the scanner name should be provided along with the target to run a successful test using the format given below:
|
Multiple attempts to login with the same account or on the same domain can cause account lockout and should be avoided.
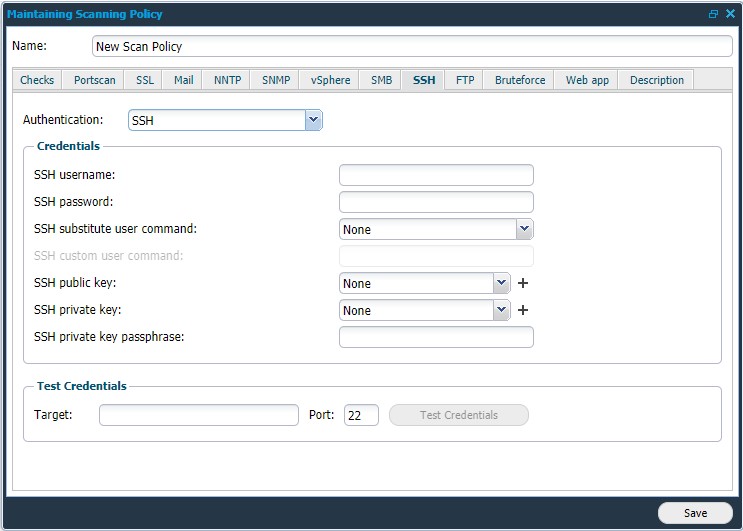
SSH
Contains the authentication settings and credentials used to enable Authenticated Scanning using SSH. For more information, see Authenticated Scanning Using SSH document.
Thycotic SSH is now available as an additional option if Thycotic integration has been configured. For more information, see Thycotic document.
|
Option |
Description |
|
SSH username |
The username to use when attempting to log on to the remote host via SSH. |
|
SSH password |
The password to use when attempting to log on to the remote host via SSH. |
|
SSH substitute user command |
If the system requires the use of escalated privileges to run commands, select the desired method.
|
|
SSH custom user command |
Sets a custom command for escalating privileges. |
|
SSH public key |
The public key file to use when negotiating SSH with the remote host. |
|
SSH private key |
The private key file to use when negotiating SSH with the remote host. |
|
SSH private key passphrase |
The private key passphrase to use when negotiating SSH with the remote host. |
|
Target Credentials |
|
|
Target |
Enter a Target and a Port to test the credentials and click Test Credentials. There could be multiple targets with same IP/hostname which must be linked to different scanners. For example: 192.168.0.1 on Scanner01
To test the credentials on one of these targets, the scanner name should be provided along with the target to run a successful test using the format given below:
|
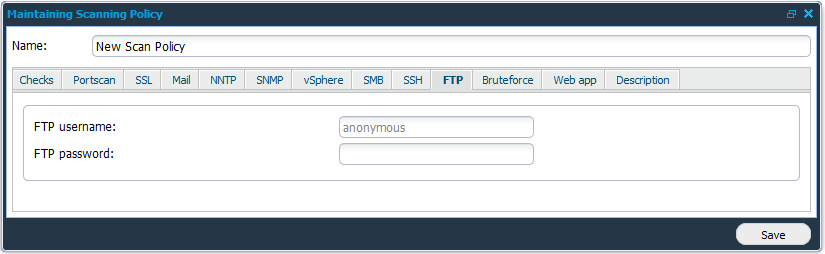
FTP
Contains the authentication/configuration settings for FTP. If configured, they are used when scanning targets running this service.
|
Option |
Description |
|
FTP username |
The username to use when attempting to log on to the remote host via FTP. |
|
FTP password |
The password to use when attempting to log on to the remote host via FTP. |
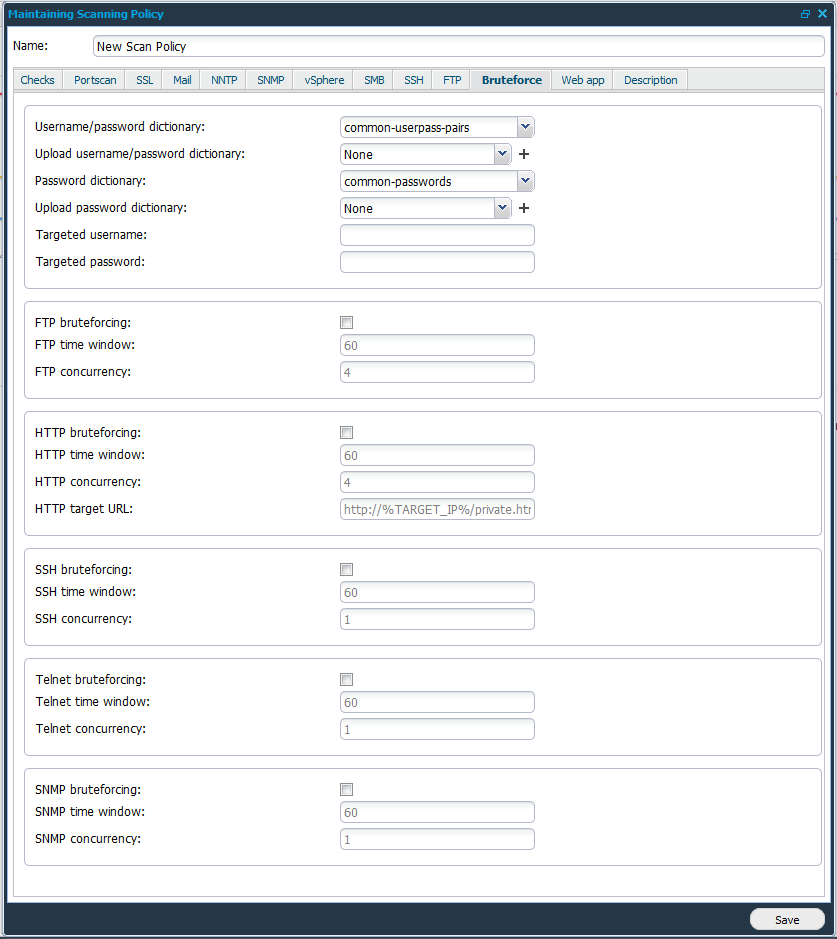
Bruteforce
Contains the settings for the Bruteforce and the different protocols which the Bruteforce can operate on.
|
Option |
Description |
|
Username/password dictionary |
Selects a dictionary to use for bruteforcing services that require a username and password pair as authentication token.
|
|
Upload username/password dictionary |
A username dictionary is a regular ASCII text file in the following format: [username0]:[password0] [username1]:[password1] … [usernameN]:[passwordN]
A few special keywords are accepted in the password field: (none) is replaced with a blank password (user) is replaced with the username that are currently bruteforced.
Example: alice:system results in username alice and password system bob:(none) results in username bob and a blank password charles:(user)1 results in username charles and password charles1 |
|
Password dictionary |
Selects a dictionary to use for bruteforcing services that require a password as authentication token.
|
|
Upload password dictionary |
A password dictionary is a regular ASCII text file in the following format: [password0] [password1] … [passwordN]
A special keyword (none) can also be used to signify a blank password. |
|
Targeted username |
A username to specifically target when performing account bruteforcing tests. |
|
Targeted password |
Configures the bruteforce tests to look for a specific password. |
|
FTP bruteforcing |
Enables bruteforcing of FTP accounts. |
|
FTP time window |
Restricts the amount of time the engine is allowed to spend performing FTP bruteforce tests. Specified in minutes. |
|
FTP concurrency |
Number of concurrent threads used while performing the bruteforce. |
|
HTTP bruteforcing |
Enables bruteforcing of HTTP accounts on all ports configured for HTTP. HTTP Basic authorization is the only currently supported authentication type. The dictionary selected in the Password dictionary is used. |
|
HTTP time window |
Restricts the amount of time the engine is allowed to spend performing HTTP bruteforce tests. Specified in minutes. |
|
HTTP concurrency |
Number of concurrent threads used while performing the bruteforce. |
|
HTTP target URL |
The URL to a password protected web page. The keyword ‘%TARGET_IP%’ is replaced at runtime with the IP address of the scanned host. |
|
SSH bruteforcing |
Enables bruteforcing of SSH accounts. |
|
SSH time window |
Restricts the amount of time the engine is allowed to spend performing SSH bruteforce tests. Specified in minutes. |
|
SSH concurrency |
Number of concurrent threads used while performing the bruteforce. |
|
Telnet bruteforcing |
Enables bruteforcing of Telnet accounts. |
|
Telnet time window |
Restricts the amount of time the engine is allowed to spend performing Telnet bruteforce tests. Specified in minutes. |
|
Telnet concurrency |
Number of concurrent threads used while performing the bruteforce. |
|
SNMP bruteforcing |
Enables bruteforcing of SNMP accounts. |
|
SNMP time window |
Restricts the amount of time the engine is allowed to spend performing SNMP bruteforce tests. Specified in minutes. |
|
SNMP concurrency |
Number of concurrent threads used while performing the bruteforce. |
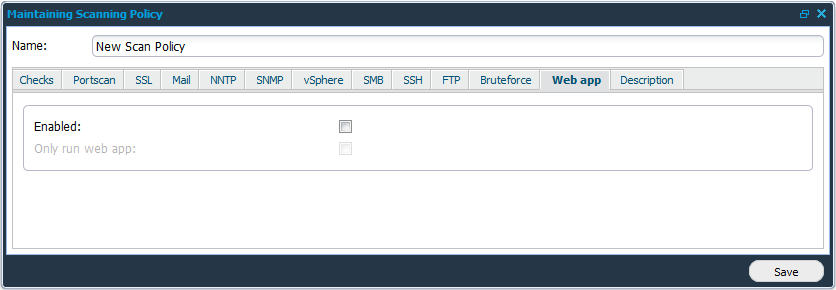
Web App
This option is used to enable or disable scanning web application related vulnerabilities.
|
Option |
Description |
|
Enabled |
Undefined |
|
Only run web app |
Skips the normal scan step. Products that are detected by the web application scanner are still checked for vulnerabilities. |
Description
Contains a small description of the scan policy. Add a description when creating a scan policy.
Customizing Scan Policy Grid
In addition to the general customization in section General Grid Customization, each tab allow specific customizations for each tab.
Filters
For general filter settings, see Filters.
To enable filtering, click on the arrow ![]()
-
Type: Filter based on the type of Scan policy.
-
System: Display all entries that are predefined.
-
User defined: Display all entries that are user defined.
-
Scan Status

The progress of all active scans is displayed in the Scan Status tab. Possible actions from this tab are:
|
Option |
Description |
|---|---|
|
Pause |
Pause running scan against the selected target. |
|
Resume |
Resume paused scan against the selected target. |
|
Stop |
Terminate the running scan against the selected target. When terminating a scan no reports will be generated. |
|
Pause all scans |
Pause all running scans. This feature only pauses the running scans at the time the button was pressed. If there are scans waiting in the queue, these scans are not paused and will run once a place in the queue becomes available.
|
|
Resume all scans |
Resume all paused scans. |
|
Stop all scans |
Terminate all running scans. When terminating a scan no reports will be generated. |
Right click on any active scan to set its priority.
Choose between
-
Low priority
-
Normal priority
-
High priority
This option is only available on HIAB.
Scan Stages
Discovery scan
The Discovery scan sends packages over multiple protocols. If the scanner gets anything back from the target, the target is confirmed to be alive.
Vulnerability scan
There are six stages.
-
Portscan - Sends packages to approximately 5500 ports (default specified port range) for UDP and TCP protocols to find open ports on the target.
-
Fingerprint - This stage uses the ports which were found open in the Portscan stage, to see which services are available on the target.
-
Scanning - It collects the information from the target such as, platform, directories, and versions.
-
Web scan (optional) - This is applicable only for web applications. It crawls over every link found and collects the information about it.
-
Detection - Compares the information collected in the scanning phase with the Outpost24 vulnerability database.
-
Report - Reports all findings found during the scan.
Customizing Scan Status Grid Window
In addition to the general customization in section General Grid Customization, each tab allow specific customization as well.
Columns
The displayed information varies upon selecting different columns. By clicking the arrow ![]()
|
Column |
Description |
|
From HIAB (OUTSCAN only) |
With HIAB External license, you can add OUTSCAN scanner to HIAB and send scans from your internal HIAB to OUTSCAN. This column shows if the scan was initiated from HIAB. |
|
Host Name |
Host name of the target. |
|
Priority (HIAB only) |
Displays the specified priority of the scan. |
|
Progress |
Displays the scan progress percentage. |
|
Scan Policy |
Displays the scan policy selected in scan schedule settings. |
|
Scanner |
Displays the name of the scanner where this scan has been sent for scanning. |
|
Schedule |
Displays the name of the scan schedule. |
|
Scheduled End |
Displays the scheduled end time of the scan irrespective of its status. |
|
Scheduled Start |
Displays when the currently running scan was initiated. If scan is paused and resumed, then it displays the time when the scan is resumed. |
|
Service |
Displays type of the currently running scan. |
|
Status |
Displays the status of the scan. |
|
Target |
Displays the target which is being scanned. |
Service Filters
For general filter settings, see Filters.
To enable filtering, click on the arrow ![]()
|
Option |
Description |
|
Scan |
Displays all scans that are currently running under scan mode. |
|
Discovery |
Displays all discovery scans. |
|
LDAP Discovery |
Displays all LDAP discovery scans. |
|
Amazon Discovery |
Displays all Amazon discovery scans. |
|
Webapp |
Displays all web app scanner scans. |
|
Web App Discovery |
Displays all web app scanner discovery scans. |
|
Test Credentials |
Displays the scan on test credentials. |
|
Lookup |
Displays all lookup scans. |
|
Update |
Displays all SLS scans. |
Yes/No: Choose to filter on either Yes or No.
Scan History
Scan History displays the history over all scans performed along with information about each scan.
Right click on any entry to perform the below actions.
-
Show Scan Results: If a scan is ended successfully, the report for this scan is visible. This can be done both on individual targets and on complete scan schedules.
-
Scan: Starts a scan against the same target(s).
-
Download Blueprint (HIAB only): This option is available only for individual target scans.
For more information, see the Scan Blueprint document.
-
Audit Log: Select this option to see the changes made to a certain entry.
Main user and Super user can also view the audit log.
-
Export: Select this option to export data as HTML or CSV. This open either a HTML page or a CSV file that you can save or copy data from.
The CSV export function in the grid has a limit of 100k rows.
Customizing Scan History
In addition to the general customization in section General Grid Customization, each tab allows for specific customization for each tab.
Columns
The displayed information varies upon selecting different columns. By clicking the arrow ![]()
|
Columns |
Description |
|
Cause of Error |
If a scan fails, its descriptive explanation can be found in the Cause of Error column. It is extremely valuable information for troubleshooting. |
|
Download State |
Displays the download status of the blueprint. |
|
Scan End Date |
Displays the end date and time of that specific scan. |
|
Scan Policy |
Displays the policy selected for that scan. |
|
Scan Schedule |
Displays the name of the scan schedule. |
|
Scan Start Date |
Displays the start date and time of that specific scan. |
|
Scan Status |
Displays the status of the scan. |
|
Scan Time |
Displays the total time taken for the scan to complete. |
|
Scanner |
Displays which scanner has been used. |
|
Target |
Displays the hostname of the target. |
|
Target Group |
Displays the target group name. |
Scan Status Filters
For general filter settings, refer to Filters.
To enable filtering, click on the arrow ![]()
|
Option |
Description |
|
Target Done |
Displays all scans that are done and completed successfully. |
|
Target Timeout |
Displays all scans that could not finish within the given scan time. |
|
Target Stopped |
Displays all scans that were stopped during the scan. |
|
Target Too many Findings |
Displays all scans during which the scanner detected more than 100 ports opened on the target. This filter is only for versions older than xmlapi 4.1.148.* as newer versions do not report the scan as too many findings. |
|
Too many Open Ports |
Displays the scans during which the scanner has detected more than 50 open ports (50 UDP or 50 TCP) on target. |
|
Target Failed |
Displays failed scans. |
|
Scan Paused |
Displays paused scans. |
|
Scan resumed |
Displays scan that are in resuming state. |
|
Scan Job Timeout |
Displays failed scan jobs that could not finish within the given scan time. |
|
Scan Job Running |
Displays scans jobs that are currently running. |
|
Scan Job Done |
Displays scans jobs that are successfully finished. |
|
Scan Job Stopped |
Displays scans jobs that were stopped. |
|
Scan Job failed |
Displays failed scans jobs. A scan job can contain several targets. |
|
Compliance target done |
Displays all compliance scans that completed successfully. |
|
Compliance scan running |
Displays all compliance scans that are currently running. |
|
Compliance scan done |
Displays all compliance scans that are successfully finished. |
|
Discovery Running |
Displays all discovery scans that are currently running. |
|
Discovery Done |
Displays all discovery scans that are successfully finished. |
|
Discovery Timeout |
Displays failed discovery scans that could not finish within the given scan time. |
|
Discovery Stopped |
Displays all discovery scans that were stopped. |
|
Discovery Failed |
Displays failed discovery scans. |
|
Imported |
Displays the scan history of imported reports. |
|
Target Update Done |
Displays all SLS scans that are done and completed successfully. |
|
Target Update Timeout |
Displays all SLS scans that could not finish within the given scan time. |
|
Target Update Stopped |
Displays all SLS scans that were stopped during the scan. |
|
Target Update Failed |
Displays SLS failed scans. |
When a scheduled discovery/scan is run where the discovery failed to find any targets, the scan will not be started and the scan history will show three statuses:
-
Scan Job Failed
-
Discovery Done
-
Scan Job Done
Scan Job Failed - with a cause of error stating that no targets were found
Discovery Done and Scan Job Done - even though no scans were actually started.
If the discovery does not find any targets, it could either be because the targets is down/does not exist, or the user not having access to the targets or the scanner.
Troubleshooting
Some of the possible causes of problem are listed below:
Problem
|
Problem |
Description |
|---|---|
|
No scans were started as no targets were found in the scan schedule. This could be because the maintainer of the schedule does not have access to the targets or scanner. |
The schedule has been maintained by a sub-user who does not have access to either the added target or the selected scanner. |
|
No targets were found during the discovery. |
The discovery could not find any of the added targets. |
Error Messages
|
Error Message
|
Description |
|
Virtual Host(s) does not resolve to the target IP |
Scanner reports this error when you add virtual host(s) to the target that cannot be resolved to the target IP at the time of scan. |
|
Instance XXX was not found |
The Amazon instance is not reachable by the scanner or does not exists anymore. |
|
Instance type XXX is not supported |
Instance type is not supported by the Outpost24 scanner, for example, because of Amazon scanning policy. |
|
Instance XXXX has no public IP |
Public IP missing from the instance. |
|
Error during web authentication procedure |
The web authentication procedure failed. |
|
Target is missing in the system |
The target no longer exists in the system. |
|
Report is missing in the system |
The report for SLS no longer exists. |
|
Maximum duration reached, terminated scan |
Due to timed out scans. |
|
Could not connect to scanner |
When the system cannot connect to the scanner you have selected. In the Distribution section of the system it can be verified when the system was last able to successfully communicate with the scanner. Different level of information about the scanner are also available in the Distribution section. |
|
Scans are already running against the targets |
Scans are already running. |
|
Scanner not approved or inactive |
This may be reported when the scanner is not approved or have been removed from the system. In the Distribution section of the system it can be verified when the system was last able to successfully communicate with the scanner. Different level of information about the scanner are also available in the Distribution section. |
|
Invalid AWS credentials |
Check if your Amazon Web Service (AWS) setup under the Integrations section is up to date. |
|
Could not start SLS, database missing |
Unable to connect to the blueprint database for vulnerability correlation offered by the SLS functionality. The vulnerability report has not received its SLS updated details. |
|
An error occurred during discovery, error code |
Some error doing discovery. This is mostly reported when discovery scan fails or stopped. |
|
Scan/IP license limit exceeded |
Reported whenever the IP license limit is less than the scans or no license is left for the scan to proceed. |
|
No seed URLs found |
URL seed missing. |