Last updated: 2023-02-14
Purpose
The purpose of this article is to provide an overview of the Manage Targets feature for OUTSCAN and HIAB, and has been elaborated under the assumption that the reader has access to the OUTSCAN/HIAB account and Portal Interface with Netsec subscription.
Introduction
The Manage Targets feature in OUTSCAN and HIAB provides a centralized interface for managing the assets included in vulnerability assessments. Targets represent systems such as IP addresses, hostnames, or network ranges that are scanned for vulnerabilities. Within Manage Targets, users can view and organize targets, edit configuration details, assign attributes, and manage scanning settings. The interface supports actions such as performing DNS, MAC, or NetBIOS lookups, labeling targets with business or security attributes, setting authentication methods, assigning policies, and scheduling scans directly from the target entry. Targets can also be organized into hierarchical groups, allowing administrators to structure assets logically and manage them across multiple groups.
Organizations should use the Manage Targets feature to maintain accurate control over the assets included in their vulnerability management program. By organizing systems into groups, assigning attributes such as business criticality or exposure level, and configuring scanning or authentication settings per target, security teams can improve asset visibility and streamline operational management. Grouping and labeling capabilities also enable more efficient scanning schedules, easier delegation of responsibilities, and improved reporting across teams and environments, helping organizations maintain consistent oversight of their attack surface. The amount of targets can be hard to maintain, therefor it is good practice to manage all targets in target groups. See Target Groups and Dynamic Target Groups.
Targets
Targets are added under the Manage Target section under the Main Menu > Netsec, which is accessible at the bottom left of the GUI.
First time when you enter this section it does not contain any targets groups and only state, All Targets and Ungrouped. Multiple groups can be created, and the targets can be in multiple groups. Arrangement can either be done automatically in Dynamic Target Groups or by manually using drag-n-drop functionality of added target.
There are three generic ways to add targets to the system. Two of those can be performed from this section and the third is to conduct a Discovery Scan and thus that functionality is tied to the scheduling section discussed later in this document.
Once the targets are in place these are the best practices.
-
If the number of targets justifies groups of targets, then consider adding targets that matches your organizations requirements. For example, create groups so that you can compare targets and/or teams in order to see how the vulnerability management is progressing over time.
-
If you have complex requirements regarding scanning time and restrictions, consider managing those rules from groups instead of having to manually edit schedule objects but simply use drag-n-drop when moving/changing scanning periods.
-
If you have additional information that would help in the day to day operation if that information was present in vulnerability management reports, add those detains to the target using custom fields. Read the user guide for more information about custom fields.
-
If the number of users having access to the tool is large along with the network, consider adding target groups per role (or even per user). This will allow you to re-assign assets between users and grant access to systems without having to re-configure users.
-
Use dynamic groups to always have updated information about the targets so that the information does not become obsolete over time.
For example: system owners can be defined as a separate customer field and be used as a dynamic filter to organize the targets. See the Dynamic Target Groups for information on how to add Dynamic Groups.
The grouping system provided by the tool can be used in many ways and allows you to have a better control of what is currently going on within your organization.
On the left side you have an overview of some of the things that has been discussed above (the number to the right of the group name represents the number of targets present in the group).
The Business Function group contains two subgroups that are used for reporting those systems separately even though they share the same database cluster for instance.
In the Event system you can see that groups have been created for different types of notifications and this allows you to simply re-configure notifications and likewise tasks without going over the notification event list trying to figure out which object to edit. Same thing applies to the Scan Window group.
The Target Assignment group contains both By Role and By User and both can be used simultaneous giving you the possibility to have individual targets assign to users and belong to a group of administrators.
Best practice is also to not use the groups for anything else without updating the name to reflect their usage.
Example:
Do not perform scheduling on system owner groups without specifically adding that information to the group name.
Cheat Sheet
|
Best practice
|
Goal
|
In place? |
||
|---|---|---|---|---|
|
Yes |
No |
N/A |
||
|
Add details on targets |
Add custom fields on the targets and populate them with adequate information. Chose information that will be useful to have access to when reading the report or managing the targets and/or risks. For example: System Owner, Datacenter, Rack slot, Geographical location or likewise. |
|
|
|
|
Add groups to match you reporting requirements |
Add group that matches what you are required to report upon.
Optional in smaller organizations.
|
|
|
|
|
Add groups for scheduling purpose |
If you have many restrictions on when you can perform your scanning, consider adding target groups for the scheduling since that provides you with a tree structured overview instead of a list of schedules. Optional in smaller organizations.
|
|
|
|
|
Target assignment |
Should there be a high number of users added to the tool, consider using the grouping system to have the same tree as overview of why can see and have access to what within the system. Optional in smaller organizations.
|
|
|
|
|
Dynamic groups |
If possible, create Dynamic Target Groups that assign targets to their respective group automatically instead of relying on manual updates that may be performed or not on a regular basis. With the use of this type of groups their content will not become obsolete over time causing you to use time to re-organize them over and over. |
|
|
|
The Manage Targets Interface
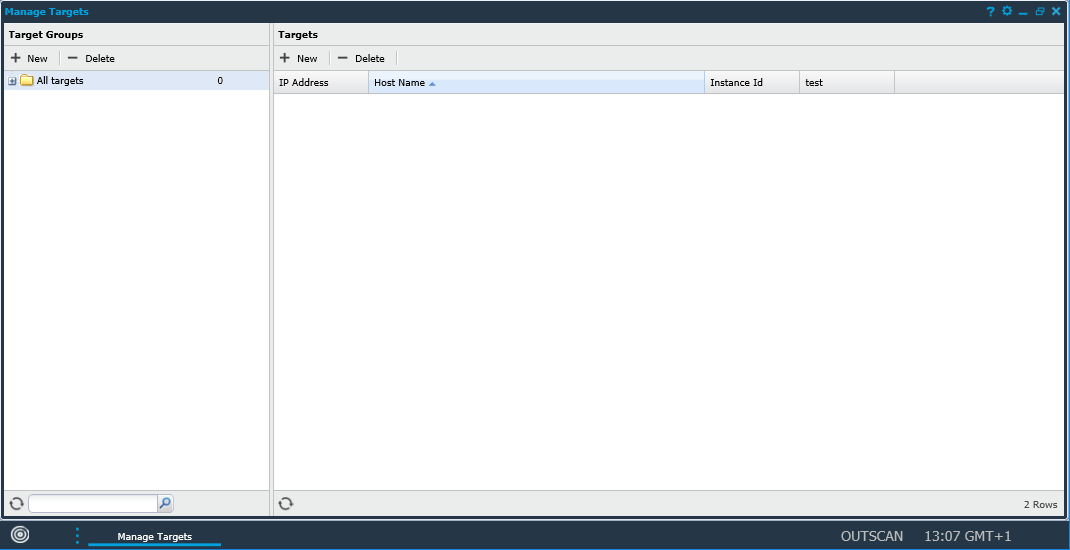
The figure shows the Manage Targets main page which displays all the defined IP’s and target groups. The Manage Targets window consists of two areas, Target Groups and Targets.
Icon List
|
Icon |
Name |
Description |
|---|---|---|
|
|
New |
Clicking New opens the Add New Targets window. The newly created targets will belong to the currently selected target group. |
|
|
Show Groups |
Show all target groups in which this target has been added to. |
|
|
Audit Log |
To see the changes made to a certain entry, right click on it and select Audit log. This show a dialog with all the changes made to the object that were made by you or one of the users that you administrate. |
|
|
Lookup |
Filter the target group grid. |
|
|
Delete |
Clicking Delete while having any targets selected deletes them from the system. Multiple targets can be selected for deletion by holding shift while selecting the targets. Reports for the selected targets are not deleted.
|
|
|
Edit |
To edit a target, right-click on it and select Edit. This allows you to set the Hostname, MAC Address, label the systems importance which is used to calculate CVSS scores, and set Virtual host, hidden URLs. It also includes settings to set target to override scan policy. |
|
|
Export |
To export data from the grid, right click on any entry and select either to export it as HTML or CSV (comma separated values) in the sub menu. This gives you either a HTML page or a CSV file with data that you can save or copy data from. |
|
|
Settings |
Global settings for Target Management |
|
|
Scan |
Create a scan schedule for the target group. |
|
|
Label Target, Update from ServiceNow, Set Policies on Target |
By right-clicking on a target you can choose to update specific labels or attributes on the target. |
|
|
Show Scanner, Set Scanners on Targets |
Lists or set scanners on targets groups. |
|
|
Refresh |
Refresh the grid |
|
|
Label Targets,Update from ServiceNow, Set Policies on Targets |
By right-clicking on a target group you can choose to update specific labels or attributes on the targets in that group. |
|
|
Set Target Authentication |
Select available authentication from a drop down menu |
|
|
Column Menu |
To add or remove columns, hover the mouse over any column name and click the down pointing arrow. |
Global Settings
Click on the Settings ![]()
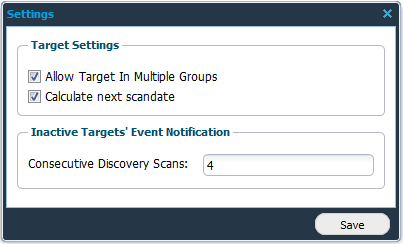
Target Settings
|
Option |
Description |
|---|---|
|
Allow Target In Multiple Groups |
Select this option to allow the targets to be placed in multiple groups |
|
Calculate Next Scandate |
Select this option if the system should calculate the next scan date for the schedules. Calculating the next scan date is resource-heavy so if you experience performance issues with the schedules view, disable this option. |
Inactive Targets Event Notification
|
Option |
Description |
|---|---|
|
Consecutive Discovery Scans |
Sets the number of event notifications sent on inactive targets. |
Adding Targets
The Target Groups grid is used to organize targets. Targets are the assets that can be managed in the system.
To create a target:
-
Open the Manage Targets module in Main Menu > Netsec > Manage Targets.
-
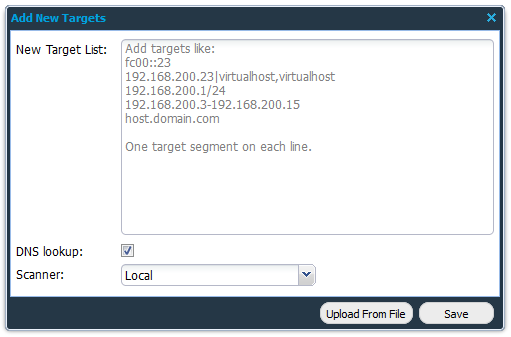
Click on + New in the Targets field to display the Add New Targets window.
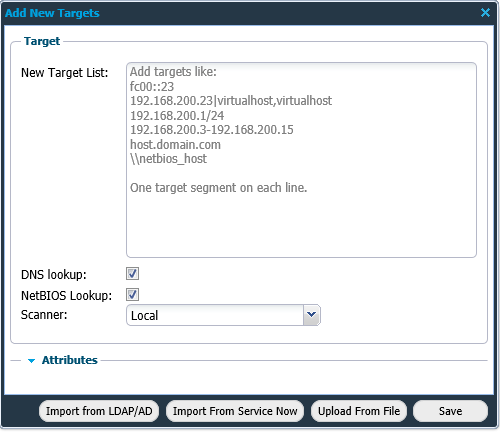
|
Format |
Description |
|---|---|
|
fc00::23 |
IPv6 |
|
192.168.200.23|virtualhost,virtualhost |
IPv4 |
|
192.168.200.1/24 |
CIDR |
|
192.168.200.3-192.168.200.15 |
IP range |
|
FQDN |
|
|
\\netbios_host |
netBIOS hostname |
-
Fill in the required information in the form fields and click Save.
Targets can also be imported from a Comma Separated Values (csv) file, LDAP/AD, or ServiceNow by clicking on respective Import/Upload button.
|
Option |
Description |
|---|---|
|
New Target List |
Add one or multiple targets using the presented help text. Private IP addresses cannot be added when using OUTSCAN.
|
|
DNS Lookup |
Select if a DNS look-up should be performed when adding the IP addresses to the system to get the host name in the system. |
|
NetBIOS Lookup (HIAB only) |
Select if a NetBIOS look-up should be performed when adding the IP addresses to the system to get the host name in the system. |
|
Scanner (HIAB only) |
Set which scanner that should scan the defined targets. Default is set to local and that is referring to the machine that you are logged on to. If you have a distributed network with multiple scanners that is accepted by the scheduler, you will be able to choose which scanner to use in the drop-down menu. If you have a HIAB External license, the OUTSCAN scanner is also available in the drop-down and should be used if public IPs are to be scanned from the OUTSCAN SaaS solution. |
|
Attributes |
This option is used to add additional information about the target. This is displayed as a column with the given field name in the Managed Targets grid. |
|
Upload From File |
Import a previously exported target group file or custom Comma Separated Values (csv) file. |
|
Import from LDAP/AD |
Import targets from LDAP/AD. |
|
Import From ServiceNow |
Import targets from ServiceNow. |
Certain tasks like adding a large/multiple networks can take a long time. When it takes more than 90 seconds, the progress can be viewed in the Task Viewer tab located at the bottom right of the task bar. Task Viewer appears for a user only if there is at least one task in the list. The three possible states for a task appearing in Task Viewer are:
-
In Progress
-
Done
-
Error
Import from LDAP/AD
The Import from LDAP/AD button displays a window where you can select which targets to import into the HIAB.
|
Option |
Description |
|---|---|
|
Search Filter |
Standard LDAP search filter. See Search Filter Syntax on Windows Dev Center for more information. |
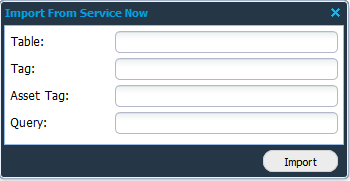
Import From ServiceNow
The Import from ServiceNow button displays a window where you can select which targets to import into the HIAB from ServiceNow.
|
Option |
Description |
|---|---|
|
Table |
Table name containing the targets in ServiceNow. |
|
Tag |
Tags are text labels in ServiceNow associated with items such as records and pages. |
|
Asset Tag |
The Asset tag refers to assets in ServiceNow Asset Management system. |
|
Query |
Search query to retrieve the ServiceNow targets. |
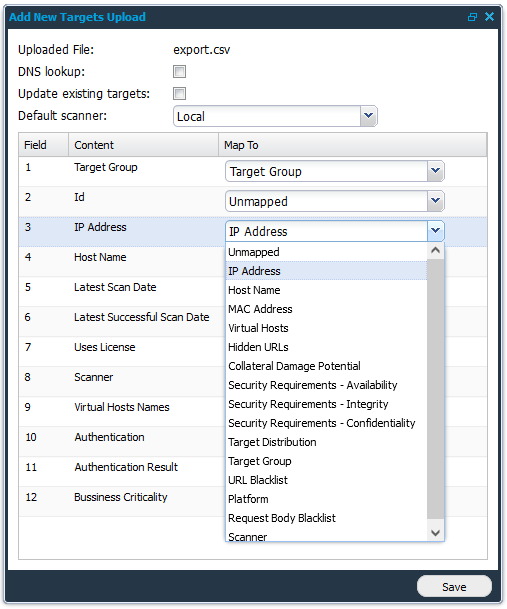
Upload From File
Adding targets from a CSV-file.
-
Click the + New button in the Targets view.

-
Click the Upload From File button.
-
Import the exported target group file or custom Comma Separated Values (csv) file by clicking the + button to select a file.

|
Option |
Description |
|---|---|
|
Upload From File |
Select a file to import. |
|
Separator |
Define what separator is used in the file.
|
|
Text Delimiter |
Define what text delimiter is used in the file.
|
|
Skip First Line |
Select this to skip the first line.
|
-
Click Next to continue.
-
Once uploaded, continue with mapping the files information to the target by selecting the appropriate subject in the drop-down menus.
-
Finish by clicking the Save button.
Label Targets
-
Right click the target.
-
Select Label targets in list.
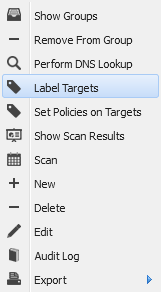
-
Select labels from drop-down menus.
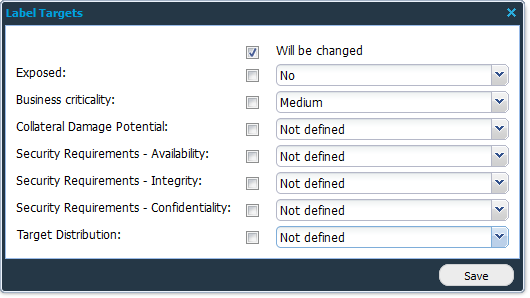
Note that the checkbox to the left of the drop-down must be checked for the value to be set.
|
Option |
Description |
|---|---|
|
Exposed |
Yes/No |
|
Business criticality |
Low, Medium, High , Critical |
|
Collateral Damage Potential |
Not Defined, None, Low, Low-Medium, Medium-High, High |
|
Security Requirements - Availability |
Not Defined, Low, Medium, High |
|
Security Requirements - Integrity |
Not Defined, Low, Medium, High |
|
Security Requirements - Confidentiality |
Not Defined, Low, Medium, High |
|
Target distribution |
Not Defined, None, Low, Medium, High |
-
Click Save.
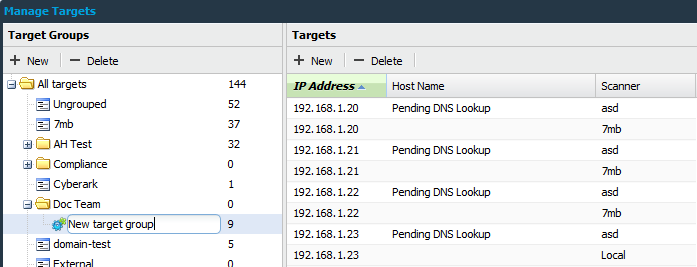
Target Groups
The Target Groups area is used to organize targets. A target group can contain any number of targets and subgroups. This allows for organization of the targets to make them easy to navigate. A target can exist in more than one target group. The number next to the target group name represents the number of targets present in that group.
Target Groups in Outpost24 organize scanning assets into logical groups, enabling efficient management, scheduling, and reporting of vulnerability assessments.
Dynamic Target Groups
A dynamic group is managed by the system so all targets that match the criteria for the group will automatically be added to the group. Targets that no longer matches the criteria will be removed.
Example
Adding a filter on an IP-range makes sure that all targets within that range is part of the group. New targets being added within the same IP-range is automatically added to the group. Any number of filters can be applied when creating the group.
To create a dynamic group complete the following steps.
Creating a View From Filters
The first step is to create a filter in your view.
-
Go to Main Menu > Netsec > Manage Targets.
-
Select All targets in the Target Groups list on the left side of the Manage Targets window.
-
Open the Filters menu by hovering the mouse pointer over the heading of a column and click on the little down pointing arrow to open the Column menu.
Different columns gives different filter options depending on the content of the columns.

-
Select Filters and create a filter by writing a string or number in the All: field.
-
After you have created a filter open the Column menu again and select Views.
-
Select Save View.
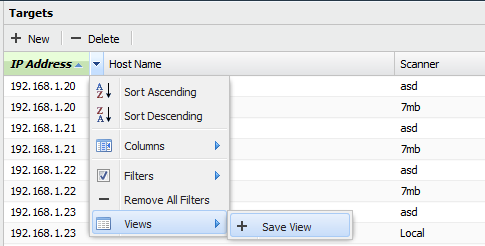
-
Enter a name for the view and click the Save button.

-
Your new view is now created.
Create a Dynamic Group
Once a view has been created you can proceed to create a dynamic group from that view.
-
Go to Main Menu > Netsec > Manage Targets.
-
Select your view.
-
Right click the group and select New dynamic group.
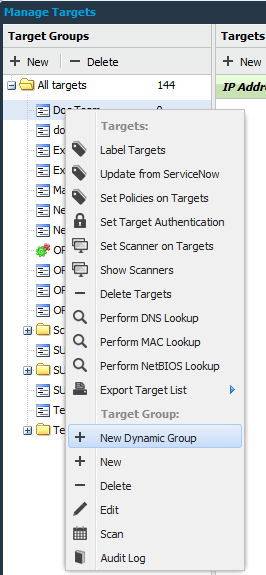
-
Name the new target group.
When the new dynamic group is ready, all new targets that are added and covered by the filter will be displayed in this group.
You can create different dynamic groups based on different filters and sorting.
Update Dynamic Group
The Update dynamic group updates a dynamic group with a new set of filters, disregarding the old ones.
Related Articles