Last Updated: 2025-11-12
Purpose
This article describe how to set up Two-factor authentication using either Mobile Security Code or Google Authenticator.
Introduction
The Two-Factor Authentication (2FA) feature in OUTSCAN and HIAB adds an additional authentication layer to user accounts to strengthen login security, and can be enabled and the mode of authentication is selected from Account Settings. Supported methods include Mobile Security Code, which sends a one-time six-digit verification code via SMS to the user’s registered phone number, and Google Authenticator, which generates time-based one-time passwords through a mobile authenticator application. During login, users must provide both their username and password and the one-time verification code. The means used for authentication can be limited, depending on the options configured for two-factor authentication under Security Policy tab.
Organizations should use Two-Factor Authentication to reduce the risk of unauthorized access caused by compromised credentials. By requiring a second verification factor—something the user possesses, such as a mobile device or authenticator app—the platform adds an extra layer of protection beyond passwords alone. This approach strengthens account security, supports security best practices such as multi-factor authentication, and helps organizations protect vulnerability management data and administrative functions from account takeover attempts.
Set Up Two-Factor Authentication
To access the Account Settings module:
-
Go to Main Menu > Settings > Account.
-
Select the Account tab.
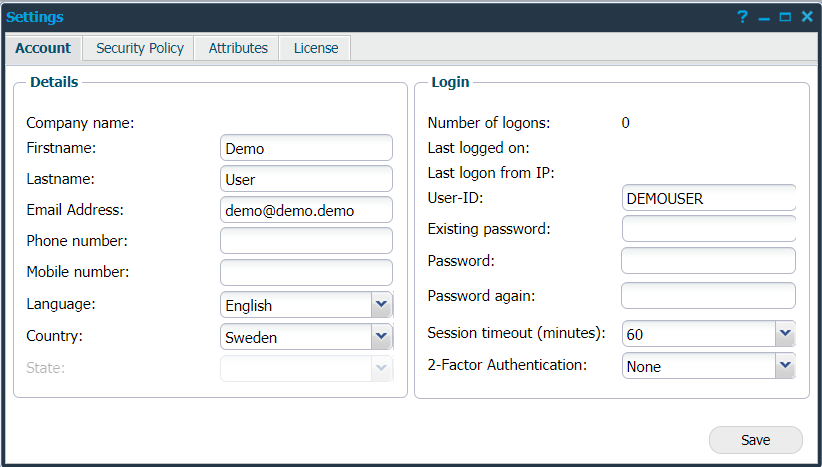
For 2-Factor Authentication choose between the following in the drop-down menu:
|
Option |
Description |
|---|---|
|
None |
No authentication other than specifying USER-ID and Password is needed. |
|
Mobile Security Code |
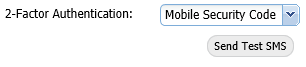
OUTSCAN, and HIAB via OUTSCAN, support Two Factor Authentication via SMS tokens. Upon login a six-digit security code will be sent to a specified mobile number of your choice, which can be used for additional authentication when logging in. SMS delivery issues with certain network providers In some cases, text messages may not be delivered if the sender name is shown as letters instead of a phone number (known as an alphanumerical sender). This is a known issue with all providers in USA and Brazil, and it can also occur in other countries. In the US, many mobile carriers block these messages entirely. If you experience issues receiving SMS codes, we recommend using mobile or desktop authenticator app as a more reliable alternative.
|
|
Google Authenticator |

A mobile application that produces a random six-digit number which can be used for additional authentication when logging in. |
To set up Mobile Security Code:
-
Select Mobile Security Code in the 2-Factor Authentication drop-down menu.
-
Test the connection by clicking on the Send Test SMS button.
To set up Google Authenticator:
-
Select Google Authenticator in the 2-Factor Authentication drop-down menu.
-
Click the Generate Credential ID button.

An ID is generated together with a QR-code.
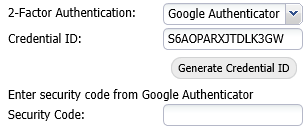
Hovering the mouse over the Credential ID displays the QR-code.
-
When Google Authentication is selected, enter the credential ID which is used to set up the account.
Method Enforcing
To enforce the two-factor authentication:
-
Go to Main Menu > Settings > Account
-
Select the Security Policy tab.
-
The Method Enforcing area determines the type of method used for authentication.
In the drop-down menu select which authentication method to enforce.
For 2-Factor Authentication, the available options are:
|
Option |
Description |
|---|---|
|
None |
2-factor authentication is not enforced; however, each user can still use a 2-Factor authentication on his/her account. |
|
Any |
This option enforces users to choose between the two authentication methods mentioned above. |
|
Mobile Security Code |
When this option is selected, a Mobile Security code is enforced as default on all users. |
|
Google Authenticator |
When this option is selected, Google Authenticator is enforced as default on all users. |
Related Articles