Last Updated: 2025-04-24
Purpose
The purpose of this article is to provide an overview of the different server settings for the HIAB.
Introduction
The article provides a detailed overview of the HIAB server settings, including the graphical interface for configuration and management. It outlines the requirements for accessing these settings, such as having an HIAB account and a web browser, and describes key functionalities like modifying network settings, managing servers, and configuring protocols like NTP and SMTP. Additionally, it covers remote SSH access, error reporting, and bandwidth limiting, emphasizing the importance of proper configuration for performance and security. The document also highlights access control measures to secure the graphical user interface and the management of SSL certificates for secure communication.
Requirements
HIAB Server Settings requires an HIAB account and web browser.
Logging in to HIAB
Server Settings
The HIAB comes with a variety of settings which are available under Main Menu > Settings > Server. In Server Settings it is possible to change:
-
Network specific settings
-
Information of different servers
-
Connections to a LDAP/AD server
Network
In the Network tab, the network specific settings for the HIAB can be changed.
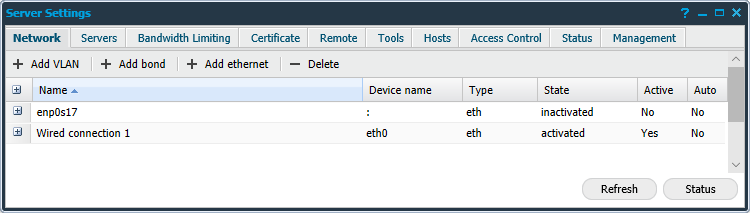
Right clicking a network interface will presents the following options:
-
Activate/Deactivate
-
Add VLAN
-
Add bond
-
Add Ethernet
-
Delete
-
Edit
Activate/Deactivate
Right click a network device to Activate or Deactivate it. Shows different option depending on the state.
Add VLAN
Same as using Add VLAN in the top of the window. Displays the Add connection window.

|
Options |
Description |
|---|---|
|
Name |
Name of the VLAN. |
|
Device |
Device name of the VLAN. |
|
Parent |
Define the parent for the VLAN (Drop down menu where you can choose between already created interfaces). |
|
ID |
ID for the VLAN. |
|
Autoactivate |
Define if this interface should be automatically activated. |
|
IPv4 |
Define IPv4 options such as
Multiple DNS servers must be added comma separated.
|
|
IPv6 |
Define IPv6 options such as
Multiple DNS servers must be added comma separated.
|
Only three DNS servers can be used totally across all connections. More servers results in a random selection of the listed servers.
Add bond
Same as using Add bond in the top of the window. Displays the Add connection window.
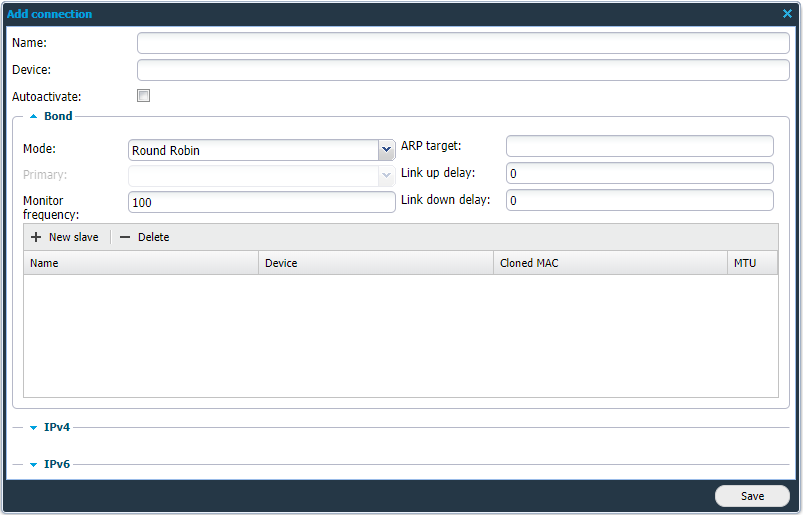
|
Options |
Description |
|---|---|
|
Name |
Name of the bond. |
|
Device |
Device name of the bond. |
|
Autoactivate |
Define if this interface should be automatically activated. |
|
Mode |
Choose how the network packages should be sent out to the slave devices.
|
|
Primary |
Only configurable for Active Backup mode. Choose which interface to be the primary device. |
|
Monitor frequency |
Enter how often monitoring should occur, in milliseconds, to verify if the interface is active. |
|
ARP target |
Define the target IP address of ARP requests. |
|
Link up delay |
Specify how long to wait before enabling the link in milliseconds. |
|
Link down delay |
Specify how long to wait after link failure before disabling the link in milliseconds. |
|
Slave |
Define the slave devices for the bond. |
|
IPv4 |
Define IPv4 options such as
Multiple DNS servers must be added comma separated.
|
|
IPv6 |
Define IPv6 options such as
Multiple DNS servers must be added comma separated.
|
Add Ethernet
Same as using Add ethernet in the top of the window. Displays the Add connection window.
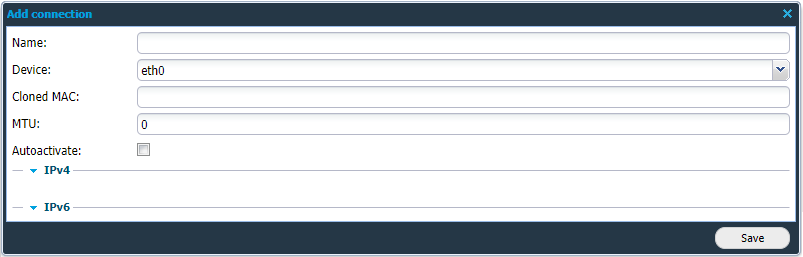
|
Options |
Description |
|---|---|
|
Name |
Name of Ethernet interface. |
|
Device |
Choose which device to enable. |
|
Cloned MAC |
Enter the MAC address of the interface. |
|
MTU |
Specify the Maximum Transfer Unit of the interface. |
|
Autoactive |
Define if this interface should be automatically activated. |
|
IPv4 |
Define IPv4 options such as:
Multiple DNS servers must be added comma separated.
|
|
IPv6 |
Define IPv6 options such as:
Multiple DNS servers must be added comma separated.
|
Delete
Removes the selected entry.
Edit
Edit the selected entry.
Servers
In the Servers tab, the information related to different servers can be configured and changed.
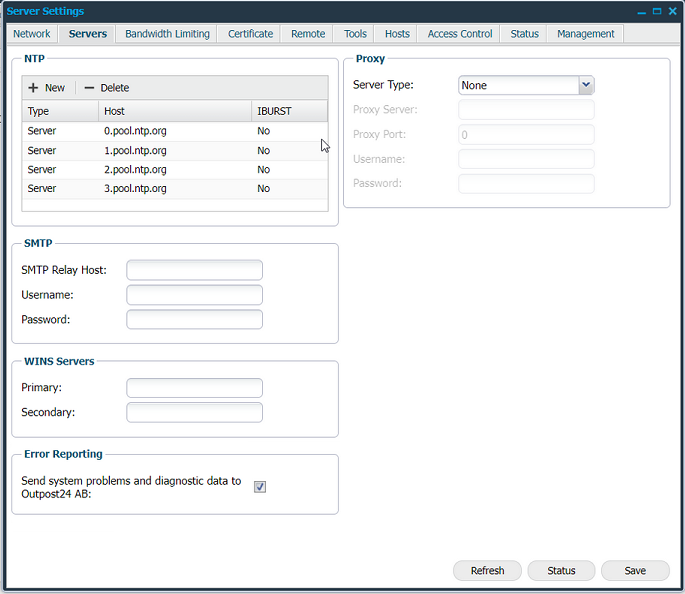
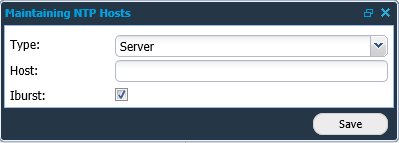
NTP
In the NTP field, click New to add NTP hosts.
The following options are configurable for NTP:
|
Options |
Description |
|
Type |
Choose between:
|
|
NTP host |
The host of the NTP server. |
|
Iburst |
|
SMTP
The following options are configurable for SMTP:
|
Options |
Description |
|
SMTP Relay Host |
The hosts which the SMTP relay resides on. The relay host can be configured with its port. Example: |
|
Username |
Define the username which is in use for authentication against the SMTP server. |
|
Password |
Define the password which is in use for authentication against the SMTP server. |
WINS Servers
The following options are configurable for WINS Servers:
|
Options |
Description |
|
Primary |
The primary host of the WINS server. |
|
Secondary |
The secondary host of the WINS server. |
Proxy
The following options are configurable for Proxy:
|
Options |
Description |
|
Server Type |
Define the server type of the proxy, choose between:
|
|
Proxy Server |
Define the proxy server. |
|
Proxy Port |
Define the port for which you connect to the proxy server. |
|
Username |
Define the username which is in use for authentication against the proxy server. |
|
Password |
Define the password which is in use for authentication against the proxy server. |
The following actions will utilize the proxy:
-
HIAB software updates from OUTSCAN.
-
Scanner-Scheduler communication, which can be independently toggleable.
-
Communication with OUTSCAN which includes license, rule updates and scan distribution.
-
Remote support, attempts to connect directly if proxy doesn't work.
Error Reporting
This feature is used to receive exceptions and errors from HIABs. By receiving and looking into these exceptions/errors, Outpost24 are able to mitigate problems that can affect customers.
To enable filebeat:
-
Log in to a HIAB scheduler.
-
Navigate to Main Menu > Settings > Server > Servers tab.
-
To enable/disable filebeat logs select the checkbox.
To enable metricbeat:
HIAB must have Services enabled and the Error Reporting enabled to send metric-data.
-
Log in to a HIAB (online HIAB scheduler).
-
Navigate to Main Menu > Settings > Server > Servers tab.
-
To enable/disable filebeat logs select the checkbox.
Bandwidth Limiting
The Bandwidth Limiting grid is used to limit the bandwidth used to different networks.
Bandwidth limit settings must be set on the HIAB performing the scanning in a Distributed environment.
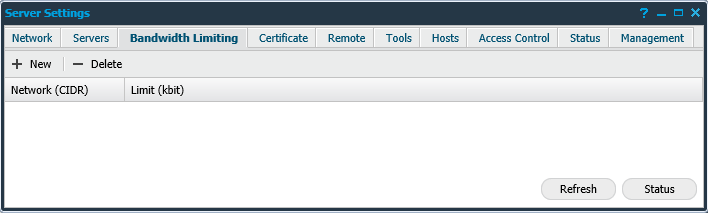
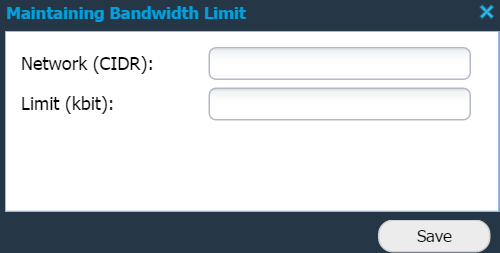
New opens the Maintaining Bandwidth Limit window where the bandwidth limit can be configured with the following options:
|
Options |
Description |
|
Network (CIDR) |
Define the network range for the bandwidth limit. |
|
Limit (kbit) |
The limit on how much bandwidth the HIAB can use in kbit. |
Delete removes the selected entry in the Bandwidth Limiting Grid.
Certificate
It is recommended that the customer supply their own certificate and change the default certificate for the HIAB web interface.
In the Certificate tab the SSL certificates can be maintained, allowing secure communication with the HIAB over the HTTPS protocol.
The needed files can be uploaded for setting up the HIAB to authenticate itself correctly, with proper validation.
Supported key formats are RSA[1] and PKCS #8[2].
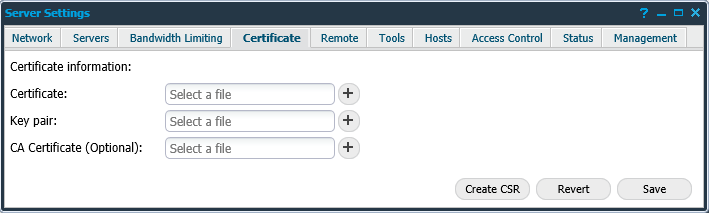
To successfully upload the certificate,
|
Options |
Description |
|
Certificate |
Upload the certificate which you have received from your Certificate Authorities (CA). The uploaded .crt or .pem file must start with a ---BEGIN CERTIFICATE--- marker.
|
|
Key pair |
Upload only the private key associated with the public key present in the certificate. The uploaded key must not be password protected.
|
|
CA Certificate (Optional) |
Upload the CA Certificate file containing the whole certificate chain to validate the certificate. |
In the lower right corner, there are three buttons:
-
Create CSR – Creates new certificate.
-
Revert – Reverts to the default certificate.
-
Save – Saves the new certificate.
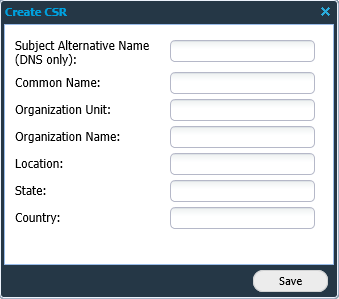
By clicking the Create CSR button, the Create CSR window is displayed, allowing you to create a private key file and a Certificate Signing Request (CSR) file using 4096-bit RSA encryption. The following options are configurable when creating the CSR:
|
Options |
Description |
|
Subject Alternative Name |
The additional host names (sites, IP addresses, common names, etc.) to be protected by a single SSL Certificate. |
|
Common Name |
Define the domain name. |
|
Organization Unit |
The division of the organization handling the certificate. |
|
Organization Name |
The legal name of the organization. |
|
Location |
The city where the organization is located. |
|
State |
The state/region where the organization is located. |
|
Country |
The two-letter ISO code for the country where the organization is located. |
Remote
In the Remote tab the remote SSH access to the HIAB console can be maintained.
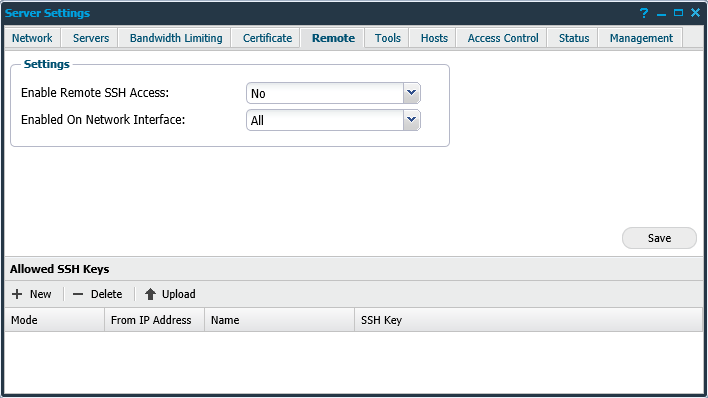
Settings
In the settings grid, you can choose if whether to allow remote SSH connections to the HIAB console, and if the SSH daemon should be limited only to listen to a specific interface.
Allowed SSH Keys
The remote SSH access to the HIAB console requires valid SSH keys for authentication. The keys listed in the SSH Key Grid are valid for authentication.
If HIAB pingable is set to OFF in the console, remote SSH access to the HIAB console is not possible.
To enable the SSH access, open the HIAB console and press w Configure UI management interface followed by p Toggle pingable for the desired interface.
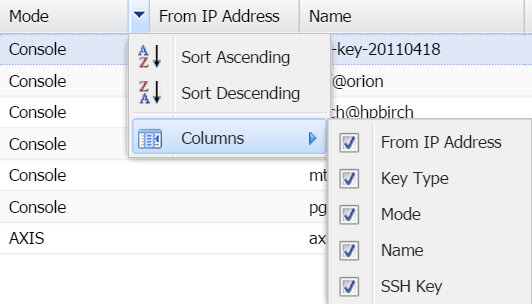
It is possible to disable or enable columns in the SSH Key Grid.
|
Options |
Description |
|
IP address |
Displays if the key is limited to an IP address. |
|
Key Type |
The format of the SSH Key (RSA, DSA). |
|
Mode |
Displays mode (Console). |
|
Name |
Custom name. |
|
SSH Key |
SSH Key data. |
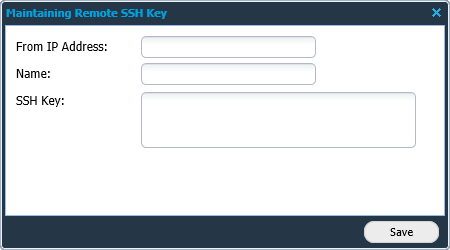
New opens the Maintaining Remote SSH Key window where a new key can be created:
|
Options |
Description |
|
From IP address |
Limit from what IP address a key can be used for authentication. |
|
Name |
Give the Key a custom name. |
|
SSH Key |
SSH Key data. |
Upload displays a new window where an existing key be uploaded.
Tools
The Tools tab gives you the opportunity to perform network commands while troubleshooting network issues.
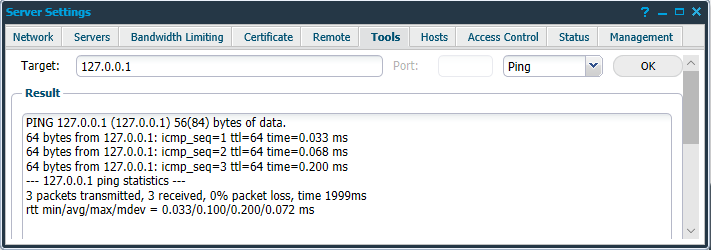
|
Options |
Description |
|
Target |
The target host that you wish to test with the selected tool. |
|
Ping |
Send PING requests to the defined target. |
|
Traceroute |
Perform UDP traceroute to the defined target. |
|
TCP traceroute |
Perform TCP traceroute to the defined target. |
|
Port |
Port number for the TCP traceroute. Not available for Ping and UDP traceroute. |
Example:
Ping
/usr/bin/ping -c3 <hostname>
/usr/bin/ping6 -c3 <hostname>

Traceroute
/usr/bin/traceroute [-T -p <port>] <hostname>
/usr/bin/traceroute6 [-T -p <port>] <hostname>
The traceroute and ping commands are sent from the appliance they are executed on, in other words, this traffic is not routed through any scanner.
All results from the various troubleshooting tools is displayed in the Results field.
Hosts
The Hosts tab gives you the opportunity to add host names which resolves the defined IP address when performing scans.
Entries are added to the scanner's local hosts file, providing the scanner with the ability to fulfill queries locally before requesting information from a nameserver. There is no limit to the number of entries that can be added.
New opens the Add Host window where following options can be defined:
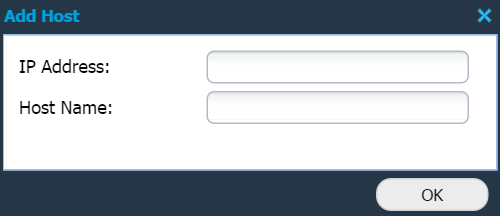
|
Options |
Description |
|
IP Address |
Define the IP address. |
|
Host Name |
Define the host name. |
Delete removes the selected entry from the list.
Access Control
The Access Control tab is used to limit the IP addresses that can access the Graphical User Interface.
To restrict the use, enter the IP address range which have access to the HIAB Graphical User Interface, make sure that the machine from which the Administrator is entering the IP range is a part of the allowed IP range.
Correct IP ranges is a requirement to prevent any unwarranted denial of access.
Access Control only apply when HIAB is in hardened mode.
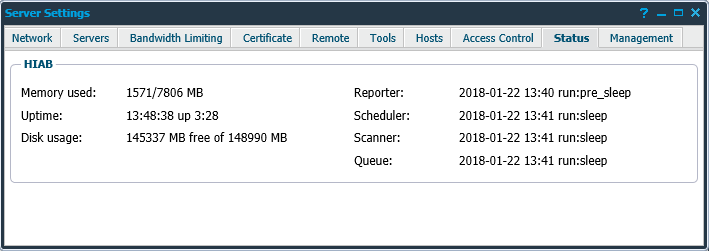
Status
The Status tab shows status for the Scheduler and distributed scanners.
Management
The Management tab allows you to remotely access the Graphical User Interface of another HIAB, if the two HIAB can communicate.
New opens the Edit Hiab Management window where the options for the remote HIAB can be configured:

|
Options |
Description |
|
Name |
Name of the remote HIAB. |
|
Address |
IP address of the remote HIAB. |
|
Port |
Port the communication will talk over. |
|
Token |
App Token generated within the remote HIAB. |
Delete removes the selected entry.
Reference
Related Articles