Last updated: 2021-06-02
Purpose
This article provides setup information on the Atlassian Jira integration.
Introduction
The Atlassian Jira integration lets you connect your Jira instance with OUTSCAN or HIAB so that vulnerability findings and other security events can create and synchronize issues directly in Jira. This integration enhances your workflow by extending vulnerability management into the project and ticketing environment used by development and operations teams, ensuring that findings are tracked, assigned, and resolved using familiar tools and processes. Configuring the connection—including authentication and project settings—enables Outpost24 to generate tickets for new findings and maintain visibility of their state in both systems.
When Jira is enabled, it will be visible as a ticket system, both in Assign Task and Event Notifications. Recently,
A linked issue can be created between projects or sub-tasks if it is a bigger task. The Jira instance must be running HTTPS.
Configuring OAuth in Jira
This is required only when you use OAuth authentication method for Jira on OUTSCAN/HIAB. To set up, Jira Administrator access is a prerequisite.
To set up OAuth in Jira:
-
Login to OUTSCAN/HIAB.
-
Go to Settings >Integrations and click on the Keys tab. If it has no content, click the Generate new button and copy the public key.
-
Go to Jira and log in (as administrator).
-
Go to Jira administration > Applications > Application links.
To set up OAuth using Jira cloud, go to Jira administration > Products > Application links and then proceed according to the instructions.
-
Enter the url to OUTSCAN or your HIAB and click on Create new link.
The url to OUTSCAN or HIAB must not end with a “/”.
Example:
https://outscan.outpost24.com
https://outscan.outpost24.com/
You might get a warning that no response is received, which is fine.
-
Click Continue.
-
Now we set up the actual connection:
-
Application Name: Provide a name for this connection to view in Jira.
-
Application Type: Generic Application.
-
-
Click the Create incoming link checkbox and click on continue.
-
Fill in the remaining details:
-
Consumer key: Any text string but maybe a randomly generated one.
-
Consumer Name: Provide a name. It can be same as application name.
-
Public Key: Paste the public key that is copied from OUTSCAN/HIAB.
-
-
Click on Register Application.
Set Up Jira Integration
Prerequisites
-
HTTPS certificate from the Jira server.
-
The user should have permission to read issues and to create new issues.
-
It is required to have Jira set up to accept sub-tasks and priority fields, these must also be set as required in Jira.
-
It is important that no custom fields are set up to be required, since nor the HIAB or OUTSCAN does provide information fore those fields.
Setting up
To set up Jira:
-
Download the HTTPS certificate from your Jira server.
-
Go to Main Menu > Settings > Integrations.
-
Select the Jira tab.
-
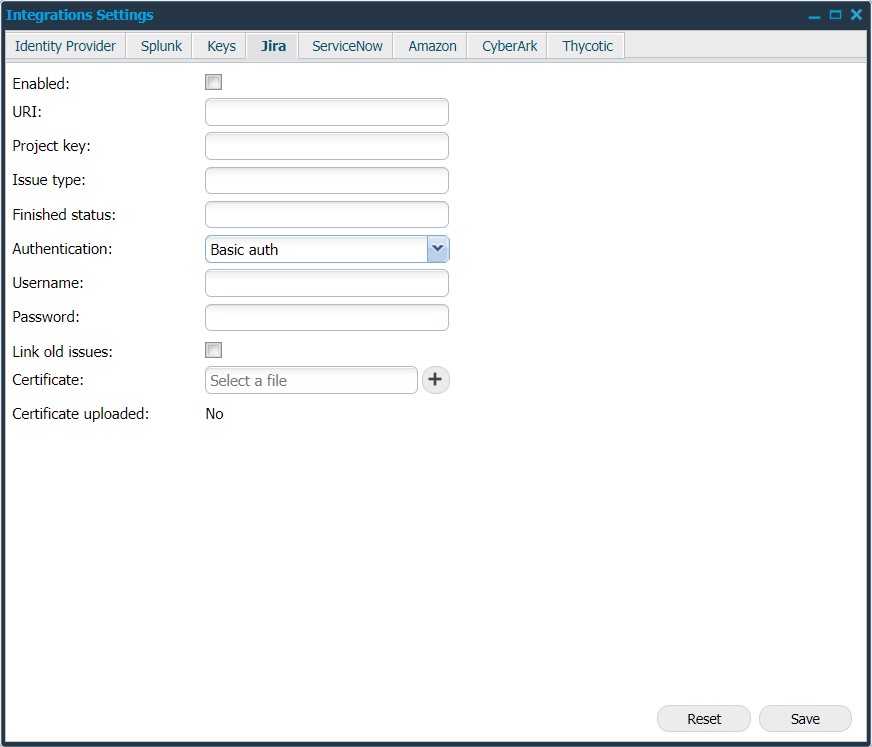
Fill in the forms in the Integration Settings window for Jira. Depending on the type of authentication chosen, the options vary.
-
When Basic Auth is selected:
-
|
Option |
Description |
|---|---|
|
Enabled |
Select the Enable checkbox to enable Jira. |
|
URI |
Provide the URI of Jira server (only https protocol is supported). |
|
Project Key |
Provide the project key from the Jira instance to use. |
|
Issue Type |
Jira can be used to track different types of issue. The common Issue types used are Bug, Epic, and Story. |
|
Finished Status |
Mention the status of the Jira issue. |
|
Authentication |
Select Basic Auth. |
|
Username |
Provide the username to authenticate against Jira server. |
|
Password |
Provide the password to authenticate against Jira server. |
|
Link old issues |
Enable this feature if you want to link old issues. It is useful when you regenerate tickets for similar issue. When a ticket for a finding already exist in Jira but is closed, a new ticket is created. If the Link old issues check box is selected, the old closed ticket is linked to the new. |
|
Certificate |
Upload the SSL certificate of the Jira instance. |
|
Certificate uploaded |
Displays Yes if a certificate has been uploaded and No if there is no certificate available. |
|
Reset (optional) |
Click Reset to fully remove the current settings. It disables the integration and it does not have to be done after you have disabled it since you might want to use the same settings again. |
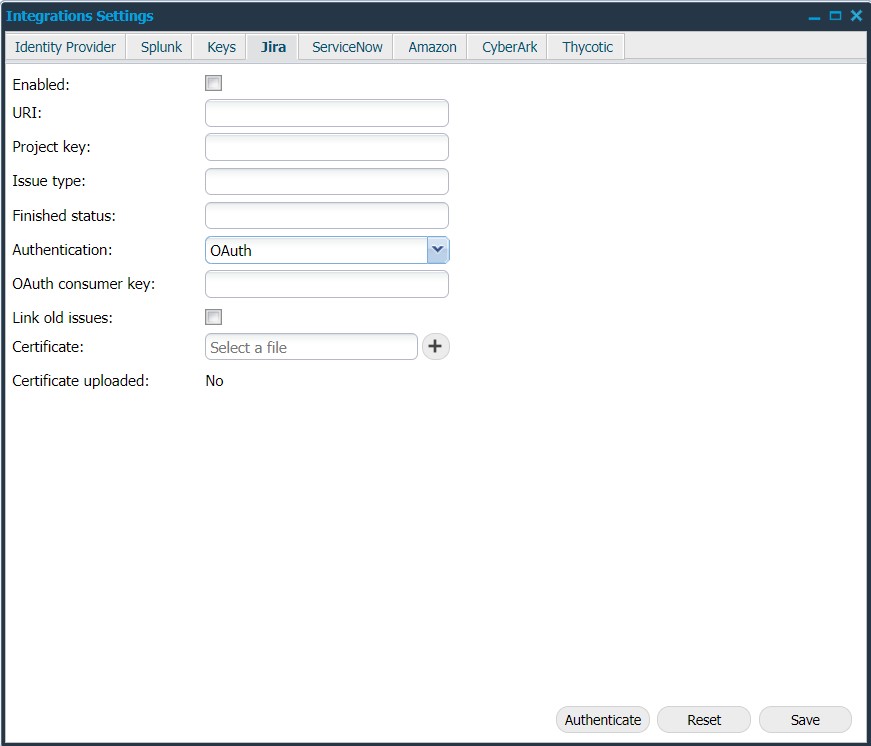
b. When OAuth is selected:
|
Option |
Description |
|---|---|
|
Enabled |
Select the Enable checkbox to enable Jira. |
|
URI |
Provide the URI of Jira server (only https protocol is supported). |
|
Project Key |
Provide the project key from the Jira instance to use. |
|
Issue Type |
Jira can be used to track different types of issue. The common Issue types used are Bug, Epic, and Story. |
|
Finished Status |
Mention the status of the Jira issue. |
|
Authentication |
Select OAuth. |
|
OAuth Consumer Key |
Provide the same ConsumerKey that is set in Jira. |
|
Link old issues |
Enable this feature if you want to link old issues. It is useful when you regenerate tickets for similar issue. When a ticket for a finding already exist in Jira but is closed, a new ticket is created. If the Link old issues check box is selected, the old closed ticket is linked to the new. |
|
Certificate |
Upload the SSL certificate of the Jira instance. |
|
Certificate uploaded |
Displays Yes if a certificate has been uploaded and No if there is no certificate available. |
|
Authenticate |
Click on Authenticate to establish the connection. After clicking, it pops up with a link to your Jira.
|
|
Reset (optional) |
Click Reset to fully remove the current settings. It disables the integration and it does not have to be done after you have disabled it since you might want to use the same settings again. |
-
Click Save to save the current settings.
Unless you get any error, the Jira integration is now configured.
Tickets
The user should have permission to read issues and to create new issues.
If you scan a lot of targets, it is recommended to have a separate Jira project for these tickets, since they can easily reach high in numbers. Every new finding can create one or more new tickets in your Jira server.
There is no maintenance needed except synchronizing configuration if you re-configure your Jira in any way. Synchronization between Jira and OUTSCAN/HIAB is periodic.
This may cause up to X minutes delay in the update.
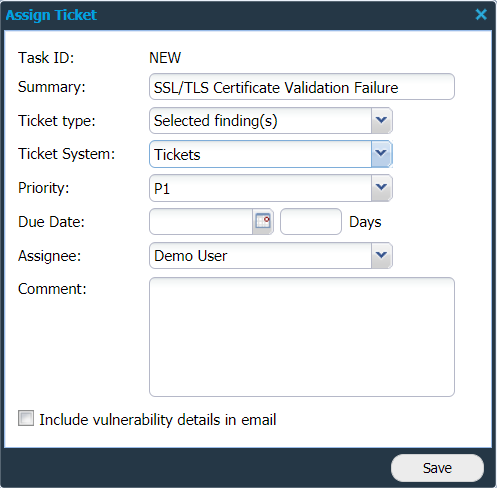
Creating a Ticket
After enabling Jira, use any of the following ways to create a ticket:
Method 1
-
Go to Main Reporting Tools > Findings.
-
Right click on any finding, select Assign task.
-
Select Jira in the ticket system drop-down menu.
-
Click Save to create a ticket.
Method 2
-
Go to PCI scanning > Reports.
-
Right click on a finding, select Assign task.
-
Select Jira in the ticket system drop-down menu.
-
Click Save to create a ticket.
Method 3
-
Go to Event Notifications.
-
Click +New.
-
Select Jira in the Action drop-down menu.
This action is only available for Finding Information, Low Risk, Medium Risk, and High Risk.
-
Click Save to create tickets whenever a report is created with findings of the type of the event.
Related Articles
- ServiceNow - Legacy
- Identity Provider Settings
- Okta Identity Provider Configuration
- Database Connector (HIAB only)
- Microsoft Entra ID (Azure AD) Identity Provider Configuration
- SNMP (HIAB only)
- ADFS Identity Provider Configuration
- Splunk
- Amazon
- Atlassian Jira
- Syslog (HIAB only)
- Thycotic
- OneLogin Identity Provider Configuration
- CyberArk
- LDAP/AD