Last Updated: 2025-03-23
Purpose
This article describes how to set up and configure the backup service in the HIAB.
Introduction
This article outlines the setup and configuration process for the HIAB backup service, which allows backups to be stored on various server types, including FTP, SCP, CIFS, or NFS. The Backup tab enables users to schedule regular backups, manage settings, and download configurations. Key features include options for including network settings, scheduling backups, and distributing backups across different servers. Users can also force instant backups and import previous backup files, with a history log available to track backup statuses. Detailed instructions for configuring the backup process are provided, including necessary settings for each server type.
HIAB Backup
HIABs can be backed up to FTP, SCP, CIFS, or NFS servers, or a local backup can be downloaded to your own machine.
Available only on HIAB scheduler.
The Backup Tab
The Backup tab allows you to schedule regular backups of the HIAB data and upload them to defined servers.
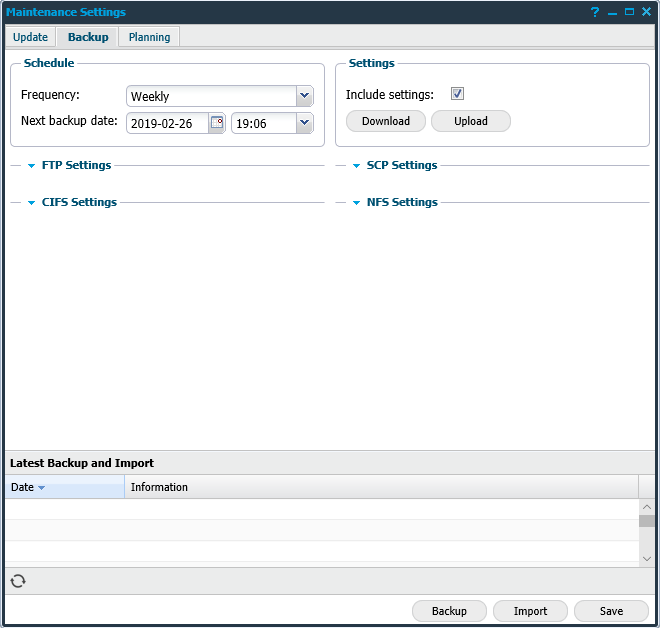
The elements of the Backup tab are:
Schedule
Allows you to schedule your backup on a regular basis, starting on the given date and time and then running accordingly to the set frequency.
|
Option |
Description |
|---|---|
|
Frequency |
Select backup frequency:
|
|
Next backup date |
Select a start date and time in the drop down menus. |
Settings
By selecting Include Settings the network and host settings are included in the backup as a default.
The settings backup includes:
-
Network configuration
-
Remote SSH settings
-
Syslog configuration
-
SNMP configuration
-
WINS Servers
-
Update settings
-
Backup settings
-
Backup FTP, SCP, CIFS, NFS configuration
-
Planning settings
-
Event settings
-
LDAP configuration
-
DBLog configuration
-
Report FTP, SCP, CIFS, NFS configuration
All other settings are included in the "normal" backup.
It is possible to download the network and host settings by clicking Download.
To supply a configuration file to update the settings accordingly, click Upload.
|
Option |
Description |
|---|---|
|
Include Settings |
Include Network and Host Settings in the backup. |
|
Download |
Download the Network and Host Settings. |
|
Upload |
Supply a configuration file, which will update the settings accordingly. |
Back Up Distribution
You can distribute your backup by:
-
FTP
-
SCP
-
CIFS
-
NFS
The backup is stored locally if you have not added any server details in the FTP, SCP, CIFS, or NFS fields.
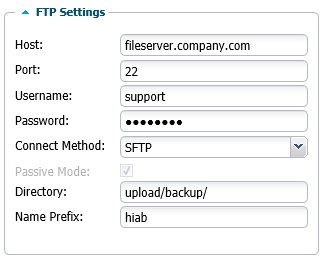
FTP Settings
In the FTP Settings section, you can set up your FTP server credentials. In the Connect method drop down you can select if you would like to connect using regular FTP, FTPS, Implicit FTPS, or SFTP (SSH FTP).
The FTP option creates a file on the FTP server called: hiabdumpData_THE_IP_ADDRESS_YYYY-MM-DD.exp, it holds all information like scan schedules, users, roles, results and so on. Take note of the file name.
|
Option |
Description |
|
Host |
Define the FTP host. |
|
Port |
Define the port in use. |
|
Username |
Define the username for authentication against the server. |
|
Password |
Define the password for authentication against the server. |
|
Connect Method |
Select if you would like to connect using regular FTP, FTPS, Implicit FTPS, or SFTP (SSH FTP). |
|
Passive Mode |
Enable/disable passive mode. When enabled, the FTP server should listen to another port than the standard FTP data port while transferring the files. |
|
Directory |
Used if you want to switch to another working directory after the authentication against the target. |
|
Name Prefix |
Given text string will be added as a prefix to the filename. |
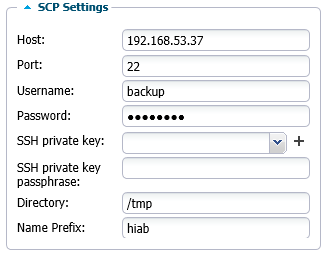
SCP Settings
In the SCP settings section, you can setup your SCP server credentials. The Private Key setting will allow you to supply a private key to be used while authenticating.
See the FTP setting section for a description of the additional fields.
|
Option |
Description |
|
Host |
Define the SCP host. |
|
Port |
Define the port in use. |
|
Username |
Define the username for authentication against the server. |
|
Password |
Define the password for authentication against the server. |
|
Private Key |
Supply a private key to be used while authenticating. |
|
Directory |
Used if you want to switch to another working directory after the authentication against the target. |
|
Name Prefix |
Given text string will be added as a prefix to the filename. |
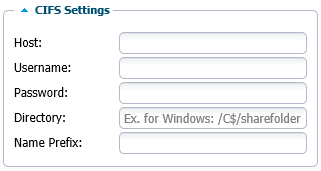
CIFS Settings
In the CIFS Settings section you can set up your CIFS server credentials.
Refer to the FTP Settings section for more information on the fields.
|
Option |
Description |
|
Host |
Define the CIFS host. |
|
Username |
Define the username for authentication against the server. |
|
Password |
Define the password for authentication against the server. |
|
Directory |
Used if you want to switch to another working directory after the authentication against the target. |
|
Name Prefix |
Given text string will be added as a prefix to the filename. |
The CIFS backup supports both SMBv1 and SMBv2.
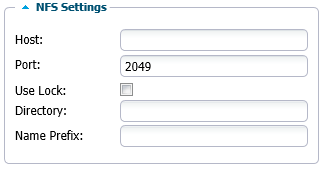
NFS Settings
In the NFS Settings section you can set up your NFS server credentials.
Refer to the FTP Settings section for more information on the fields.
|
Option |
Description |
|
Host |
Define the NFS host. |
|
Port |
Define the port in use. |
|
Use Lock |
Disable/enable file locking. This setting is occasionally required when you are connecting to older NFS servers. |
|
Directory |
Used if you want to switch to another working directory after the authentication against the target. |
|
Name Prefix |
Given text string will be added as a prefix to the filename. |
Latest Backup and Import: Displays the backup history. This grid is configurable, by clicking the arrow next to the name of any grid column allows you to customize which columns that will be shown out of the following:
-
Date: Date when the backup occurred
-
Information: Status of the backup or import
At the bottom of the window, there are four options available:
-
Download Local: You can download a backup file locally, which will be available once a backup has been performed. The file is stored locally as localbackup.exp.
-
Backup: Force an instant backup of the HIAB data. The backup is uploaded to the configured file server. Priority for file servers is from high to low, i.e. FTP, SCP, CIFS, NFS.
-
Import: Clicking on import opens a popup with list of files in the given setting of the first file server if configured any (FTP, SCP, CIFS, NFS). You can select a file and click on Import button or click on Upload local button which allows to import the local backup.
The current data will be removed and replaced with the content from the imported file
-
Save: Saves the current settings in the system.
Configuring Backup
To back up the existing HIAB scheduler, follow the below procedure.
-
Go to Main Menu > Settings > Account window and select the License tab and review the number of IPs and scans of your license.
-
Go to Main Menu > Settings > Maintenance window, select the Backup tab.
-
To include the server settings to Backup file, select the checkbox beside Include settings. To download the settings as a separate file, click on Download.
The network settings will not be migrated.
-
To enable to the Download Local option, you must first backup the system to the HIAB locally, this will then allow you to download the HIAB to your local machine. Click on the Backup button.
-
Once complete, select the refresh icon (bottom left) to view the Backup done: Successfully message.
The HIAB will not notify you that the backup is complete.
Reference
Related Articles