Last Updated: 2026-01-05
Purpose
This article provides setup information on the Identity Provider (IdP) integration.
Introduction
The Identity Provider Settings feature allows the Outpost24 platform to integrate with an external Identity Provider (IdP) in order to enable Single Sign-On (SSO) authentication for users. An IdP acts as a trusted authentication service that verifies user identities and returns authentication responses to the platform. The integration is typically based on the Security Assertion Markup Language (SAML) protocol, where metadata is exchanged between the platform and the identity provider to establish a secure trust relationship and define how authentication information is shared during login.
Using an external identity provider simplifies authentication management and improves the user experience. Credentials are maintained in the identity provider rather than in the platform, which reduces password fatigue and allows organizations to apply centralized identity policies such as strong authentication and access control. This approach enables secure and consistent user authentication while allowing users to access the platform through their existing organizational identity systems.
Setting Up Identity Provider
To enable SSO on OUTSCAN or HIAB, you must import meta-data from your IdP into the solution. You also need to export the service provider’s meta-data from OUTSCAN or HIAB and import it to your IdP.
While reading the response from IdP during signing in to our portal, we accept signed assertions with parameters. The parameters list which your IdP is returning in response must include your user name in a parameter. By default it is set to parameter named uid but you can set up to different parameter (eg Subject attribute).
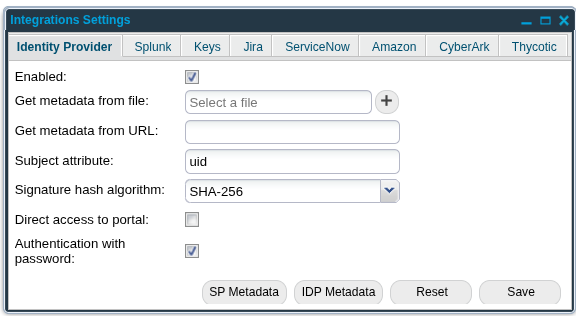
To set up Identity Provider:
-
Go to Menu > Settings > Integrations and select the Identity Provider tab.
-
Provide the below information to enable Identity Provider (IdP):
|
Option |
Description |
||
|---|---|---|---|
|
Enabled |
Select the Enabled checkbox to enable the protocol for single sign-on trusting another source to log in. |
||
|
Use one or both of the following option to provide metadata of IdP: |
|||
|
Get metadata from file |
Select Identity provider’s metadata file by clicking the + symbol beside the field. Metadata contains information such as how it works, what type of login is acceptable and so on. |
||
|
Get metadata from URL |
Provide a URL from which the OUTSCAN or HIAB (Service Provider) should fetch metadata from IdP. |
||
|
Subject attribute |
Enter uid string if you want to use USERNAME that is not an email address. This field cannot be left empty. Subject attribute considerations uid is a reserved name in Outpost24 software to truncate the USERNAME to the part below the @ sign, meaning that if you want to use email address as USERNAME, you can not use uid as Subject attribute, but you can use any other string (such as emailAddress). The parameter name must be typed as expected in the SAML authentication response (one single word starting with lowercase and may include some upper cases (such as camelCase)).
|
||
|
Signature hash algorithm |
Select between SHA-256 or SHA-1. |
||
|
Direct access to portal |
SSO binds you respectively to Portal UI or NetSec UI when box is checked or not checked. If 'Direct access to portal' appears in grey then you cannot use this capability unless you update the SP metadata on your Identity Provider. For that you need first to download the SP Metadata by clicking on SP Metadata button and then make sure to upload it on your IdP. Once done you can then select option to be directed to either NetSec or Portal UI. If 'Direct access to portal' is shown in grey then only SP initiated SSO is available. If you need to enable IdP initiated SSO then you have to download the SP Metadata by clicking on SP Metadata button and then make sure to upload it on your IdP. Once done you can then perform Single Sign On from the Identity Portal side. |
||
|
Authentication with password |
Enable this flag when users authenticate with a password. |
||
|
IDP Metadata |
Click this button to display the currently uploaded metadata of the Identity Provider. |
||
|
SP Metadata |
Click on this button to display the service provider’s metadata. |
||
-
After enabling the required settings, click Save to save the current settings.
-
Click Reset to fully remove the current settings. This disables the integration.
Related Article
- ServiceNow - Legacy
- Identity Provider Settings
- Okta Identity Provider Configuration
- Database Connector (HIAB only)
- Microsoft Entra ID (Azure AD) Identity Provider Configuration
- SNMP (HIAB only)
- ADFS Identity Provider Configuration
- Splunk
- Amazon
- Atlassian Jira
- Syslog (HIAB only)
- Thycotic
- OneLogin Identity Provider Configuration
- CyberArk
- LDAP/AD