Purpose
This document provides users with a comprehensive overview of Auditing setup for OUTSCAN and HIAB user roles.
Requirements
This document assumes that the reader has basic access to the OUTSCAN/HIAB account and Portal Interface.
Introduction
The Auditing module allows for viewing user activity information such as login and log out, targets created, scans initiated and more of all the users that you are allowed to administer in the system.
Log In
Auditing
To access the Auditing module, go to Main Menu > Auditing.
The Auditing window displays a detailed user activity information such as login and log out, targets created, scans initiated and many more. You are only allowed to see changes made by yourself and users that you administrate.

Auditing Fields
The Auditing window consists of nine columns, but not all are visible. To add the extra columns, click on the arrow beside any column name and select the required columns.
Only seven columns are visible by default.
|
Option |
Description |
|
Data Type |
Indicates what type of entry has been changed. |
|
Action |
Indicates what type of action is being performed. |
|
Name |
Indicates the name of the edited/ added entity. |
|
First Name |
First name of the user making the change. |
|
Last Name |
Last name of the user making the change. |
|
Date |
Date when the change was made. |
|
Data |
Additional information about the audit entry. |
|
Consultancy User |
OUTSCAN only. Indicates the name of the support personnel who made changes. |
|
Comment |
The comments entered by the user are displayed here. |
Data Type
The Data Type column can vary depending on the type of entry that is being changed.
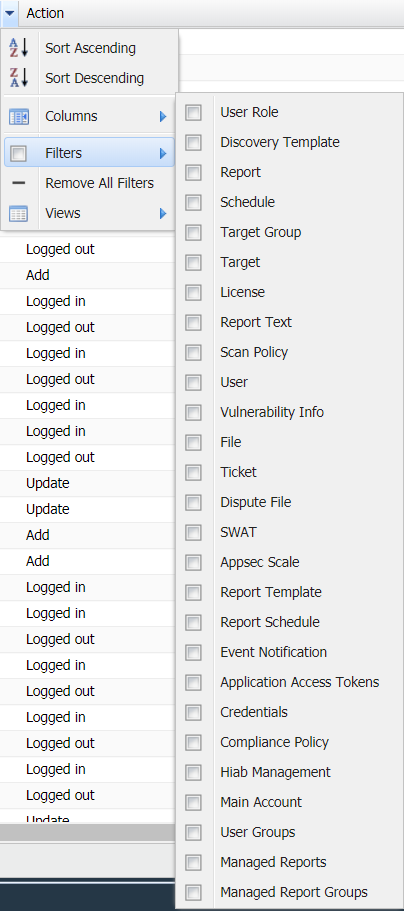
The most effective way to search Audit logs is by setting filters. The images below show the available filter options in OUTSCAN and HIAB.
Selecting different options displays all entries related to changes made to these options.
Note that the options differ between the OUTSCAN and HIAB.
|
OUTSCAN |
HIAB |
|---|---|
|

|
Main Account and User groups are only visible to Main User or Super User.
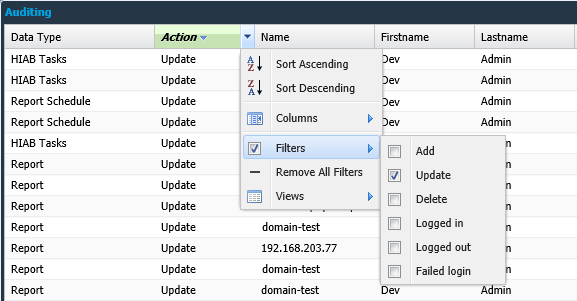
Action
The Action column shows the type of action performed. This column is used to filter the specific user action during auditing.
Example:
If you are trying to check who deleted targets, setting the filter in the action column to delete displays all the deletion actions performed. Results can further be narrowed using filtering on multiple columns.
Filter settings can be set on the column Action with the options mentioned below.
|
Option |
Description |
|
Add |
Displays when an entry is added to the system. |
|
Update |
Displays when an entry is updated, or a report is exported. |
|
Delete |
Displays when an entry is deleted from the system. |
|
Logged In |
Displays when a user logs in. |
|
Logged Out |
Displays when a user logs out. |
|
Failed Login |
Displays when a user fails to login. |
Other Columns
Name
The Name column indicates the name of the corresponding entry in Data Type column. It can be filtered by three text fields. It is possible to use all three at once to limit the results, can also use quotes to match an entire phrase.
|
Option |
Description |
|
All |
Displays records that contain all the search words. |
|
Any |
Filters on records that contain any of the search words. |
|
None |
Excludes all records that contain any of the search words. |
First Name
The First Name of the user who made the changes. It can be filtered by three text fields. It is possible to use all three at once to limit the results, but you can also use quotes to match an entire phrase.
|
Option |
Description |
|
All |
Displays records that contain all the search words. |
|
Any |
Filters on records that contain any of the search words. |
|
None |
Excludes all records that contain any of the search words. |
Last Name
The Last Name of the user who made the changes. It can be filtered by three text fields. It is possible to use all three at once to limit the results, but you can also use quotes to match an entire phrase.
|
Option |
Description |
|
All |
Displays records that contain all the search words. |
|
Any |
Filters on records that contain any of the search words. |
|
None |
Excludes all records that contain any of the search words. |
The first name and last name of a user should be set using user account under Main Menu > Settings > Manage Users.
Date
The Date column indicates the date and time of the performed action. It can be filtered by three types.
|
Option |
Description |
|
Before |
Display all entries before the provided date. |
|
After |
Display all entries after the provided date. |
|
On |
Display all entries on the provided date. |
Data
The Data column displays the additional information about the data type entrys action. It can be filtered by three text fields. It is possible to use all three at once to limit the results, but you can also use quotes to match an entire phrase.
|
Option |
Description |
|
All |
Displays records that contain all the search words. |
|
Any |
Filters on records that contain any of the search words. |
|
None |
Excludes all records that contain any of the search words. |
Example:

In the above figure, Action column displays Update and Data column displays the additional details regarding the change that occurred on the selected object.
Consultancy User
Available on a super user account on OUTSCAN. Whenever a support technician makes changes to the settings, the name of the technician will appear in this column. This feature is not enabled by default.
Searching by Name
It is easy to filter using the name or action field, in case you are looking for the exact user or action.
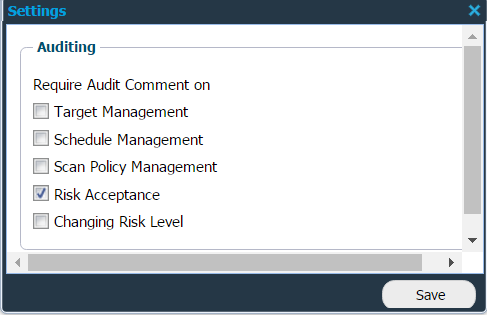
Audit Settings
These options are only available for a Main User or Super User.
By clicking the Settings icon in the top right corner of the window, the Audit settings can be changed. This helps the user to define the actions, which will require an audit comment.
|
|
The following options enforces an Audit Comment to be supplied by the user:
-
Target Management - when adding, removing, or changing targets .
-
Schedule Management - when adding, removing, or changing scan schedules.
-
Scan Policy Management - when adding, removing, or changing a scan policy.
-
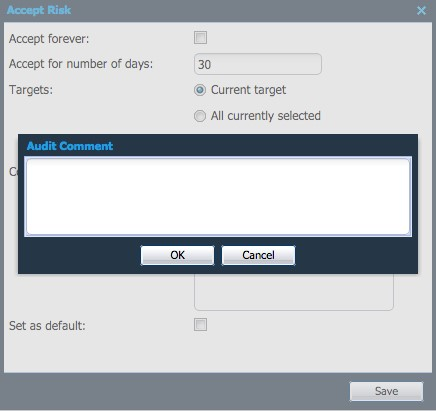
Risk Acceptance - when accepting a risk in the reporting section.
-
Changing Risk Level - when changing a risk level in the reporting section.
The comment can later be read in the audit log.
Export Audit Log
You can export the audit log to Excel format by clicking the Export audit log button on the left bottom of the window.
Related Articles