Purpose
This document provides users with a comprehensive overview of how to setup and use the Event Notifications module in OUTSCAN and HIAB. This document has been elaborated under the assumption that the reader has access to the OUTSCAN /HIAB account and Portal Interface.
Introduction
This document provide a step-by-step configuration setup guide for configuring the OUTSCAN/HIAB solution according to best practice. It consider the size of the organizations and provide information about why different options are taken over other in order to provide justification why the different paths where chosen.
Event Notification
The Event Notification system is located in Main Menu > Settings > Event Notification in the lower left corner of the screen. When selected a window is displayed showing an overview of the already defined events within the organization.
To monitor and maintain the solution specific events should be defined to keep track of the ongoing progress of the vulnerability management program. This includes knowing when the scanner is updated, someone makes alterations and when scanning occurs unsuccessfully.
Scan Starting
Knowing when a scan is starting may be a requirement for any network operating team and can easily be set up within the tool.
In the above image you can see that you not only can define a notification for all targets but also select a specific group for which notification will be sent. This is interesting if there are separated network team that require or would like to have notifications just for their targets.
Specific system owners may also want to know when a scan may affect the operational process of the system and that can also be defined in a separate event.
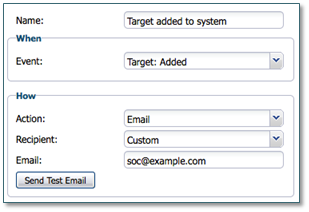
Targets Added
This entry should be considered together with the next event listed below. Using these in conjunction will allow you to see if any policy breach has occurred. If you have a scan policy that all targets should be scanned, then if a target is not added prior to the discovery scan below picking up the asset, then you need to follow up on the process in order to see where it has failed.
A key factor of knowing your security level is to have full knowledge of the risks within the organizations network and infrastructure. If a target can be added and the normal procedure whereas adding it to the part of the vulnerability management solution has been overseen, then your view will no long reflect the whole organization.
Discovered Targets Added
Discovery scans should be part of your strategy to maintain full coverage of what targets are part of your network. The scanning tool will allow you to have targets defined that won’t affect the license. Therefore, it is possible to regular scan the organizations network ranges in order to determine if any new targets have been added to the network without them being part of the scanning.

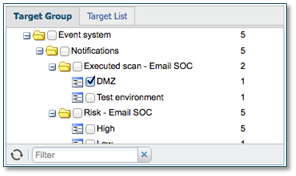
In order to determine which targets, there is that are not scanned, define a dynamic group, which contains those targets that has the Use License flag set to No as shown below.
If you receive a notification of targets being added by the discovery scan without them foregoing a notification for that target being manually added to the tool, then either one administrator is scanning a range for the first time or targets has been added without following the defined policy.
Cheat Sheet - Event Notification
|
Best practice
|
Goal
|
In place? |
||
|---|---|---|---|---|
|
Yes |
No |
N/A |
||
|
Scan starting |
Define a notification that will send out an email to the required parties when a scan is about to take place. This will inform any teams/individuals about possible disturbance so that they know whom to contact if anything needs to be escalated. For example: System Owner(s), Network or System Operation Center(s). |
|
|
|
|
Target added |
Add notification if a target is added to the solution. This is both for keeping track of what’s being scanned and if the procedure is followed when adding a target to the organizations network. Optional in smaller organizations.
|
|
|
|
|
Target discovered |
Alert when a new target is found while performing discovery scans. Unmonitored targets within the organizations network range drastically increase the overall risk level. If this notification is sent out, then someone has forgotten to manually add the target to the vulnerability management solution and may therefore not have followed the policy/procedure for adding targets to the organizations network. Optional in smaller organizations.
|
|
|
|
|
Alert on high risks |
Configure the tool to send out notifications on critical targets as soon as they are discovered. |
|
|
|
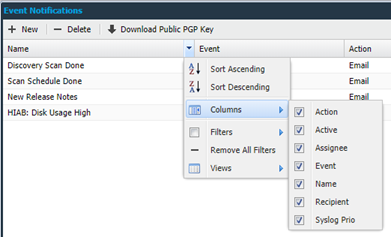
To access the Event Notifications module, go to Main Menu > Settings > Event Notifications.
This module allows for actions to be performed upon certain events. Default Event Notifications are Discovery Scan Done, Scan Schedule Done, and New Release Notes.

|
Option |
Description |
|
Discovery Scan Done |
Sends a notification when a discovery scan is completed. |
|
Scan Schedule Done |
Sends a notification when a scan schedule is completed. |
|
New Release Notes |
Sends a notification when the release notes distributed. |
|
HIAB: Disk Usage High |
Sends a notification when the disk usage exceeds the preset percentage. |
To deactivate any of the default event notifications, right click on selected event and select Disable.
The Event Notifications view is configurable. Clicking the arrow next to the name of any column name allows you to customize which columns should be shown.
The available options are as follows:
|
Option |
Description |
|---|---|
|
Action |
What to do when the event occurs. |
|
Active |
Displays if the event is currently active. |
|
Assignee |
If the action is to create a ticket, the assignee is listed here. |
|
Event |
The type of the event to be notified. |
|
Name |
Displays the user specified name for the notification. |
|
Recipient |
If the action is to send an email, the recipient is listed here. |
|
Syslog Prio (HIAB only) |
If the action is to send a syslog message, the priority is listed here. |
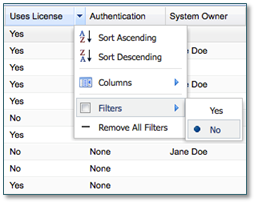
Filters
The search can further be refined by enabling the filters. Most grid columns allow filtering, which lets you choose specific selection of data to be displayed. To enable filtering, click on the arrow next to the name of the grid column and select Filters. Depending on the existing kind of data, you are presented with various options. For specific filtering options, see each section below.
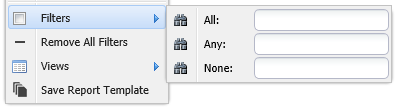
Remove All Filters
Select to remove all the applied filters.
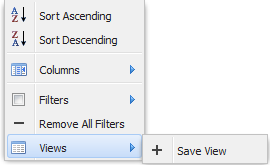
Views
All the settings in the columns can be saved as views. To save the current view of the Scan Scheduling:
-
Click on Save View.
-
Provide a name for the view.

-
Click Save.
Maintaining Event Notifications
Create
To create an event notification:
-
Click the + New button in the top left corner of the Maintaining Event Notification window.
-
Name the event and fill in the required event function and click Save.
To get instruction on the various event settings, see the Edit section.
Edit
To configure one of the existing event notifications, right click on the selected event notification and choose Edit.
In any of the above cases, you are prompted with the Maintaining Event Notification window.
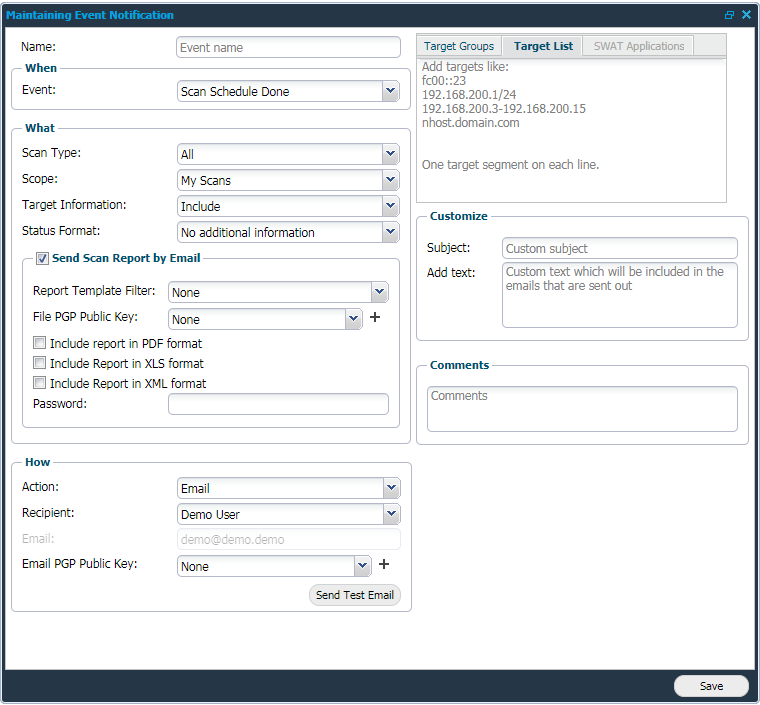
The elements of this window are described below:
Name
When creating a new event notification, provide a name in this field.
When
Event: Select the event in the drop-down menu for which you want to be notified.
Depending on the choice in the When section, you are presented with various fields in the What and How sections .
|
Option |
Description |
|
Scan Schedule Done |
Sends a notification when a scan schedule has finished. |
|
Discovery Scan Done |
Sends a notification when a discovery scan has finished. |
|
Discovery: Alive Target Found |
Sends a notification when alive targets are discovered in a discovery scan. |
|
Discovery: Alive Target Added |
Sends a notification when alive targets are added from a discovery scan. |
|
Discovery: Inactive Target Found
|
Sends a notification when inactive targets are found. Only for Discovery scans. |
|
Discovery: Inactive Target Found (Consecutive Scans) |
Sends a notification when a target has been reported inactive for the number of consecutive discovery scans. The amount can be set in Manage Targets by accessing Settings icon located in the upper right corner. |
|
Target: Added |
Send a notification when a target is added. |
|
Target: Removed |
Sends a notification when a target is removed. |
|
Target: Compliant |
Sends a notification for each target that is compliant (if this is a compliance scan). |
|
Target: Not Compliant |
Sends a notification for each target that is not compliant (if this is a compliance scan). |
|
Target: Report Finding Ready |
Triggered when a scan has completed, and a report has been created. |
|
Target: Scan Failed |
Sends a notification when a scan fails. |
|
Target: Host not reachable |
Sends a notification when a host is not reachable during scanning. |
|
Target: Authentication Failed |
Sends a notification when the authentication fails for a target during a scan. |
|
Target: Scan Scheduled |
Sends a notification x day(s) before the scan is scheduled for the targets. X can be set in the Send Before (Days) field. |
|
Target: Scan Started |
Sends a notification when the scan has started for the targets. |
|
Target: Scan Timeout |
Sends a notification when the scan timeouts for the targets. |
|
Target: Scan Stopped |
Sends a notification when the scan stops for the targets. |
|
Target: Scan Failed |
Sends a notification when the scan fails for the targets. |
|
Target: Scan Results Updated |
Sends a notification when the scan results are updated for the targets after an SLS-scan. |
|
Scan: Could not start SLS |
Sends a notification when scanning less scan could not start for the targets. |
|
Scan: Schedule Scheduled |
Sends a notification x day(s) before the scan is scheduled to start. X can be set in the Send Before (Days) field. |
|
Scan: Schedule Started |
Sends a notification when the scan schedule has started. |
|
Finding: High Risk Found |
Sends a notification when a high risk has been detected. |
|
Finding: Medium Risk Found |
Sends a notification when a medium risk has been detected. |
|
Finding: Low Risk Found |
Sends a notification when a low risk has been detected. |
|
Finding: Information Found |
Sends a notification when an informational finding has been detected. |
|
Finding: Exploit Available |
Sends a notification when a finding with an exploit available has been detected. |
|
Finding: Ports Opened |
Sends a notification when ports have been reported as opened. |
|
Finding: Ports Closed |
Sends a notification when ports have been reported as closed. |
|
Finding: Comment Added |
Sends a notification when a comment has been added for a finding. This is done by right clicking the finding within Reporting tools and select Add Comment. |
|
Finding: Risk Accepted |
Sends a notification when a risk has been accepted. |
|
Finding: Risk Acceptance Expired |
Sends a notification when the acceptance for a risk has expired. |
|
Finding: Risk Acceptance Expiring |
Sends a notification when the acceptance for a risk is about to expire. |
|
Finding: Discussion Updated
|
Sends a notification when the discussion for a SWAT finding has been updated. |
|
Finding: Verify Done
|
Sends a notification when a verification has been performed in the SWAT report. |
|
Finding: PCI failed |
Sends a notification when a PCI report fails. This relates to the PCI preview policy, and the PCI module in OUTSCAN. |
|
User: Login activity |
Sends a notification when a user logs in. |
|
New Release Notes |
Sends a notification when there are new release notes available. |
|
HIAB: Scanner Missing |
Sends a notification when the current HIAB loses connection to any distributed HIAB. |
|
HIAB: Update Done |
Sends a notification when an update has finished successfully. |
|
HIAB: Update Failed |
Sends a notification when an update failed. |
|
HIAB: Backup Done |
Sends a notification when a backup has been performed. |
|
HIAB: Backup Failed |
Sends a notification when a backup has failed. |
|
HIAB: Disk Usage High |
Sends a notification when the disk use has exceeded the specified percentage.
|
|
HIAB: Server Rebooted |
Sends a notification when the HIAB has restarted. |
|
HIAB: Remote Support Notification |
Sends a notification when remote support is enabled or disabled. |
|
HIAB: Maintenance Plan Completed |
Sends a notification when the maintenance plan has finished. |
What
|
Option |
Description |
|
Scan Type |
Select for which scan type you want to be notified.
|
|
Scope |
Select the scope of the event. For events concerning schedule jobs and discovery jobs, you can set a Scope which determine if only your own jobs should be causing events or if any job that handles the targets shall be used.
|
|
Targets |
Select when you want to be notified.
|
|
Target Information |
Select Include if you want to add the target information in the notification, else select Exclude.
|
|
Status Format |
Set status format:
|
|
Filter |
High Risk, Medium Risk, Low Risk, Information, and Exploit Available findings can be filtered using the following four selections.
|
|
Script Id |
Provide a Script Id that should trigger the notification. |
|
Trigger |
Select an option that should trigger a notification.
|
|
Information |
Select the information that needs to be included in the notification.
|
|
Send Scan Report by Email |
Enable this feature if you want to send the scan report by email to the specified recipient.
|
How
Select how you want to send notification. This could be adding an email recipient to be notified, creating a task on new findings, a SNMP trap, Splunk, or sending a Syslog message.
|
Action |
Description |
|---|---|
|
SNMP (HIAB only) |
Send the notification to the configured SNMP server. To enable, go to the SNMP tab in Main Menu > Settings > Integrations. Test SNMP: Sends a SNMP trap to the defined SNMP server. |
|
Syslog (HIAB only) |
Send the notification to the configured syslog server. These settings are available in the Syslog tab in Main Menu > Settings > Integrations. Syslog Priority - Select priority of the syslog event sent.
Hover over Show example to view an example setting. |
|
Database (HIAB only) |
Allows you to export findings to an external database. If selected, a dialogue box is displayed asking for confirmation of export. To enable, go to the Database tab in Main Menu > Settings > Integrations. Action - Database Fields - Select the fields to be part of the event.
|
|
Splunk |
Send the notification to the configured Splunk server. To enable, go to the Splunk tab in Main Menu > Settings > Integrations. Format - Applicable to All Findings only. Select the format you want to send the notification.
Fields - Select the fields you want to include in the notification. Hover over Show example to view an example setting.
1) Splunk Integrations |
|
|
Send the notification by email to an existing user, or a custom recipient. Multiple recipients can be entered with a comma separator. Recipient - Provide a name to whom you want to send the notification. Custom is available only if you have super user privileges. Email - If you want to send notification to a custom recipient, supply the email address in this field. Email PGP Public Key - Choose Unencrypted to send an unencrypted email. For encrypting the email, choose from the keys available in the drop-down menu or click on + to upload a new key file. An error message pops up when None is selected. You must supply a public PGP key. Send Test Email - This allows you to send a test email to a selected recipient. |
|
SMS (OUTSCAN only) |
Send the notification by text message to an existing user. Recipient - Provide a name to whom you want to send the notification. Custom is available only if you have super user privileges.
|
|
Task |
Create a task within the built-in ticketing system and assign to an existing user. Assignee - Provide a username to whom you want to assign this task.
|
|
JIRA |
Create an issue within JIRA. These settings can be configured under Main Menu > Settings > Integrations > JIRA tab. |
Target Groups/Target List
Events can also be filtered out by selecting a set of targets or target groups.
Example
When setting up an event for High Risk Found, it sends out an event for all high-risk findings found on any target.
Selecting a target group for the event, the high-risk event is only sent to targets in that group limiting the events to specific targets.
|
Option |
Description |
|
Target Groups |
Choose the target group for which the event notification should be assigned. |
|
Target List |
Choose IP address, range, subnet, FAQ, or NetBIOS host the event notification should be assigned to. You do not have to specify IP addresses that have been selected in the target groups tab. Formats:
|
|
SWAT Applications |
Limit the event notification to specific SWAT applications. |
Customize
|
Option |
Description |
|
Subject |
Custom subject for email. |
|
Add text |
The added custom text is included in the email that is sent out. |
Comments
You can add any additional comments in this field.
Settings
OUTSCAN
By clicking the Settings icon located on top right of the window, the notification settings can be changed.
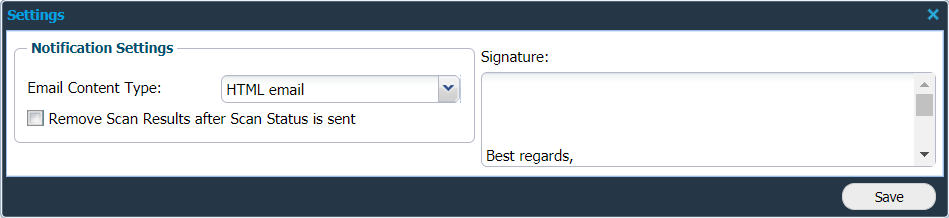
|
Option |
Description |
|
Email Content Type |
Allows you to choose the email format.
|
|
Remove Scan Results after Scan Status is sent |
Remove the report from the system after the email is sent. It removes the report only after successfully sending the report to all the recipients. |
|
Signature Section |
Allows you to change the email signature from the system. If left empty, it takes the default signature. |
HIAB
By clicking the Settings icon located on top right of the window, the notification settings can be changed.
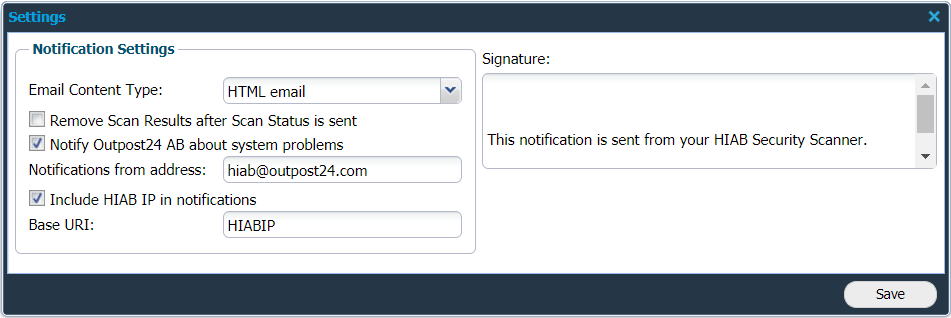
|
Option |
Description |
|
Email Content Type |
Allows you to choose the email format.
|
|
Remove Scan Results after Scan Status is sent |
Remove the report from the system after the email is sent. It removes the report only after successfully sending the report to all the recipients. |
|
Notify Outpost24 AB about system problems |
Allows the system to send emails to Outpost24 regarding a system problem. To disable this function, unselect the Notify Outpost24 AB about system problems check box. |
|
Notifications from address |
Determines the sender address. |
|
Include HIAB IP in notifications |
Include a reference to the HIAB IP in system notifications. |
|
Base URI |
Allows you to define a domain name instead of the HIAB IP in the system notifications. |
|
Signature |
Section allows you to change the email signature from the system. If left empty, it takes the default signature. |