Purpose
This document describes how to create and edit Event Notifications.
Introduction
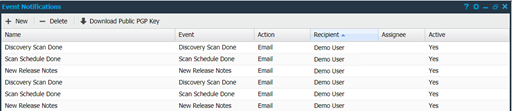
The Event Notifications window allows for actions to be performed upon certain events. The actions available are SNMP, syslog, creating a task, or sending an email. Default Event Notifications Settings are Discovery Scan Done, Scan Schedule Done, and New Release Notes
|
Option |
Description |
|
Discovery Scan Done |
When a discovery scan is completed a notification will be sent out by email to the specified recipient (by default this will be the main user). |
|
Scan Schedule Done |
When a scan schedule is completed a notification will be sent out by email to the specified recipient (by default this will be the main user). |
|
New Release Notes |
When there are any release notes distributed, a notification will be sent out by email to the specified recipient, (by default this will be the main user). |
To deactivate any of the default event notifications, right click on selected event and select Disable.
Log In
To access the Event Notification module, go to Main Menu > Settings > Even Notifications.
Creating and Editing Event Notifications
Create New Event
To create a new event notification, click the + New button in the top left corner of the window.
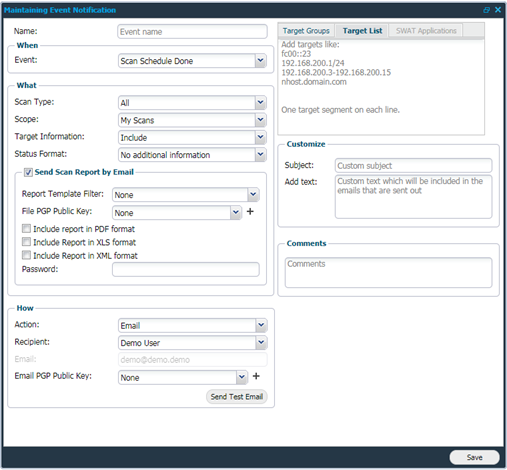
The Maintaining Event Notification window is displayed.
When creating a new Event Notification, provide an event name in the Name field.
Elements
There are five elements in this window, When, What, How, Customize, and Comments.
What and How sections vary with the Event selected in the When section.
When
Event: Select the event in the drop-down menu for which you want to be notified .
Depending on the choice in the When section, you are presented with various fields in the What and How sections .
|
Option |
Description |
|
Scan Schedule Done |
Sends a notification when a scan schedule has finished. |
|
Discovery Scan Done |
Sends a notification when a discovery scan has finished. |
|
Discovery: Alive Target Found |
Sends a notification when alive targets is discovered in a discovery scan. |
|
Discovery: Alive Target Added |
Sends a notification when alive targets are added from a discovery scan. |
|
Discovery: Inactive Target Found (Each Scan) |
Sends a notification when inactive targets are found. Only for Discovery scans. |
|
Discovery: Inactive Target Found (Consecutive Scans) |
Sends a notification when a target has been reported inactive for the number of consecutive discovery scans. The amount can be set in Manage Targets by accessing Settings the cogwheel in the upper right corner. |
|
Target: Added |
Send a notification when a new target is added. |
|
Target: Removed |
Sends a notification when a target is removed. |
|
Target: Compliant |
Sends a notification for each target that is compliant (if this is a compliance scan). |
|
Target: Not Compliant |
Sends a notification for each target that is not compliant (if this is a compliance scan). |
|
Target: Report Finding Ready |
Triggered when a scan has completed and a report has been created |
|
Target: Large Report Found |
Sends a notification when the report is too large. |
|
Target: Host not reachable |
Sends a notification when a host is not reachable during scanning. |
|
Target: Authentication Failed |
Sends a notification when the authentication fails for a target during a scan. |
|
Target: Scan Scheduled |
Sends a notification X day before the scan is scheduled for the targets. X can be set within the Send Before (Days) section. |
|
Target: Scan Started |
Sends a notification when the scan has started for the targets. |
|
Target: Scan Timeout |
Sends a notification when the scan timeouts for the targets. |
|
Target: Scan Stopped |
Sends a notification when the scan stops for the targets. |
|
Target: Scan Failed |
Sends a notification when the scan fails for the targets. |
|
Target: Scan Results Updated |
Sends a notification when the scan results are updated for the targets after an SLS-scan. |
|
Scan: Could not start SLS |
Sends a notification when scanning less scan could not start for the targets. |
|
Scan: Schedule Scheduled |
Sends a notification x days before the scan is scheduled to start. X can be set within the Send Before (Days) section. |
|
Scan: Schedule Started |
Sends a notification when the scan schedule has started. |
|
Finding: High Risk Found |
Sends a notification when a high risk has been detected. |
|
Finding: Medium Risk Found |
Sends a notification when a medium risk has been detected. |
|
Finding: Low Risk Found |
Sends a notification when a low risk has been found. |
|
Finding: Information Found |
Sends a notification when an informational finding has been reported. |
|
Finding: Exploit Available |
Sends a notification when a finding with an exploit available has been reported. |
|
Finding: Ports Opened |
Sends a notification when ports have been reported as opened. |
|
Finding: Ports Closed |
Sends a notification when ports have been reported as closed. |
|
Finding: Comment Added |
Sends a notification when a comment has been added for a finding. This is done by right clicking the finding within Reporting tools and select Add Comment. |
|
Finding: Risk Accepted |
Sends a notification when a risk has been accepted. |
|
Finding: Risk Acceptance Expired |
Sends a notification when the acceptance for a risk has expired |
|
Finding: Risk Acceptance Expiring |
Sends a notification when the acceptance for a risk soon will expire. |
|
Finding: Risk Acceptance Expired |
Sends a notification when the acceptance for a risk expires. |
|
Finding: Discussion Updated |
OUTSCAN only. Sends a notification when the discussion for a SWAT finding has been updated. |
|
Finding: Verify Done |
OUTSCAN Only. Sends a notification when a verification has been performed in the SWAT report. |
|
Finding: PCI failed |
Sends a notification when a PCI report fails. This relates to the PCI preview policy, and the PCI module in OUTSCAN. |
|
User: Logged In |
Sends a notification when a user logs in. |
|
New Release Notes |
Sends a notification when there are new release notes available. |
|
HIAB: Scanner Missing |
Sends a notification when the current HIAB loses connection to any distributed HIAB. |
|
HIAB: Update Done |
Sends a notification when an update has finished successfully. |
|
HIAB: Update Failed |
Sends a notification when an update failed. |
|
HIAB: Backup Done |
Sends a notification when a backup has been performed. |
|
HIAB: Backup Failed |
Sends a notification when a backup has failed. |
|
HIAB: Disk Usage High |
Sends a notification when the Disk usage is too high. |
|
HIAB: Server Rebooted |
Sends a notification when the HIAB has restarted. |
|
HIAB: Remote Support Notification |
Sends a notification when remote support is enabled or disabled. |
|
HIAB: Maintenance Plan Completed |
Sends a notification when the maintenance plan has finished. |
What
|
Option |
Description |
|
Scan Type |
Select for which scan type you want to be notified. |
|
Scope |
Select the scope of the event. For events concerning schedule jobs and discovery jobs, you can set a Scope which determine if only your own jobs should be causing events or if any job that handles the targets shall be used (My Scans or All Scans). |
|
Target Information |
Select Include if you want to add the target information in the notification, else select Exclude. |
|
Status Format |
Set status format:
|
|
Send Scan Report by Email |
Enable this feature if you want to send the scan report by email to a specified recipient.
|
How
|
Option |
Description |
|
Action |
Select how do you want to send notification from the provided options. This could be adding an email recipient to be notified, creating a task on new findings, a SNMP trap, Splunk or sending a Syslog message.
|
|
Recipient |
Provide a name to whom you want to send the notification. Custom is only available if you have super user privileges. |
|
|
If you want to send notification via email, please supply the email address in this field. |
|
Email PGP Public Key |
If desired, add a PGP Public Key to be used when emailing the notification. |
|
Send Test Email |
This allows you to send a test email to your account. |
|
Send SMS Test |
Sending a test SMS to a mobile phone is allowed for events like "High risk found". If an event like that is selected, the SMS option is available in Action. Select sms and the Test SMS button becomes visible. |
|
Test SNMP |
Sends a SNMP trap to the defined SNMP server. |
|
Test Syslog |
Sends a Syslog message to the defined Syslog server. |
You can also filter out events by selecting a set of targets or target groups.
When setting up an event for "High risk found", it sends out an event for all high-risk findings found on any target.
Selecting a target group for the event, the high-risk event is only sent to targets in that group limiting the events to specific targets.
|
Option |
Description |
|
Target Groups |
Choose what target group the event notification will be assigned to. |
|
Target List |
Choose what IP range the event notification will be assigned to. You do not have to specify IP addresses that have been selected in the target groups tab. |
|
SWAT Applications |
Limit the event to specific SWAT applications. |
Customize
|
Option |
Description |
|
Subject |
Custom subject for email. |
|
Add text |
The added custom text will be included in the email that is sent out. |
Comments
Add any additional comments in this field.
Edit Existing Event
To edit an existing event notifications, right click on the selected event notification and choose Edit.
The Maintaining Event Notification window is displayed.
Then proceed in the same way as Create New Event
Reference