Last updated: 2023-04-31
Purpose
This article describes how to set up and manage target groups.
Introduction
The Target Groups feature in OUTSCAN and HIAB enables users to organize and manage scanning assets by grouping targets into logical collections. Targets such as IP addresses or hostnames can be assigned to one or more groups and arranged in hierarchical structures with subgroups. Administrators create groups in the Manage Targets view, then populate them manually through drag-and-drop or automatically through dynamic grouping. Within a target group, users can perform administrative and operational tasks such as labeling targets with attributes, assigning authentication credentials, applying policies, selecting scanners, performing DNS/MAC/NetBIOS lookups, exporting target lists, and initiating or scheduling vulnerability scans for the entire group. Built-in groups such as All Targets and Ungrouped provide default views for organizing newly added assets.
Use Target Groups to simplify asset management and improve operational control across large environments. Grouping systems by criteria such as business function, geography, asset type, or team ownership allows security teams to manage scanning schedules, policies, and access more efficiently. Target groups also enable better reporting and comparison of vulnerability management progress across different systems or departments. By organizing assets in structured groups and applying configurations at the group level, administrators reduce manual configuration work and maintain clearer visibility into the organization’s attack surface.
Targets Overview
Targets are added under the Manage Target section, which is accessible either using the icon on the desktop of from the menu at the bottom left of the GUI.
First time when you enter this section it does not contain any targets groups and only state, All Targets and Ungrouped. Multiple groups can be created, and the targets can be in multiple groups. Arrangement can either be done automatically in Dynamic Target Groups or by manually using drag-n-drop functionality of added target.
When creating target groups, consider these best practices.
-
If the number of targets justifies groups of targets, then consider adding targets that matches your organizations requirements. For example, create groups so that you can compare targets and/or teams in order to see how the vulnerability management is progressing over time.
-
If you have complex requirements regarding scanning time and restrictions, consider managing those rules from groups instead of having to manually edit schedule objects but simply use drag-n-drop when moving/changing scanning periods.
-
If you have additional information that would help in the day to day operation if that information was present in vulnerability management reports, add those detains to the target using custom fields. Read the user guide for more information about custom fields.
-
If the number of users having access to the tool is large along with the network, consider adding target groups per role (or even per user). This will allow you to re-assign assets between users and grant access to systems without having to re-configure users.
-
Use dynamic groups to always have updated information about the targets so that the information does not become obsolete over time.
For example: system owners can be defined as a separate customer field and be used as a dynamic filter to organize the targets. See the Dynamic Target Groups for information on how to add Dynamic Groups.
The grouping system provided by the tool can be used in many ways and allows you to have a better control of what is currently going on within your organization.
On the left side you have an overview of some of the things that has been discussed above (the number to the right of the group name represents the number of targets present in the group).
The Business Function group contains two subgroups that are used for reporting those systems separately even though they share the same database cluster for instance.
In the Event system you can see that groups have been created for different types of notifications and this allows you to simply re-configure notifications and likewise tasks without going over the notification event list trying to figure out which object to edit. Same thing applies to the Scan Window group.
The Target Assignment group contains both By Role and By User and both can be used simultaneous giving you the possibility to have individual targets assign to users and belong to a group of administrators.
Best practice is also to not use the groups for anything else without updating the name to reflect their usage.
Example:
Do not perform scheduling on system owner groups without specifically adding that information to the group name.
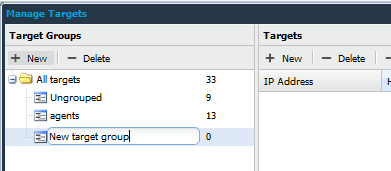
A target group can contain any number of targets and subgroups. This allows for organization of the targets to make them easy to navigate. A target can exist in more than one target group. The number next to the target group name represents the number of targets present in that group.
Icon List
|
Icon |
Name |
Description |
|---|---|---|
|
|
New |
Clicking New opens the Add New Targets window. The newly created targets will belong to the currently selected target group. |
|
|
Show Groups |
Show all target groups in which this target has been added to. |
|
|
Audit Log |
To see the changes made to a certain entry, right click on it and select Audit log. This show a dialog with all the changes made to the object that were made by you or one of the users that you administrate. |
|
|
Lookup |
Filter the target group grid. |
|
|
Delete |
Clicking Delete while having any targets selected deletes them from the system. Multiple targets can be selected for deletion by holding shift while selecting the targets. Reports for the selected targets are not deleted.
|
|
|
Edit |
To edit a target, right-click on it and select Edit. This allows you to set the Hostname, MAC Address, label the systems importance which is used to calculate CVSS scores, and set Virtual host, hidden URLs. It also includes settings to set target to override scan policy. |
|
|
Export |
To export data from the grid, right click on any entry and select either to export it as HTML or CSV (comma separated values) in the sub menu. This gives you either a HTML page or a CSV file with data that you can save or copy data from. |
|
|
Settings |
Global settings for Target Management |
|
|
Scan |
Create a scan schedule for the target group. |
|
|
Label Target, Update from ServiceNow, Set Policies on Target |
By right-clicking on a target you can choose to update specific labels or attributes on the target. |
|
|
Show Scanner, Set Scanners on Targets |
Lists or set scanners on targets groups. |
|
|
Refresh |
Refresh the grid |
|
|
Label Targets,Update from ServiceNow, Set Policies on Targets |
By right-clicking on a target group you can choose to update specific labels or attributes on the targets in that group. |
|
|
Set Target Authentication |
Select available authentication from a drop down menu |
|
|
Column Menu |
To add or remove columns, hover the mouse over any column name and click the down pointing arrow. |
Managing Target Groups
Built In Target Groups
A couple of special target groups are already built in the system by default:
All Targets: This group contains all the targets that have been added to the system.
Ungrouped contains all targets that are not in another group.
Populate the new groups with targets from these groups.
Create Target Group
To create a target group:
-
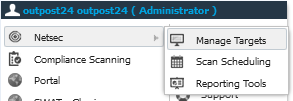
Go to Main Menu > Netsec > Manage Targets.
-
Click on + New in the Targets Groups field and name the group.
Populate a Target Group
To populate a new group with already existing targets within another group:
-
Select the Targets field to add to the new group, either by ctrl + select or shift + select multiple entries, then drag them to the group and release.
Edit a Target Group
Select a target group to edit and right click on the groups.
Targets
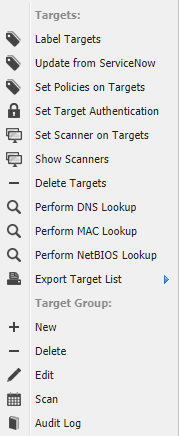
The edit menu allows you to:
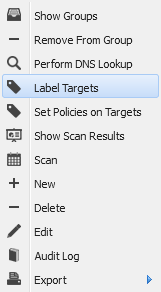
Label Targets: By right-clicking on a target group you can choose to label all your targets. The labels are used to calculate CVSS scores. In the Label Targets window you can define exactly which fields that will be updated. See Label Targets section for more information.
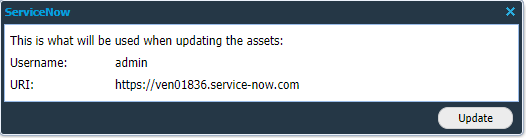
Update from ServiceNow: If you have a ServiceNow license, The ServiceNow window displays the Username and URI that is used when updating an asset.
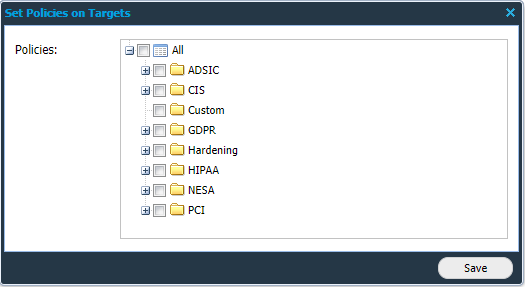
Set Policies on Target: Select policies for the group.
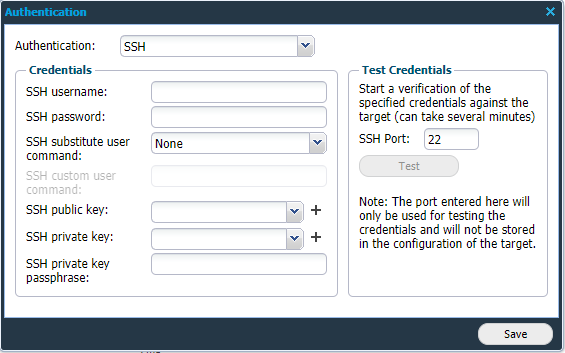
Set Target Authentication: This option allows you to define authentication on all targets currently present in the selected group. Choose from:
-
None
-
SSH
-
SMB
-
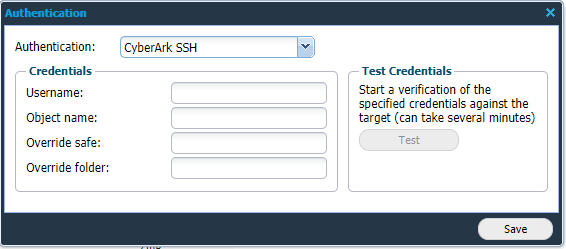
CyberArc SSH
-
CyberArc SMB
-
Thycotic SSH
-
Thycotic SMB
Fill in the credentials and click the Test button to verify the credentials against the target.
SSH
|
Option |
Description |
|---|---|
|
SSH username |
Enter your SSH user name. |
|
SSH password |
Enter your SSH password. |
|
SSH substitute user command |
|
|
SSH custom user command |
If custom is selected in SSH substitute user command then add it here. |
|
SSH public key |
Add or select public key. |
|
SSH private key |
Add or select private key. |
|
SSH private key passphrase |
Set a private key password. |
Test Credentials
Verify your credentials by selecting port and press the Test button
SMB
|
Option |
Description |
|---|---|
|
SMB Domain |
SMB Domain which will authenticate the user. |
|
SMB allow NTLMv1 |
Allow NTLM authentication over SMB. |
|
SMB username |
SMB username to be authenticated with. |
|
SMB password |
SMB password to be authenticated with. |
|
Enable remote registry |
Enable to be able to scan target registry. |
Test Credentials
Verify your credentials by pressing the Test button
CyberArk SSH
|
Option |
Description |
|---|---|
|
Username |
Username to be authenticated with. |
|
Object name |
The name of the object that stores the credentials. |
|
Override safe |
Override the CyberArk safe that contains the credentials. |
|
Override folder |
Override the CyberArk folder that contains the credentials. |
Test Credentials
Verify your credentials by pressing the Test button
CyberArk SMB
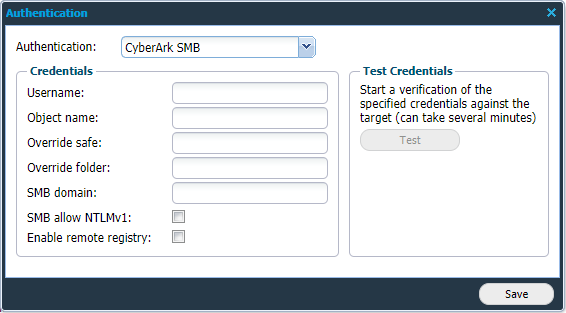
|
Option |
Description |
|---|---|
|
Username |
Username to be authenticated with. |
|
Object name |
The name of the object that stores the credentials. |
|
Override safe |
Override the CyberArk safe that contains the credentials. |
|
Override folder |
Override the CyberArk folder that contains the credentials. |
|
SMB Domain |
SMB Domain which will authenticate the user |
|
SMB allow NTLMv1 |
Allow NTLM authentication over SMB |
|
Enable remote registry |
Enable to be able to scan target registry |
Thycotic SSH /SMB
Refer to Thycotic for information about setting up Thycotic SSH or Thycotic SMB authentication.
Test Credentials
Verify your credentials by pressing the Test button.
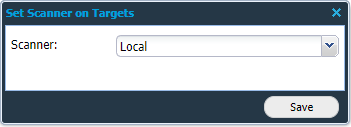
Set Scanner on targets: This option sets the scanner for selected targets. Select available scanners from the drop-down menu.
Show Scanners: Displays a list of scanners that has been set for this group.
Delete Targets: Deletes the targets in the group.
The targets will be deleted and not just removed from the group.
Perform DNS lookup: To perform a DNS lookup on all targets in a group, right click on the group and select Perform DNS lookup, this does a DNS lookup to get the targets host names in the system.
Perform MAC lookup: To perform a MAC address lookup on all targets in a group, right click on the group and select this option.
Perform NetBIOS lookup: To perform a NetBIOS lookup on all targets in a group, right click on the group and select Perform NetBIOS lookup, this does a NetBIOS lookup to get the targets NetBIOS names in the system.
Export target list: This option will display the targets within this group and any sub groups in a pop up window.
New dynamic group: This option will create a new dynamic group. A dynamic group is managed by the system so all targets that match the criteria for the group will automatically be added to the group. Targets that no longer matches the criteria will be removed. To create a group, first select a set of filters matching the criteria that the group should have.
Target Group
New: Allows you to add a new target group, as a subgroup to the currently selected target group. To move a target group in the hierarchy, use the drag and drop functionality.
Delete: Allows you to delete the group you have currently selected.
Edit: Lets you add a description to the selected group.
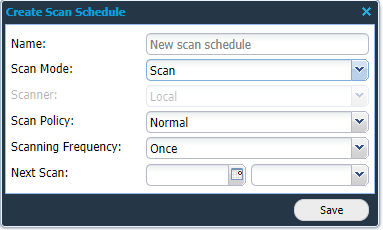
Scan: A scan can be started on a target group by right clicking on it and select Scan. From here you can set a Name, Scan Mode, Scan Policy, Scanning Frequency, and the start of the next scan.
|
Option |
Description |
|---|---|
|
Name |
Name the Scan Schedule. |
|
Scan Mode |
Select scan mode
|
|
Scan Policy |
Select scan policy from drop down menu. |
|
Scanning Frequency |
|
|
Next Scan |
Set date and time for next scan. |
Audit Log: It is possible to right click on a group and check the audit entries related to that group.
Label Targets
-
Right click the target.
-
Select Label targets in list.
-
Select labels from drop-down menus.
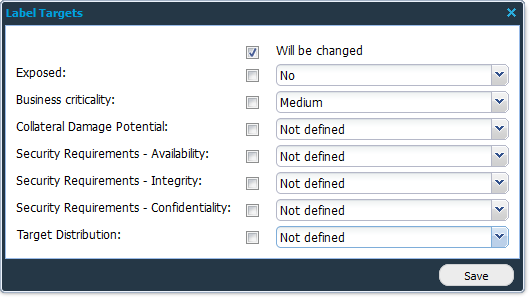
Note that the checkbox to the left of the drop-down must be checked for the value to be set.
Option
Description
Exposed
Yes/No
Business criticality
Low, Medium, High , Critical
Collateral Damage Potential
Not Defined, None, Low, Low-Medium, Medium-High, High
Security Requirements - Availability
Not Defined, Low, Medium, High
Security Requirements - Integrity
Not Defined, Low, Medium, High
Security Requirements - Confidentiality
Not Defined, Low, Medium, High
Target distribution
Not Defined, None, Low, Medium, High
-
Click Save.
Related Articles