Last updated: 2026-03-03
Purpose
This document describe how to start a verification scan.
Introduction
In Outpost24, Run Verification Scans lets you confirm whether previously identified vulnerabilities still exist on a target after remediation efforts. When a finding is flagged during a regular scan, a verification scan can be triggered to reassess that specific issue against the asset. The scan updates the status of the finding to show if the vulnerability is still present, has been resolved, or could not be verified, providing security teams with more reliable evidence of remediation success and reducing uncertainty in ongoing vulnerability management workflows.
Verify scans are a best endeavor to see if a vulnerability still exists. There may be some elements of the verify scan which do not work under certain conditions and we cannot guarantee against false positives or false negatives. if you require more accuracy, please re-run a vulnerability scan against the target.
How to Verify a Scanned Target
Prerequisites
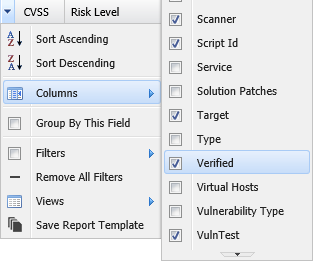
Before you start make sure that the Verified column is activated to show the status of the findings.
Verify the Target
To activate the column:
-
Click on the down pointing arrow in any column heading.
-
Select Columns > Verified in the displayed menu.
Scanning
To verify a scanned target:
-
Click on Main Menu > Netsec > Reporting Tools.
-
Select a group in Target Group.
-
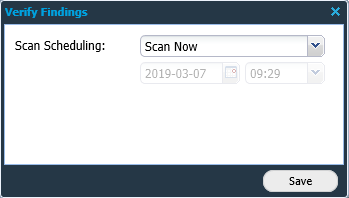
In the Findings tab, right click on the finding that should be scanned and select Verify.
-
The Verify Findings window is displayed.
-
To scan directly select Scan Now in the Scan Scheduling menu, or set up a later scan using the Scan Later function.
|
Option |
Description |
|---|---|
|
Scan Now |
Starts a scan immediately. |
|
Scan Later |
Activates the date and time settings to set up a scan at a later time. |
|
Cancel Scans |
Removes a preprogrammed scan. |
-
Click Save and the scan starts automatically.
Result
After running the verification scan the Verified column status changes reflecting the result of the scan.
|
Result |
Description |
|---|---|
|
Not verified |
The finding has a vulnerability that has not been verified |
|
No Longer Present |
The vulnerability has been solved and verified |
|
Still present |
The vulnerability has not been solved, and the vulnerability is still present |
Related Articles