Last updated: 2026-06-15
Purpose
This article describes the Scheduled Reports view.
Introduction
Scheduled Reports in the Outpost24 Portal enable automated generation and distribution of detailed vulnerability and compliance analyses for selected assets, providing security teams with consistent, timely insights into their environment’s security posture. This feature allows configuration of report types, such as compliance or vulnerability assessments, with customizable detail levels such as management, summary, or detailed and output formats like PDF for readability, Excel for tabular data, or XML for integration. Reports can be delivered via email to specified users or stored in the Reports View, with options for password-protected ZIP compression and tag-based asset scoping. By supporting flexible scheduling with predefined or custom timeframes, Scheduled Reports streamline compliance monitoring, reduce manual effort, and ensure stakeholders receive critical security data regularly, enhancing proactive risk management and decision-making.
See Schedules on how to create schedules for the Scheduled reports.
See Reports on how to set up a scheduled report.
Description
The Scheduled reports view provides an overview of the automated reports which are generated and distributed via e-mail or the stored in the Reports View. Each scheduled report can be enabled or disabled directly from the view. The view lists all available reports, and provides a quick overview of each report, including its current status, the next scheduled generation time, the delivery method, and the report type.
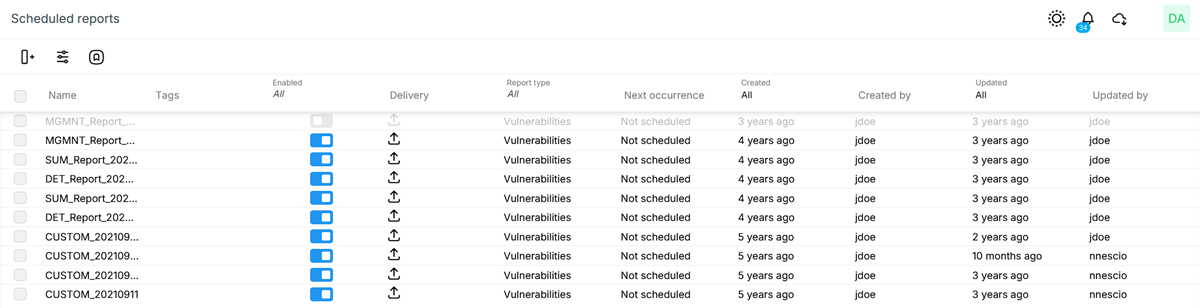
Columns
Columns can be configured as described in Column Configuration together with the Filters function.
|
Column |
Description |
|
|---|---|---|
|
Created |
|
Shows the creation date of the report schedule. |
|
Created by |
|
Shows the creator of the report schedule |
|
Delivery |
|
Type of delivery: Sent to Reports Sent by E-mail |
|
Enabled |
|
Turn the report scheduled on or off. Enabled Disabled |
|
ID |
|
The identifier of the notification setting. |
|
Last Sent |
|
When it was last sent |
|
Name |
|
Shows the name of the notification. |
|
Next occurrence |
|
When the report will run again |
|
Report Type |
|
Report type
|
|
Report view template name |
|
Select a report View template
|
|
Tags |
|
Tags that are associated to the report schedule. See the Tags document. |
|
Update |
|
Shows the date of the last update to the report schedule. |
|
Updated by |
|
Shows the user who last updated the report schedule. |
Right clicking an object displays the context menu where you can tag scheduled report by clicking the Edit tags command. For more information about tagging see Tags.
In the context menu you can trigger a schedule to send a report directly by using the Send now command.
The Delete command in the context menu removes the scheduled report.
Scheduled Reports Settings
Settings
A Scheduled report can be reconfigured by selecting it and open the settings form. The view displays the same settings as when setting up the reports in Generate Reports.
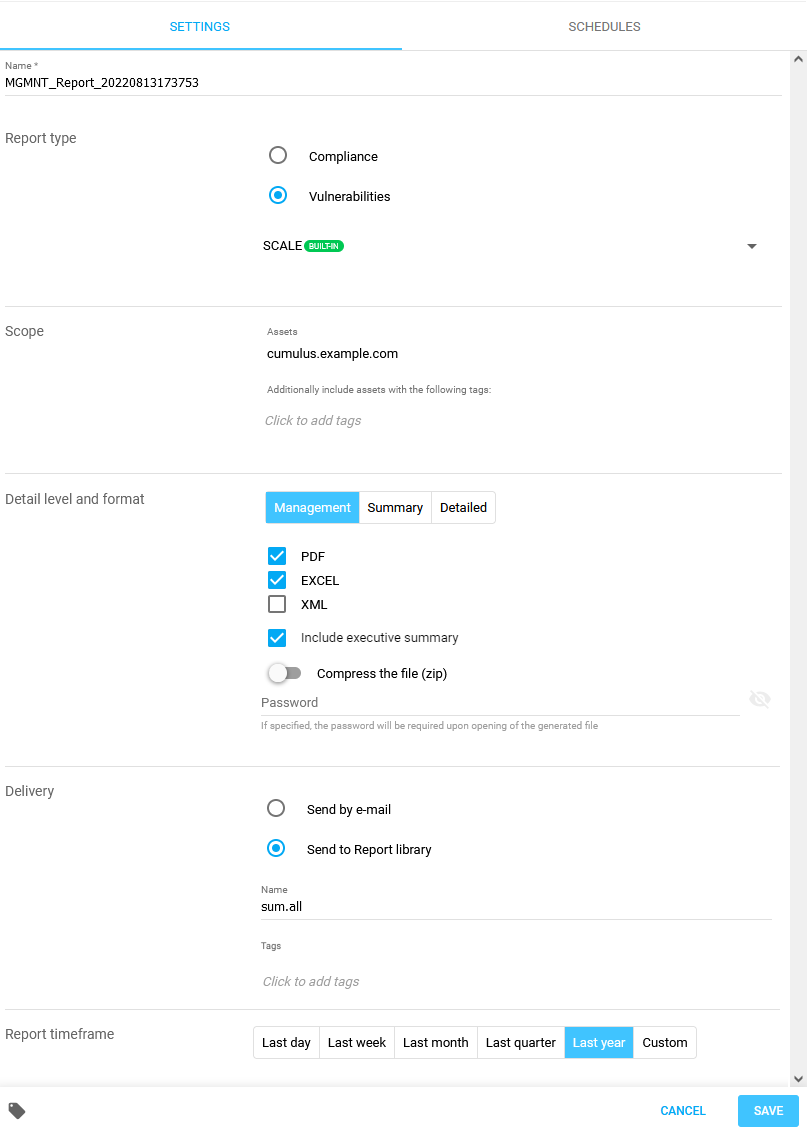
Name
The set report name can be changed to better suit the updated report schedule.
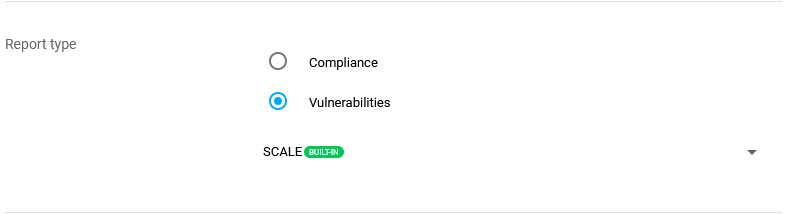
Report Type
-
Compliance - A compliance scan is performed to assess a target against a set of rules as per security standards. The result shows if the target is compliant with the standards selected for the scan.
-
Vulnerability - A vulnerability scan is performed to evaluate assets for security vulnerabilities that can be exploited. The result shows if the asset suffers from one or more of the known vulnerabilities.
Drop-down menu provides optional built in templates for filtering report such as:
-
SWAT
-
Scale
-
Fixed
-
Not fixed
-
Open and older then 90 days
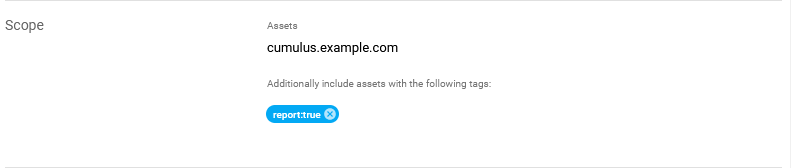
Scope
In scope you enter the assets the report should cover, multiple assets can be selected. Additionally, assets can be included by adding common tags.
Detail Level and Format
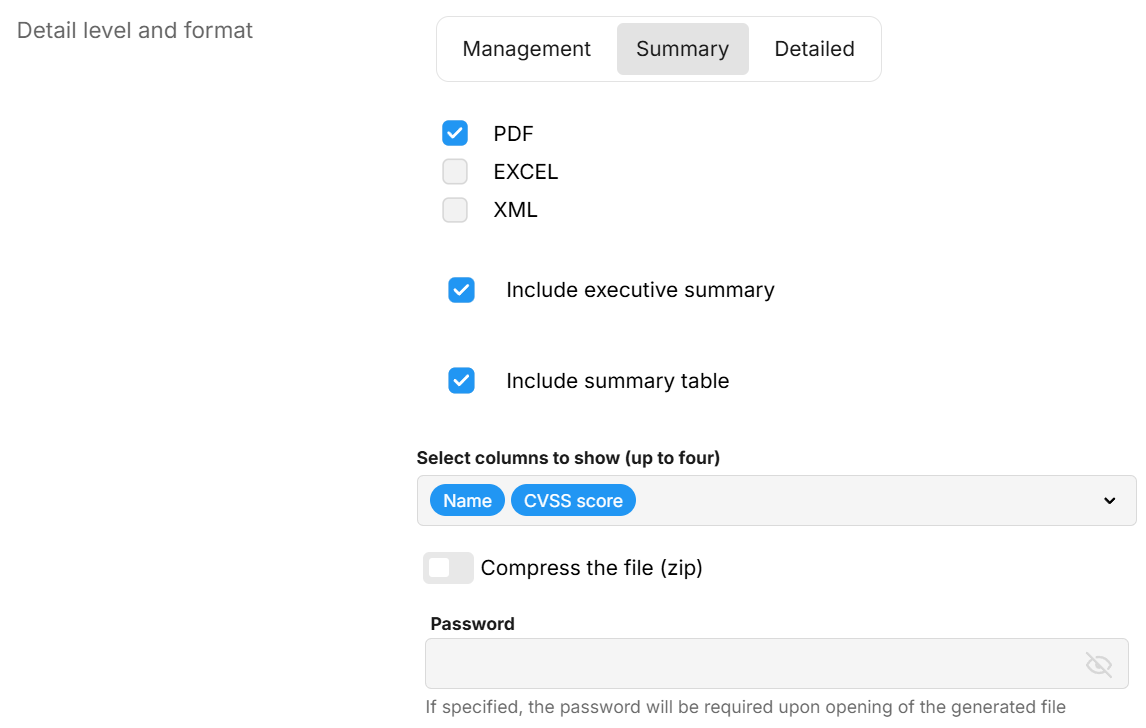
Detail Level
The detail level can be adjusted based on the target recipient of the report. The amount of information varies in each type, thus making each report exclusive depending on the functionality and audience. There are three report levels available:
-
Management
-
Summary
-
Detailed
For more information, see Report Levels in the Reports document
Format
A report can be exported in the three most commonly and widely used document formats.
-
PDF - This is the most commonly used reporting format.
-
Excel - The reports generated using excel format have a lot of tabular information, which can be useful when reporting information to IT/Security department or similar divisions.
-
XML - This format is the default industry standard used for data exchange and integration. The reports generated in XML format are typically used for integration and automation.PDF
Include executive summary
An executive summary is a text from the penetration-testers that describes the overall security level of the application.
This option allows excluding the summary from the generated report.
Include Summary table
Select Include Summary table to add a customizable findings table to your Management or Summary level report. When enabled, use the Select columns to show (up to four) multi-select dropdown to choose which data columns will be displayed in the report
Compress the file (zip)
If not sent to the Reports View, the report is delivered as a ZIP-file and can be password protected by providing a password that will be required to open the generated file.
Delivery
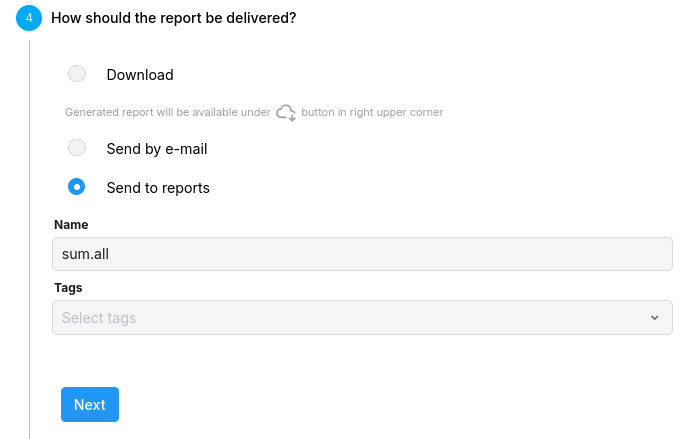
A scheduled report can be delivered as e-mail to one or more users or be stored in the Reports View. See the Reports View document.
-
Send by E-mail
-
Users - enter one or more recipients to receive the report by e-mail.
-
-
Send to Reports
-
Name - Enter a filename for the file that will be generated in the Reports View.
-
Tags - Enter a tag that will be attached to the report file.
-
Report Timeframe

Set the timeframe that the report should cover. Select a predefined value in the list or set a custom timeframe by entering a start date and a end date under the Custom selection.
-
Last day
-
Last week
-
Last month
-
Last quarter
-
Last year
-
Custom
-
Start date
-
End date
-
Schedules
Clicking the schedule tab displays a list of available schedules associated to the scheduled report.
Edit Schedule
To edit the schedule click the edit (pen) icon the edit the schedule.
Remove Schedule
Click the bin icon to remove a schedule.
This only removes the schedule from the list, it will still be available under Automation > Schedules and need to be deleted from here as well to be completely removed.
Add Schedule
Click the plus sign to open the Add a schedule form to create a new schedule.
Use an existing schedule
When adding a schedule you can choose to use an existing schedule or create a new.
To use a existing schedule open the drop-down menu to select a schedule from the list of available schedules.
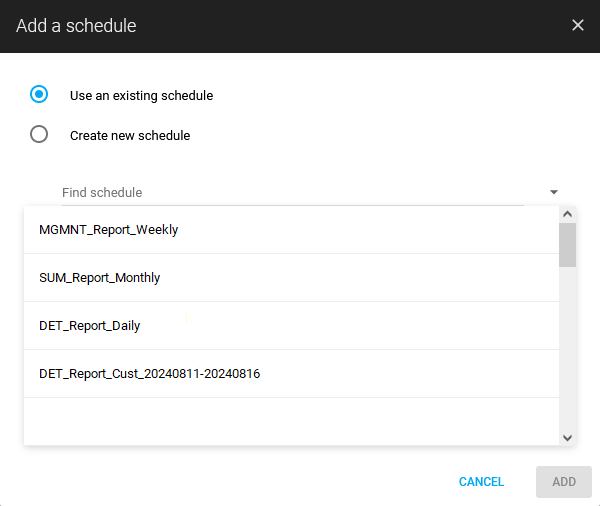
Create new schedule
When creating a new schedule a form is displayed. This is the same form as in Schedules.
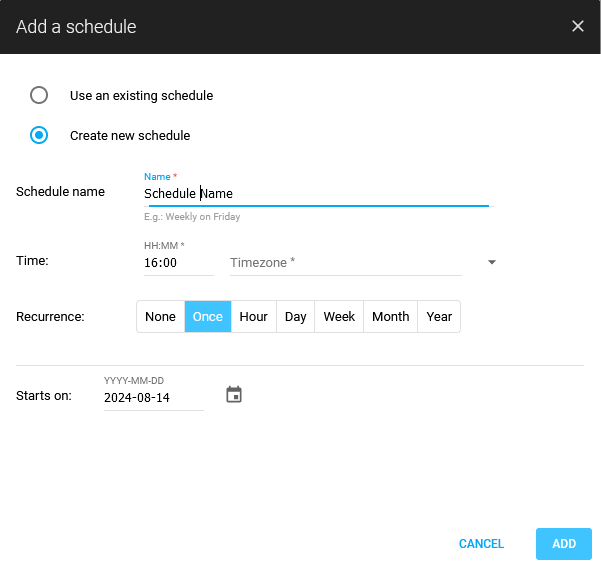
Once added, the schedule is available in Automation > Schedules as well.
Related Articles