Last updated: 2020-01-31
Purpose
This article provides users with a comprehensive overview of the feature Manage Users for OUTSCAN and HIAB. and Portal Interface.
Introduction
The Manage Users feature in OUTSCAN and HIAB provides administrators with a centralized interface for creating, organizing, and managing user accounts within the platform. Through the Manage Users view, administrators can create individual user accounts, organize users into hierarchical structures or groups, and assign roles that define what actions users can perform in the system. The feature includes capabilities such as configuring login credentials, enabling two-factor authentication, defining account details, assigning access to specific targets and scanners, and managing user roles and permissions. It also provides a user accounts grid that displays detailed account information and supports actions such as editing, copying, exporting, or deleting users.
Customers should use this feature to maintain secure and controlled access to the vulnerability management platform. By assigning individual accounts, enforcing password policies, and using role-based access control, organizations can ensure that users only have the permissions necessary for their responsibilities. This approach improves accountability, supports the principle of least privilege, and enables scalable management of access across teams and organizational structures. As the number of users grows, grouping, hierarchical user management, and role assignments simplify administration while maintaining strong security governance and auditability.
Users
The users are defined within the Main Menu > Settings > Manage Users in the lower left corner of the screen. When selected, a window is displayed, showing an overview of the tree structure of the already defined users. Should none be defined, then the leftmost field only states Top level.
When considering setting up multiple users, it is always good to investigate how to group them or perhaps have them organize themselves. Users can be created with sub users (and sub sub users) where access rights are inherited from the parent users. Meaning that if a user can add targets, then that user may be able to grant that access to sub users (unless they are not allowed to administrate users).
Depending on the size of the organizations, there are different best practices in place but the main thing that applies to all of them is the following:
-
Assign an individual account to all users – This is in order to get accountability. Users that understand that they have a personal account for which they are responsible will think twice before sharing such an account.
-
Set up a password policy within the solution that matches the one in your company.
-
Since this solution contains the discovered risks for your organization, if you have multiple password policies within your organization, choose the password policy accordingly.
-
Before adding the users, see if there is any additional information that you have access to when managing the users. For example, business role such as Sys admin, DBA, Manager or likewise. The reason for this is that there is a role-based access system built into the tool, and not having a clear view of the role of the users may cause trouble afterwards when the number of users grows.
-
Within the system, you can also define another user to be a Super user. This allows you to share the responsibilities of the tool, should any of you go on a holiday, or likewise. Verify that this function is present and working, prior to going abroad and communicate to the users utilizing this tool whom they can turn to for questions.
Size of Organization
SMALL
Should the number of people operating the tool be 1-5, and all of them are working in a close group, then it may be justified that all the people with access to the tool are Super users. Of course, giving more access than required is not the best practice, but setting to granular restrictions upon users within a small group may cause issues within the group itself. However, should a manager have access, then that person can be set to only have access to the dashboard and given only read access to the tool in order to prevent any unwanted changes.
MEDIUM
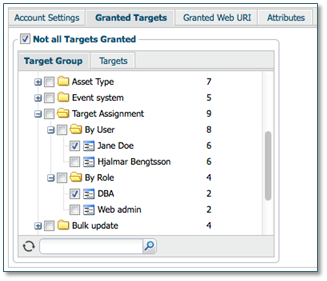
When you have personal responsibilities for targets (like system owners), then it is wise to define groups within the target management section, which you then assign as granted targets to the individual users. Depending on the size of the network, this can either be based on the user itself or a specific role. Like, for example, in the below picture, where Jane Doe is a user and a DBA. Thus, whenever a new database is added to the target group, or if she becomes the owner of a new system, then her access rights to that target will automatically be increased once the target group is updated.
LARGE
In a complex organization it may be required to assign targets to specific teams instead. Like Network Operational Center(NOC), Security Operational Center (SOC), Microsoft, or Linux team. These teams can then be individually divided into smaller groups if required. Appoint a single person responsible for the team by normal delegation of responsibilities within the user setup.
Cheat sheet – User
|
Best practice |
Goal |
In place? |
||
|---|---|---|---|---|
|
Yes |
No |
N/A |
||
|
Password policy defined |
The password policy should reflect the company password policy for tools matching the same. |
|
|
|
|
Add additional information on users |
Include information prior to population for easier maintenance of larger set of users. |
|
|
|
|
Add additional user with full rights |
In larger organizations, have a stand-in for managing the tool in case of an emergency occurs where the main point of contact cannot be reached. |
|
|
|
|
Define target assignment groups |
These groups are for ease the management of multiple users within the group without having to individually update each user when a new target is added to the vulnerability management program. |
|
|
|
|
Enforce two factor authentications |
When 2FA is enabled, then the user also needs to provide information from something they also have (one-time token) instead of just something they know (the password), thus increasing the security. |
|
|
|
|
Force password change on initial login |
Enforce that users change their password to a new one once they log in for the first time. This allows you to force the users to define their own password, which complies to the security policy defined by the tool and minimizing the impact on your preference or the automatic randomization of generated credentials. |
|
|
|
Manage User Accounts
Go to Main Menu > Settings > Manage Users to access the Manage Users feature which allows viewing and editing of all the users administered in the system.
The Manage User Accounts tab consists of the Groups tree and Users tree to the left, and a user grid to the right.
Groups
The Groups section shows a hierarchical structure of the defined user groups. The Groups section enables you to categorize users in different groups.
Clicking any group displays the users included in that specific group.
See the Groups section for more information on how manage groups.
Filter: The Groups tree can be filtered by entering a partial or full name in the filter area at the bottom of the Groups tree section. This only show the groups that match the filtering string, and the parent accounts that are needed to show the hierarchy. Press the X-icon to clear the filter and show all groups again.
Users
In Users section, the Top Level represents your account and underneath a hierarchical structure of all the users that you can administrate is displayed. The usernames are shown in this tree. To select any user, click on the user name. This changes the user account grid to show only that user. Re-click to deselect that user.
Filter: The Users tree can be filtered by entering a partial or full name in the search bar, located at the bottom of the Users section. This shows only the users that match the filtering string, and the parent accounts that are needed to show the hierarchy. Click on the X button, to clear the filter and show all users again.
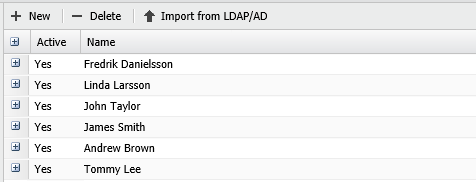
User Accounts Grid
The User Accounts grid shows detailed information about the users. It is possible to add or remove columns in this grid.
To add or remove columns:
-
Click on the arrow ▼ beside any column name to view the drop-down menu.
-
Choose Columns, and select the columns that you wish to add.
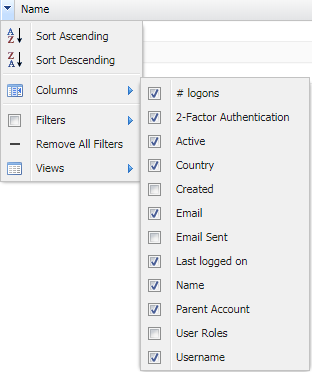
Below you find a list of the different columns available.
|
Option |
Description |
|
Logons |
Displays how many times the user has logged into the system. |
|
2-Factor Authentication |
What sort of 2-factor authentication the user is using. |
|
Active |
If the account active or not. |
|
Country |
The users’ country. |
|
Created |
The date and time when the account was created. |
|
|
The email address of the user. |
|
Email Sent |
The last time an information email or password recovery email was sent to the user. |
|
Last logged on |
When the user last logged into the system. If this entry is blank the user has still not logged into the system. |
|
Name |
The full name of the user. |
|
Parent Account |
The parent account of the user account. Top Level means that your account is the parent. |
|
User Roles |
The type of user roles assigned to the user. |
|
Username |
The username that the user logs into the system with. |
Right-clicking a user brings up a context menu where specific actions on that user or view can be performed.
|
Option |
Description |
|
New |
Opens the Create new user window. |
|
Delete |
Deletes the selected user. |
|
Edit |
Change details on the selected user. |
|
Copy |
Copies the selected user's base settings, and open a new user where the general information needs to be filled in.
|
|
Export |
Export all user accounts as a CSV or HTML file. |
Clicking on the expand icon or double-clicking a user displays additional information about the user account.

Managing Users
Create and manage user accounts in Outpost24 by assigning roles, permissions, and resource access to ensure secure and controlled platform usage.
Create Users
The Create Users feature in Outscan allows administrators to create and manage individual user accounts within the system. Through the Manage Users interface, administrators can define account details, configure login credentials, and assign roles and permissions that determine what actions a user can perform. User accounts can also be organized within a hierarchical structure, where parent accounts can manage subordinate users and control their access to resources such as targets and scanners.
Using dedicated user accounts is an important part of secure identity and access management. By assigning specific roles and permissions to each user, organizations can enforce the principle of least privilege and maintain clear accountability for actions performed within the platform. This approach improves operational security, supports auditability, and ensures that users only have access to the resources and capabilities required for their responsibilities. See Create Users article on how to create and manage Users.
User Groups
The User Groups feature allows administrators to organize users into structured groups within the platform’s user management interface. Groups provide a way to categorize users based on organizational structure, team responsibilities, or operational roles. Within the Manage Users section, administrators can create groups and subgroups and populate them by assigning users to the appropriate group. This grouping is displayed in a hierarchical structure, which makes it easier to navigate and view users that belong to specific teams or departments.
Using user groups simplifies the administration of larger environments by enabling administrators to manage users collectively rather than individually. Users can be moved between groups as responsibilities change, while the group structure helps maintain a clear overview of how users are organized within the system. This approach improves scalability and operational clarity when managing many accounts, ensuring that user administration remains efficient as the organization grows. The Groups function enables you to bundle users together into simple groups to be presented in the group grid. See User Groups article on how to create and manage User Groups.
User Roles
The User Roles feature allows administrators to define and manage permission sets that control what actions users can perform within the platform. By creating roles with specific privileges, organizations can assign appropriate levels of access to different users based on their responsibilities. Each user can be assigned one or more roles, enabling flexible permission management and allowing administrators to tailor access rights to operational needs.
User roles helps enforce structured access control across the system by limiting functionality to authorized users only. Permissions can be configured for multiple areas such as target management, scan scheduling, reporting tools, and user administration, ensuring that users only interact with features relevant to their tasks. This approach improves operational security, simplifies user administration, and supports the principle of least privilege within the platform. See User Roles article on how to create and manage User Roles.
Attributes
The Account settings allows the main user to manage all the users accounts that in the system. As the main user, you can manage several security policies attributes such as Password Policy, Method Enforcing, CSRF Validation, and Login Policy. Under the License tab, the amount of scans, targets that can be maintained in the system can be monitored
The Attributes tab is available only if they are set to active. See Attributes section in Account Settings document for information on how to set attributes.
The tabs in the lower half of the window varies depending on your license.
Related Articles