
Last Updated: 2026-10-06
Purpose
This article describes how to create, edit, and schedule workflows in the Outpost24 Portal with the scan wizard.
Introduction
A workflow runs several scan types one after the other, so that the result of one scan is used by the next. A typical workflow discovers the assets on a network, runs a network host assessment on the discovered hosts, and then runs an application assessment on the web applications found by that assessment. Because each assessment covers what the preceding scan found, no target list has to be kept up to date by hand, and the same scanning strategy is repeated on every run.
A workflow can also hold reports. After each run, every report in the workflow is created from the assets scanned in that run.
Workflows are created and edited in the scan wizard, a step-by-step dialog that covers the choice of scan types, the settings shared by the whole workflow, the settings of each scan type, the reports, and a final review. Each scan type in the workflow is saved as its own scan configuration, and the workflow runs these configurations in order.

For more information on the individual scan types, see Discovery Scan Configuration and Scan Assessment Configuration.
Requirements
-
It is assumed that the reader has basic access to the OUTSCAN or HIAB account to access the Portal.
-
A Netsec subscription is required for network and cloud scan types. Only the scan types included in the account are offered in the scan wizard.
-
The user must have permission to view and manage scan configurations.
-
To add or change reports, the user must have permission to view and manage scheduled reports. Users who can only view scheduled reports see a workflow's reports but can't change them.
Supported Workflows
A workflow consists of two or more scan types, or of a single assessment with at least one report. Discoveries always run first, followed by the assessments in the order below.
|
Category |
Workflow |
|---|---|
|
Network & web |
Network discovery → Network host assessment |
|
Network & web |
Network discovery → Network host assessment → Application assessment |
|
Network & web |
Network discovery → Network host assessment → Limited application assessment |
|
Network & web |
Cloud discovery → Network host assessment |
|
Network & web |
Cloud discovery → Network host assessment → Application assessment |
|
Network & web |
Cloud discovery → Network host assessment → Limited application assessment |
|
Network & web |
Network host assessment → Application assessment |
|
Network & web |
Network host assessment → Limited application assessment |
|
Network & web |
Network host assessment (with a report) |
|
Network & web |
Application assessment (with a report) |
|
Docker |
Docker image discovery → Docker image assessment |
|
Docker |
Docker image assessment (with a report) |
Limited application assessment is offered only when the account includes it. A workflow with a single assessment requires at least one report, so it can only be created by users who can manage scheduled reports.
Accessing Workflows
-
Navigate to Configuration > Workflows in the Main Menu.
The Workflows view is displayed, listing all workflows.
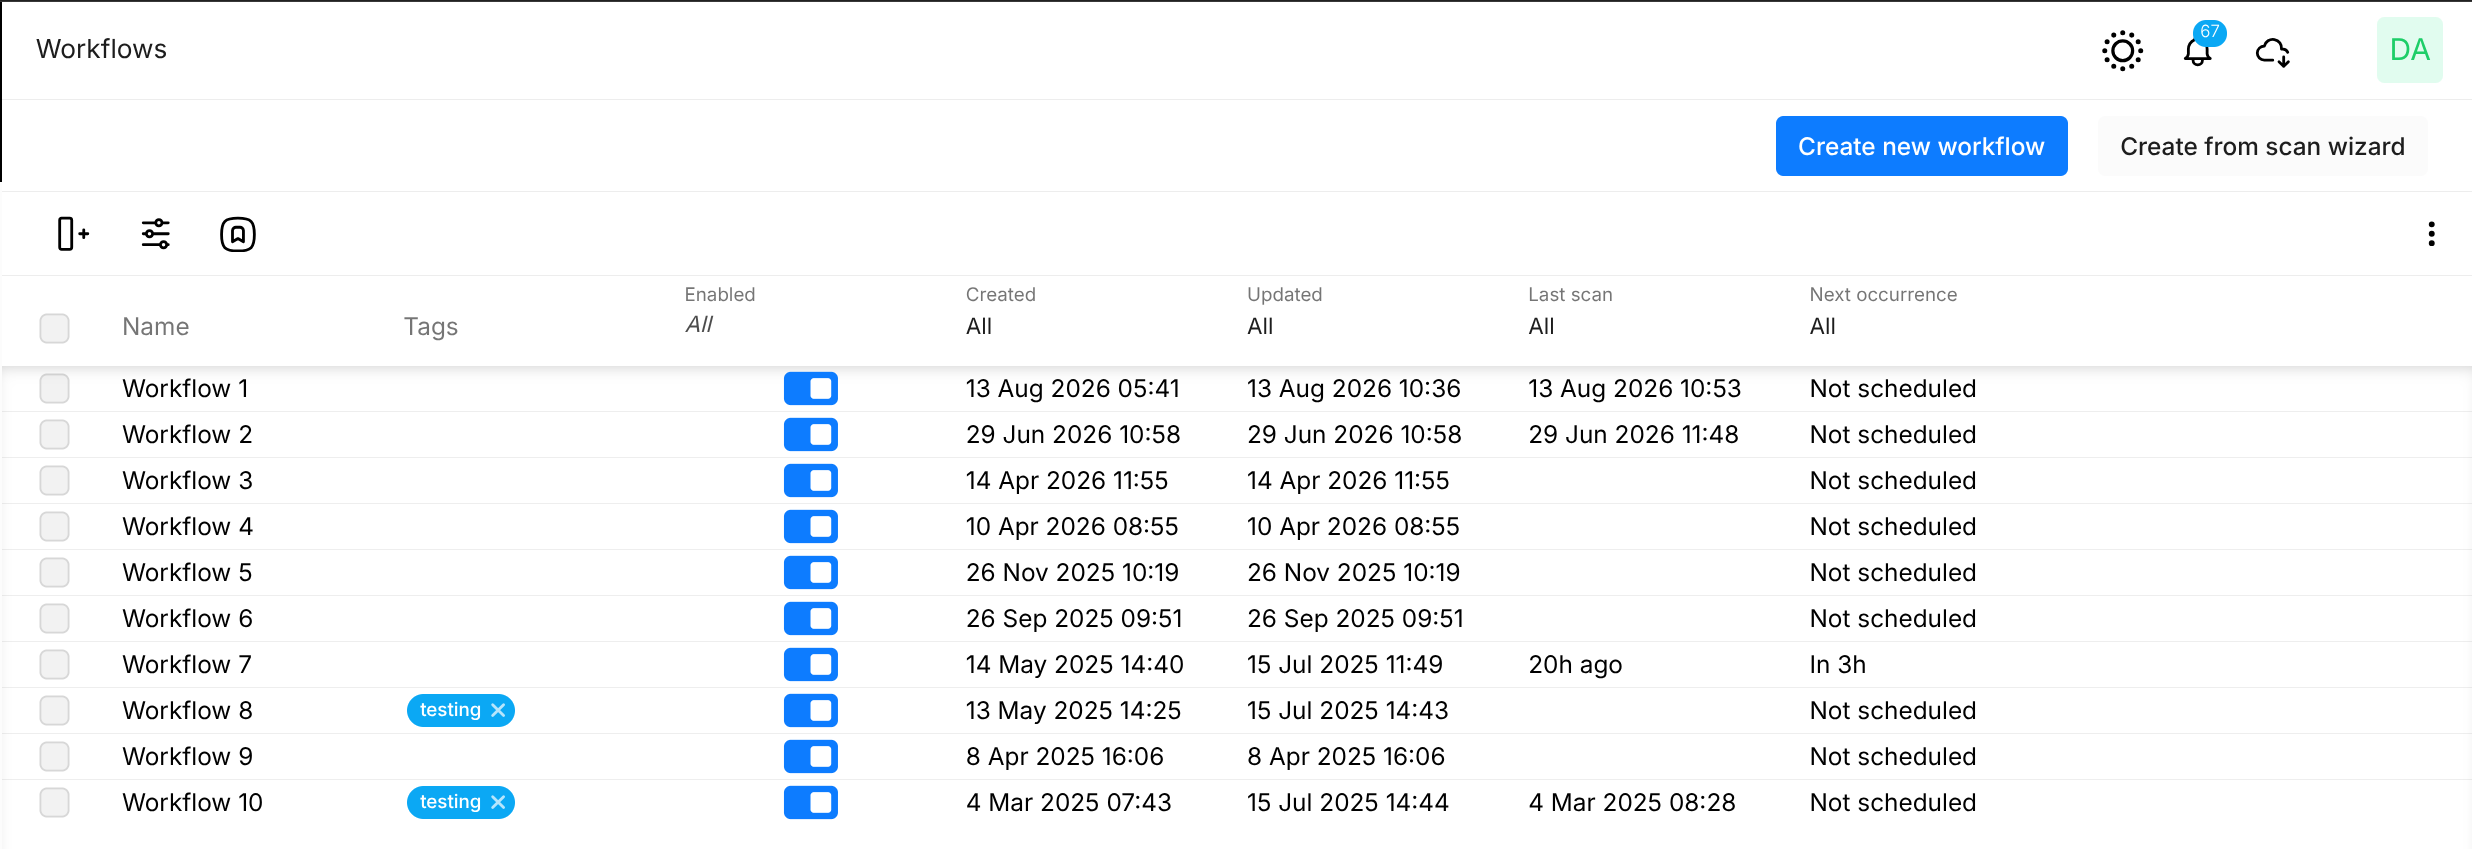
Table Columns
|
Column |
Description |
|---|---|
|
Name |
The name of the workflow. |
|
Tags |
The tags assigned to the workflow. |
|
Enabled |
A toggle that enables or disables the workflow. A disabled workflow does not run on its schedules. |
|
Created |
When the workflow was created. |
|
Updated |
When the workflow was last modified. |
|
Last scan |
When the workflow last ran. |
|
Next occurrence |
When the workflow runs next. Not scheduled is shown when no schedule is assigned. |
The Scan Wizard
The scan wizard opens as a dialog with three areas:
-
Step indicator - at the top, listing the steps of the workflow and marking the current one.
-
Step content - in the middle, with the fields of the current step and the Back and Continue buttons.
-
Explainer - on the right, describing what the current step is for and how its choices affect the workflow.
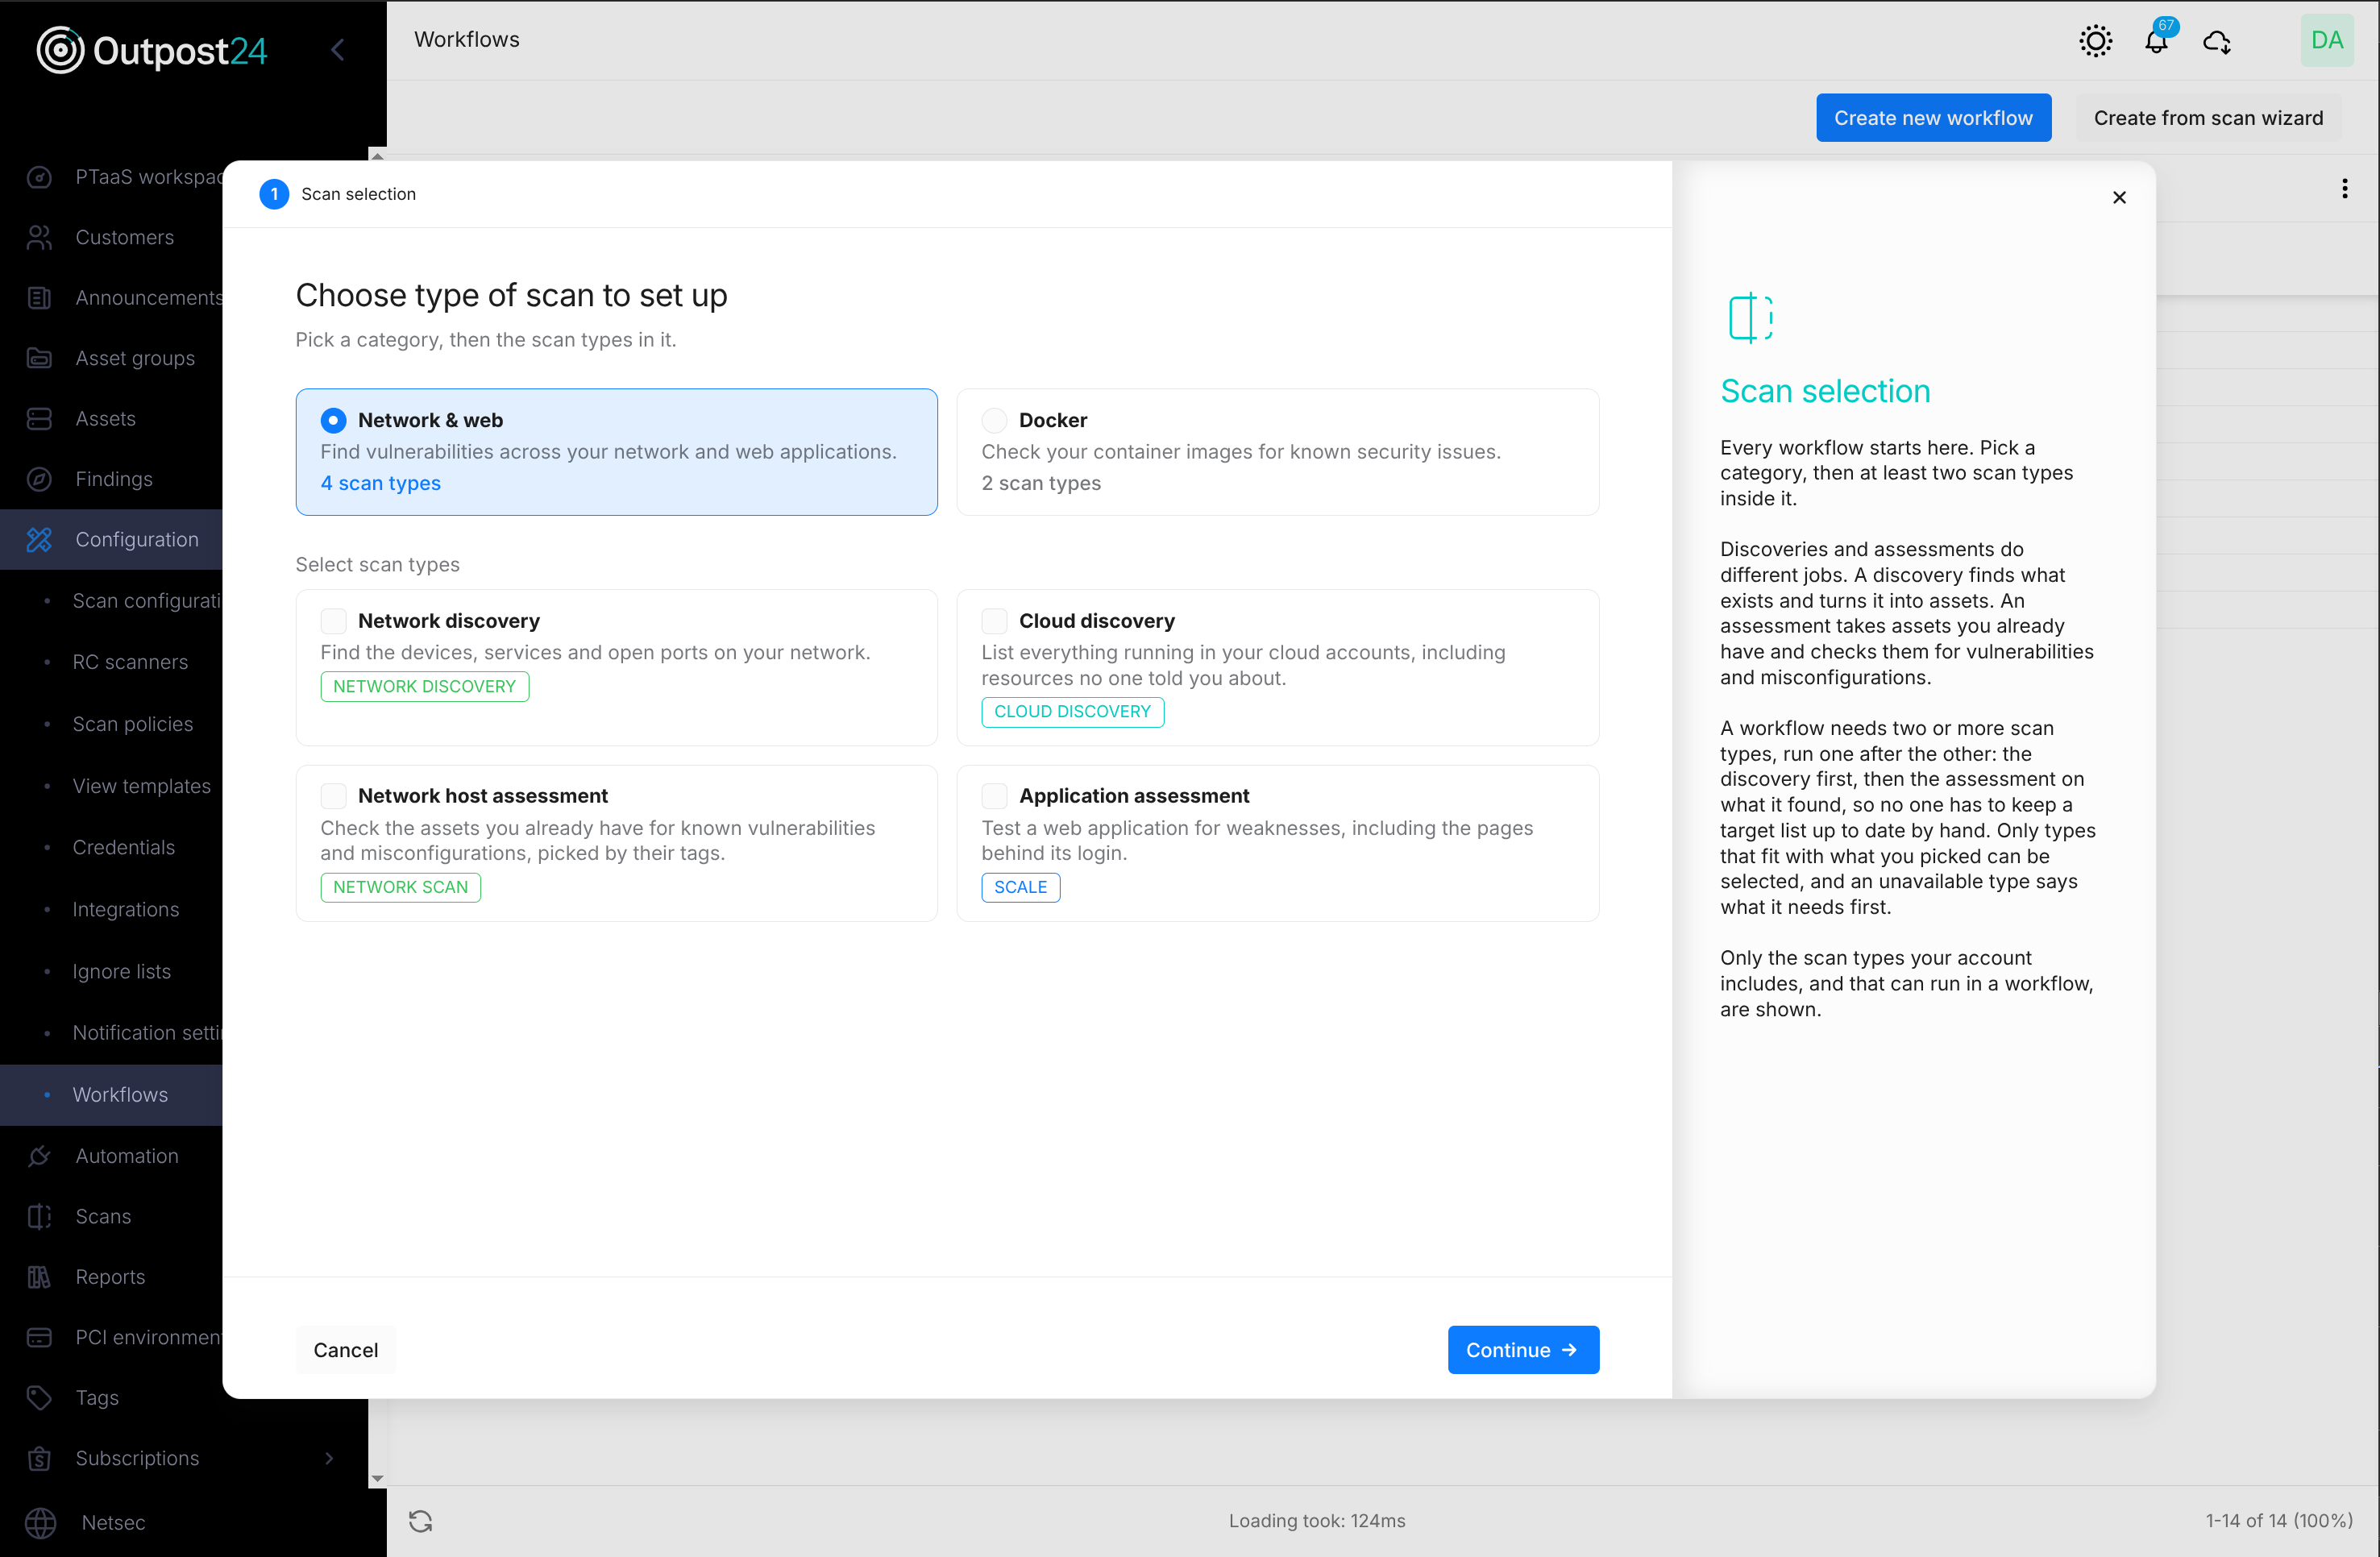
The steps depend on the selected scan types and are added or removed as choices are made.
-
Continue validates the current step. Fields that need attention are highlighted with a message, and the wizard does not continue until they are corrected.
-
Back returns to the previous step. Entered values are kept. On the first step, the button is named Cancel.
-
Esc goes back, and Ctrl+Enter (⌘+Enter on macOS) continues.
-
Closing the wizard after changes have been made displays a confirmation, since the selections are lost.
Several steps contain a Recommended settings card with the default values that suit most scans. Click Edit on the card to change the values in a dialog.
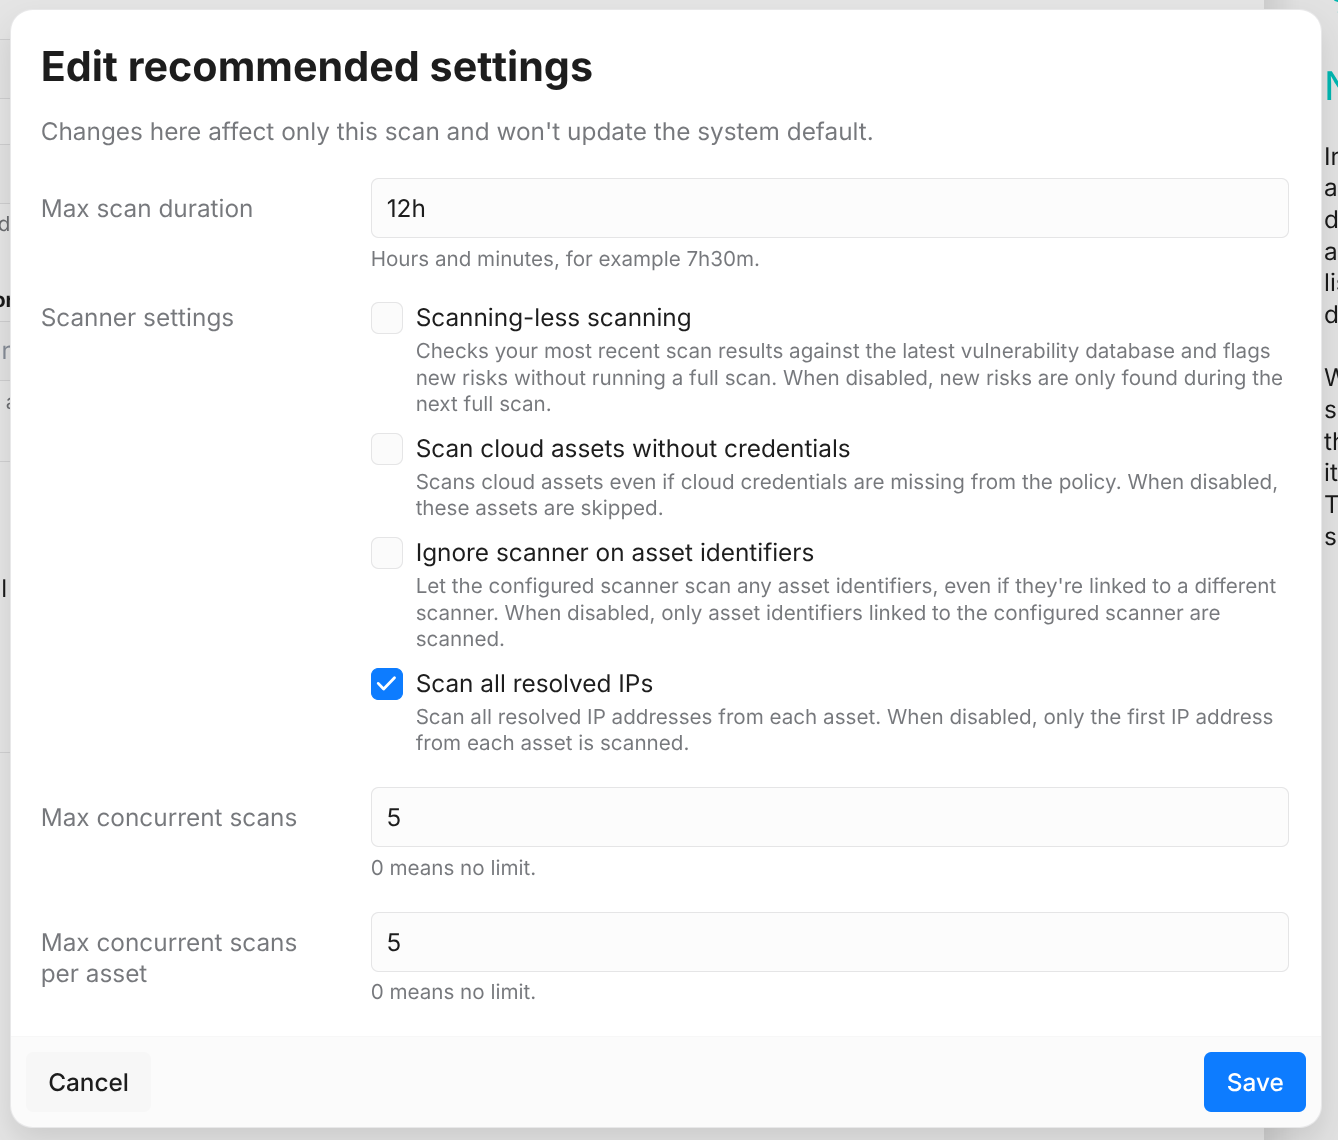
Changes made in Recommended settings apply only to this workflow. The system defaults are not changed.
The previous workflow editor is still available for a limited time through the Create in old view and Open in old view buttons. It will be removed in a later release.
Creating a Workflow
The procedure below creates a Network discovery → Network host assessment → Application assessment workflow. The other workflows follow the same pattern; see the Other Scan Types section for the steps that differ.
To open the scan wizard:
-
Click the Create workflow button above the table.
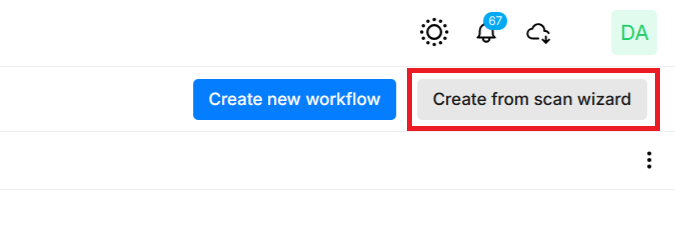
Starting from an Existing Workflow
Instead of starting from scratch, a new workflow can be filled in from an existing one.
-
On the Scan selection step, click Start from an existing workflow at the top right.
-
Search for the workflow by name and select it. The list shows the newest workflows first.
-
Click the Use this workflow button.
The wizard is filled in with a copy of the workflow: its scan types, their settings, and its reports. The name gets (copy) added. The scanner, schedules, and tags are not copied and are chosen again. Everything can still be changed before the workflow is created, and the original workflow is never changed.
-
Workflows that can't be copied are greyed out. Hover over one to display the reason, for example a workflow with a Cloud assessment, or one that uses credentials the user has no access to.
-
Users who can't manage scheduled reports get the copy without its reports, and a message says so.
-
Docker images the user has no access to are left out of the copy, and a message says so.
-
If the wizard already contains changes, a confirmation is displayed before they are replaced.
Scan Selection
-
Select a category, for example Network & web. The scan types of the category are displayed below it.
-
Select the scan types to include, for example Network discovery, Network host assessment, and Application assessment.
-
Click the Continue button.
Only scan types that can be combined with the ones already selected are enabled. Hover over a disabled scan type to display the reason, for example Needs Network host assessment selected first. Deselecting a scan type also deselects the scan types that depend on it; the values entered for them are kept if they are selected again.
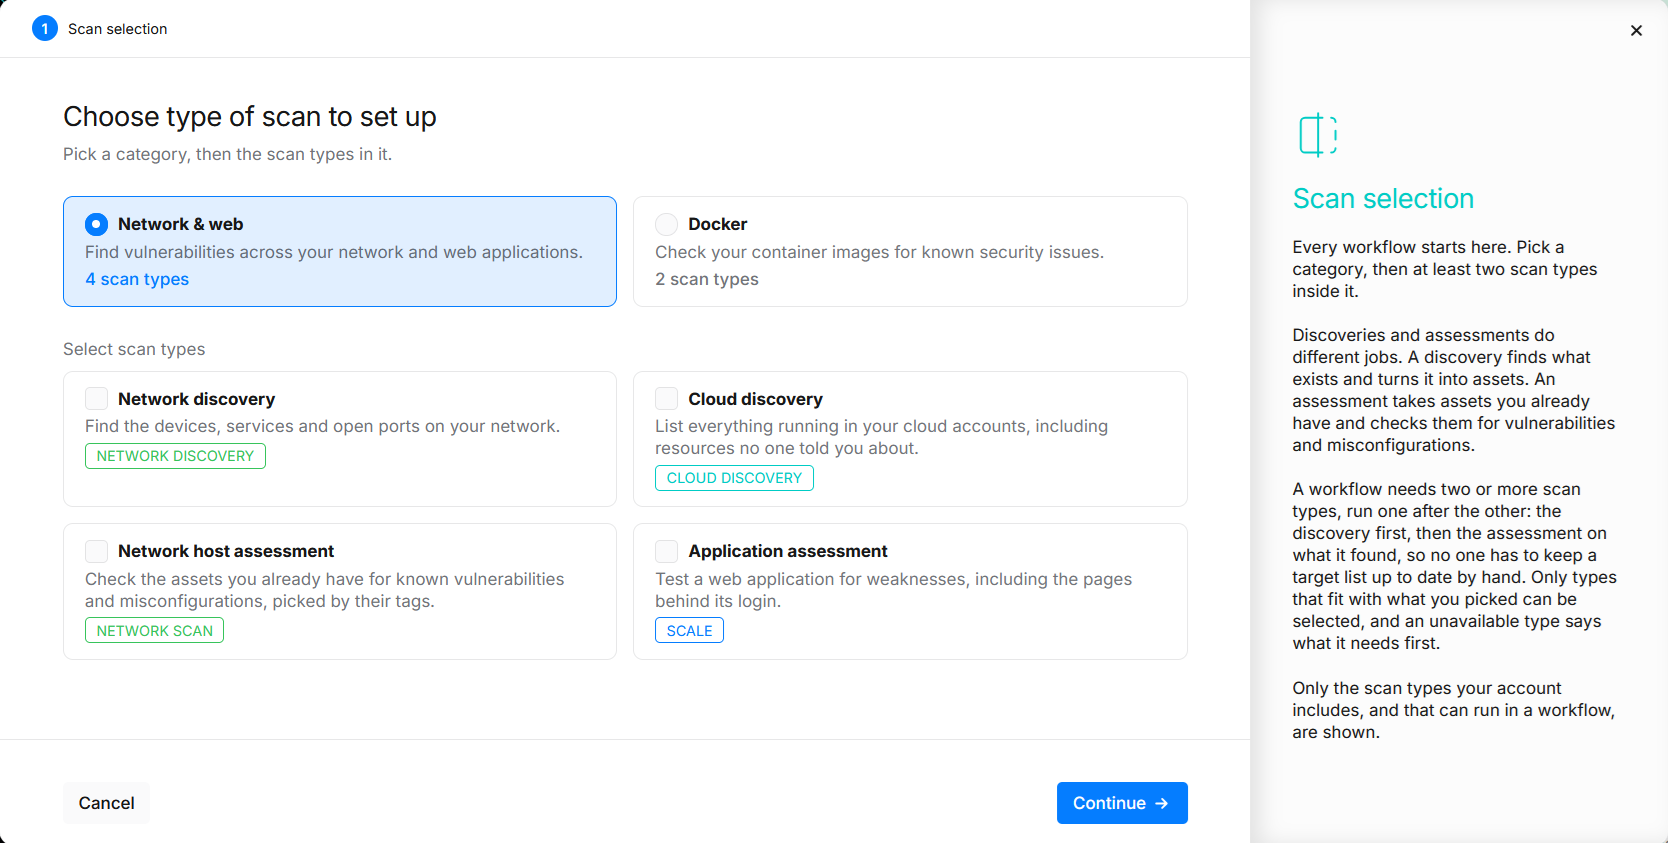
A single Network host assessment, Application assessment, or Docker image assessment can be saved as a workflow, as long as it has at least one report. A discovery can't run on its own; select an assessment to run on what it finds.
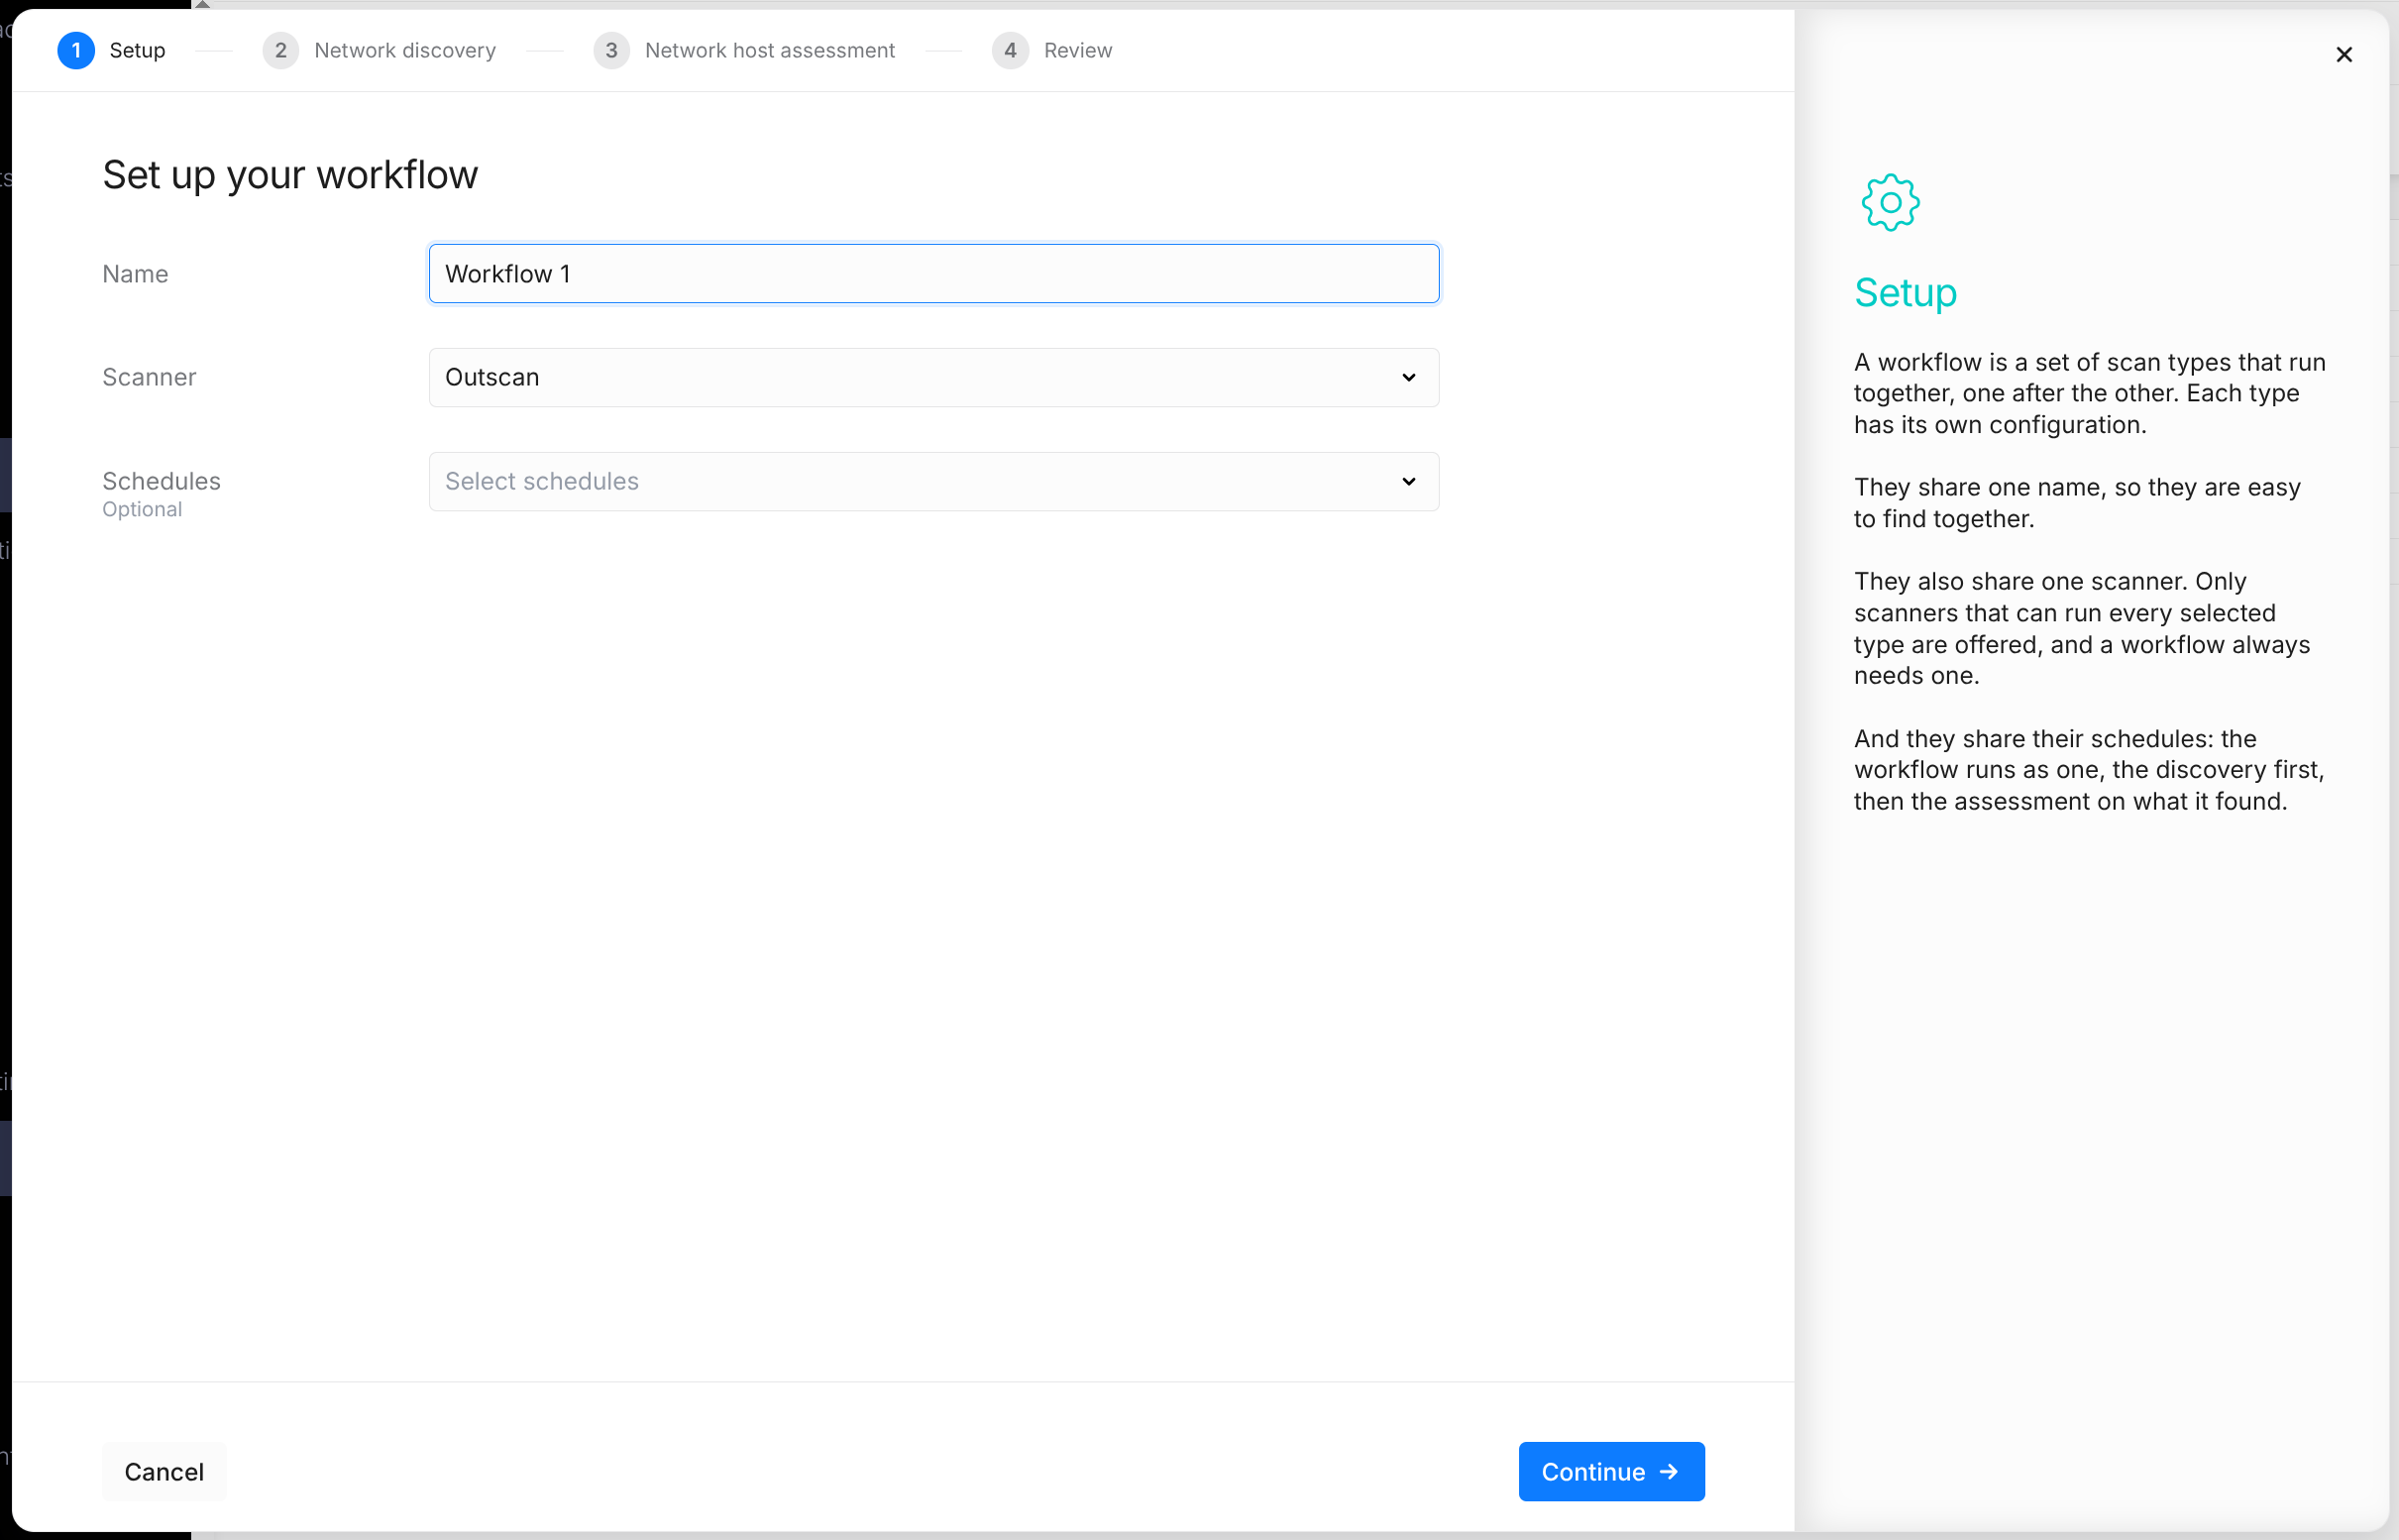
Setup
The Setup step holds the settings shared by the whole workflow.
-
Enter a Name for the workflow.
-
Select a Scanner.
-
Optionally, select one or more Schedules. To create a schedule without leaving the wizard, click Create new schedule in the drop-down; the new schedule is added and selected automatically.
-
Click the Continue button.
|
Field |
Description |
|---|---|
|
Name |
The name of the workflow. The scan configurations created for the workflow get the same name. |
|
Scanner |
The scanner that runs every scan type in the workflow. Only scanners that can run all selected scan types are listed. |
|
Schedules |
When the workflow runs. Without a schedule, the workflow runs only when started manually. |
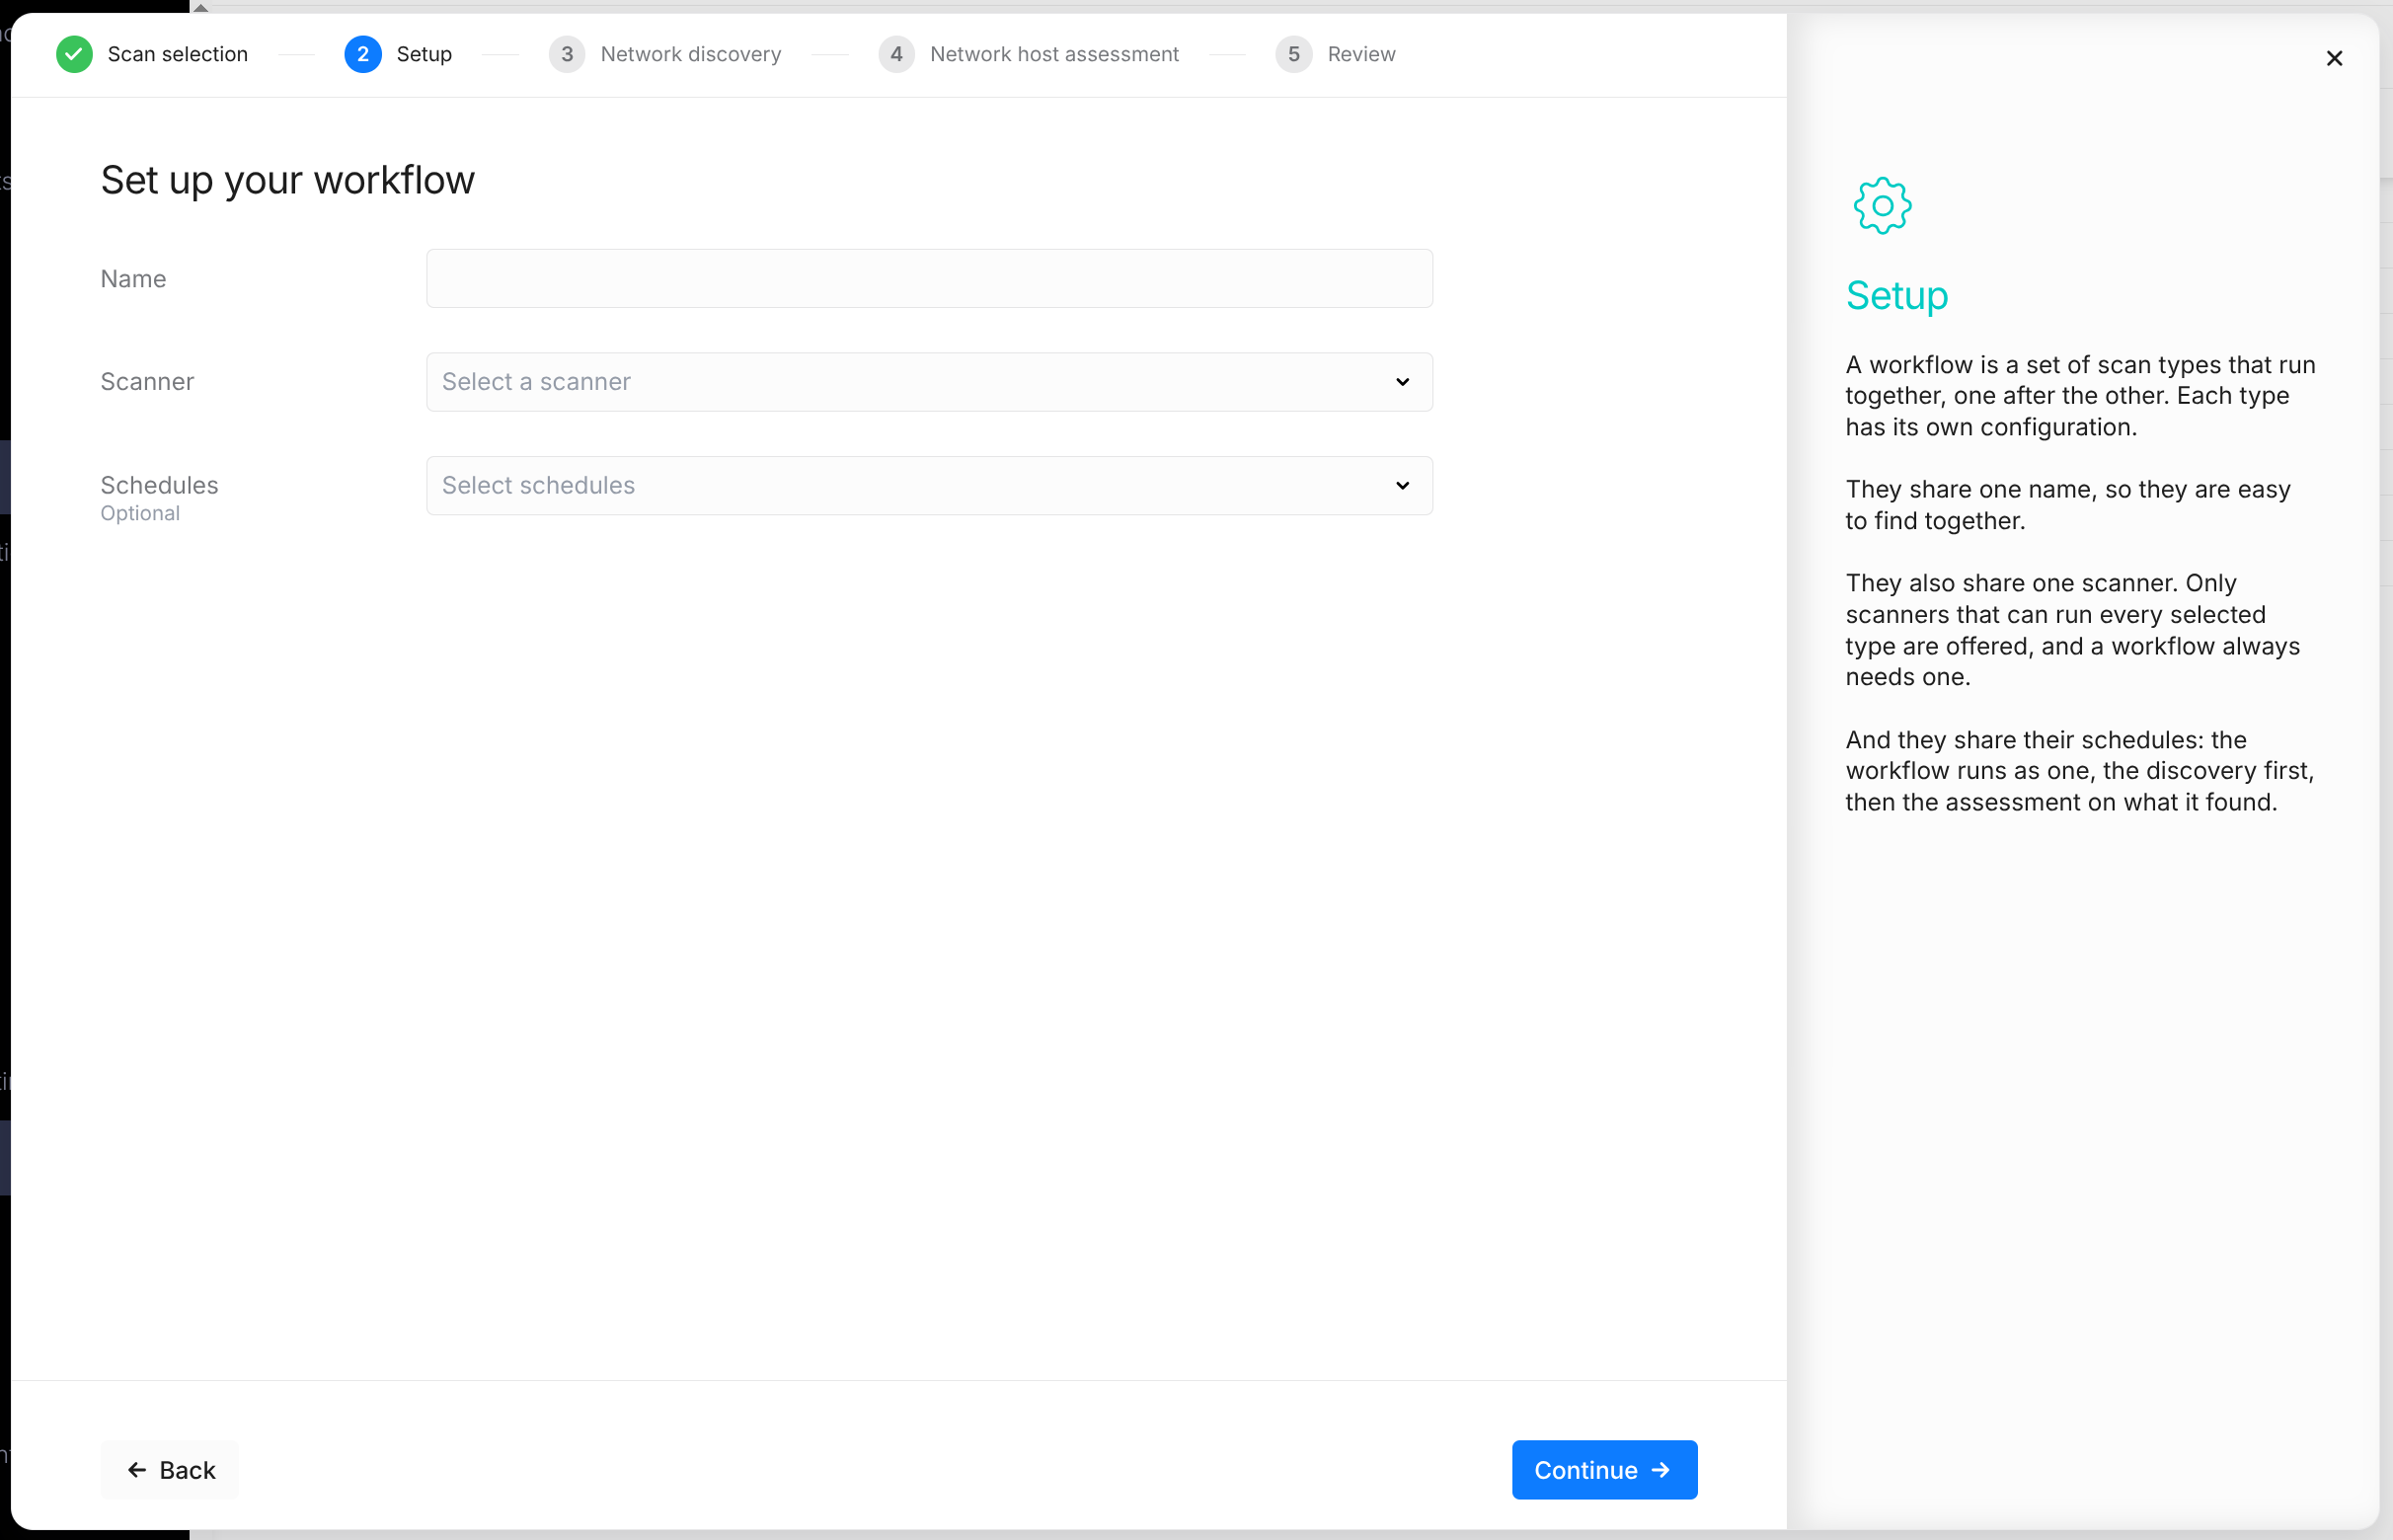
The scanners offered depend on the selected scan types:
-
On OUTSCAN, the Outscan scanner is offered for network and cloud workflows in addition to the account's own scanners.
-
Appsec scanners are offered only when the workflow contains an application assessment, and never together with a cloud discovery.
-
A Docker workflow requires a scanner of the account's own, on an appliance or connected remotely, that can reach the registry. Hosted scanners are not offered. A Docker image assessment on its own needs no scanner.
-
When the cloud discovery uses a role ARN credential, only scanners that can use it are offered, and Role ARN credentials run only on hosted scanners. is displayed below the field. On HIAB, Role ARN credentials can't be sent to hosted scanners. is displayed.
Network Discovery
Each scan type in the workflow has its own step, named after the scan type.
-
Enter the Max scan duration.
-
Enter the Targets, one target per line.
-
Optionally, enter the Excluded targets.
-
Optionally, enter a Packet filter.
-
Optionally, click Edit on the Recommended settings card to change the port scanning and protocols.
-
Optionally, enter Tags to add and Exclusive tags.
-
Click the Continue button.
|
Field |
Description |
|---|---|
|
Max scan duration |
How long the discovery may run, in hours and minutes, for example 7h30m. The value must be between 30 minutes and 24 hours. The default is 12 hours. |
|
Targets |
What the discovery probes: an IP address, a hostname, a CIDR network, or an address range, IPv4 or IPv6. Invalid rows are highlighted. |
|
Excluded targets
|
Targets that are never probed, even inside an included range. |
|
Packet filter |
For advanced users. Only network traffic that matches the filter is recorded, for example icmp[icmptype] != icmp-echo for all ICMP traffic except echo requests. |
|
Port scanning |
Use default ports or Use custom ports. Custom ports are entered as a comma-separated list of single ports, ranges, or exclusions, for example 22, 20-80, !25565. |
|
Protocols |
The protocols used to probe: TCP, UDP, ARP, and ICMP. |
|
Tags to add
|
Tags added to every asset the discovery finds. Tags the assets already have are kept. |
|
Exclusive tags
|
Tags removed from every other asset, and then applied only to the assets found by this discovery. |
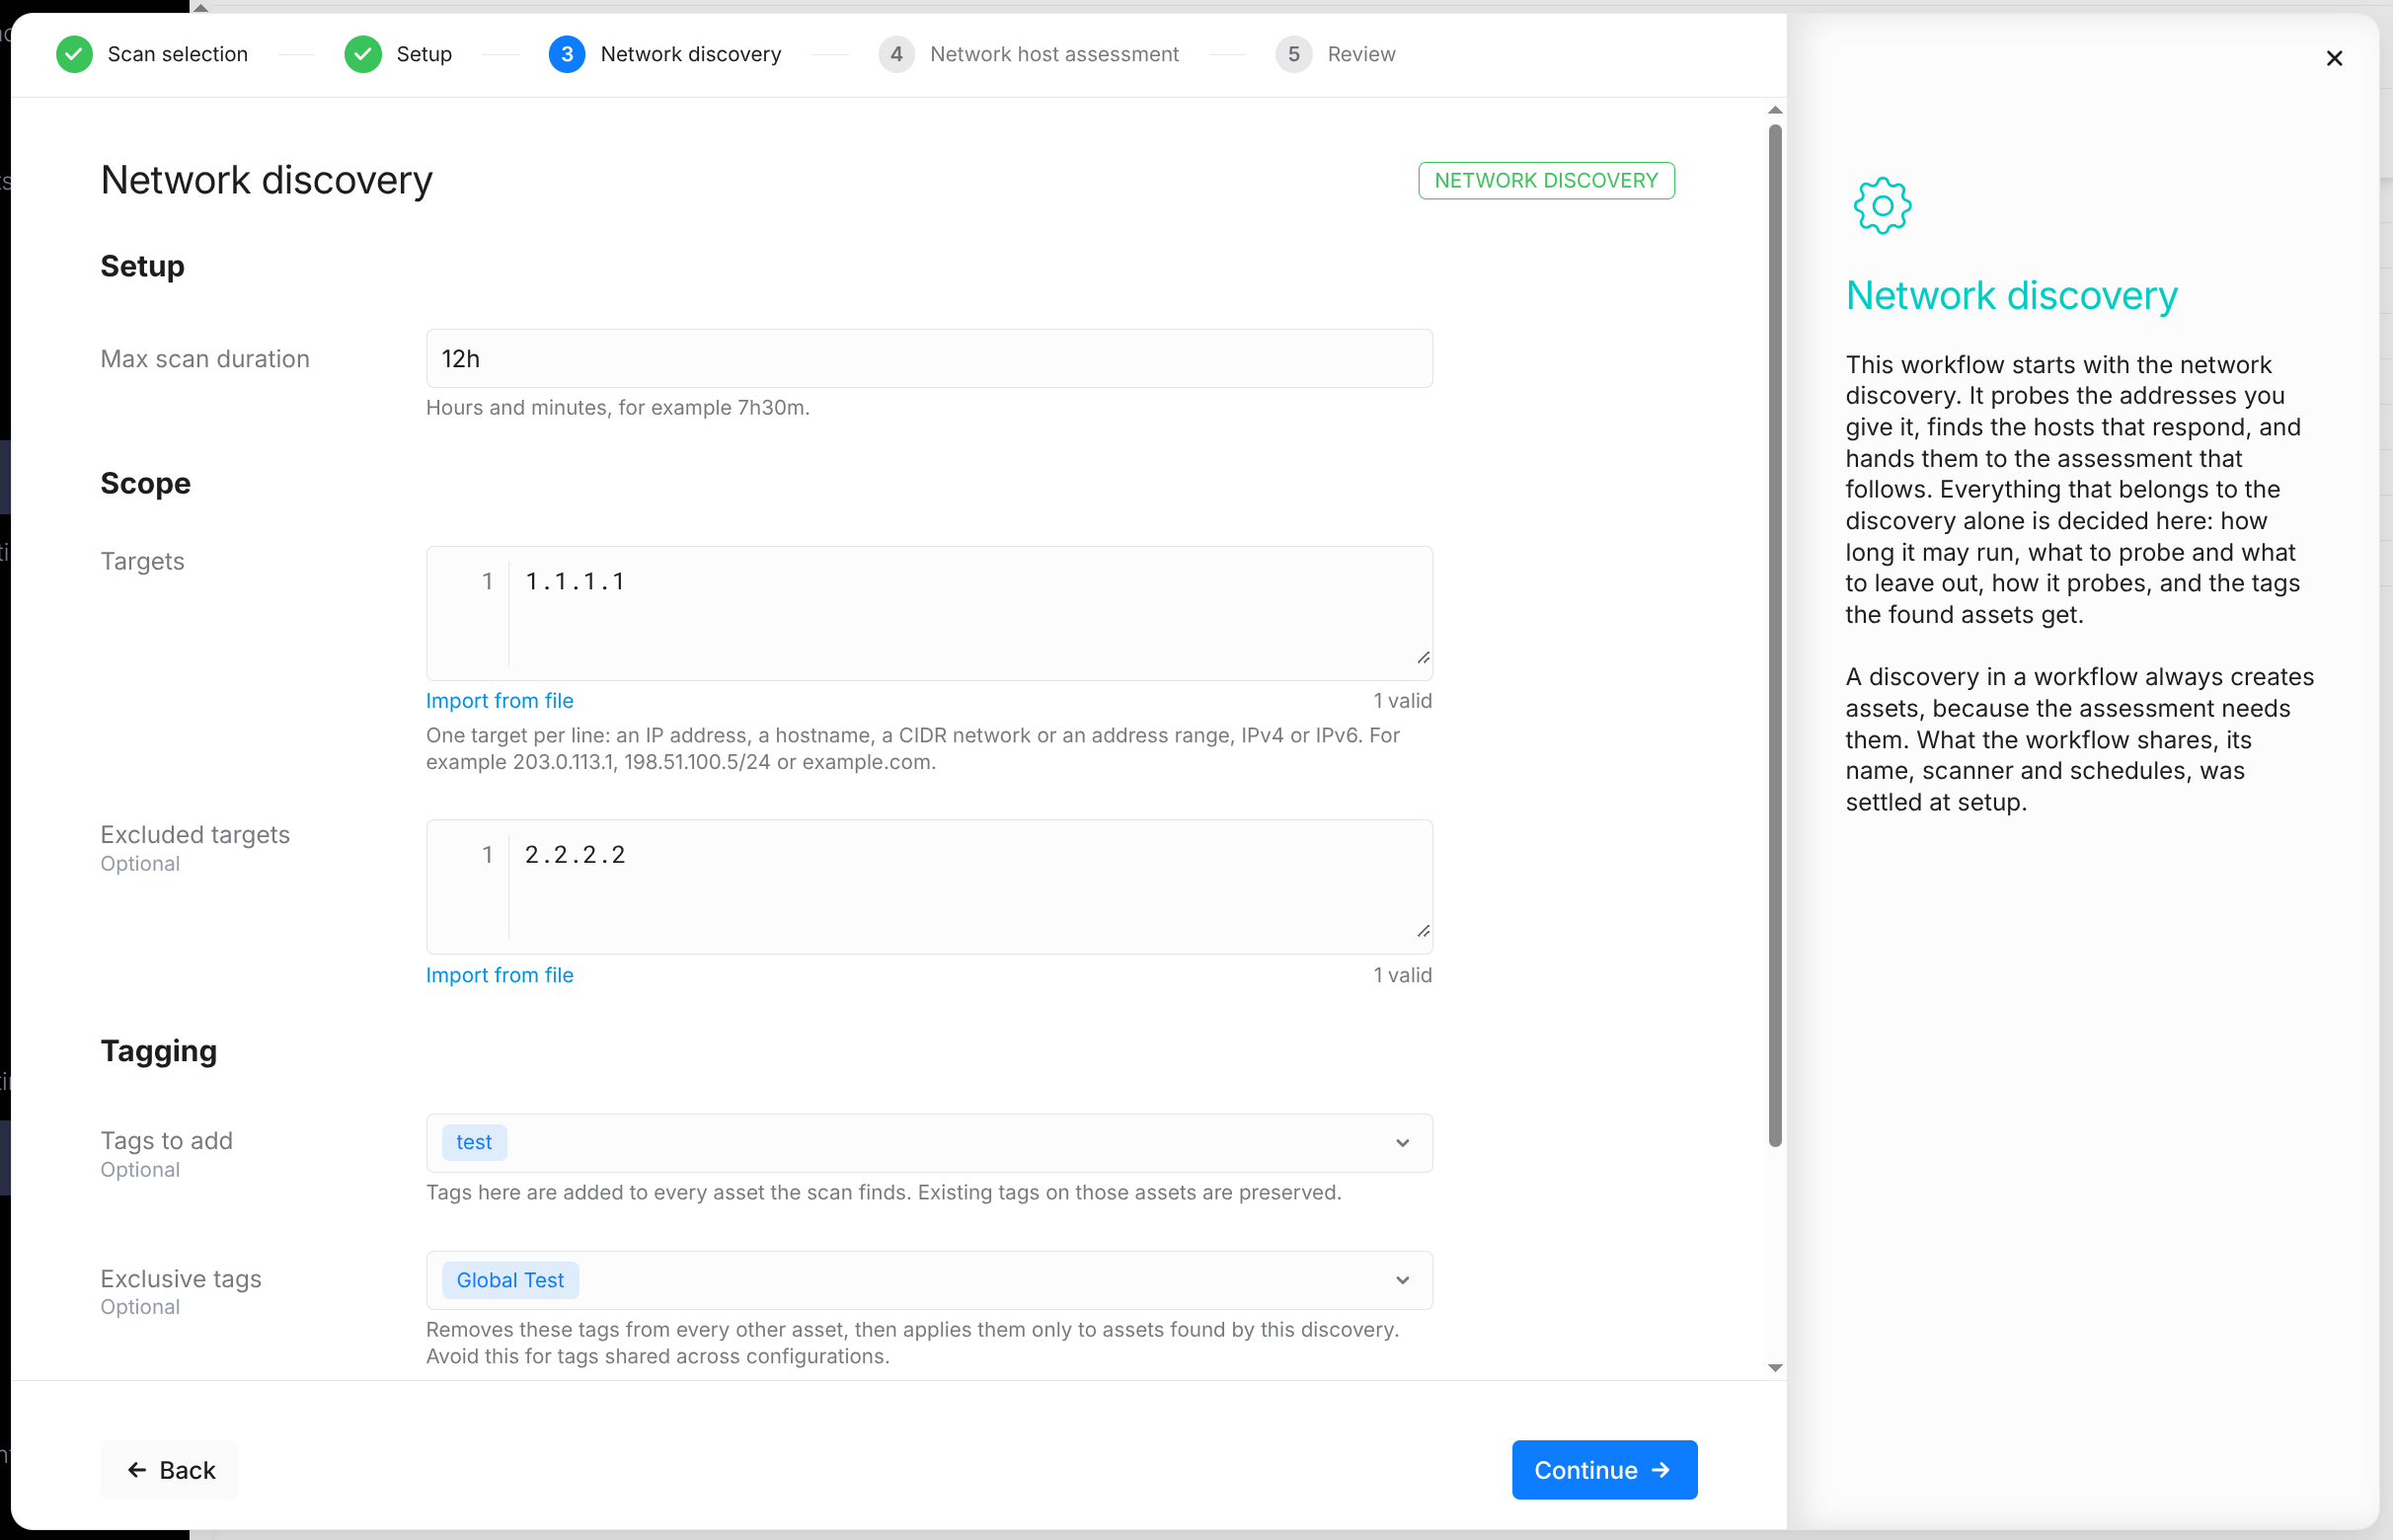
In a workflow, the discovery always creates assets from its results, because the assessment that follows needs them.
Exclusive tags are removed from all existing assets and added only to the discovered assets. Do not use exclusive tags for tags that are used across different configurations. For more information on discovery tagging, see Discovery Scan Configuration.
Network Host Assessment
-
Select a Scan policy.
-
Optionally, select an Override scan policy.
-
Optionally, select Ignore lists.
-
Optionally, click Edit on the Recommended settings card to change the scan duration, scanner settings, and concurrency limits.
-
Click the Continue button.
|
Field |
Description |
|---|---|
|
Scan policy |
The policy the assessment follows. The default scan policy is preselected. |
|
Override scan policy
|
A second policy that replaces individual settings of the scan policy. |
|
Ignore lists
|
Lists of known and accepted targets kept out of the results. |
|
Max scan duration |
How long the assessment may run. The value must be between 2 and 12 hours, or up to 24 hours on an appliance scanner. The default is 12 hours. |
|
Scanner settings |
Scanning-less scanning, Scan cloud assets without credentials, Ignore scanner on asset identifiers, and Scan all resolved IPs. |
|
Max concurrent scans |
The maximum number of scans that can run at the same time. Set the value to 0 for no limit. |
|
Max concurrent scans per asset |
The maximum number of scans that can run against a single asset at the same time. Set the value to 0 for no limit. |
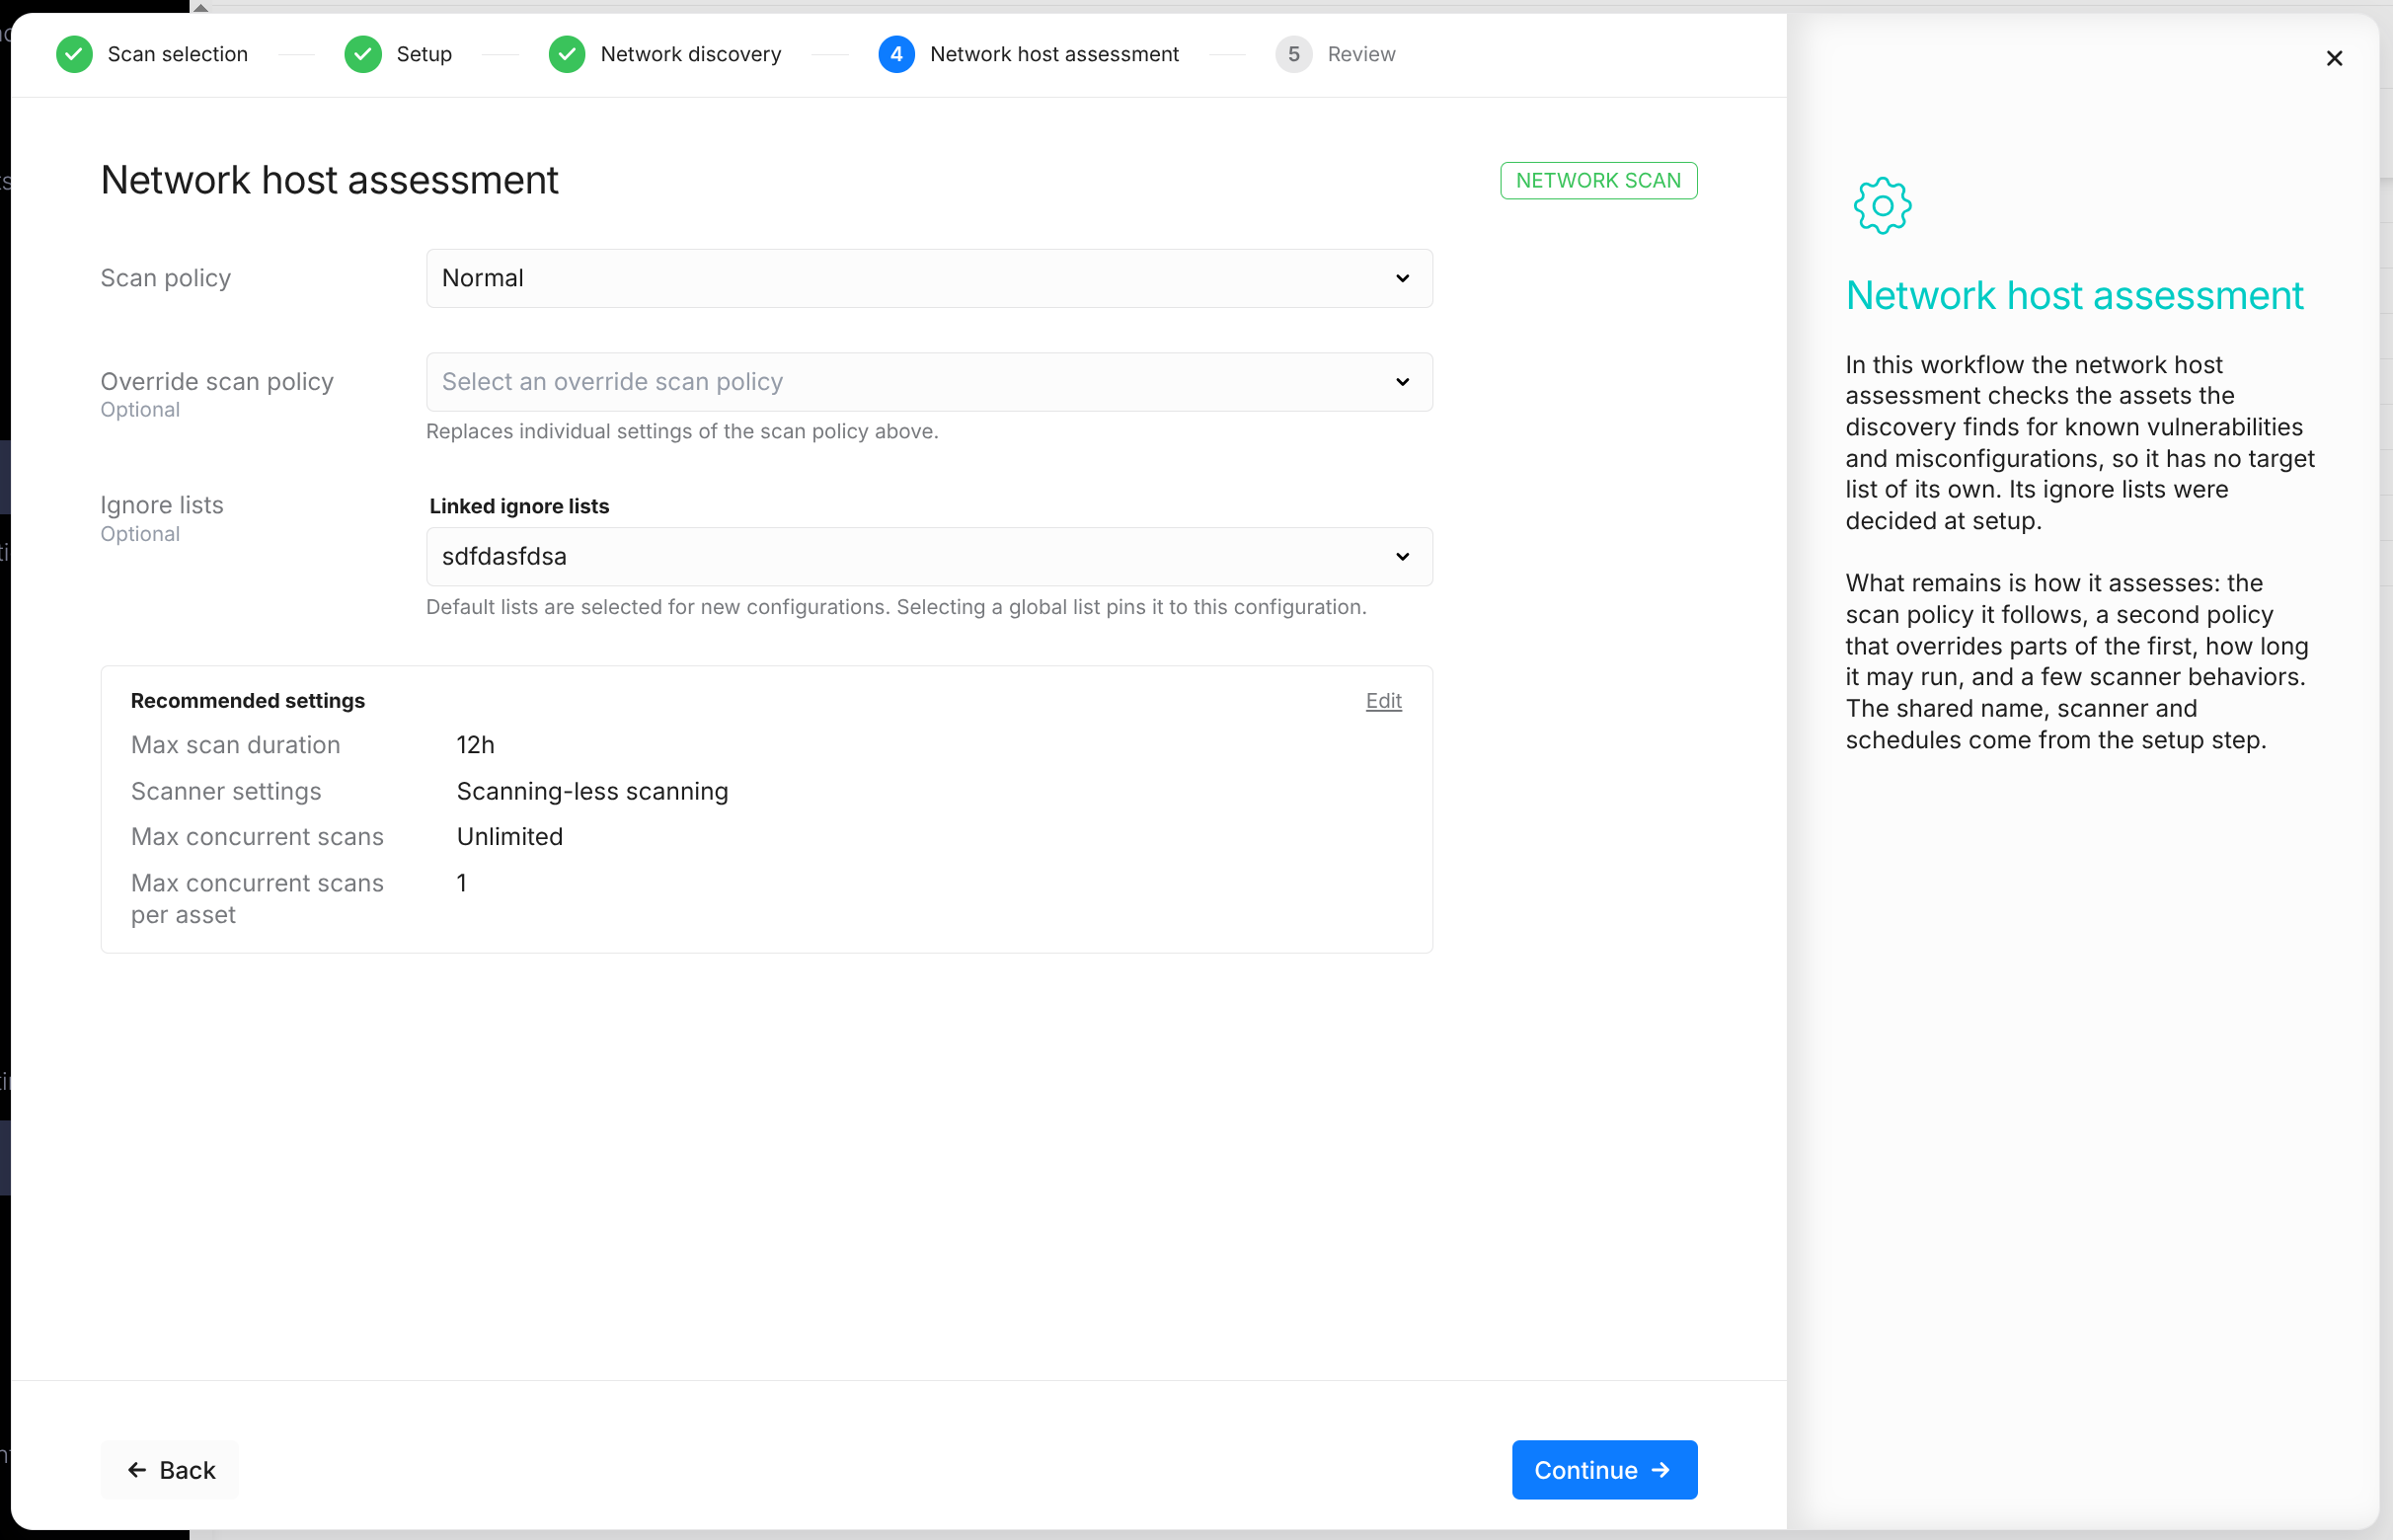
The assessment checks the assets found by the discovery, so it has no targets of its own. When the network host assessment is the first step of the workflow (Network host assessment → Application assessment, or a Network host assessment on its own), the step also contains Asset tags: every asset that carries all the selected tags is assessed. For more information, see Network Host Assessment.
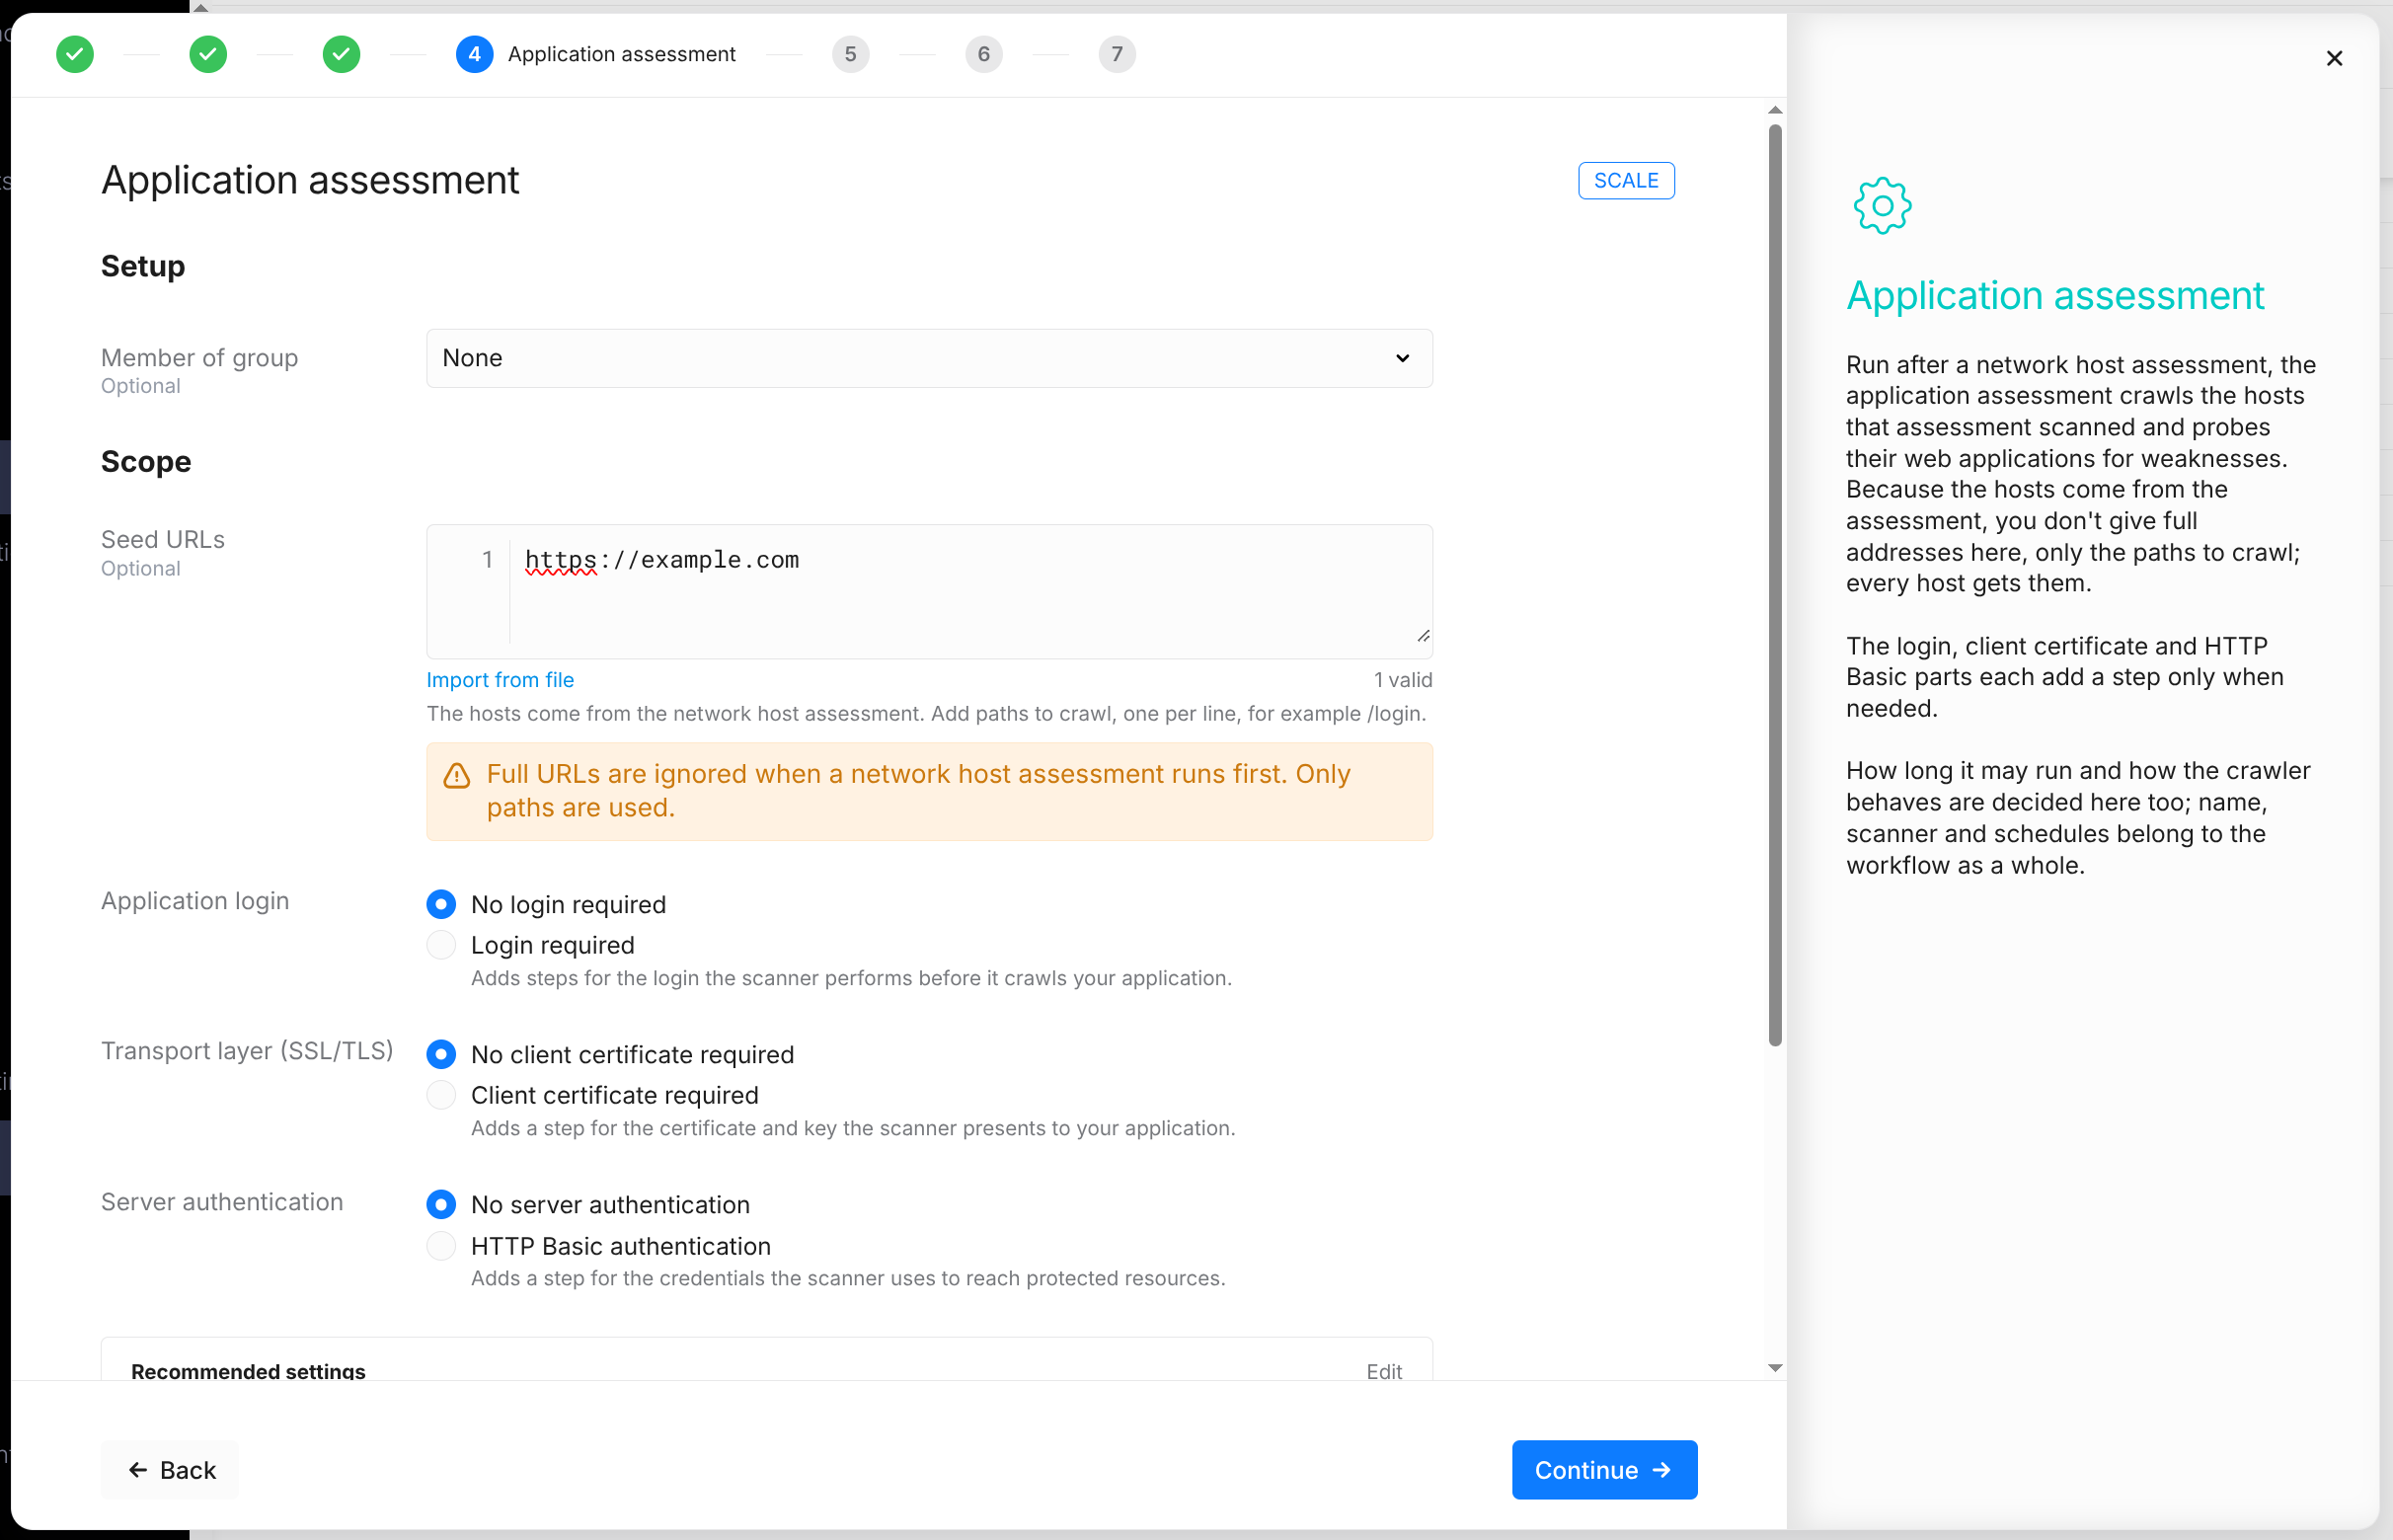
Application Assessment
-
Optionally, select a group in Member of group.
-
Enter the Seed URLs.
-
Select whether the application requires a login, a client certificate, or HTTP Basic authentication.
-
Select whether to use request filters and host maps.
-
Optionally, enter the API specification.
-
Optionally, click Edit on the Recommended settings card to change the scan duration and crawler settings.
-
Click the Continue button.
|
Field |
Description |
|---|---|
|
Member of group |
The group the scan configuration belongs to. |
|
Seed URLs |
Where the crawl starts. In a workflow, the hosts come from the network host assessment, so only paths are entered, one per line, for example /login. Full URLs are ignored, and a warning is displayed if one is entered. |
|
Application login |
No login required or Login required. Login required adds the Authentication step. |
|
Transport layer (SSL/TLS) |
No client certificate required or Client certificate required. Client certificate required adds the Transport layer step. |
|
Server authentication |
No server authentication or HTTP Basic authentication. HTTP Basic authentication adds the Server authentication step. |
|
Request filters |
No request filters or Use request filters. Use request filters adds the Request filters step. |
|
Host maps |
No host maps or Use host maps. Use host maps adds the Host maps step. |
|
API specification |
The address of an OpenAPI 3 specification in JSON or YAML. The API endpoints are then tested as well. Displayed only when available for the account. |
|
Recommended settings |
Max scan duration (between 30 minutes and 24 hours), Include infrastructure scan, Scan intensity, Vulnerability testing (fuzzing), User agent, and, depending on the scanner, Enhanced crawling. |
The application assessment continues with the following steps, each displayed only when selected above:
|
Step |
Description |
|---|---|
|
Transport layer |
The Certificate and Private key in PEM format, and an optional Passphrase. |
|
Server authentication |
The Username, Password, and URL prefix whose requests carry the credentials. |
|
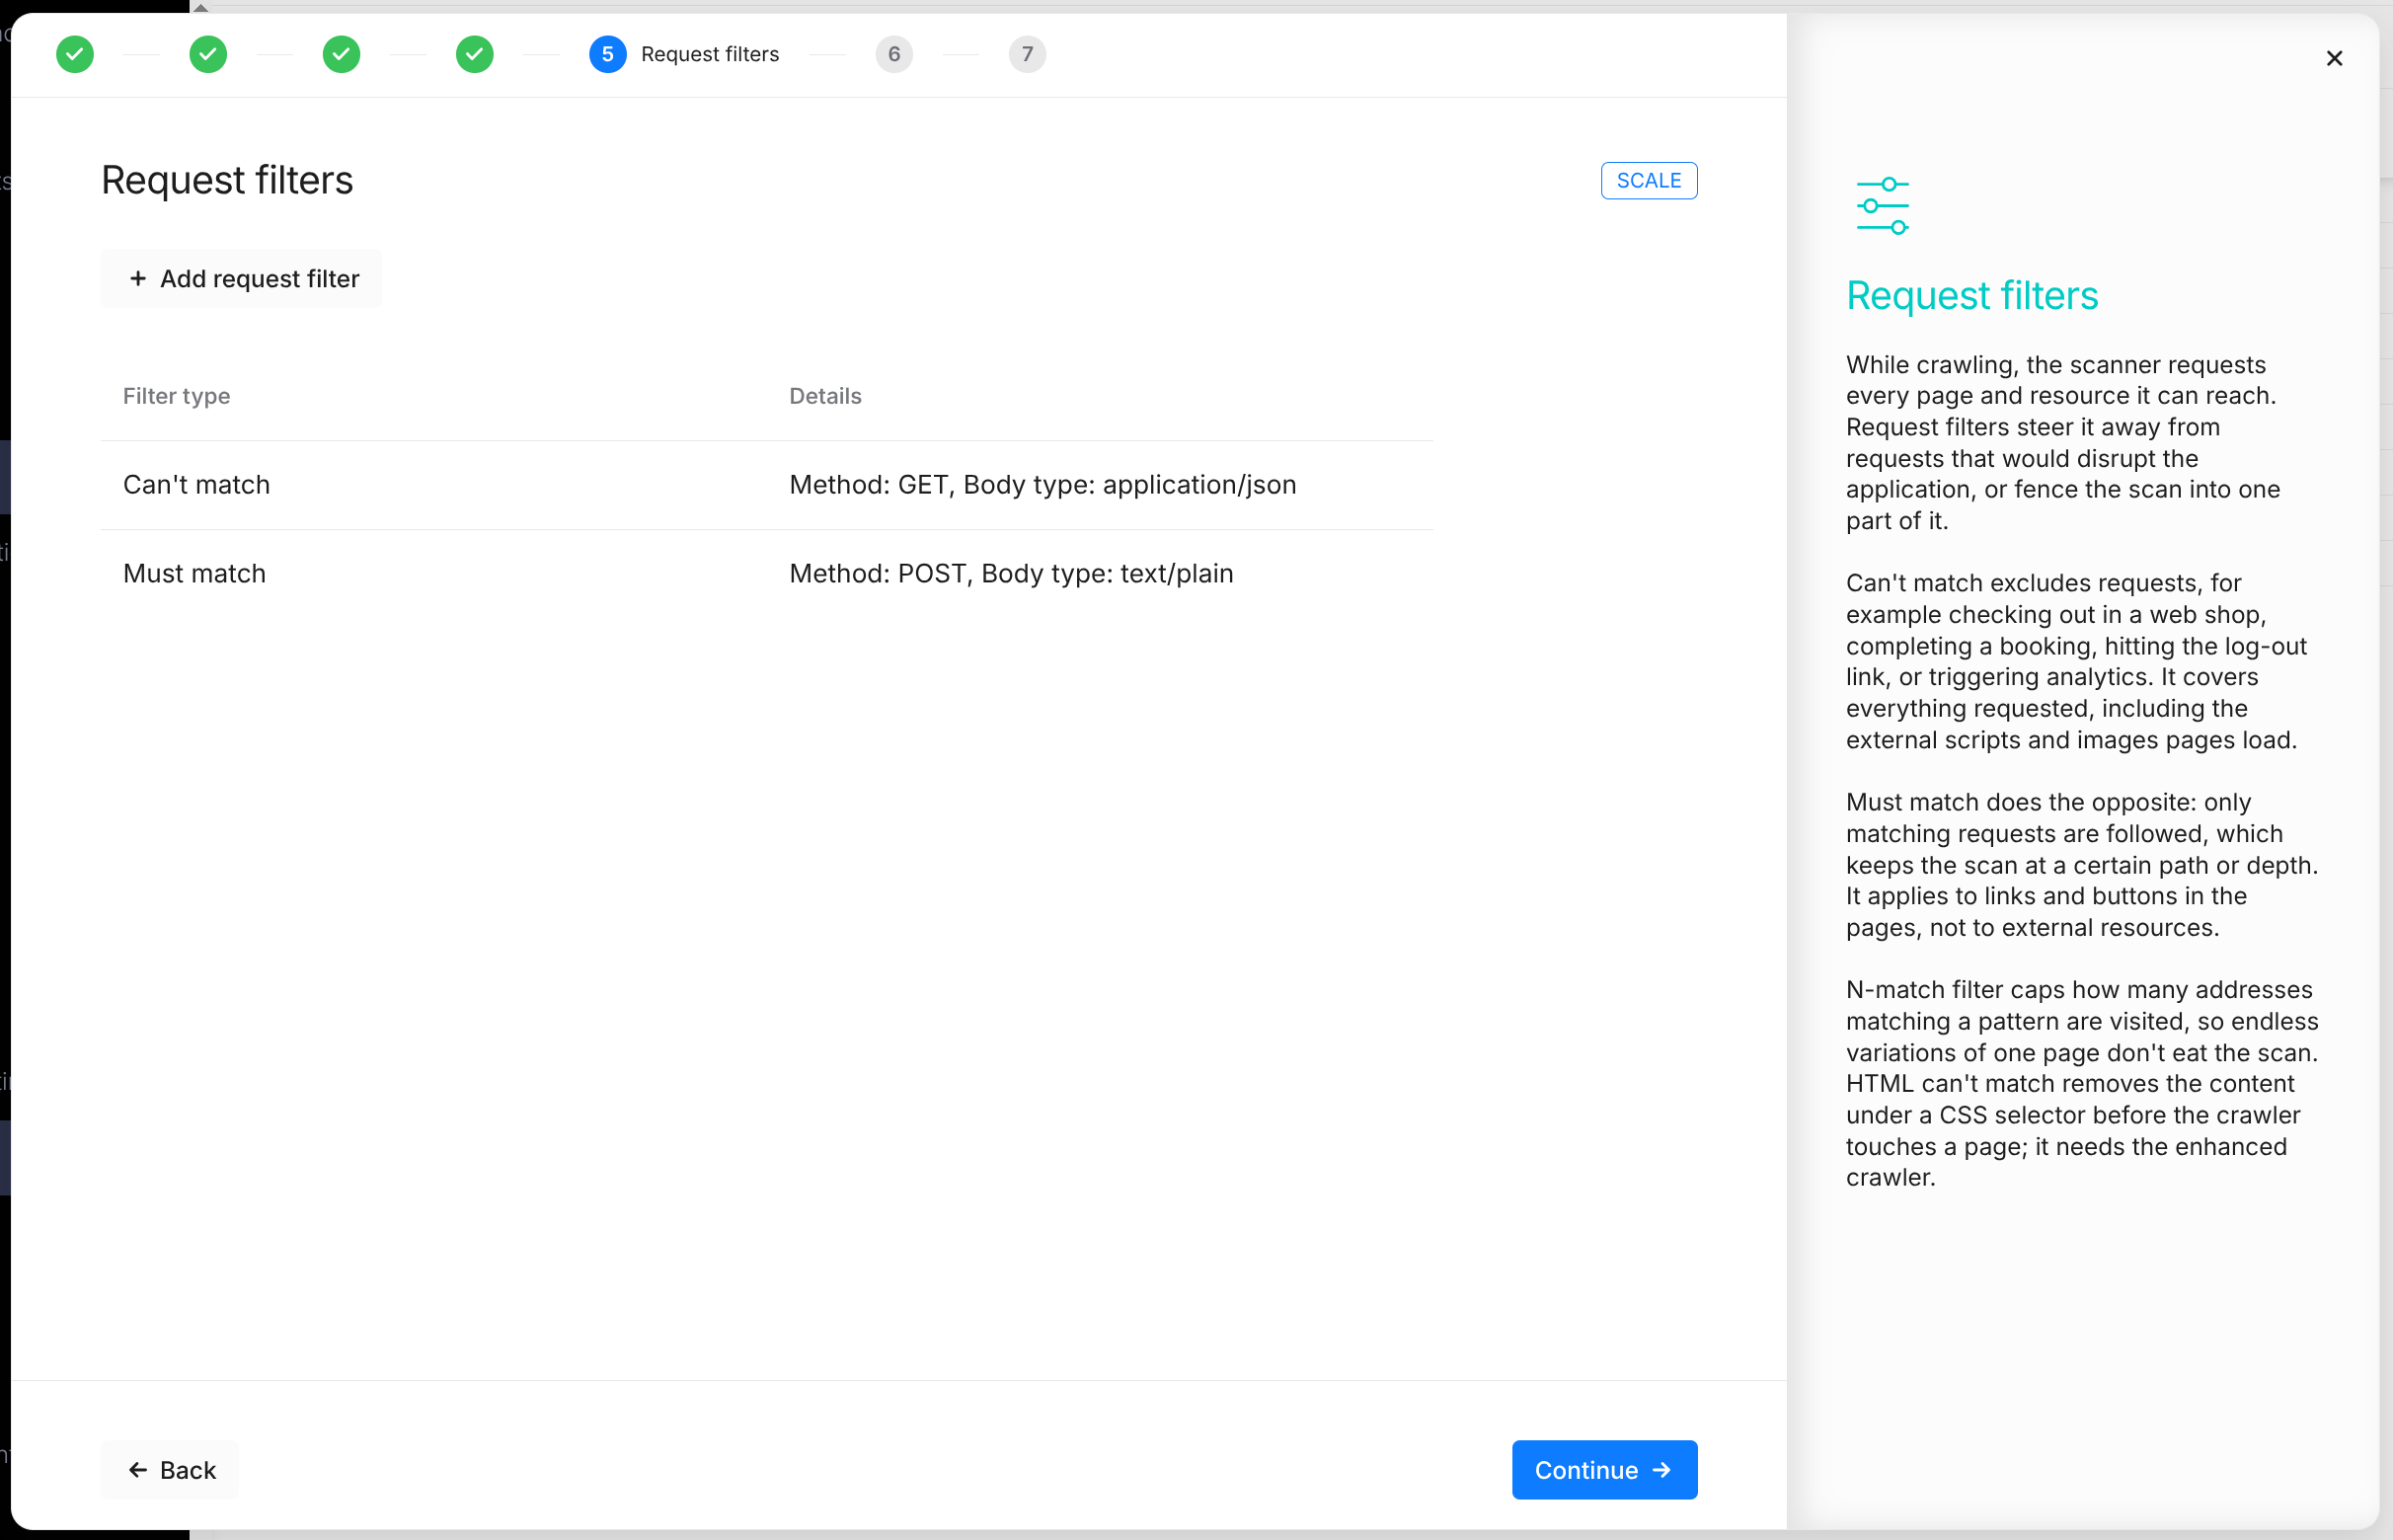
Request filters |
Filters that limit what the scanner requests. Click Add request filter to add one. Right-click a filter and select Edit or Delete from the context menu. |
|
Host maps |
Mappings from a host name to one or more IP addresses. Click Add host map to add one. Right-click a host map and select Edit or Delete from the context menu. |
Switching Request filters or Host maps back to No request filters or No host maps removes the entered filters or host maps when the workflow is saved.
Selenium will no longer be supported after January 31, 2027. A warning is displayed when Selenium is selected, and saving a workflow that uses a Selenium login asks for confirmation first. Migrate configurations with Selenium authentication to another type before the deadline.
Authentication
The Authentication step is displayed when Login required is selected.
-
Select the Authentication type.
-
Fill in the authentication configuration.
-
Optionally, enter a Scan abort pattern.
-
Click the Continue button.
|
Authentication type |
Description |
|---|---|
|
Login form |
A standard web login form: Username, Password, the HTML names of the Username field and Password field, and the Login URL. |
|
AI-assisted login |
The login steps described in plain language, including the login URL, and optional Credentials. |
|
Playwright |
A Playwright script for complex login flows, written in the editor or uploaded, and optional Credentials. |
|
Selenium |
A recorded Selenium script, pasted or uploaded. |
|
Lua |
A Lua script for logins that the other types can't handle. Examples and a Lua API reference are available in the step. |
The Scan abort pattern is available for every type except AI-assisted login. When the pattern appears in a response, the scanner treats the session as logged out.
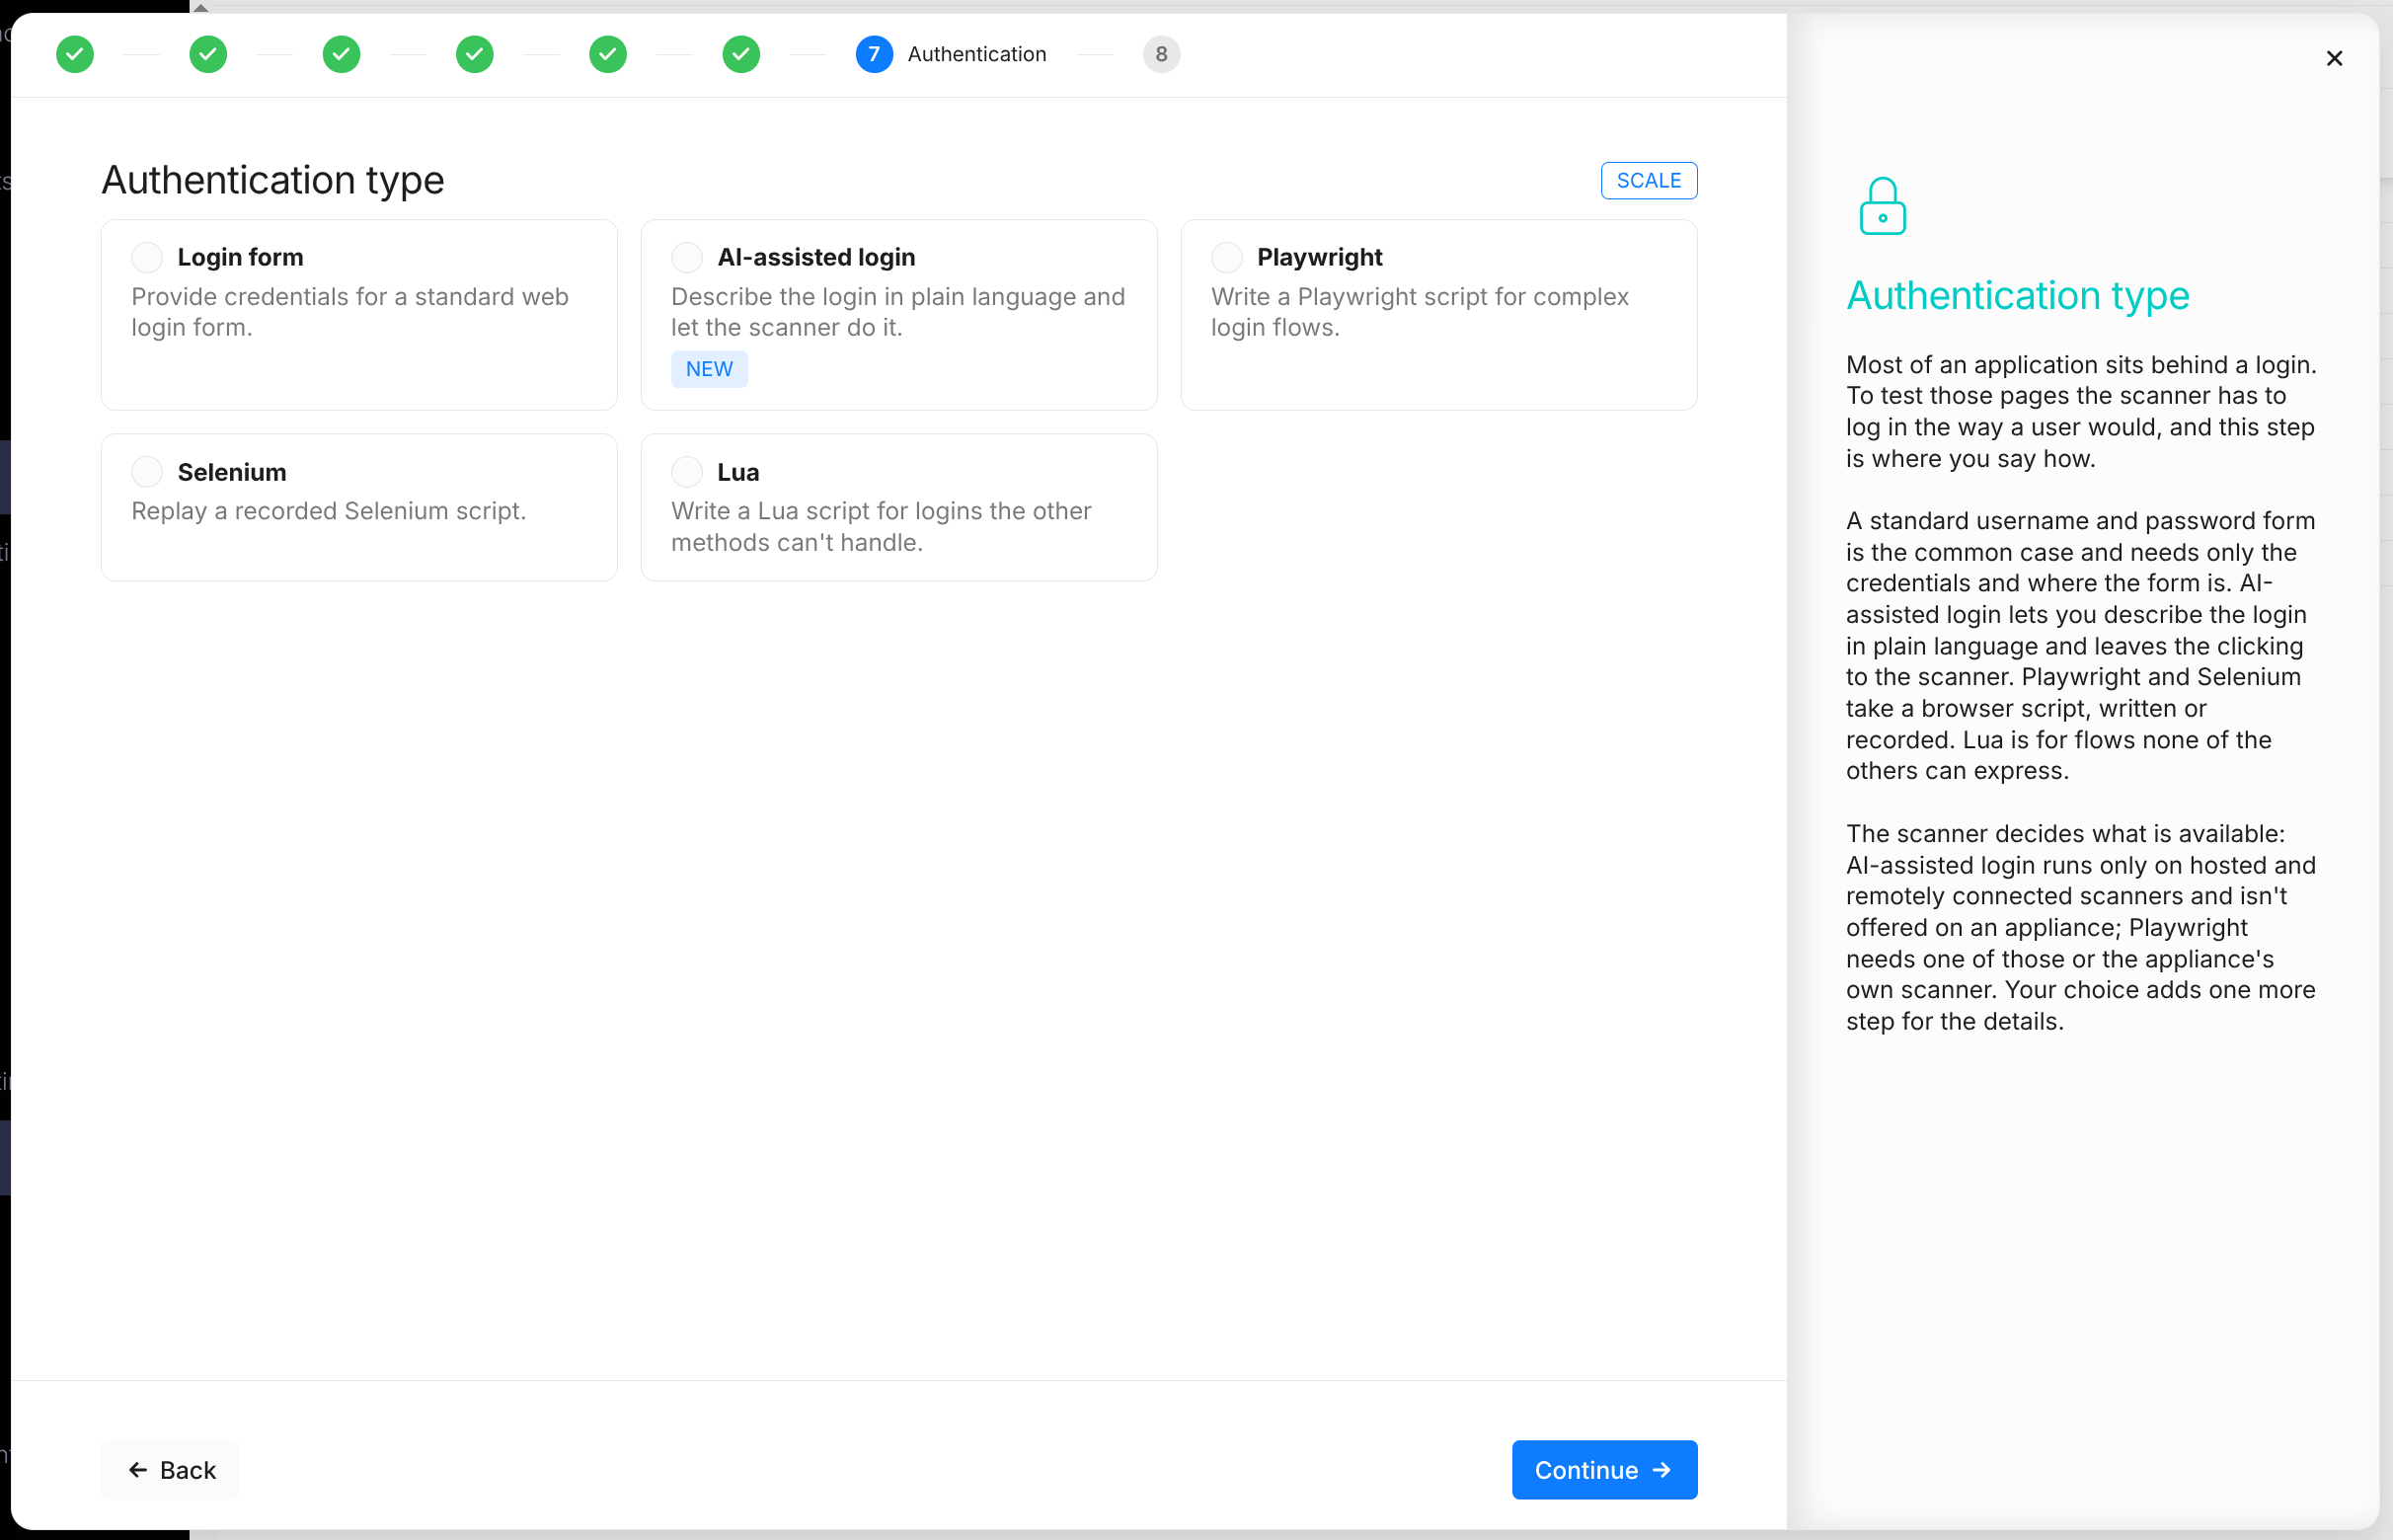
AI-assisted login and Playwright are not available for every scanner, and AI-assisted login is not available on an appliance. Hover over a disabled type to display the reason.
Reports
The Reports step comes right before Review. It lists the reports of the workflow; after each run, every report is created from the assets scanned in that run.
-
Click a report type to add a report: Vulnerability report, Solutions report, or Delta report.
-
Fill in the report details in the dialog.
-
Optionally, click Edit on the Advanced settings card to change the delivery and file settings.
-
Click the Add report button.
-
Repeat for more reports, then click the Continue button.
|
Report type |
Description |
|---|---|
|
Vulnerability report |
A full list of the current vulnerabilities on the assets the workflow scans. |
|
Solutions report |
A list of remediation actions for those vulnerabilities. |
|
Delta report |
What changed on the scanned assets over the past year. |
|
Field |
Description |
|---|---|
|
Name |
The name of the report. It is prefilled with the report type and the workflow name, for example Vulnerability report - Weekly scan, and follows the workflow name until it is changed. |
|
Detail level |
Management (executive summary and totals), Summary (totals plus a finding table), or Detailed (every finding with full details). |
|
Executive summary |
Whether the report includes an executive summary. |
|
Timeframe |
The period the report covers: last day, week, month, quarter, or year, all time, or a custom range. |
|
View template |
Optionally, a saved view template that filters the findings in the report. |
|
Delivery |
Save in report library or Email to users. On HIAB, the report is emailed by default, or can be uploaded to the Outscan report library instead. |
|
Recipients, Subject, and Message |
For email delivery: the users or addresses that receive the report, and the email text. |
|
Library name and Tags |
For report library delivery: the name and tags of the report in the library. |
|
Format, Compression, and Password |
The file formats (PDF, Excel, XML), whether the file is zipped, and an optional password. |
To copy the settings of an existing scheduled report, click Start from an existing report at the top right of the step, select a report, and click Use this report.
Right-click a report in the list and select Edit or Remove from the context menu to change or remove it.
-
With two or more scan types, reports are optional.
-
With a single scan type, at least one report is required. Add at least one report. A workflow with a single scan type needs one. is displayed until one is added.
-
Users who can only view scheduled reports see the workflow's reports but can't add, change, or remove them. Users without access to scheduled reports don't see the step.
Review
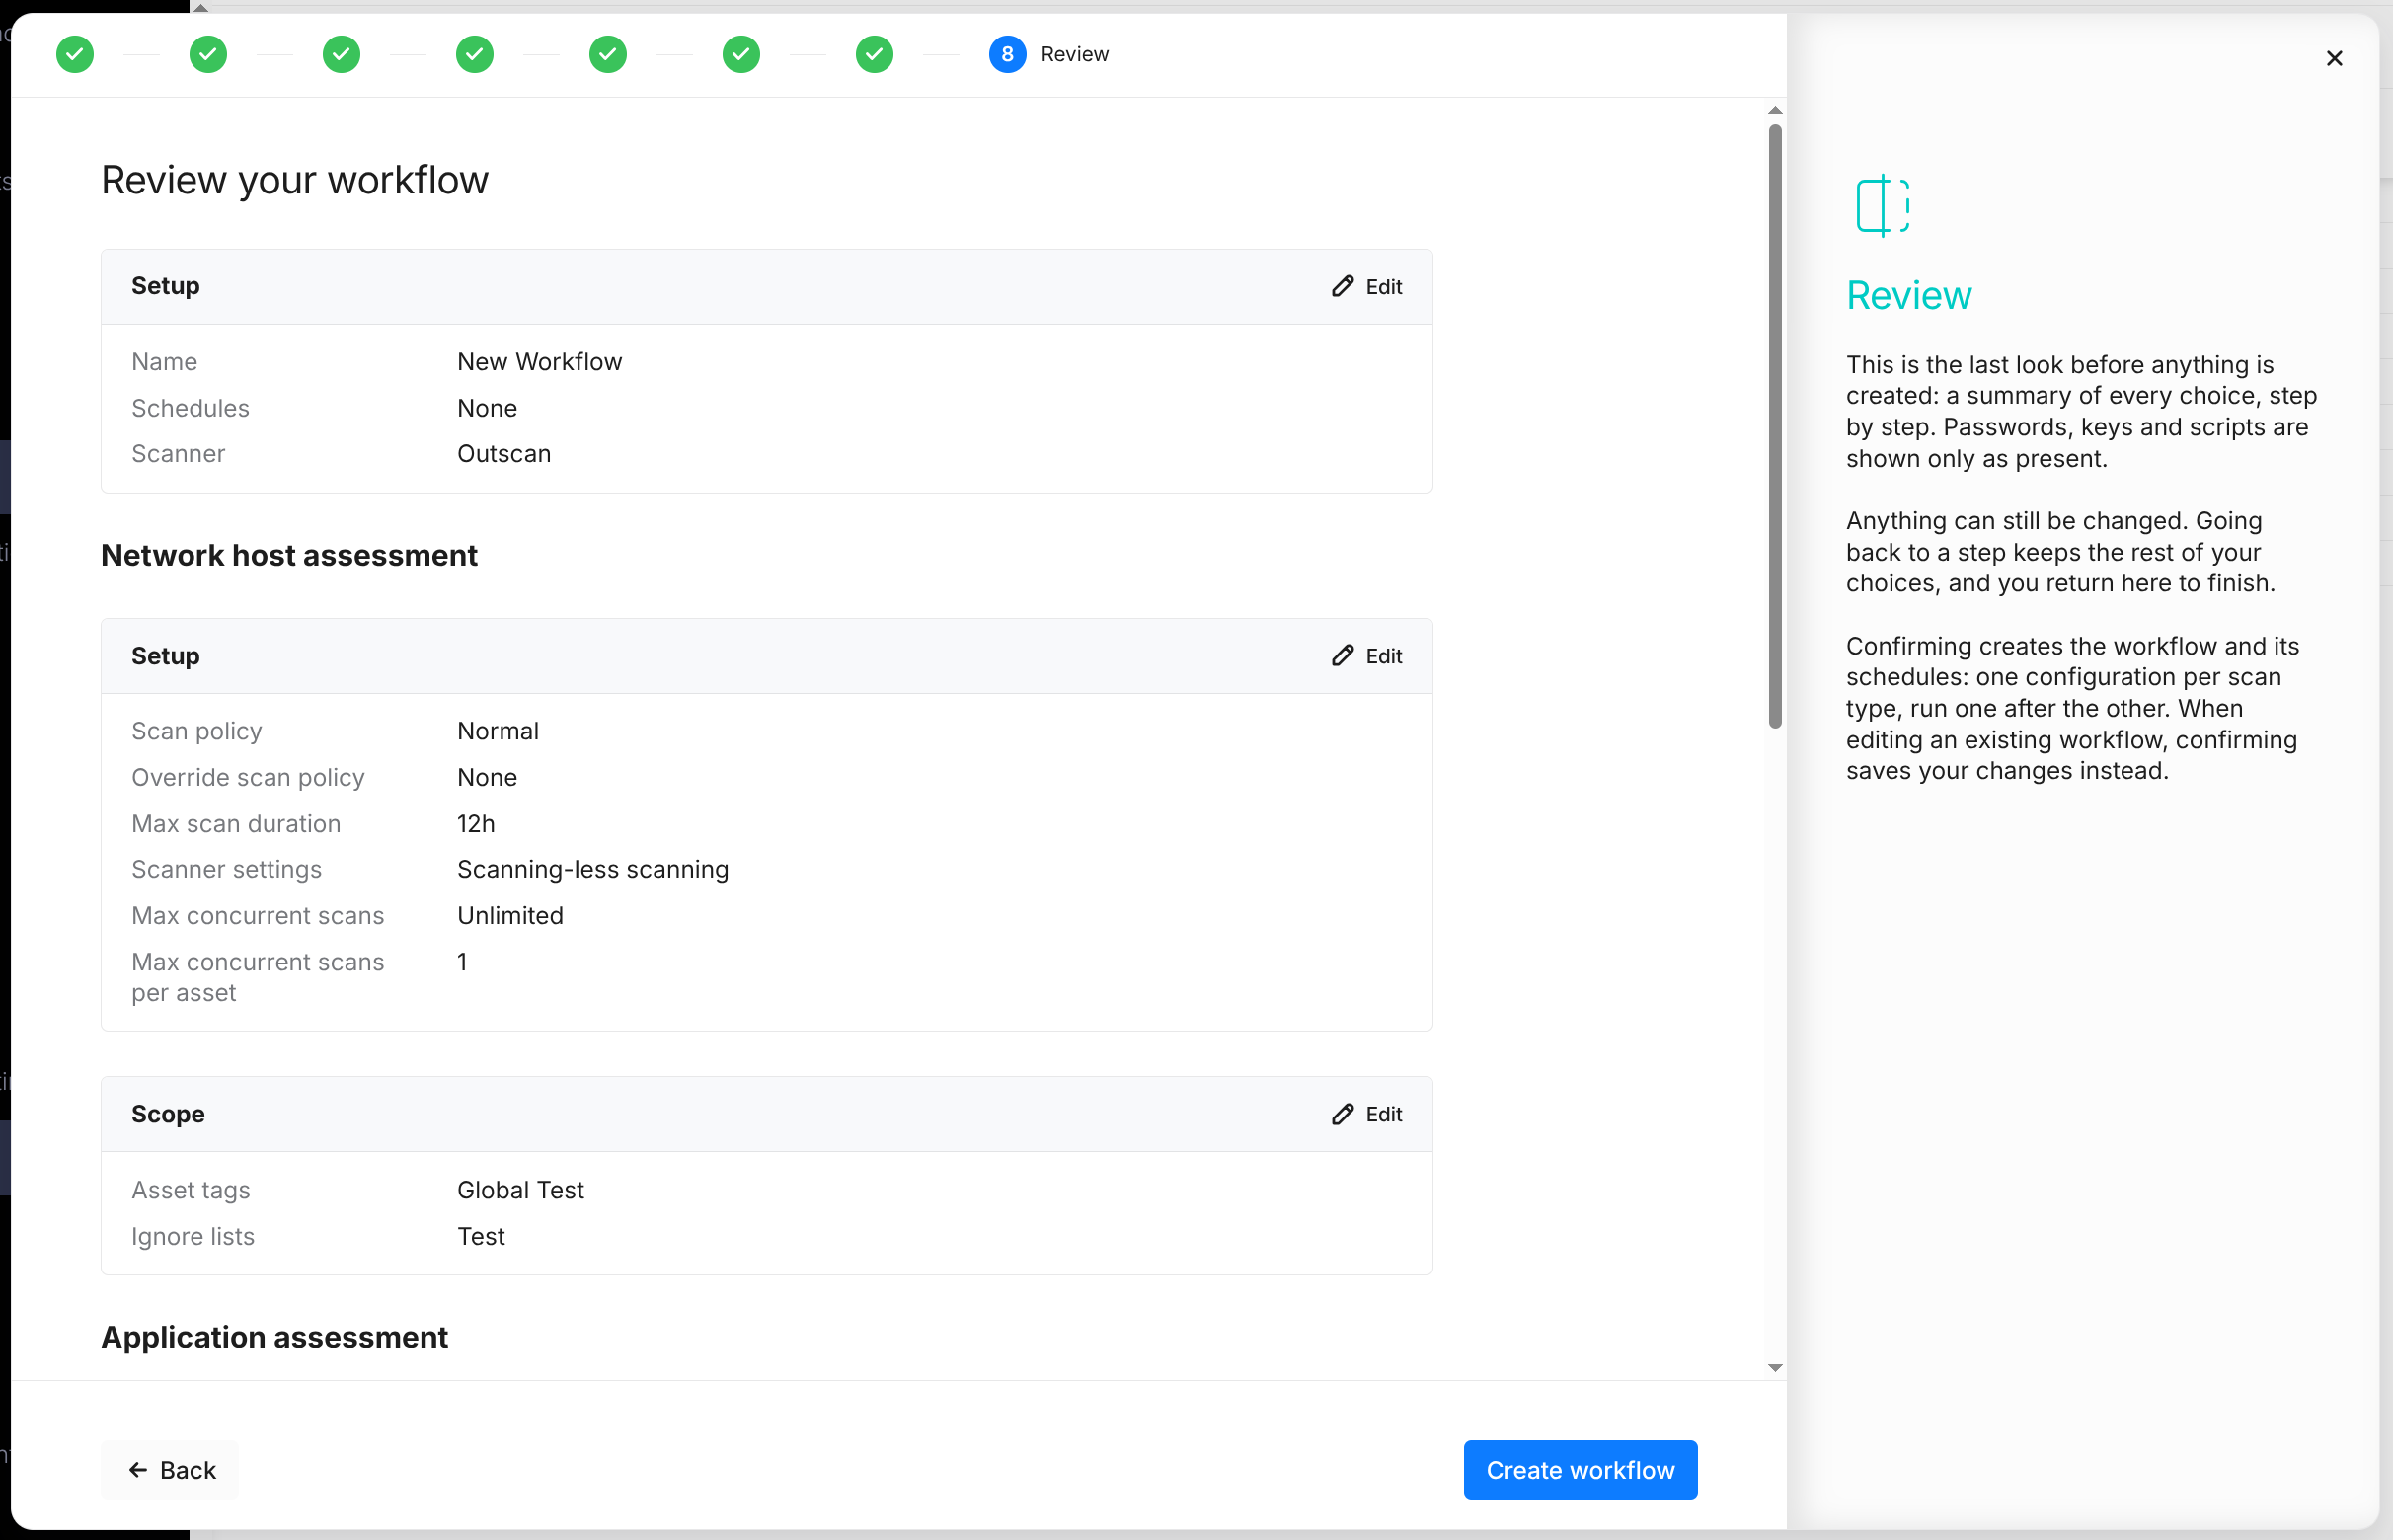
The Review step summarizes every choice, grouped by step and scan type, including the reports. Passwords, keys, and scripts are shown only as Provided. Click Edit on a card to return to that step; the other choices are kept.
-
Click the Create workflow button.
One scan configuration is created per scan type, together with the workflow that runs them and its reports. Scan workflow created. is displayed, and the workflow is displayed in the table.
Other Scan Types
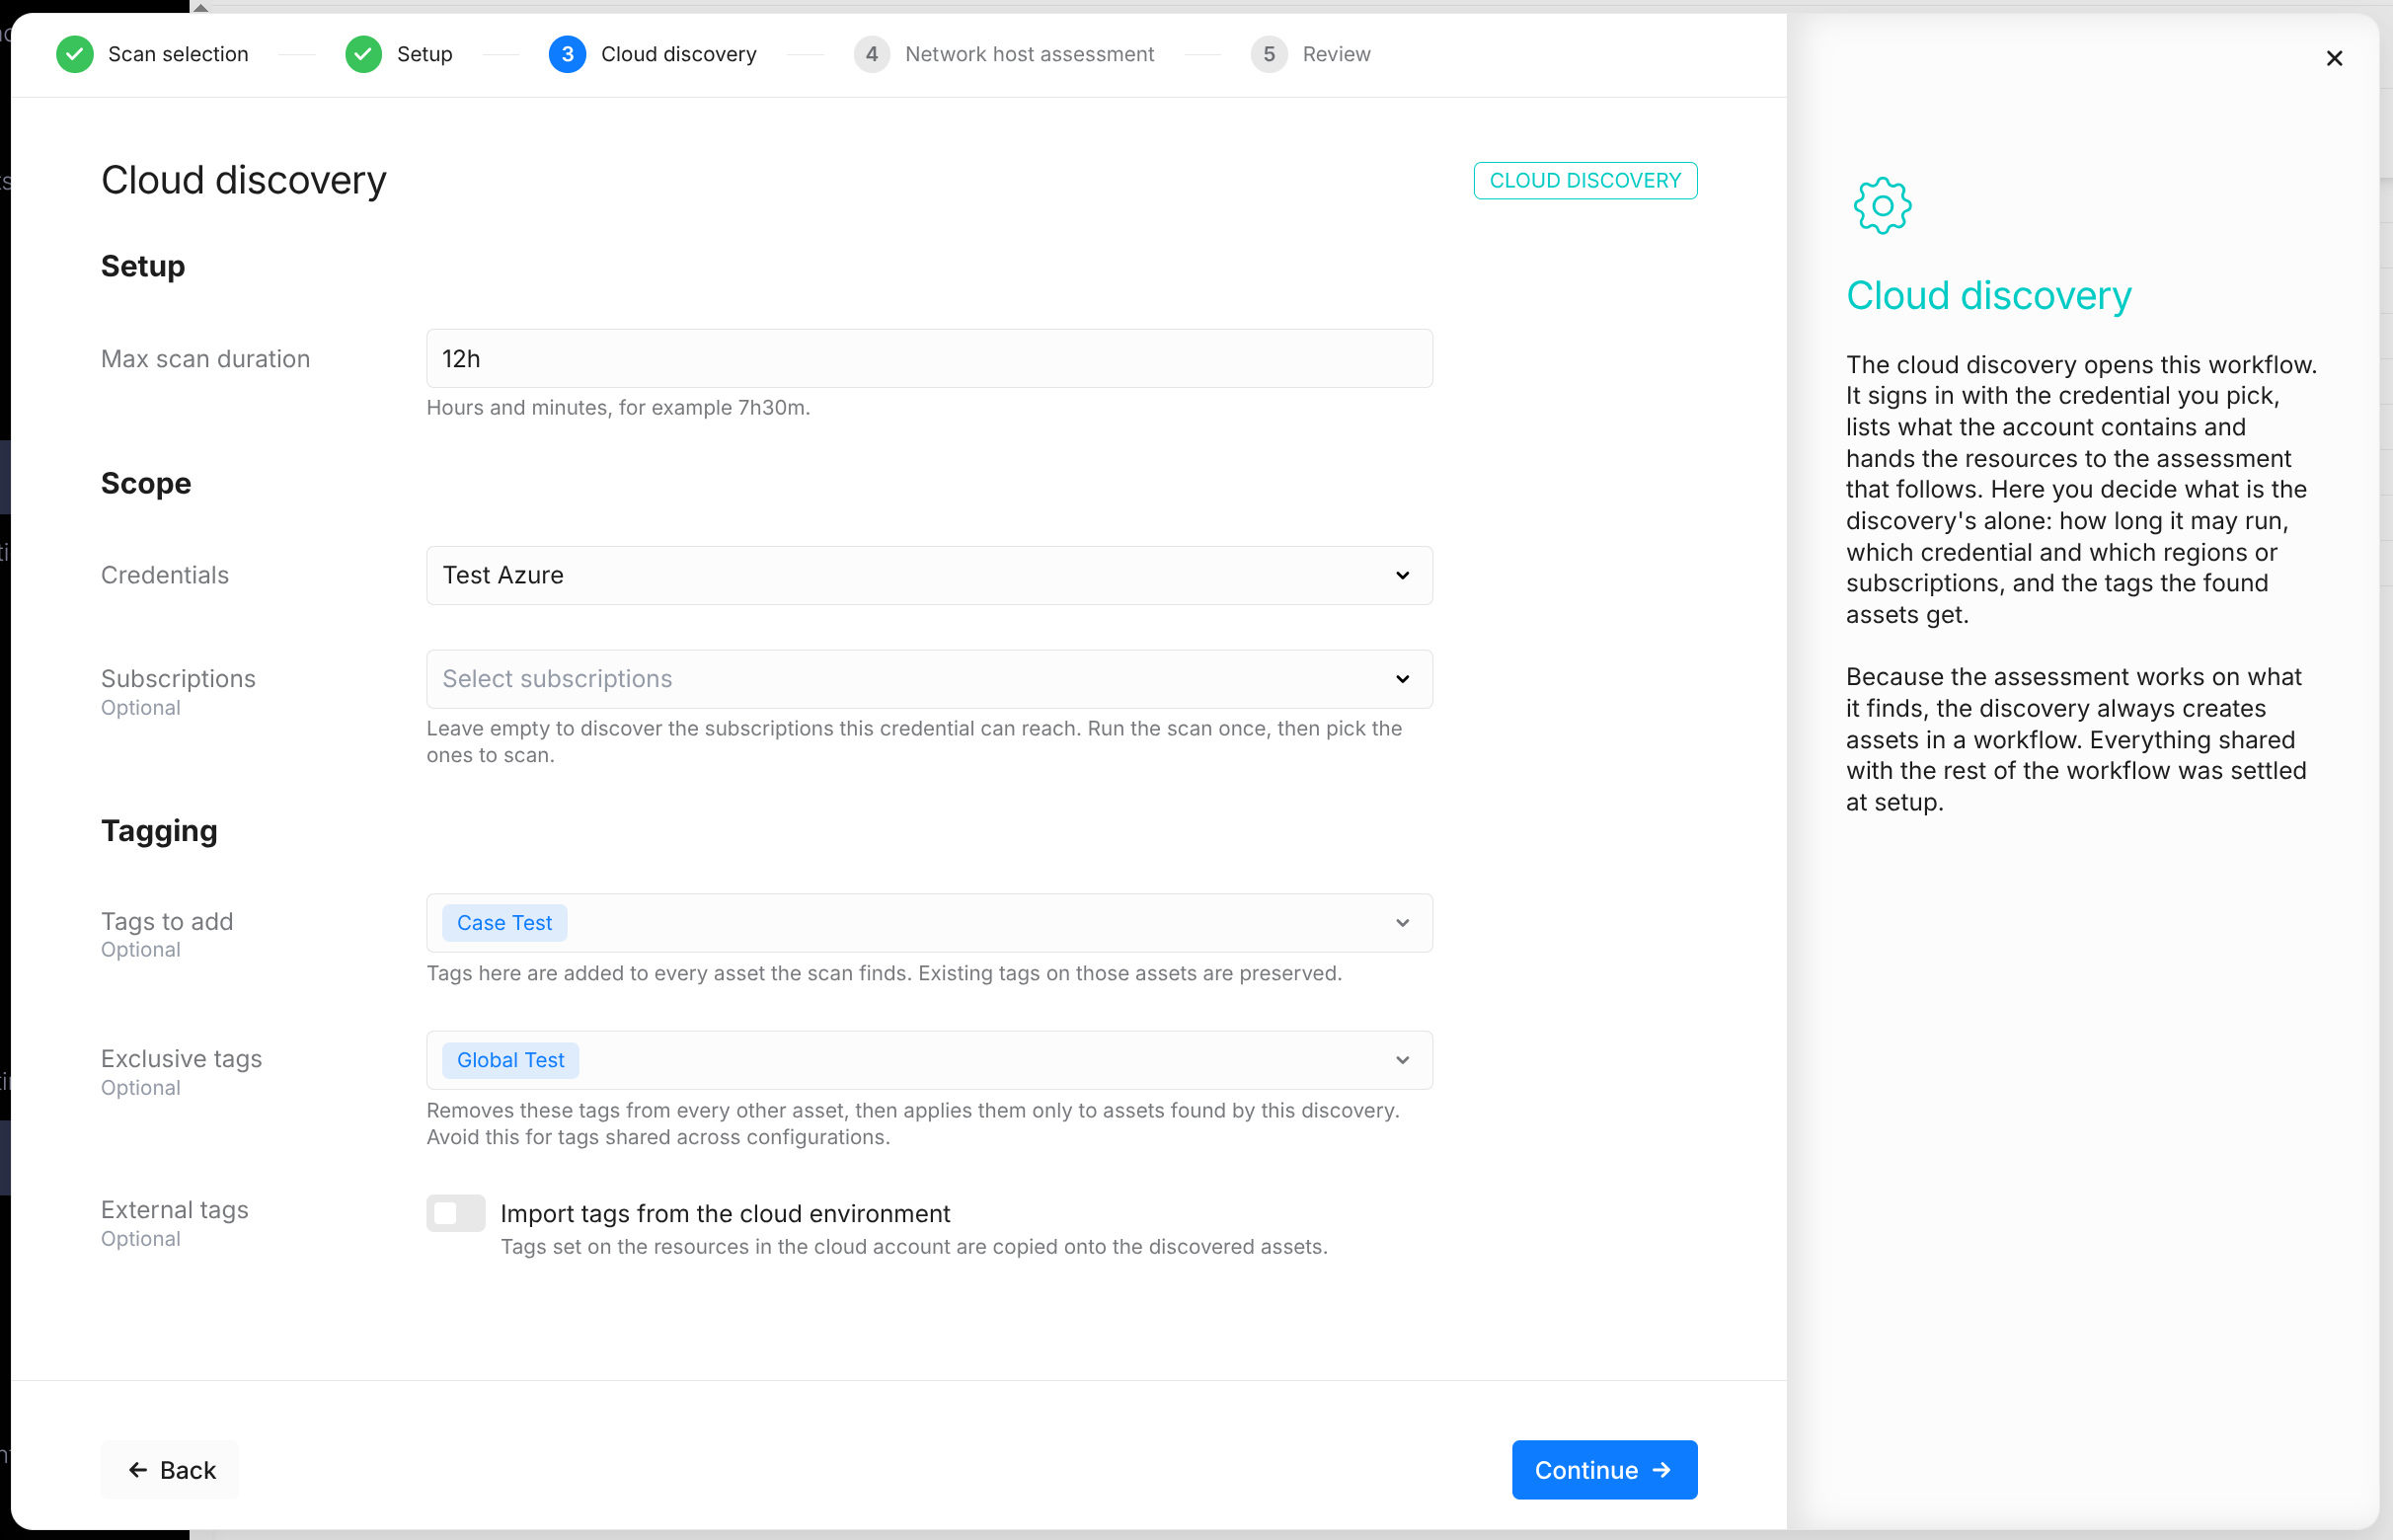
Cloud discovery replaces the network discovery in a cloud workflow.
|
Field |
Description |
|---|---|
|
Max scan duration |
How long the discovery may run. The value must be between 30 minutes and 24 hours. |
|
Credentials |
The cloud credential to use. To create one without leaving the wizard, click Create new credential in the drop-down. The credential type decides the provider. |
|
Regions |
AWS only. The regions to discover. At least one region is required. |
|
Subscriptions |
Azure only. The subscriptions to discover. Leave empty to discover the subscriptions the credential can reach, then select the ones to scan. |
|
Tags to add and
|
As for a network discovery. |
|
External tags |
Enable Import tags from the cloud environment to copy the tags set on the cloud resources onto the discovered assets. Optionally, list the tag keys to import, one per line; leave empty to import every tag. |
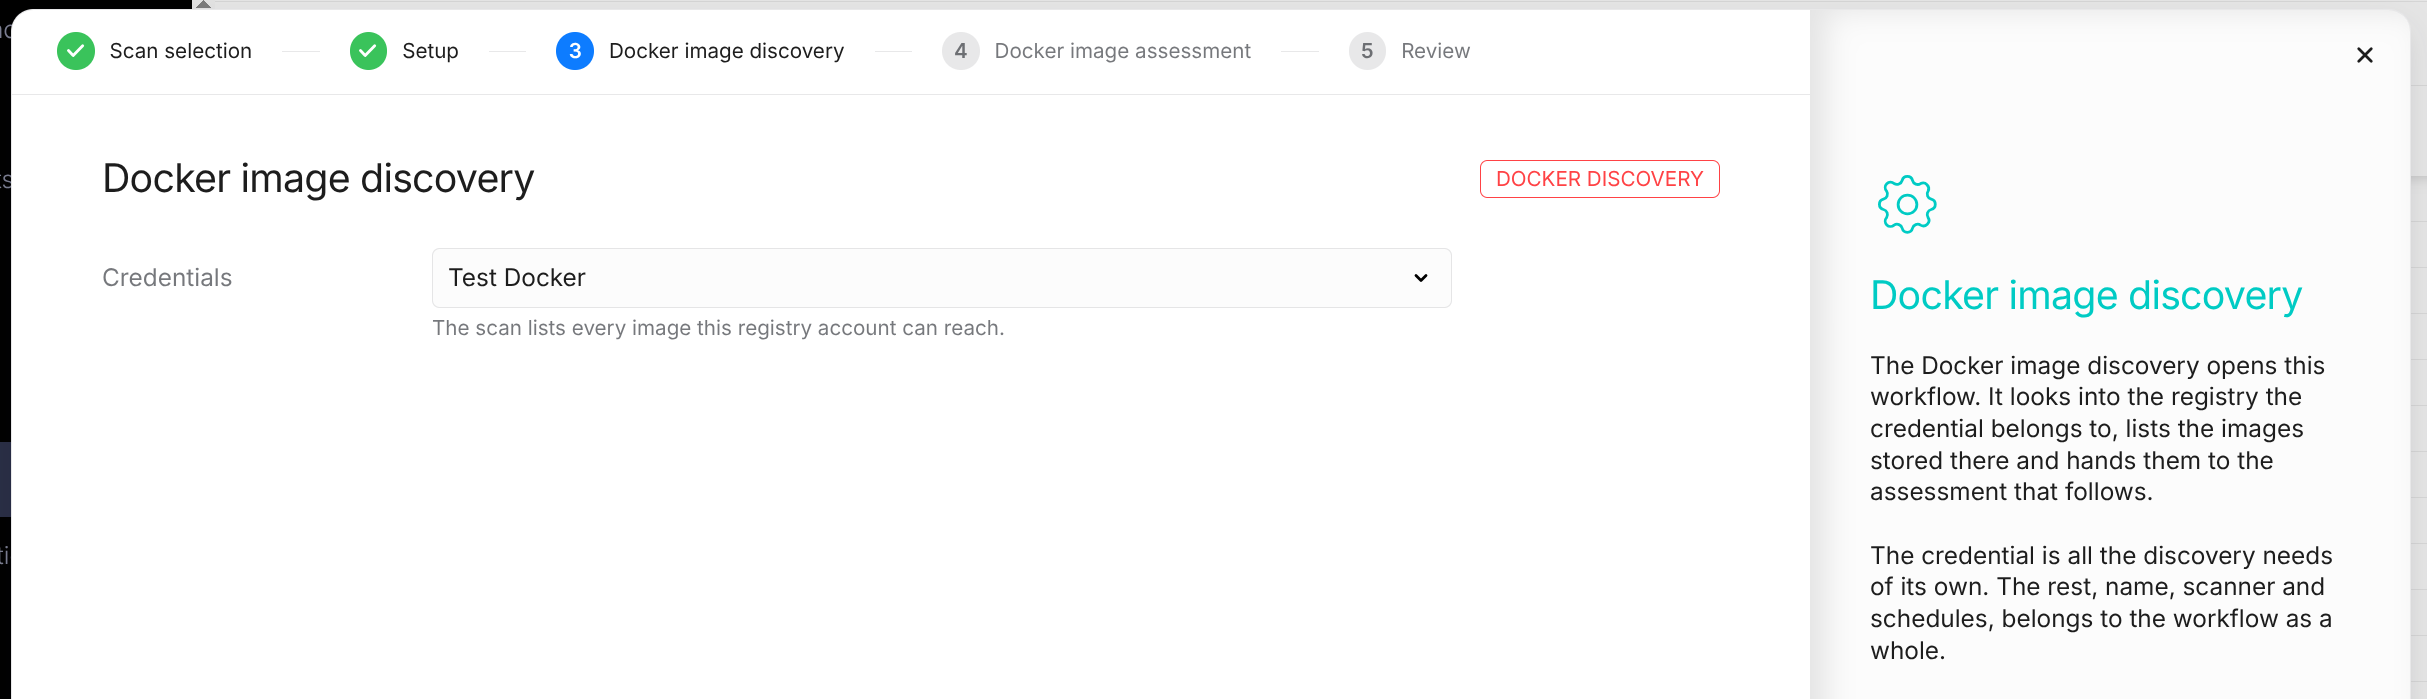
Docker image discovery → Docker image assessment is selected in the Docker category.
|
Step |
Description |
|---|---|
|
Docker image discovery |
The registry Credentials. The discovery lists every image the registry account can reach. |
|
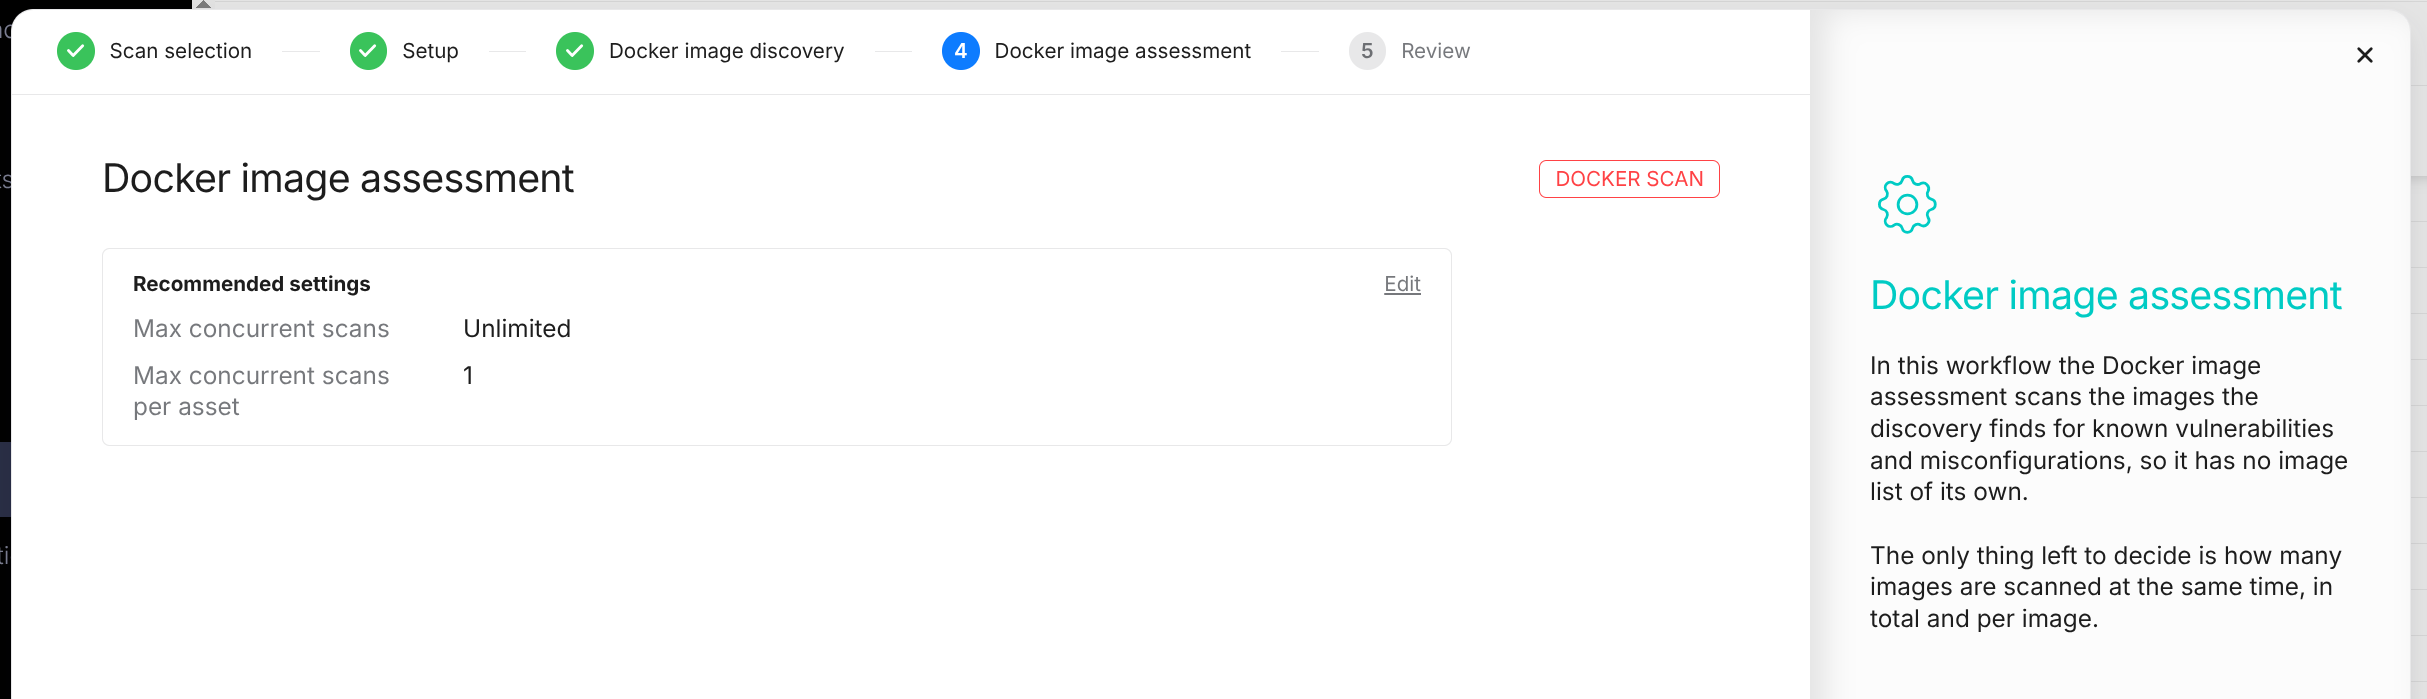
Docker image assessment |
The assessment scans the images found by the discovery. On its own, the images to scan are selected from the list of discovered images instead. The Recommended settings card holds Max concurrent scans and Max concurrent scans per asset. Set the value to 0 for no limit. |
Limited application assessment tests the web applications a network host assessment finds, with preset settings. It is offered in the Network & web category when the account includes it, always runs after a Network host assessment, and can't be combined with an Application assessment.
|
Step |
Description |
|---|---|
|
Limited application assessment |
The Seed URLs: optional paths to crawl, one per line, for example /login. The hosts come from the network host assessment. All other settings are preset and can't be changed. |
|
Request filters |
Optional filters for requests the scanner must not make. Only the Can't match type is available. |
Workflow Details
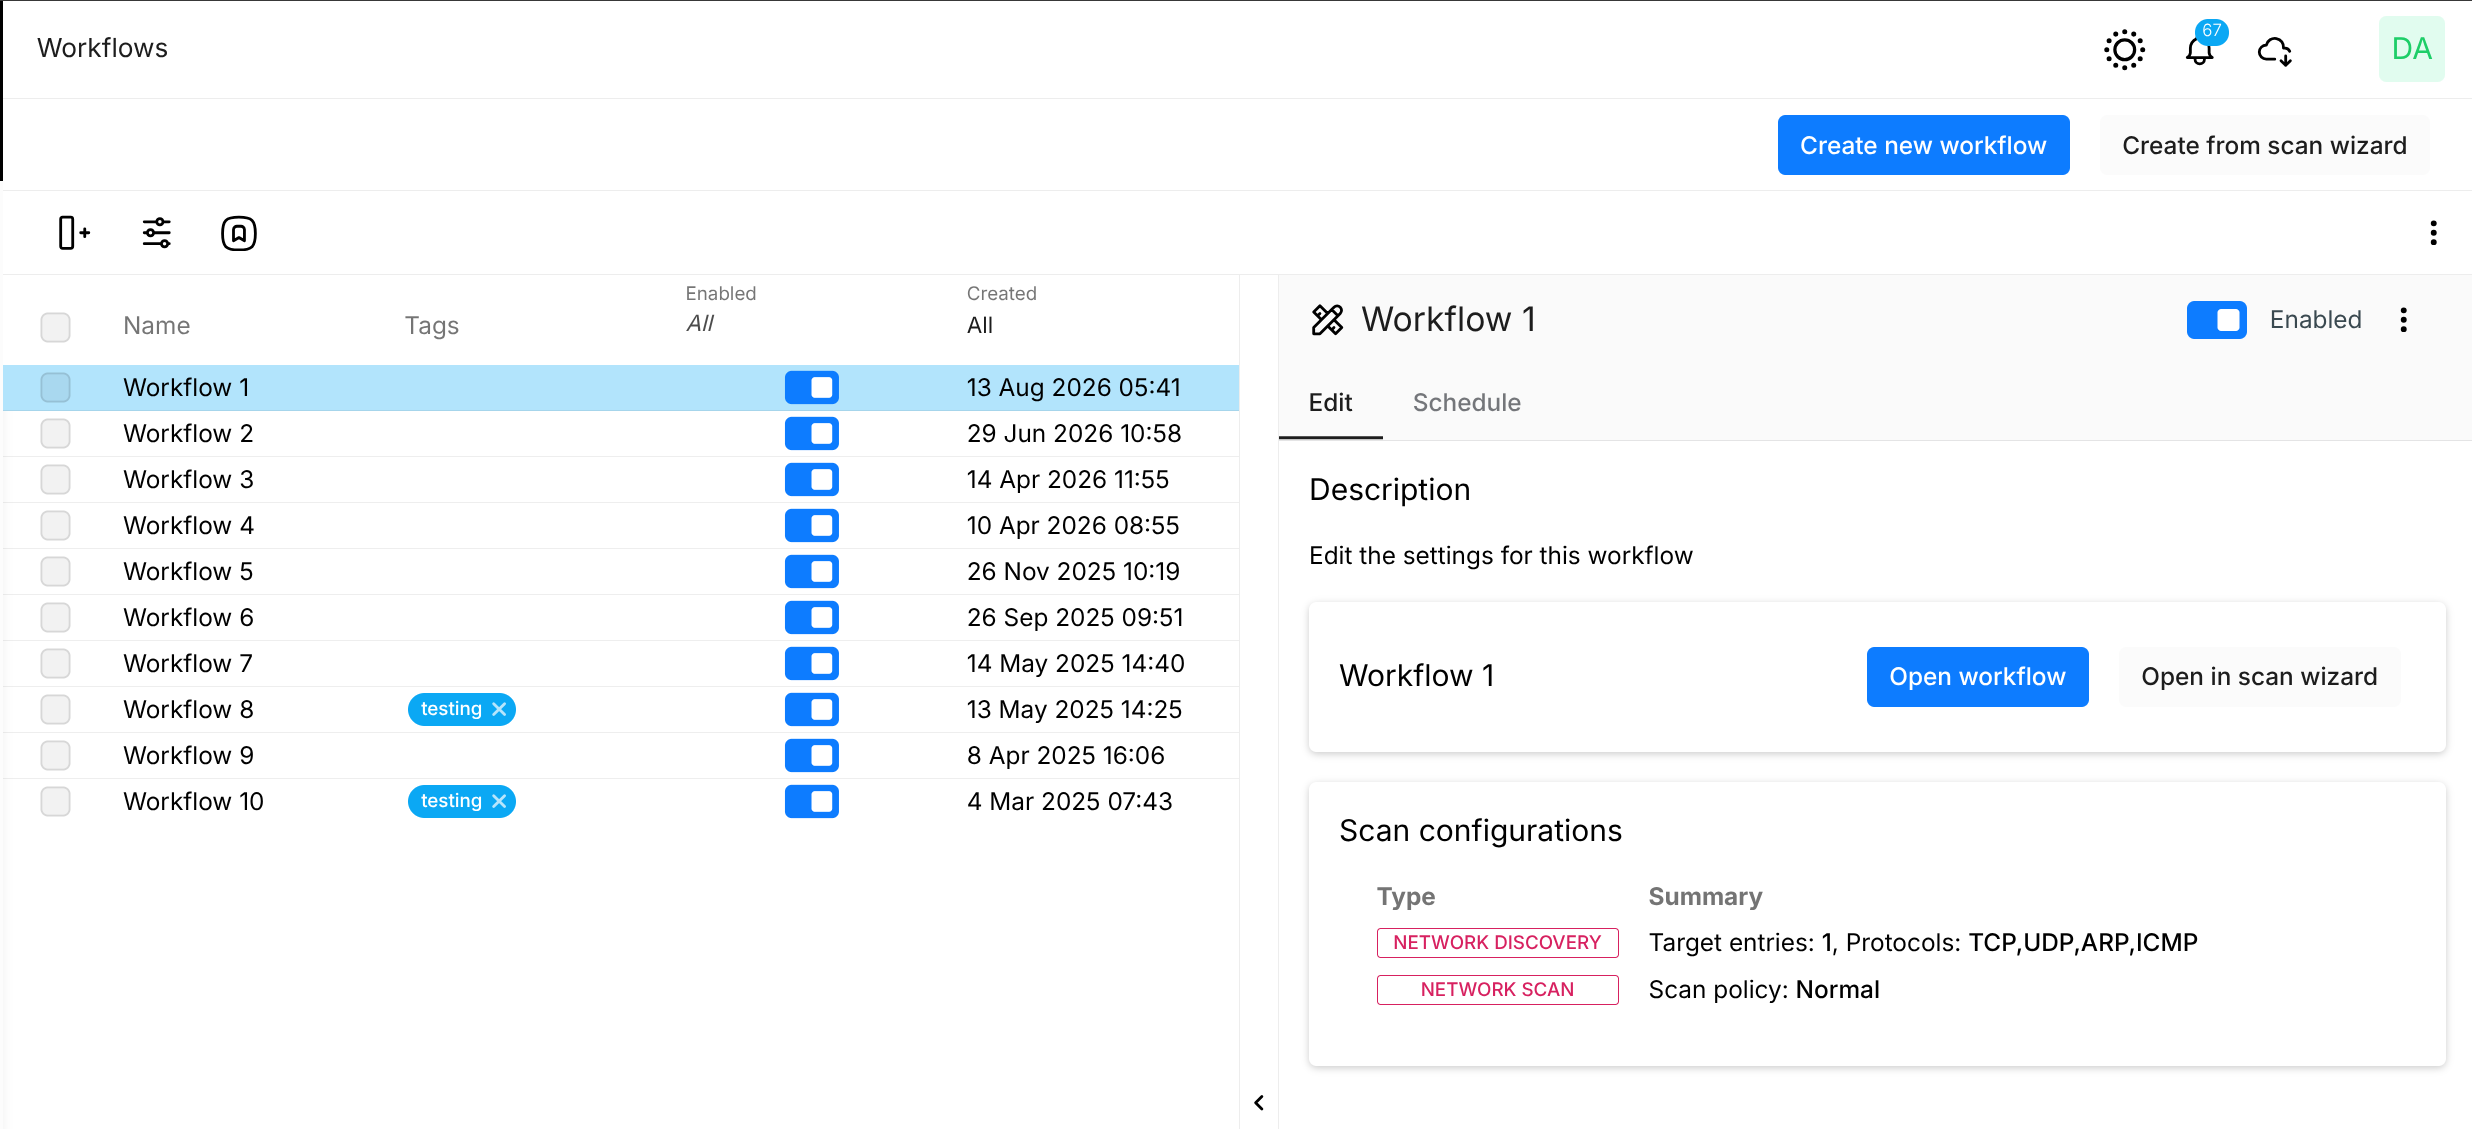
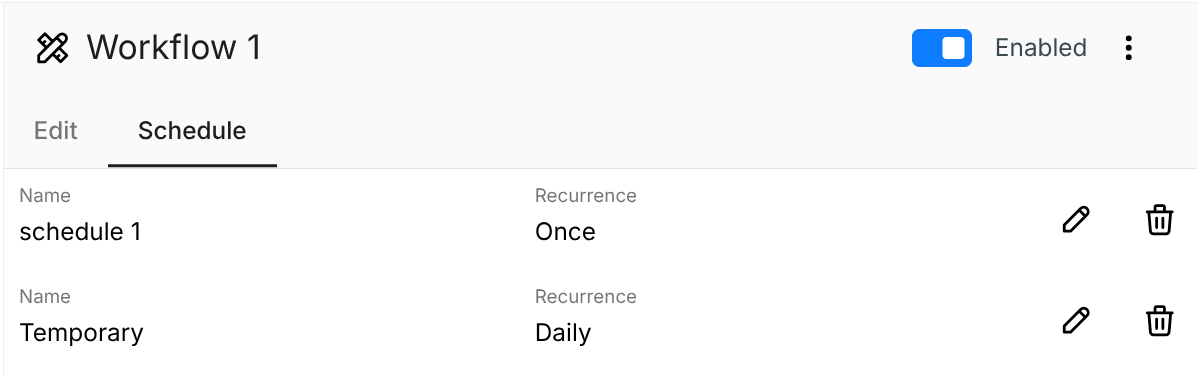
Clicking a workflow row opens the detail panel on the right side of the window. The panel has two tabs, Edit and Schedule.
-
The Edit tab shows the workflow name with the Open workflow button, and lists the scan configurations of the workflow with a summary of each. See the Editing a Workflow section. The Open in old view button opens the previous editor while it is still available.
-
The Schedule tab lists the schedules assigned to the workflow. See the Scheduling a Workflow section.
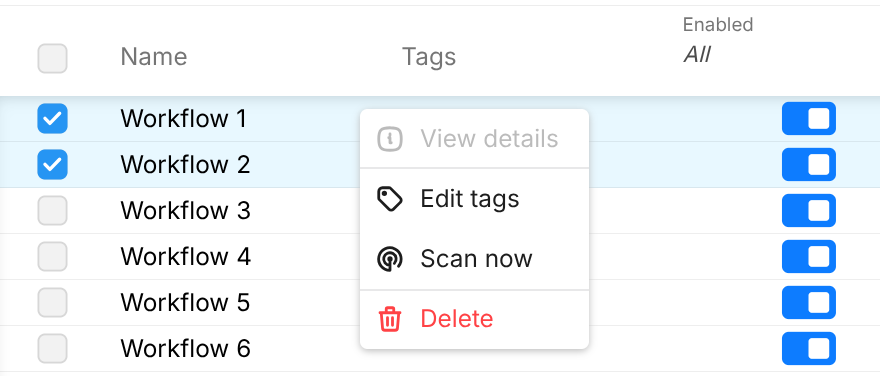
Workflow Actions
Right-click a workflow row to open the context menu.
|
Action |
Description |
|---|---|
|
Edit |
Open the workflow in the scan wizard. Available when a single workflow is selected. |
|
Edit tags |
Open the tag dialog. |
|
Scan now |
Start the workflow manually. |
|
Delete |
Delete the workflow and its scan configurations. |
To run an action on several workflows, select them by checking the boxes on the left hand side, and click Edit tags, Scan now, or Delete in the toolbar that is displayed above the table.
Editing a Workflow
-
Click the Open workflow button in the Edit tab of the detail panel.
Or:
-
Right-click the workflow in the table and select Edit from the context menu.
Then:
-
Change the settings in the scan wizard.
-
Click the Save changes button on the Review step.
The scan configurations, the reports, and the workflow are updated, including the schedules added or removed in the Setup step. Scan workflow updated. is displayed. The enabled or disabled state of each scan configuration is kept.
Editing differs from creating in the following ways:
-
The wizard opens on the Scan selection step, so scan types can be added, removed, or swapped. Added scan types get their own steps, as when creating a workflow.
-
Unchecking a scan type the workflow already had displays a warning that saving deletes its configuration. Selecting it again keeps it. Saving with removed scan types asks for confirmation first, because the deletion can't be undone.
-
The workflow's reports are listed in the Reports step and can be added, changed, or removed.
-
For an application assessment with a login, a Test login button is available in the Authentication step for every type except Selenium. It runs the login against the application and shows whether it succeeded.
Some workflows can't be edited in the scan wizard. A message is displayed instead, and the wizard doesn't open:
-
Workflows with a Cloud assessment, which is no longer supported.
-
Workflows with a Limited application assessment, when the account doesn't include it.
-
Other workflows the scan wizard can't edit yet. Use Open in old view for these while the previous editor is available.
Scheduling a Workflow
A workflow is scheduled in the same way as an ordinary scan configuration. Schedules are selected in the Setup step of the scan wizard, or managed in the Schedule tab of the detail panel. For more information, see Schedules and Scan Configuration Settings.
Related Articles