Chapter 03: Asset Discovery and Monitoring Services
Asset Discovery and Monitoring Services
The Pulse analytics engine collects data from sensors running services or tasks that discover and monitor the wired, wireless, and Bluetooth-enabled assets throughout your organization.
A service is a persistent, automated scanning program that runs on a Pulse sensor. Among the available sensor services are the following Pulse-specific services:
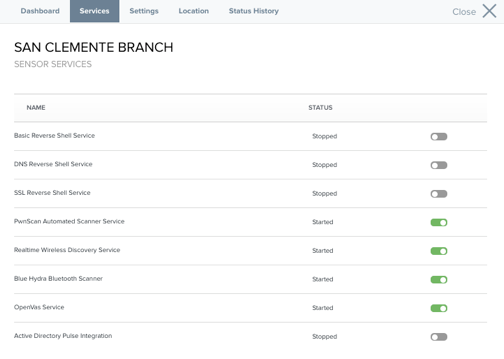
- PwnScan Automated Scanner Service for actively discovering wired network hosts.
- Realtime Wireless Discovery Service for passively monitoring the wireless environment.
- Blue Hydra Bluetooth Scanner for detecting Bluetooth-enabled devices.
- Active Directory Pulse Integration for querying baseline data from a local Active Directory server.
You configure and manage services in the management view for a particular sensor, which you access through the Sensors tab of the Pulse web application.
A task is a discrete scan you can configure to run at regular intervals or at specific times. Pulse includes several network-based, wireless, Bluetooth, and a vulnerability scan task for use. However it is strongly recommended to utilize the Services to perform discovery opposed to using Tasks as the service based approach provides continuous discovery.
You configure tasks on the Tasks tab of the Pulse Administration Console. You can also use the Scripts tab to create and schedule custom tasks.
Wired Network Monitoring
Automated Network Scanning with PwnScan
This section discusses how to configure the PwnScan service to scan the appropriate networks. This is the preferred method of network scanning and discovery with Pulse. Scanning tasks are described in this section as an alternative to PwnScan, to be used where continuous scanning is not desired.
Pulse runs the PwnScan service on the sensor to detect and fingerprint all hosts with IP address on the wired network. The sensor can only scan networks to which it is connected or has visibility (this is important in choosing the appropriate location for the sensor based on intended subnet targets).
Configuring PwnScan
To configure PwnScan:
- Log into Pwn Pulse and open the Sensors tab.
- Click the sensor you want to configure.
- On the sensor profile page, open the Services tab.

- Click PwnScan Automated Scanner Service.
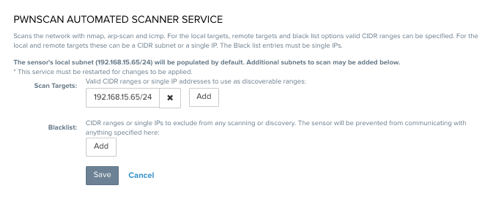
Complete configuration settings as follows. The fields accept valid Classless Inter-Domain Routing (CIDR) ranges or single Internet Protocol version 4 (IPv4) addresses.
Note
Following any changes to the following settings once the service is running, PwnScan must be stopped and restarted for changes to take effect.
Setting Description Blacklist IP addresses/ranges (for example, x.x.x.x/32) to be excluded from the active discovery of ports, services, and operating systems. Scan Targets Subnets, in CIDR notation, on which the sensor will perform active and passive scanning.
The local subnet in which the sensor is assigned own IP address will be populated automatically. Additional subnets to which the sensor has access to scan from its location can be added here.
Systems on the locally available subnet can be discovered quickly by passively detecting their ARP broadcasts.
Note
If the sensor is moved to a different native network after its initial configuration, either change the Scan Targets or deregister and then reregister the sensor.
Note
See the Appendix A–Monitoring Multiple VLANs for information on configuring the sensor to monitor multiple VLANs at a trunk port.
- Click Save.
- On the Services tab, click Start to start the service. If scanning a new network for the first time, and the service was previously running, it must be stopped and restarted to enable changes.
When scanning a new network for the first time, it may take up to several hours for the scan to populate data in Pulse, depending on the network size.
Using Scheduled Tasks for Network Host Scanning
As an alternative to continuous scans with PwnScan, you can use task-based scanning instead of automated network host discovery and scanning.
Important
These scans should not be used simultaneously in conjunction with PwnScan on the same subnets.
Pulse, by default, has several preconfigured network discovery tasks that can be run immediately. They are as follows:
- Network Discovery – Default uses Nmap to scan the local network subnet (based upon the IP and netmask assigned to the sensor) to identify the live hosts, then scan each host for the Nmap Top 1,000 ports. This task is not intended to be highly configurable and only scans the subnet associated with the eth0 interface.
Network Discovery – Basic is performed in the same manner as Network Discovery: Default with the exception the user may specify the target IP address or target range and the port(s) to be scanned.
Note
If the ports: field is left blank, the Nmap Top 1,000 ports are scanned. If ports are being specified, use comma delimited or hyphen to indicate a range of ports.
Network Discovery – Simple uses ARP to scan the target IP address or target range specified, the goal of which is to determine if the target is live, nothing else is discovered.
Note
This is an extremely FAST method to discover live hosts within the local network subnet. If the target(s) specified are on a connecting remote subnet, it is not expected targets will be discovered in other subnets unless ProxyARP is enabled on the router in between.
Network Discovery - Service uses Nmap with the -sV -O switches to scan the target IP address or target range specified, the goal of which is to identify live hosts, listening ports, services and operating system for each.
Note
If the ports: field is left blank, the Nmap Top 1,000 ports are scanned. If ports are being specified, use comma delimited or hyphen to indicate a range of ports.
Network Discovery – Aggressive uses Nmap with the -T5 -A -v switches to aggressively scan the target IP address or target range specified, the goal of which is to identify live hosts, open ports (of all possible 65,535), service detection, version detection, OS detection, and script scanning.
Warning
This is an INTENSIVE SCAN.
It is NOT recommended to run this against a target range, but to instead test an individual target IP address when this level of detail is required. Depending on the network, this method of scanning may overwhelm switches or cause an Denial of Service.
Configuring a Network Discovery Task 
- To add a new task, click Tasks on the left-hand toolbar.
- Click Add Task.
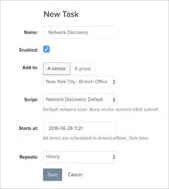
On the New Task page, complete task settings as follows.
Setting Description Name Assigned task name. Enabled Select to enable the task (required for task to run). Script Select a Network Discovery task from the drop-down list, which displays all tasks currently in Pulse, including any custom scripts you have added in the Scripts section. Target Specify the target IP address, or network to be scanned, in Classless Inter-Domain Routing (CIDR) notation. Ports Some tasks allow you to specify which ports to scan. Where available, format this as if passing to an Nmap scan. Add to Select whether to run this task against a single sensor, or a group of sensors. Starts at Schedule when you want the task to run—default is the current time. Repeats Select whether and how frequently to repeat the task. Click Save.
The task begins automatically at the specified start time, and runs against the sensors selected.
Wireless Network Monitoring
Pulse’s Realtime Wireless Discovery Service provides continuous passive monitoring of the 2.4Ghz and 5Ghz 802.11 spectrum. This scan passively monitors the entire WiFi spectrum.
Enable Real-Time Wireless Scanning
To enable real-time wireless scanning:
- Log into Pulse and open the Sensors tab.
- Click the sensor you want to configure.
- On the sensor profile page, open the Services tab.
- Click Realtime wireless discovery service.
Note
Once you join a sensor to Pulse, it may take up to five minutes before Realtime Wireless Discovery Service is available for enabling.
Scanning for Bluetooth Devices
Pulse includes a Bluetooth service called BlueHydra Bluetooth Scanner to provide continuous discovery of Classic & Low Energy (LE) Bluetooth devices.
- Bluetooth Classic – Designed for continuous streaming data applications.
- Bluetooth Low Energy (BLE, Bluetooth 4.0) – Designed for devices that only need to exchange small amounts of data periodically.
Enable the BlueHydra Bluetooth Scanner Service
To enable the BlueHydra Bluetooth Scanner service:
- Log into Pulse and open the Sensors tab.
- Click the sensor you want to configure.
- On the sensor profile page, open the Services tab.
- Locate Blue Hydra Bluetooth Scanner and click the toggle switch to on (green).
Newly discovered Bluetooth devices will now begin to populate on the Assets tab under Bluetooth.
Note
Once you join a sensor to Pulse, it may take up to five minutes before the Blue Hydra Bluetooth Scanner is available to enable.
Copyright
© 2025 Outpost24® All rights reserved. This document may only be redistributed unedited and unaltered. This document may be cited and referenced only if clearly crediting Outpost24® and this document as the source. Any other reproduction and redistribution in print or electronically is strictly prohibited without explicit permission.
Trademark
Outpost24® and OUTSCAN™ are trademarks of Outpost24® and its affiliated companies. All other brand names, product names or trademarks belong to their respective owners.