Pwnie Express PULSE & SENSOR Quick Start Guide
Purpose
The purpose of this document is to provide the necessary steps to set up the sensors and join them to the Pulse service.
Introduction
This guide is has two parts. Part 1 describes how to connect the sensor to the network for scanning and monitoring, and Part 2 elaborates on how to join the sensor to the Pulse subscription service.
Requirements For Subscription Service
The following are conditions and requirements for joining the sensors to the Pulse subscription service, providing continuous monitoring and advanced device threat analytics.
The sensor connects to the subnet to be monitored, and its IP address is either dynamically assigned through DHCP, or assigned a static IP address that is either pre-programmed or configured locally.
For sensors addressed with Dynamic Host Configuration Protocol (DHCP), you need a means of identifying the IP—either through DHCP server access, or with a network discovery tool such as Network Mapper (Nmap).
The sensor requires the following outbound connection points:
TCP/443 to yoursubdomain.pwnieexpress.net*
TCP/443 to sensors.yoursubdomain.pwnieexpress.net*
TCP/443 to updates.pwnieexpress.com
TCP/443 to kalirepo.pxinfra.net
TCP/80 to www.openvas.org†
TCP/873 to feed.openvas.org†
* “yoursubdomain”is a unique subdomain that Pwnie Express assigns.
† Pwn Pro only.
For more information on Pulse, visit https://outpost24.com/products/risk-based-vulnerability-management/.
Part 1–Connecting to Your Sensor
The instructions in this guide to connect the sensor are based on the following options:
Option A--You purchased the Pwnie Express pre-authorization and configuration service. With this option, the sensor IP address is determined in one of the following ways:
Dynamically assigned through DHCP –the default.
Pre-programmed with a requested static IP address --Your sensor has been configured with data provided to Pwnie Express prior to shipment.
Option B--You did not purchase the Pwnie Express pre-authorization and configuration service. With this option, the sensor IP address is determined in one of the following ways:
Dynamically through DCHP (the default).
Locally configured with a static IP address. Follow procedures for your sensor accordingly.
If your sensor has not been configured by Pwnie Express, continue to Option B-Local Programming.
Option A–Pwnie Express Pre-authorization and Configuration Service
Your sensor arrives pre-programmed with data you provided to Pwnie Express prior to shipment. The sensor is either set to use DHCP,or programmed with the requested static IP address. Perform all the procedure sin this section, in order.
When connected to the local network to be monitored, with proper outbound connectivity, the sensor automatically connects to Pulse, requiring approval only through the Pulse UI. Pwnie Express strongly recommends, however, that you complete this section for each sensor to ensure that the default password is changed and the sensor is up-to-date.
Power on and Connect the Sensor to the Network
Plug in the sensor to AC power and press the power button to turn it on.
Connect the sensor into the Ethernet port on the network to be monitored.
On a computer connected to the same network, do one of the following:
Static IP address--Open a web browser and navigate to port 1443 on the sensor, using the following URL:
https://x.x.x.x:1443...where x.x.x.x is the programmed static IP address.DHCP IPaddress--Use Nmap or similar network scanning tool to identify the assigned IP address.
After the IP address is identified, access the sensor at the URL specified earlier in step 3.
To connect directly to the sensor and assign a static IP, see Option B-Local Programming.
Log Into the Sensor and Change the Default Password
At the prompt, log in with the default credentials:
Username: pwnie
Password: pwnplug8000
The System Setup page is displayed, where red screen text informs you that the default password remains unchanged.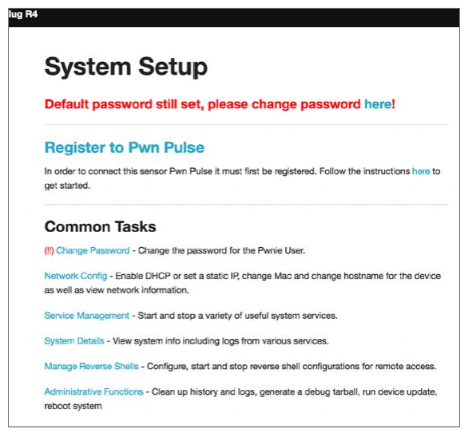
Change the sensor’s default password as follows:
Click the link in the warning text, and enter the current (default) password.
Enter a new password.
For subsequent password changes, go to the System Setup page. click Change Password from the Common Tasks drop-down menu, and follow the on-screen instructions.
Test Outbound Connectivity and Update Sensor
Use the new password to log into System Setup again.
Do one of the following:
If you are registering the sensor to Pulse, click Register to Pwn Pulse.
Otherwise, navigate to the Admin Functions page.
From the Register to Pwn Pulse page, click Registration step 3 –Test connection to pulse here.
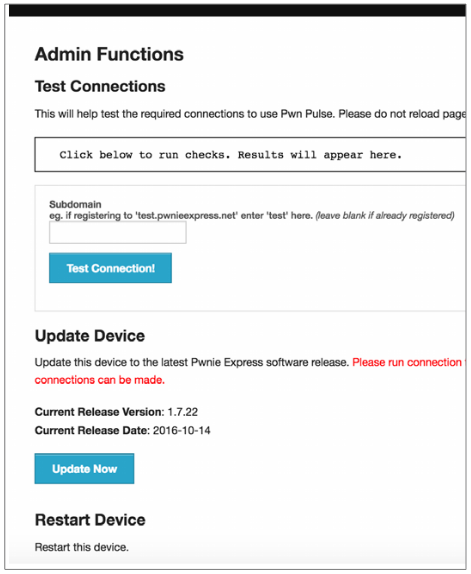
On the Admin Functions page, enter the subdomain assigned to your Pulse instance by Pwnie Express, and click Test Connection!.
Verify that output connection checks indicate Valid or Success. If any checks fail, ensure that the firewall is configured to allow outbound connectivity to each of the ports and domains listed in the requirements section.
Update the sensor to ensure that the sensor is running the most current firmware, do the following:
From the Register to Pwn Pulse page, click Registration step 4 –Update sensor here.
On the Admin Functions page, click Update Now.
Next Steps
To connect the sensor to Pulse, proceed to Part 2 - Joining Your Sensor to Pulse.
For guidance on local use of the sensor for penetration testing, consult the user manual for your sensor.
Option B–Local Programming
The Pwnie Express pre-authorization and programming service has not been ordered. The sensor will be programmed locally. Perform all the procedures in this section, in order.
Power On and Connect the Sensor to the Network
Plug in the sensor to AC power and press the power button to turn it on.
Do one of the following:
If connecting to the sensor with DHCP, go to the procedure Set the Sensor's Network Configuration Using a DHCP IP Address.
If setting a static IP address on the sensor, continue to the next step in this procedure.
Use an Ethernet cable to connect a computer directly to the sensor.
Set a temporary local IP address of the computer to the following (the method varies by OS):
IP address: 192.168.9.11
Netmask: 255.255.255.0
Default Gateway: 192.168.9.1Using computer’s web browser, navigate to port 1443 on the sensor by entering the following URL: https://192.168.9.10:1443
Complete the procedure in section Log In to the Sensor and Change the Default Password.
Complete the procedure in section Test Outbound Connectivity and Update Sensor.
Set the Sensor's Network Configuration Using a Static IP Address
Use the new password to log into the sensor.
Do one of the following:
If you are registering the sensor to Pulse, click Register to Pwn Pulse.
Otherwise, navigate to the Network Config page under Common Tasks.
Set sensor’s network configuration, including static IP address, as follows:
Click Registration step 2 –Confirm Network Configuration here. The Network Config page is displayed.
Click the eth0 link.
Under Configure eth0 Settings, select the Static Config tab.
Fill out the table as required.
Click Apply Static IP Settings.
Unplug the direct Ethernet connection from the computer and connect the sensor directly into the network to be monitored via Ethernet. Ensure that it is connected and able to route traffic to all segments of the network to be monitored.
Restore the computer’s network settings and connect to the network. Log into the sensor at the new static IP address on port 1443 by entering the following URL into a web browser: https://x.x.x.x:1443...where x.x.x.x is the programmed static IP address.
Complete the procedure in section Log In to the Sensor and Change the Default Password.
Complete the procedure in section Test Outbound Connectivity and Update Sensor.
Set the Sensor’s Network Configuration Using a DHCP IP Address
Plug the sensor into the Ethernet port on the network to be monitored. Ensure that it is connected and able to route traffic to all segments of the network to be monitored.
Determine the assigned IP address of the sensor by using Nmap or similar network scanning tool with a computer on the network. For more details, see the user manual for your sensor.
Using a web browser on a computer connected to same network, navigate to port 1443 on the sensor by entering the following URL: https://x.x.x.x:1443...where x.x.x.x is the assigned IP address.
Complete the procedure in section Log In to the Sensor and Change the Default Password.
Complete the procedure in section Test Outbound Connectivity and Update Sensor.
Next Steps
To connect the sensor to Pulse, proceed to Part 2–Joining Your Sensor to Pulse. For guidance on local use of the sensor for penetration testing, consult the user manual for your sensor.
Part 2–Joining Your Sensor to Pulse
Part 2 of this guide assumes the following:
The Pulse subscription has been purchased.
The Launch Form has been filled out and sent to Pwnie Express
You have received your login email from Pulse.
Sensors have been installed and programmed as described in Part 1 of this guide.
If your sensors are pre-authorized by Pwnie Express, proceed to the procedure to Approve Your Sensor .
Register Your Sensor
Log in to the local interface of the sensor as described in the procedure to Power On and Connect the Sensor to the Network.
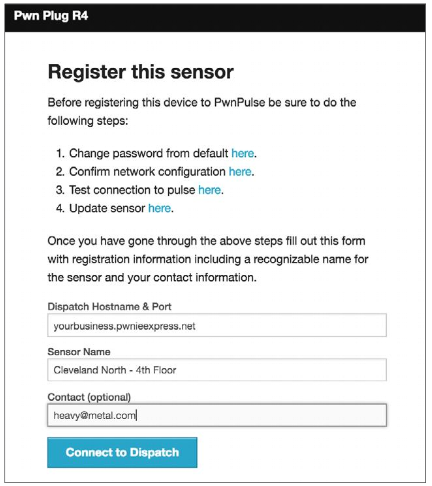
On the System Setup page, select Register to Pwn Pulse.
Ensure that you have completed the following tasks, as described in Part 1 of this guide.
Change password from default.
Confirm network configuration.
Test connection to Pulse.
Update sensor.
Under Sensor Name, enter the name for your sensor –this is typically chosen based on location, for example, Akron, OH -North Branch.
For dispatch hostname and port, enter the URL for your Pulse instance provided by Pwnie Express, for example, yourbusiness.pwnieexpress.net.
Enter admin contact.
Click Connect to Dispatch.
Approve Your Sensor
Login to Pulse at the hostname requested and assigned by Pwnie Express, for example, https://yourbusiness.pwnieexpress.net.
From the Tools menu at the top of the page, select Unapproved Sensors.
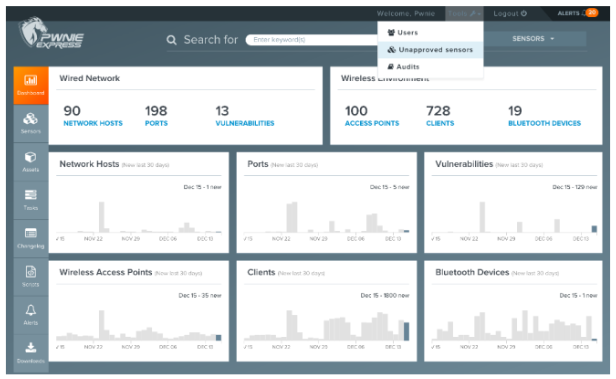
Choose the sensor you are authorizing, and select Approve.
Repeat for each sensor to be joined to Pulse.
Begin Scanning Wired and Wireless Networks
To begin scanning wired and wireless networks(it may take several minutes for services to become available following approval):
Wireless scanning –In Pulse, select the sensor and click Services. Start the Real-time wireless discovery service to begin Wi-Fi scanning.
Wired scanning–In Pulse, select the sensor and click Services. Click PwnScan automated scanner service. Devices or networks that you do not want scanned can be added to the blacklist in CIDR notation. The local_scanning targets will autopopulate. Save settings, and start the PwnScan automated scanner service.
Bluetooth scanning–In Pulse, select the sensor and click Services. Start the Blue Hydra Bluetooth Scanner to begin Bluetooth device discovery.
Next Steps
View instructional videos on the Pulse Support Videos page at https://www.pwnieexpress.com/support/support-video-pulse.
Go to the Pulse User Guide, available at https://outpost24.com/support/ for more information on using Pulse, setting tasks and alerts, and managing services.
To ensure proper operation, do not enable tasks before consulting the manual or working with the Outpost24 support team.
Copyright
© 2025 Outpost24® All rights reserved. This document may only be redistributed unedited and unaltered. This document may be cited and referenced only if clearly crediting Outpost24® and this document as the source. Any other reproduction and redistribution in print or electronically is strictly prohibited without explicit permission.
Trademark
Outpost24® and OUTSCAN™ are trademarks of Outpost24® and its affiliated companies. All other brand names, product names or trademarks belong to their respective owners.