Chapter 06: Creating an Asset Baseline
Creating an Asset Baseline
Pulse leverages a combination of system fingerprinting, Trust Level tagging, a Policy Definition engine, and Corporate asset designation to allow users to quickly baseline and map their networks and assets.
How to Use This Chapter
To create a baseline, configure each available baseline input as described below. More data provided to Pulse regarding known devices and configurations builds a stronger baseline, and ultimately, provides greater intelligence from the system.
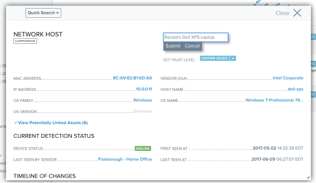
Device Names
Pulse sensors, upon configuration, will automatically retrieve hostnames from a specified local DNS server for locally discovered network assets. The IP Address of the DNS server can be managed from the sensor’s local User Interface. (See Sensor User Manual for additional detail). Additionally, Pulse will automatically query for NetBios names (where available). No user configuration is required to gather this information.
Additional names for devices may be added to individual devices through Pulse by editing the Asset "Friendly" Name field on any Asset’s record page.
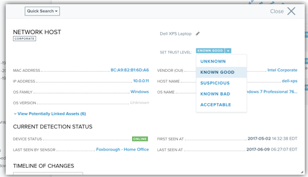
Trust Level Tags
Each asset discovered by Pulse – including wired, wireless, and Bluetooth devices – can be tagged and sorted based on its Trust Level. Trust Levels – including:
- Unknown
- Known Good
- Suspicious
- Known Bad
- Acceptable
are defined by users manually or automatically.
How to Assign Trust Level Tags
Upon discovery, new devices are automatically tagged as Unknown. Trust levels are updated using any combination of the following methods:
- Active Directory Connector (automatic tagging) - If an updated asset list is available through Active Directory, Pulse may be configured to connect directly to Active Directory and update automatically. (See Appendix B: Active Directory Integration)
- Manual Tagging - Manually update the Trust Level using the drop-down menu on the Asset list or individual asset record.
- Bulk Tagging - Bulk asset inventory list upload, via Pwnie Express services team.
Corporate Asset Designation
In order to focus users and workflows, a corporate designation tagging system is leveraged throughout Pulse - all network hosts and wireless clients are identified as either "Corporate" or "Non-Corporate". Threat and Asset lists and views can be sorted and filtered based on this status.
Corporate assets are devices that authenticate to corporate designated networks and therefore have access to business systems and resources. All network hosts identified by Pulse are designated as corporate. Wireless Clients that connect with corporate designated access points are designated as corporate. Access Points are designated as corporate through the use of Access Point Policies (next section).
How to Designate Corporate Assets
To designate Corporate Assets, follow the next section on Access Point Policies to identify corporate Access Points. Once complete, all clients observed connecting with these Access Points will automatically be designated as corporate.
Access Point Policies
Pulse allows users to define policies associated with the configuration of corporate and guest wireless Access Points. Based on these policies, Pulse will identify Access Points associated with corporate wireless networks as well as guest networks.
Corporate designated access points are typically the encrypted wireless networks through which employees connect and access business resources and/or the Internet. Guest designated access points are the wireless networks provided for guests, visitors and/or contractors to connect to the Internet, are typically segmented from corporate resources, and may be running without encryption. Pulse allows users to classify access points discovered in their environment as either Corporate or Guest using Access Point Policies.
How to Define Access Point Policies
Access Point Policies are managed by Admin Users through the Access Point Policies page on the Tools menu.
Add policies in order to identify and designate corporate and guest networks based on matching attributes including the Access Point’s
- ESSID
- Encryption Type
- Authentication Mechanism
- hardware vendor
Upon building a policy, all observed Access Points matching the policy are presented as Un-reviewed Matches, and must be approved by the user. Typically, a policy is added to profile each type of location, in order to identify sets of Access Points with similar attributes.
To add an Access Point Policy:
- From Pulse, select Access Point Policies from the upper Tools menu.
- Select + Create New Policy.
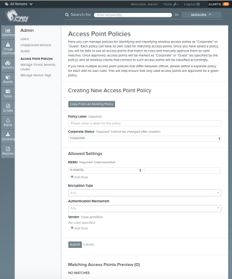
From this screen, you can define the Access Point Policy by identifying expected Extended Service Set Identification (ESSID), Encryption Type, Authentication Mechanism, and Vendor for a particular location. If desired, select Copy From An Existing Policy and edit from this point.
As information is entered, you will see any Access Points in your Pulse database matching your rules under Matching Access Points Preview at the bottom of the page.Tip
You can define a policy with a minimum of ESSID, but it is strongly recommended to define all fields in order to better define policy to identify spoofed Access Points or other attacks.
- When finished, click Submit.
Select your new Policy from the list on the Access Point Policies page to see all the Access Point Asset Records that match this policy. Review and approve each record individually, or all at once.
Note
Only Access Points that have been observed (and are not "cloaked") by the sensor can be designated through this workflow. The Asset Record must already exist in Pulse.
Note
Until matches are approved, they will not be tagged as corporate by Pulse.
- Repeat steps to add policies and approve Access Points for each location profile associated with your organization.
To Edit/Delete an Access Point Policy:
- From Pulse, select Access Point Policies from the upper Tools menu.
- Select the policy you would like to edit, and click on the pencil icon next to the Policy Name.
- Make desired edits, or click Delete this Policy and confirm.
- As edits are made, the Matching Access Points Preview will update with Access Points matching the policy.
- When complete, click Submit. You need to review and approve matching Access Points from the Access Point Policies page.
Copyright
© 2025 Outpost24® All rights reserved. This document may only be redistributed unedited and unaltered. This document may be cited and referenced only if clearly crediting Outpost24® and this document as the source. Any other reproduction and redistribution in print or electronically is strictly prohibited without explicit permission.
Trademark
Outpost24® and OUTSCAN™ are trademarks of Outpost24® and its affiliated companies. All other brand names, product names or trademarks belong to their respective owners.