Appendix B: Active Directory Integration
Active Directory Integration
Overview
As a part of the baselining process, the Pulse Active Directory Pulse Integration service is recommended to match known systems from Active Directory with those that have been already observed by Pulse. Active Directory Pulse Integration can be configured to query Active Directory to gather a list of Network Hostnames, which are matched against unknown Network Assets in Pulse. Any hostname that is correlated will have its Trust Level automatically set to Known Good.
Requirements
The Active Directory Pulse Integration service requires that an active user in Active Directory with sufficient privileges be provided, which Active Directory Pulse Integration will use to query Active Directory over the network. Following the practice of least-privilege, the user permissions can be set to read-only and needs only the following permissions :
Query Active Directory remotely
Make LDAP search queries against the domain for hostnames
The Sensor needs access to communicate locally via the Network to the Active Directory server, along with being able to maintain outbound connectivity to Pulse.
In order to match and automatically update trust levels, the Network Hosts and associated Hostnames must have already been discovered by Pulse using the PwnScan service.
Scoping and Deployment
Only one sensor (per Active Directory server) is required to be running the Active Directory Pulse Integration service. If a single Active Directory server maintains all relevant information, than only a single sensor is needed.
If the required hostnames exist across multiple implementations of AD, then one sensor per Active Directory server is required. There is no limit to the number of hostname records that be matched or queried for.
Security and Protection
Pulse requires a set of user account credentials for Active Directory and uses encryption to ensure secure storage of account information. After entering the password, Pulse uses Shamir’s Secret Sharing algorithm (see https://en.wikipedia.org/wiki/Shamir's_Secret_Sharing) to split the password into two hashes. Each part is encrypted using a public key generated on the sensor. One encrypted hash is shipped and stored on the sensor, while the other is kept in the cloud.
Using this architecture:
Pulse will NEVER have access to any portion of the original password.
The Pulse side hash is never saved on sensor.
When the service requires the use of the credentials (to query Active Directory), it will use the already established TLS 1.2 tunnel to request the missing half of the credentials from Pulse. Pulse will then send down the fully encrypted hash, which the service then decrypts and combines this with the sensor side hash in memory temporary for one-time use. The Pulse half is discarded after being combined with the sensor side and is never stored on sensor.
Revoking access to the given credentials on sensor can be done in an emergency by deregistering the sensor from Pulse.
Configuring the Active Directory Pulse Integration service
Gathering required Active Directory information
The following Active Directory information will be required to configure the Active Directory Pulse Integration service:
AD Base
IP Address of Active Directory Server
Port to query Active Directory server on (ex. LDAP: 389, LDAPS: 686)
AD User
Setting up Active Directory Pulse Integration
Login to Pulse as an Admin user.
Select the Sensors tab from the left-hand navigation column and select the sensor that will be used to query Active Directory.
From the sensor view, select the Services tab.
Scroll down to the bottom of the list and select Active Directory Pulse Integration.
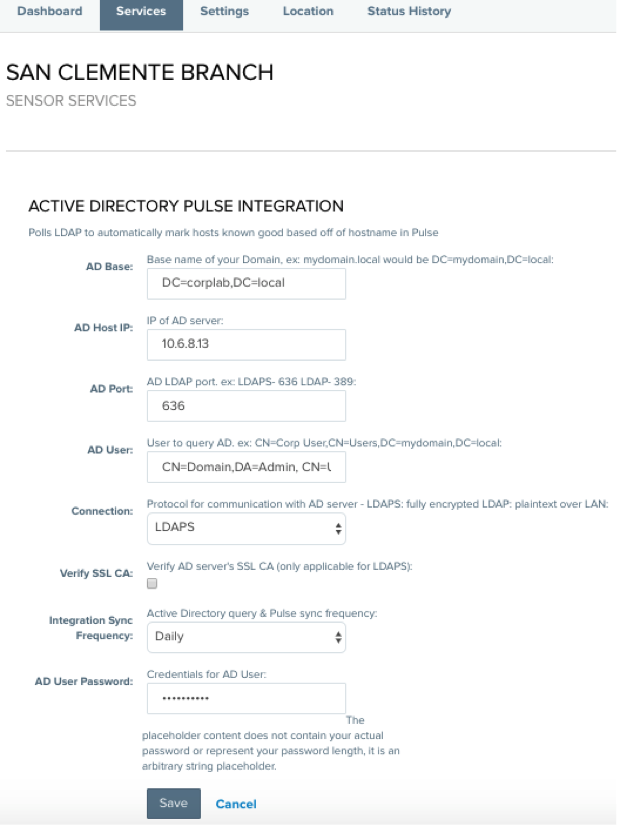
You will now be presented with the Active Directory Pulse Integration service configuration screen. Each field is required to be filled out.
For AD Base, enter the base name for your domain. As an example, if the domain is mydomain.local, the AD Base entered would be:
CODEDC=mydomain,DC=localFor AD Host IP, enter the IP Address of the Active Directory server. For example: 192.168.1.10
AD Port is the port number that the Active Directory server is configured to accept connections on. For example, the default port for LDAPS would be 686
For AD User, enter the Active Directory username that will be used to query the AD server in CN Format. For example: CN=Corp User,CN=Users,DC=CorpLab,DC=local
For Connection, select the appropriate protocol for how the queries will be made:
LDAP uses plaintext queries across the network.
LDAPS encrypts queries across the network.
If LDAPS is used, clicking the Verify SSL CA will have the service attempt to validate that the certificate has been signed by a verified Certificate Authority. If a self-signed certificate is being used—or the certificate has been signed by an unknown third-party CA—leave this option unchecked.
For AD User Password, enter the password specified for the AD User account that was entered above in step d.
Once all fields have been correctly filled out, click the Save button.
Now that Active Directory Pulse Integration has been configured and saved, the final step is to enable the Active Directory Pulse Integration service. From the Services screen, scroll back down to the bottom of the list and click the slider-toggle to the right of Active Directory Pulse Integration.
Once the toggle-slider has turned green and the status states Started, the Active Directory Pulse Integration service will begin polling Active Directory.
Verify Results Being Returned
To confirm that the service has been configured properly and Pulse is receiving hostnames:
In the top-right corner of Pulse, click the Tools drop-down menu and select Audits. Successful queries will look similar—and can be searched using the Search Bar using “AD Integration”.
It is important to note that depending on the quantity of hosts in Active Directory—or hostnames returned by the first LDAP query—the changes in Pulse may take some time to process and become visible within the Pulse UI.
If after ~5 minutes of enabling the Active Directory Pulse Integration service the status switches back to stopped, this means the service has encountered an error. This most likely means that the service was misconfigured and requires the information entered to be re-reviewed.
Additional Troubleshooting:
If for some reason the Active Directory Pulse Integration service is unable to return results, the most likely cause is incorrect credentials or a misconfiguration. Begin by reviewing the log file on the sensor as follows:
Using SSH, login to the sensor with the pwnie user account.
Next, type
sudo suand press Enter, then re-type the password to become superuser.Type
tail -n 10 /var/log/pwnix/ad_integration.logand press Enter to review the last ten lines. The log file should not reflect any errors. Here is an example of the log file reflecting the Active Directory Pulse Integration is working properly.CODE2017-06-29T15:44:48.452-0400 INFO runner#75683: Starting AdNauseam... 2017-06-29T15:44:48.452-0400 INFO runner#75683: Sending Credential Request to Pulse... 2017-06-29T15:44:48.453-0400 INFO runner#75683: Waiting for Credential Request Response from Pulse... 2017-06-29T15:44:51.139-0400 INFO runner#75683: Credentials Request Complete... 2017-06-29T15:44:51.268-0400 INFO runner#75683: Sending (1/1 MAX:100) devices to Pulse. 2017-06-29T15:44:51.268-0400 INFO runner#75683: AdNauseam Run Complete...If the log file does reflect errors, it will likely be one of the following. Simply review the possible causes and perform the recommended resolution, then restart the Active Directory Service.
*** Log Error: Failed to bind to LDAP: (Invalid Credentials)
Possible causes: Invalid User or Password
Resolution: Enter a valid user + password in pulse, save config, restart service. Alternatively verify the credentials specified are correct, see "Validating User Credentials" below.*** Log Error: Failed to bind to LDAP: SSL_connect returned=1 errno=0 state=error: certificate verify failed
Possible causes: Self signed cert, unknown CA
Resolution: Change verify_cert to false in pulse. Save config, restart service. Connection will still be LDAPS*** Log Error: Failed to bind to LDAP: Connection refused - connect(2) for 10.6.8.2:636
Possible causes: Wrong host, wrong port, wrong protocol on that port
Resolution: Confirm host IP correct, confirm port correct, confirm protocol (LDAP/LDAPS) correct in Pulse. Save config, restart service.*** Log Error: Failed to bind to LDAP: Connection timed out - user specified timeout
Possible causes: Wrong port, wrong host, wrong protocol on that port
Resolution: Confirm port correct, confirm host IP correct, confirm protocol (LDAP/LDAPS) correct in Pulse. Save config, restart service.*** Log Error: Failed to bind to LDAP: Connection reset by peer @ io_fillbuf - fd:8
Possible causes: Wrong protocol on that port, wrong host, wrong port
Resolution: Confirm protocol (ldap/ldaps) correct, confirm host IP correct, confirm port correct in Pulse. Save config, restart service.
Validating User Credentials
Using the ldapsearch command, it is possible to validate the user credentials for accessing the Active Directory server from the sensor itself.
For example:
Assuming the LDAP Server's IP address is 192.168.123.102 and it uses LDAP Port 389. If the Base DN is "DC=VMW2k3,DC=local" and the User DN is "CN=User,CN=Users,DC=VMW2k3,DC=local" use the ldapsearch command as follows:
Using SSH, login to the sensor with the pwnie user account.
Next, type
sudo suand press Enter, then re-type the password to become superuser.Type
ldapsearch -h 192.168.123.102 -p 389 -x -D "CN=User,CN=Users,DC=VMW2k3,DC=local" -b "DC=VMW2k3,DC=local" -Wand press Enter.When prompted, provide the password for the user account specified.
If everything entered is correct, results will be displayed to the screen. Else, something is not correctly entered and will need to be resolved
Copyright
© 2025 Outpost24® All rights reserved. This document may only be redistributed unedited and unaltered. This document may be cited and referenced only if clearly crediting Outpost24® and this document as the source. Any other reproduction and redistribution in print or electronically is strictly prohibited without explicit permission.
Trademark
Outpost24® and OUTSCAN™ are trademarks of Outpost24® and its affiliated companies. All other brand names, product names or trademarks belong to their respective owners.