Vulnerability Scanning with OpenVAS in Pulse – Best Practices
Purpose
The purpose of this document is to provide the best practices around Vulnerability Scanning with OpenVAS in Pulse.
Introduction
Pulse includes a customized implementation of OpenVAS, the advanced open source scanner, to perform vulnerability scanning of network assets with the Pwn Pro sensor. This uncredentialled vulnerability scan is configured to target the network or specified network assets for a breadth of vulnerability types and score them based on their criticality. Whether running vulnerability scans for remote offices, or supplementing a commercial vulnerability scanner, Pulse enables you to centrally manage scans covering the entire organization.
Configure
Scans are configured through the Pulse User Interface.
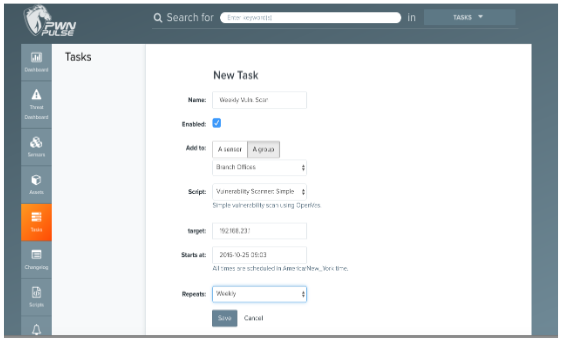
Create a new Task to perform a Vulnerability Scan.
Select Vulnerability Scan Script from drop-down
Specify the frequency of the scan, and the network target(s) in Classless Inter-Domain Routing (CIDR) notation.
To ensure you are scanning for the most current vulnerabilities, make sure your sensor is up-to-date. This can be done automatically through Pulse by setting a weekly Task, to run a sensor update each week. See the Wireless Pulse User Guide for more details on sensor updates.
Scanning with OpenVAS Vulnerability Scanner in Pulse:
Simple Scan - a scan that has removed various categories of vulnerabilities for which are known to likely result with service disruption or denial of service. Default method available for use when testing a single asset or the subnet.
Connections Needed - Allow TCP port 80 to www.openvas.org, Allow TCP/873 to feed.openvas.org
Validate
Prior to scheduling a vulnerability scan on a full network, create a Task for a scan on a single target host on that subnet by IP address. This is to ensure that the traffic will be properly routed to the target from the sensor, with no filtering or IDS/IPS systems blocking traffic. Once the scan on the individual target has returned results (approximately 1 hour), proceed with scheduling larger scans on that network.
Schedule
Schedule a single sensor to scan up to 254 hosts (/24 network) weekly.
If performing vulnerability scans on multiple subnets, where possible, use multiple, staggered tasks –set to run at different times –to perform the scans. Where possible, schedule Vulnerability Scans at night to minimize any potential network impact.
Review & Remediate
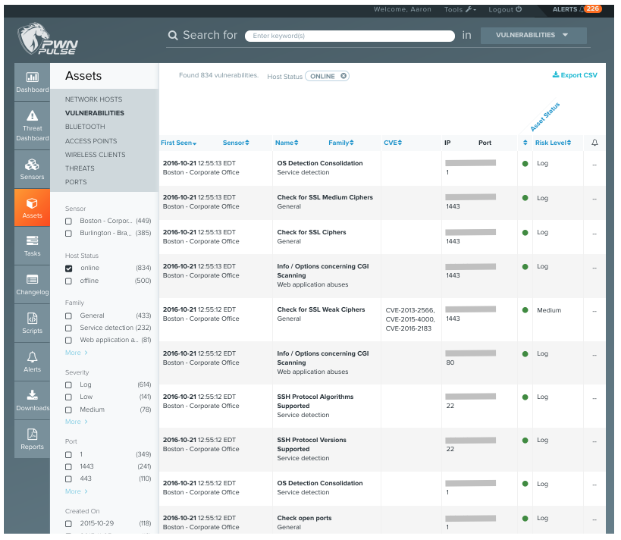
The results of the scan are displayed in Pulse once the scan is complete. Vulnerabilities are displayed on individual assets in the Assets –Network Hosts view, and can be listed, filtered, and exported as a csv from the Assets –Vulnerabilities view. Where applicable, Common Vulnerabilities and Exposures (CVE) numbers will be assigned.
Review Vulnerabilities in the Assets –Vulnerabilities view, and sort using filters based on Severity (Log/Low/Medium/High), Vulnerability Family, Created Date, and associated port.
Apply patches and remediate vulnerabilities, and validate remediation with follow-on scans.
Copyright
© 2025 Outpost24® All rights reserved. This document may only be redistributed unedited and unaltered. This document may be cited and referenced only if clearly crediting Outpost24® and this document as the source. Any other reproduction and redistribution in print or electronically is strictly prohibited without explicit permission.
Trademark
Outpost24® and OUTSCAN™ are trademarks of Outpost24® and its affiliated companies. All other brand names, product names or trademarks belong to their respective owners.