Chapter 12: Alerts
Alerts
Pulse’s alerting engine proactively notifies users when conditions of interest are met based on real-time data from the sensors. You may define the trigger conditions for an alert as well as the method of the alert delivery.
Setting Alerts
Create or Enable Alerts
To create or enable an alert:
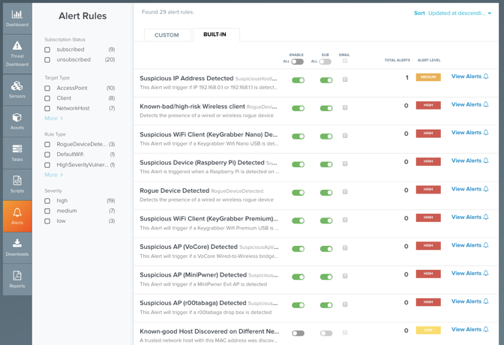
- From the Pulse Dashboard, select Alerts, and Manage Rules.
- Using the toggles next to each alert, you can enable, disable, subscribe, and set email alerts.
After an alert is enabled, Pulse logs all instances when the alert criteria are met to the Alerts Page.
This is a global setting - all account users will access all of the enabled alerts. - In order to get an e-mail notification upon the each trigger of the alert, you can select the e-mail checkbox for that alert.
Creating a Custom Alert
A number of Built-In Alerts are included with Pulse, based on known threat devices and conditions. If an additional alert is required, it can easily be set as a Custom Alert.
- Select Alerts from the left-hand toolbar and click Manage Rules.
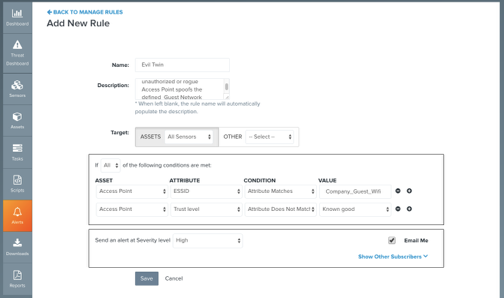
- Select the Custom tab and click Create New Rule.
- Enter the Name and Description for the rule, then select the Target, which may be a sensor or group of sensors, or some other refinement parameter (Invitation, Sensor Service, Task Result, User)
- To create the condition for the alert, select the following:
- Asset – The type of device (for example, Access Point)
- Attribute – characteristic to monitor (for example, ESSID)
- Condition (for example, Attribute Contains)
- Value for the alert
- To add more conditions, click +.
- Assign a severity level to the alert: Low, Medium, or High.
- Select Email me to subscribe to emails for this alert. Click Show Other Subscribers to subscribe other users to alert emails (available to Admin Users).
- When complete, Save your alert.
Reading Alerts
Access all of your enabled and subscribed alerts by selecting the Alerts tab on the left-hand toolbar, or the icon on the upper right corner of the Pulse page.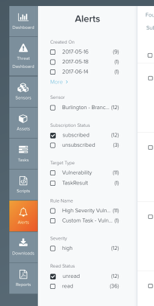
By default, alerts are ordered by most recently triggered. Use the filters to sort by the following:
- Subscription Status – Subscribed or Unsubscribed
- Read Status – Read or Unread
- Sensor – The sensor that detected the alerting condition
- Rule Type – Category of alert
- Target Type
- Severity
To mark an alert as read, click the eye icon associated with the alert. To mark multiple alerts as read:
- Select the check-boxes for the alerts in the list.
- Click Edit Multiple
- Set status to Read.
Alerts that have been emailed will come from your Pulse URL, and contain the title of the Alert. For security, these emails do not contain technical detail about the alerts. You can see additional information by following the links to view the alert in Pulse.
Copyright
© 2025 Outpost24® All rights reserved. This document may only be redistributed unedited and unaltered. This document may be cited and referenced only if clearly crediting Outpost24® and this document as the source. Any other reproduction and redistribution in print or electronically is strictly prohibited without explicit permission.
Trademark
Outpost24® and OUTSCAN™ are trademarks of Outpost24® and its affiliated companies. All other brand names, product names or trademarks belong to their respective owners.